Managing Amazon EC2 Instances
AWS Explorer provides detailed views of Amazon Machine Images (AMI) and Amazon Elastic Compute Cloud (Amazon EC2) instances. From these views, you can launch an Amazon EC2 instance from an AMI, connect to that instance, and either stop or terminate the instance, all from inside the Visual Studio development environment. You can use the instances view to create AMIs from your instances. For more information, see Create an AMI from an Amazon EC2 Instance.
The Amazon Machine Images and Amazon EC2 Instances Views
From AWS Explorer, you can display views of Amazon Machine Images (AMIs) and Amazon EC2 instances. In AWS Explorer, expand the Amazon EC2 node.
To display the AMIs view, on the first subnode, AMIs, open the context (right-click) menu and then choose View.
To display the Amazon EC2 instances view, on the Instances node, open the context (right-click) menu and then choose View.
You can also display either view by double-clicking the appropriate node.
-
The views are scoped to the region specified in AWS Explorer (for example, the US West (N. California) region).
-
You can rearrange columns by clicking and dragging. To sort the values in a column, click the column heading.
-
You can use the drop-down lists and filter box in Viewing to configure views. The initial view displays AMIs of any platform type (Windows or Linux) that are owned by the account specified in AWS Explorer.
Show/Hide Columns
You can also choose the Show/Hide drop-down at the top of the view to configure which columns are displayed. Your choice of columns will persist if you close the view and reopen it.

Show/Hide Columns UI for AMI and Instances views
Tagging AMIs, Instances, and Volumes
You can also use the Show/Hide drop-down list to add tags for AMIs, Amazon EC2 instances, or volumes you own. Tags are name-value pairs that enable you to attach metadata to your AMIs, instances, and volumes. Tag names are scoped both to your account and also separately to your AMIs and instances. For example, there would be no conflict if you used the same tag name for your AMIs and your instances. Tag names are not case-sensitive.
For more information about tags, go to Using Tags in the Amazon EC2 User Guide for Linux Instances.
To add a tag
-
In the Add box, type a name for the tag. Choose the green button with the plus sign (+), and then choose Apply.

Add a tag to an AMI or Amazon EC2 instance
The new tag is displayed in italic, which indicates no values have yet been associated with that tag.
In the list view, the tag name appears as a new column. When at least one value has been associated with the tag, the tag will be visible in the AWS Management Console
. -
To add a value for the tag, double-click a cell in the column for that tag, and type a value. To delete the tag value, double-click the cell and delete the text.
If you clear the tag in the Show/Hide drop-down list, the corresponding column disappears from the view. The tag is preserved, along with any tag values associated with AMIs, instances, or volumes.
Note
If you clear a tag in the Show/Hide drop-down list that has no associated values, the AWS Toolkit will delete the tag entirely. It will no longer appear in the list view or in the Show/Hide drop-down list. To use that tag again, use the Show/Hide dialog box to re-create it.
Launching an Amazon EC2 Instance
AWS Explorer provides all of the functionality required to launch an Amazon EC2 instance. In this section, we'll select an Amazon Machine Image (AMI), configure it, and then start it as an Amazon EC2 instance.
To launch a Windows Server Amazon EC2 instance
-
At the top of the AMIs view, in the drop-down list on the left, choose Amazon Images. In the drop-down list on the right, choose Windows. In the filter box, type
ebsfor Elastic Block Storage. It may take a few moments for the view to be refreshed. -
Choose an AMI in the list, open the context (right-click) menu, and then choose Launch Instance. .

AMI list
-
In the Launch New Amazon EC2 Instance dialog box, configure the AMI for your application.
- Instance Type
-
Choose the type of the EC2 instance to launch. You can find a list of instance types and pricing information on the EC2 Pricing
page. - Name
-
Type a name for your instance. This name cannot be more than 256 characters.
- Key Pair
-
A key pair is used to obtain the Windows password that you use to log in to the EC2 instance using Remote Desktop Protocol (RDP). Choose a key pair for which you have access to the private key, or choose the option to create a key pair. If you create the key pair in the Toolkit, the Toolkit can store the private key for you.
Key pairs stored in the Toolkit are encrypted. you can find them at
%LOCALAPPDATA%\AWSToolkit\keypairs(typically:C:\Users\<user>\AppData\Local\AWSToolkit\keypairs). You can export the encrypted key pair into a.pemfile.-
In Visual Studio, select View and click AWS Explorer.
-
Click on Amazon EC2 and select Key Pairs.
-
The key pairs will be listed, and those created/managed by the Toolkit marked as Stored in AWSToolkit.
-
Right click on the key pair you created and select Export Private Key. The private key will be unencrypted and stored in the location you specify.
-
- Security Group
-
The security group controls the type of network traffic the EC2 instance will accept. Choose a security group that will allow incoming traffic on port 3389, the port used by RDP, so that you can connect to the EC2 instance. For information about how to use the Toolkit to create security groups, see Managing Security Groups from AWS Explorer.
- Instance Profile
-
The instance profile is a logical container for an IAM role. When you choose an instance profile, you associate the corresponding IAM role with the EC2 instance. IAM roles are configured with policies that specify access to Amazon Web Services and account resources. When an EC2 instance is associated with an IAM role, application software that runs on the instance runs with the permissions specified by the IAM role. This enables the application software to run without having to specify any AWS credentials of its own, which makes the software more secure. For more information about IAM roles, go to the IAM User Guide.
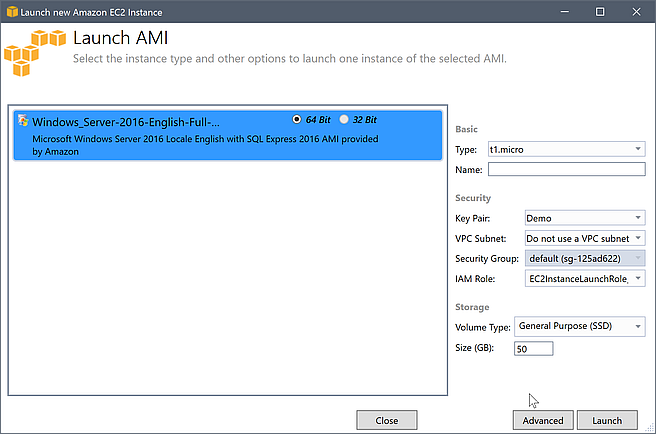
EC2 Launch AMI dialog box
-
Choose Launch.
In AWS Explorer, on the Instances subnode of Amazon EC2, open the context (right-click) menu and then choose View. The AWS Toolkit displays the list of Amazon EC2 instances associated with the active account. You may need to choose Refresh to see your new instance. When the instance first appears, it may be in a pending state, but after a few moments, it transitions to a running state.

Connecting to an Amazon EC2 Instance
You can use Windows Remote Desktop to connect to a Windows Server instance. For authentication, the AWS Toolkit enables you to retrieve the administrator password for the instance, or you can simply use the stored key pair associated with the instance. In the following procedure, we'll use the stored key pair.
To connect to a Windows Server instance using Windows Remote Desktop
-
In the EC2 instance list, right-click the Windows Server instance to which you want to connect. From the context menu, choose Open Remote Desktop.
If you want to authenticate using the administrator password, you would choose Get Windows Passwords.

EC2 Instance context menu
-
In the Open Remote Desktop dialog box, choose Use EC2 keypair to log on, and then choose OK.
If you did not store a key pair with the AWS Toolkit, specify the PEM file that contains the private key.

Open Remote Desktop dialog box
-
The Remote Desktop window will open. You do not need to sign in because authentication occurred with the key pair. You will be running as the administrator on the Amazon EC2 instance.
If the EC2 instance has only recently started, you may not be able to connect for two possible reasons:
-
The Remote Desktop service might not yet be up and running. Wait a few minutes and try again.
-
Password information might not yet have been transferred to the instance. In this case, you will see a message box similar to the following.

Password not yet available
The following screenshot shows a user connected as administrator through Remote Desktop.

Remote Desktop
-
Ending an Amazon EC2 Instance
Using the AWS Toolkit, you can stop or terminate a running Amazon EC2 instance from Visual Studio. To stop the instance, the EC2 instance must be using an Amazon EBS volume. If the EC2 instance is not using an Amazon EBS volume, then your only option is to terminate the instance.
If you stop the instance, data stored on the EBS volume is retained. If you terminate the instance, all data stored on the local storage device of the instance will be lost. In either case, stop or terminate, you will not continue to be charged for the EC2 instance. However, if you stop an instance, you will continue to be charged for the EBS storage that persists after the instance is stopped.
Another possible way to end an instance is to use Remote Desktop to connect to the instance, and then from the Windows Start menu, use Shutdown. You can configure the instance to either stop or terminate in this scenario.
To stop an Amazon EC2 instance
-
In AWS Explorer, expand the Amazon EC2 node, open the context (right-click) menu for Instances, and then choose View. In the Instances list, right-click the instance you want to stop and choose Stop from the context menu. Choose Yes to confirm you want to stop the instance.

-
At the top of the Instances list, choose Refresh to see the change in the status of the Amazon EC2 instance. Because we stopped rather than terminated the instance, the EBS volume associated with the instance is still active.

Terminated Instances Remain Visible
If you terminate an instance, it will continue to appear in the Instance list alongside running or stopped instances. Eventually, AWS reclaims these instances and they disappear from the list. You are not charged for instances in a terminated state.

To specify the behavior of an EC2 instance at shutdown
The AWS Toolkit enables you to specify whether an Amazon EC2 instance will stop or terminate if Shutdown is selected from the Start menu.
-
In the Instances list, right-click an Amazon EC2 instance, and then choose Change shutdown behavior.

Change Shutdown Behavior menu item
-
In the Change Shutdown Behavior dialog box, from the Shutdown Behavior drop-down list, choose Stop or Terminate.

