Using field-level encryption to help protect sensitive data
With Amazon CloudFront, you can enforce secure end-to-end connections to origin servers by using HTTPS. Field-level encryption adds an additional layer of security that lets you protect specific data throughout system processing so that only certain applications can see it.
Field-level encryption allows you to enable your users to securely upload sensitive information to your web servers. The sensitive information provided by your users is encrypted at the edge, close to the user, and remains encrypted throughout your entire application stack. This encryption ensures that only applications that need the data—and have the credentials to decrypt it—are able to do so.
To use field-level encryption, when you configure your CloudFront distribution, specify the set of fields in POST requests that you want to be encrypted, and the public key to use to encrypt them. You can encrypt up to 10 data fields in a request. (You can’t encrypt all of the data in a request with field-level encryption; you must specify individual fields to encrypt.)
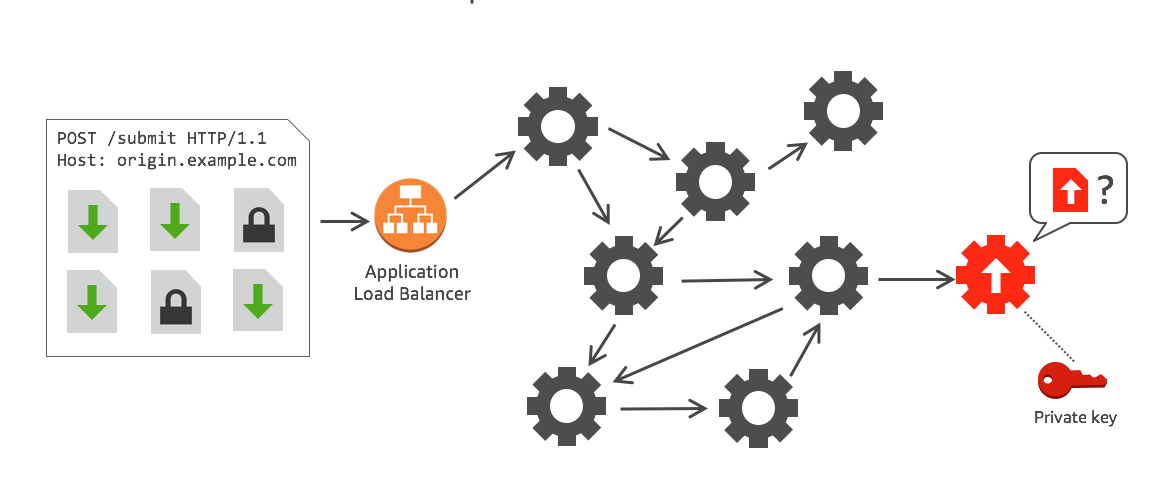
When the HTTPS request with field-level encryption is forwarded to the origin, and the request is routed throughout your origin application or subsystem, the sensitive data is still encrypted, reducing the risk of a data breach or accidental data loss of the sensitive data. Components that need access to the sensitive data for business reasons, such as a payment processing system needing access to a credit number, can use the appropriate private key to decrypt and access the data.
Note
To use field-level encryption, your origin must support chunked encoding.
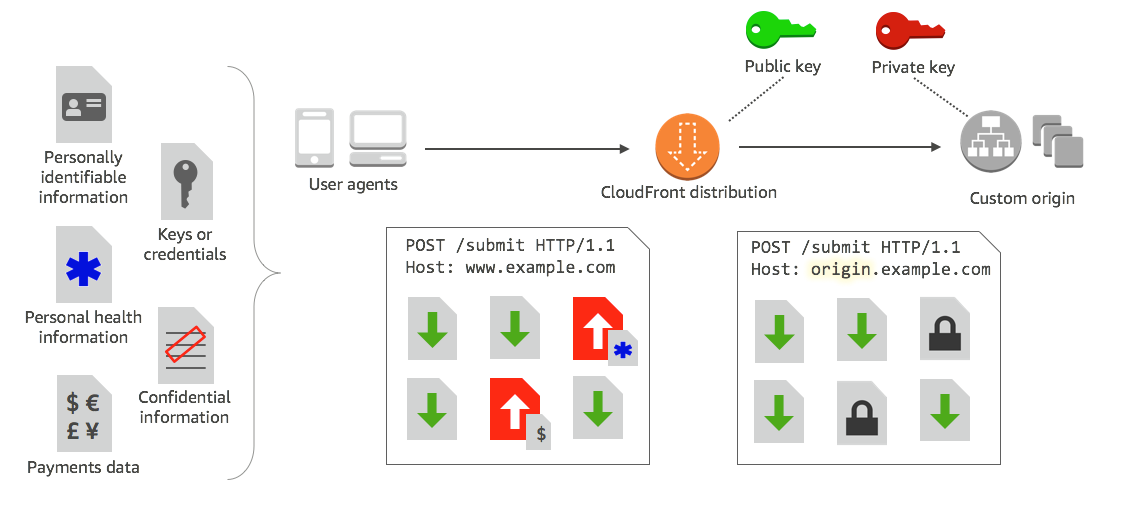
CloudFront field-level encryption uses asymmetric encryption, also known as public key encryption. You provide a public key to CloudFront, and all sensitive data that you specify is encrypted automatically. The key you provide to CloudFront cannot be used to decrypt the encrypted values; only your private key can do that.
Topics
Overview of field-level encryption
The following steps provide an overview of setting up field-level encryption. For specific steps, see Setting up field-level encryption.
-
Get a public key-private key pair. You must obtain and add the public key before you start setting up field-level encryption in CloudFront.
-
Create a field-level encryption profile. Field-level encryption profiles, which you create in CloudFront, define the fields that you want to be encrypted.
-
Create a field-level encryption configuration. A configuration specifies the profiles to use, based on the content type of the request or a query argument, for encrypting specific data fields. You can also choose the request-forwarding behavior options that you want for different scenarios. For example, you can set the behavior for when the profile name specified by the query argument in a request URL doesn’t exist in CloudFront.
-
Link to a cache behavior. Link the configuration to a cache behavior for a distribution, to specify when CloudFront should encrypt data.
Setting up field-level encryption
Follow these steps to get started using field-level encryption. To learn about quotas (formerly known as limits) on field-level encryption, see Quotas.
Step 1: Create an RSA key pair
To get started, you must create an RSA key pair that includes a public key and a private key. The public key enables CloudFront to encrypt data, and the private key enables components at your origin to decrypt the fields that have been encrypted. You can use OpenSSL or another tool to create a key pair. The key size must be 2048 bits.
For example, if you’re using OpenSSL, you can use the following command to
generate a key pair with a length of 2048 bits and save it in the file
private_key.pem:
openssl genrsa -out private_key.pem 2048
The resulting file contains both the public and the private key. To extract the public key from that file, run the following command:
openssl rsa -pubout -in private_key.pem -out public_key.pem
The public key file (public_key.pem) contains the encoded
key value that you paste in the following step.
Step 2: Add your public key to CloudFront
After you get your RSA key pair, add your public key to CloudFront.
To add your public key to CloudFront (console)
Sign in to the AWS Management Console and open the CloudFront console at https://console.aws.amazon.com/cloudfront/v4/home
. -
In the navigation pane, choose Public key.
-
Choose Add public key.
-
For Key name, type a unique name for the key. The name can't have spaces and can include only alphanumeric characters, underscores (_), and hyphens (-). The maximum number of characters is 128.
-
For Key value, paste the encoded key value for your public key, including the
-----BEGIN PUBLIC KEY-----and-----END PUBLIC KEY-----lines. -
For Comment, add an optional comment. For example, you could include the expiration date for the public key.
-
Choose Add.
You can add more keys to use with CloudFront by repeating the steps in the procedure.
Step 3: Create a profile for field-level encryption
After you add at least one public key to CloudFront, create a profile that tells CloudFront which fields to encrypt.
To create a profile for field-level encryption (console)
-
In the navigation pane, choose Field-level encryption.
-
Choose Create profile.
-
Fill in the following fields:
- Profile name
-
Type a unique name for the profile. The name can't have spaces and can include only alphanumeric characters, underscores (_), and hyphens (-). The maximum number of characters is 128.
- Public key name
-
In the drop-down list, choose the name of a public key that you added to CloudFront in step 2. CloudFront uses the key to encrypt the fields that you specify in this profile.
- Provider name
-
Type a phrase to help identify the key, such as the provider where you got the key pair. This information, along with the private key, is needed when applications decrypt data fields. The provider name can't have spaces and can include only alphanumeric characters, colons (:), underscores (_), and hyphens (-). The maximum number of characters is 128.
- Field name pattern to match
-
Type the names of the data fields, or patterns that identify data field names in the request, that you want CloudFront to encrypt. Choose the + option to add all the fields that you want to encrypt with this key.
For the field name pattern, you can type the entire name of the data field, like DateOfBirth, or just the first part of the name with a wildcard character (*), like CreditCard*. The field name pattern must include only alphanumeric characters, square brackets ([ and ]), periods (.), underscores (_), and hyphens (-), in addition to the optional wildcard character (*).
Make sure that you don’t use overlapping characters for different field name patterns. For example, if you have a field name pattern of ABC*, you can’t add another field name pattern that is AB*. In addition, field names are case-sensitive and the maximum number of characters that you can use is 128.
- Comment
-
(Optional) Type a comment about this profile. The maximum number of characters that you can use is 128.
-
After you fill in the fields, choose Create profile.
-
If you want to add more profiles, choose Add profile.
Step 4: Create a configuration
After you create one or more field-level encryption profiles, create a configuration that specifies the content type of the request that includes the data to be encrypted, the profile to use for encryption, and other options that specify how you want CloudFront to handle encryption.
For example, when CloudFront can’t encrypt the data, you can specify whether CloudFront should block or forward a request to your origin in the following scenarios:
-
When a request’s content type isn’t in a configuration – If you haven’t added a content type to a configuration, you can specify whether CloudFront should forward the request with that content type to the origin without encrypting data fields, or block the request and return an error.
Note
If you add a content type to a configuration but haven’t specified a profile to use with that type, CloudFront always forwards requests with that content type to the origin.
-
When the profile name provided in a query argument is unknown – When you specify the
fle-profilequery argument with a profile name that doesn’t exist for your distribution, you can specify whether CloudFront should send the request to the origin without encrypting data fields, or block the request and return an error.
In a configuration, you can also specify whether providing a profile as a query argument in a URL overrides a profile that you’ve mapped to the content type for that query. By default, CloudFront uses the profile that you’ve mapped to a content type, if you specify one. This lets you have a profile that’s used by default but decide for certain requests that you want to enforce a different profile.
So, for example, you might specify (in your configuration)
SampleProfile as the query argument profile to use. Then
you could use the URL
https://d1234.cloudfront.net?fle-profile=SampleProfile instead of
https://d1234.cloudfront.net, to have CloudFront use
SampleProfile for this request, instead of the profile
you’d set up for the content type of the request.
You can create up to 10 configurations for a single account, and then associate one of the configurations to the cache behavior of any distribution for the account.
To create a configuration for field-level encryption (console)
-
On the Field-level encryption page, choose Create configuration.
Note: If you haven’t created at least one profile, you won’t see the option to create a configuration.
-
Fill in the following fields to specify the profile to use. (Some fields can’t be changed.)
- Content type (can’t be changed)
-
The content type is set to
application/x-www-form-urlencodedand can’t be changed. - Default profile ID (optional)
-
In the drop-down list, choose the profile that you want to map to the content type in the Content type field.
- Content format (can’t be changed)
-
The content format is set to
URLencodedand can’t be changed.
-
If you want to change the CloudFront default behavior for the following options, select the appropriate check box.
- Forward request to origin when request’s content type is not configured
-
Select the check box if you want to allow the request to go to your origin if you have not specified a profile to use for the content type of the request.
- Override the profile for a content type with a provided query argument
-
Select the check box if you want to allow a profile provided in a query argument to override the profile that you’ve specified for a content type.
-
If you select the check box to allow a query argument to override the default profile, you must complete the following additional fields for the configuration. You can create up to five of these query argument mappings to use with queries.
- Query argument
-
Type the value that you want to include in URLs for the
fle-profilequery argument. This value tells CloudFront to use the profile ID (that you specify in the next field) associated with this query argument for field-level encryption for this query.The maximum number of characters that you can use is 128. The value can’t include spaces, and must use only alphanumeric or the following characters: dash (-), period (.), underscore (_), asterisk (*), plus-sign (+), percent (%).
- Profile ID
-
In the drop-down list, choose the profile that you want to associate with the value that you typed for Query argument.
- Forward request to origin when the profile specified in a query argument does not exist
-
Select the check box if you want to allow the request to go to your origin if the profile specified in a query argument isn't defined in CloudFront.
Step 5: Add a configuration to a cache behavior
To use field-level encryption, link a configuration to a cache behavior for a distribution by adding the configuration ID as a value for your distribution.
Important
To link a field-level encryption configuration to a cache behavior, the
distribution must be configured to always use HTTPS, and to accept HTTP
POST and PUT requests from viewers. That is, the
following must be true:
-
The cache behavior’s Viewer Protocol Policy must be set to Redirect HTTP to HTTPS or HTTPS Only. (In AWS CloudFormation or the CloudFront API,
ViewerProtocolPolicymust be set toredirect-to-httpsorhttps-only.) -
The cache behavior’s Allowed HTTP Methods must be set to GET, HEAD, OPTIONS, PUT, POST, PATCH, DELETE. (In AWS CloudFormation or the CloudFront API,
AllowedMethodsmust be set toGET,HEAD,OPTIONS,PUT,POST,PATCH,DELETE. These can be specified in any order.) -
The origin setting’s Origin Protocol Policy must be set to Match Viewer or HTTPS Only. (In AWS CloudFormation or the CloudFront API,
OriginProtocolPolicymust be set tomatch-viewerorhttps-only.)
For more information, see Values that you specify when you create or update a distribution.
Decrypting data fields at your origin
CloudFront encrypts data fields by using the AWS Encryption SDK. The data remains encrypted throughout your application stack and can be accessed only by applications that have the credentials to decrypt it.
After encryption, the ciphertext is base64 encoded. When your applications decrypt the text at the origin, they must first decode the ciphertext, and then use the AWS Encryption SDK to decrypt the data.
The following code example illustrates how applications can decrypt data at your origin. Note the following:
-
To simplify the example, this sample loads public and private keys (in DER format) from files in the working directory. In practice, you would store the private key in a secure offline location, such as an offline hardware security module, and distribute the public key to your development team.
-
CloudFront uses specific information while encrypting the data, and the same set of parameters should be used at the origin to decrypt it. Parameters CloudFront uses while initializing the MasterKey include the following:
-
PROVIDER_NAME: You specified this value when you created a field-level encryption profile. Use the same value here.
-
KEY_NAME: You created a name for your public key when you uploaded it to CloudFront, and then specified the key name in the profile. Use the same value here.
-
ALGORITHM: CloudFront uses
RSA/ECB/OAEPWithSHA-256AndMGF1Paddingas the algorithm for encrypting, so you must use the same algorithm to decrypt the data.
-
-
If you run the following sample program with ciphertext as input, the decrypted data is output to your console. For more information, see the Java Example Code in the AWS Encryption SDK.
Sample code
import java.nio.file.Files;
import java.nio.file.Paths;
import java.security.KeyFactory;
import java.security.PrivateKey;
import java.security.PublicKey;
import java.security.spec.PKCS8EncodedKeySpec;
import java.security.spec.X509EncodedKeySpec;

import org.apache.commons.codec.binary.Base64;

import com.amazonaws.encryptionsdk.AwsCrypto;
import com.amazonaws.encryptionsdk.CryptoResult;
import com.amazonaws.encryptionsdk.jce.JceMasterKey;

/**
 * Sample example of decrypting data that has been encrypted by CloudFront field-level encryption.
 */
public class DecryptExample {

    private static final String PRIVATE_KEY_FILENAME = "private_key.der";
    private static final String PUBLIC_KEY_FILENAME = "public_key.der";
    private static PublicKey publicKey;
    private static PrivateKey privateKey;

    // CloudFront uses the following values to encrypt data, and your origin must use same values to decrypt it.
    // In your own code, for PROVIDER_NAME, use the provider name that you specified when you created your field-level
    // encryption profile. This sample uses 'DEMO' for the value.
    private static final String PROVIDER_NAME = "DEMO";
    // In your own code, use the key name that you specified when you added your public key to CloudFront. This sample
    // uses 'DEMOKEY' for the key name.
    private static final String KEY_NAME = "DEMOKEY";
    // CloudFront uses this algorithm when encrypting data.
    private static final String ALGORITHM = "RSA/ECB/OAEPWithSHA-256AndMGF1Padding";

    public static void main(final String[] args) throws Exception {

        final String dataToDecrypt = args[0];

        // This sample uses files to get public and private keys.
        // In practice, you should distribute the public key and save the private key in secure storage.
        populateKeyPair();

        System.out.println(decrypt(debase64(dataToDecrypt)));
    }

    private static String decrypt(final byte[] bytesToDecrypt) throws Exception {
        // You can decrypt the stream only by using the private key.

        // 1. Instantiate the SDK
        final AwsCrypto crypto = new AwsCrypto();

        // 2. Instantiate a JCE master key
        final JceMasterKey masterKey = JceMasterKey.getInstance(
                publicKey,
                privateKey,
                PROVIDER_NAME,
                KEY_NAME,
                ALGORITHM);

        // 3. Decrypt the data
        final CryptoResult <byte[], ? > result = crypto.decryptData(masterKey, bytesToDecrypt);
        return new String(result.getResult());
    }

    // Function to decode base64 cipher text.
    private static byte[] debase64(final String value) {
        return Base64.decodeBase64(value.getBytes());
    }

    private static void populateKeyPair() throws Exception {
        final byte[] PublicKeyBytes = Files.readAllBytes(Paths.get(PUBLIC_KEY_FILENAME));
        final byte[] privateKeyBytes = Files.readAllBytes(Paths.get(PRIVATE_KEY_FILENAME));
        publicKey = KeyFactory.getInstance("RSA").generatePublic(new X509EncodedKeySpec(PublicKeyBytes));
        privateKey = KeyFactory.getInstance("RSA").generatePrivate(new PKCS8EncodedKeySpec(privateKeyBytes));
    }
}
