Control subnet traffic with network access control lists
A network access control list (ACL) allows or denies specific inbound or outbound traffic at the subnet level. You can use the default network ACL for your VPC, or you can create a custom network ACL for your VPC with rules that are similar to the rules for your security groups in order to add an additional layer of security to your VPC.
There is no additional charge for using network ACLs.
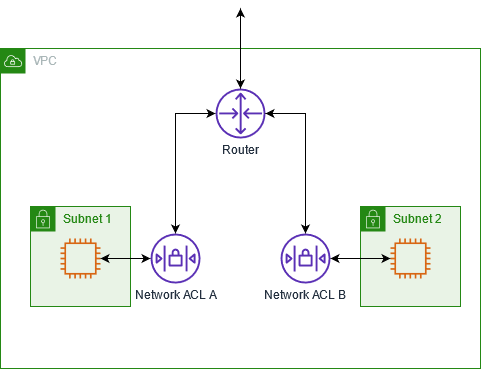
The following diagram shows a VPC with two subnets. Each subnet has a network ACL. When traffic enters the VPC (for example, from a peered VPC, VPN connection, or the internet), the router sends the traffic to its destination. Network ACL A determines which traffic destined for subnet 1 is allowed to enter subnet 1, and which traffic destined for a location outside subnet 1 is allowed to leave subnet 1. Similarly, network ACL B determines which traffic is allowed to enter and leave subnet 2.
For information about the differences between security groups and network ACLs, see Compare security groups and network ACLs.
Contents
Network ACL basics
The following are the basic things to know about network ACLs before you begin.
Network ACL associations
-
Each subnet in your VPC must be associated with a network ACL. If you don't explicitly associate a subnet with a network ACL, the subnet is automatically associated with the default network ACL.
-
You can create a custom network ACL and associate it with a subnet to allow or deny specific inbound or outbound traffic at the subnet level.
-
You can associate a network ACL with multiple subnets. However, a subnet can be associated with only one network ACL at a time. When you associate a network ACL with a subnet, the previous association is removed.
Network ACL rules
-
A network ACL has inbound rules and outbound rules. There are quotas (or limits) to the number of rules you can have per network ACL. Each rule can either allow or deny traffic. Each rule has a number from 1 to 32766. We evaluate the rules in order, starting with the lowest numbered rule, when deciding whether allow or deny traffic. If the traffic matches a rule, the rule is applied and we do not evaluate any additional rules. We recommend that you start by creating rules in increments (for example, increments of 10 or 100) so that you can insert new rules later on, if needed.
-
We evaluate the network ACL rules when traffic enters and leaves the subnet, not as it is routed within a subnet.
-
NACLs are stateless, which means that information about previously sent or received traffic is not saved. If, for example, you create a NACL rule to allow specific inbound traffic to a subnet, responses to that traffic are not automatically allowed. This is in contrast to how security groups work. Security groups are stateful, which means that information about previously sent or received traffic is saved. If, for example, a security group allows inbound traffic to an EC2 instance, responses are automatically allowed regardless of outbound security group rules.
Limitations
-
There are quotas (also known as limits) for network ACLs. For more information, see Network ACLs.
-
Network ACLs can't block DNS requests to or from the Route 53 Resolver (also known as the VPC+2 IP address or AmazonProvidedDNS). To filter DNS requests through the Route 53 Resolver, you can enable Route 53 Resolver DNS Firewall.
-
Network ACLs can't block traffic to the Instance Metadata Service (IMDS). To manage access to IMDS, see Configure the instance metadata options in the Amazon EC2 User Guide.
-
Network ACLs do not filter traffic destined to and from the following:
-
Amazon Domain Name Services (DNS)
-
Amazon Dynamic Host Configuration Protocol (DHCP)
-
Amazon EC2 instance metadata
-
Amazon ECS task metadata endpoints
-
License activation for Windows instances
-
Amazon Time Sync Service
-
Reserved IP addresses used by the default VPC router
-
