Create a Classic Load Balancer with an HTTPS listener - Elastic Load Balancing

Create a Classic Load Balancer with an HTTPS listener

A load balancer takes requests from clients and distributes them across the EC2 instances that are registered with the load balancer.

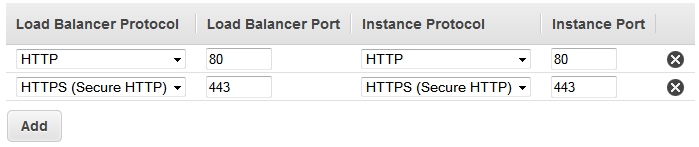
You can create a load balancer that listens on both the HTTP (80) and HTTPS (443) ports. If you specify that the HTTPS listener sends requests to the instances on port 80, the load balancer terminates the requests and communication from the load balancer to the instances is not encrypted. If the HTTPS listener sends requests to the instances on port 443, communication from the load balancer to the instances is encrypted.

If your load balancer uses an encrypted connection to communicate with the instances, you can optionally enable authentication of the instances. This ensures that the load balancer communicates with an instance only if its public key matches the key that you specified to the load balancer for this purpose.

For information about adding an HTTPS listener to an existing load balancer, see Configure an HTTPS listener for your Classic Load Balancer.

Prerequisites

Before you get started, be sure that you've met the following prerequisites:

  • Complete the steps in Prepare your VPC and EC2 instances.

  • Launch the EC2 instances that you plan to register with your load balancer. The security groups for these instances must allow traffic from the load balancer.

  • The EC2 instances must respond to the target of the health check with an HTTP status code 200. For more information, see Configure health checks for your Classic Load Balancer.

  • If you plan to enable the keep-alive option on your EC2 instances, we recommend that you set the keep-alive settings to at least the idle timeout settings of your load balancer. If you want to ensure that the load balancer is responsible for closing the connections to your instance, make sure that the value set on your instance for the keep-alive time is greater than the idle timeout setting on your load balancer. For more information, see Configure the idle connection timeout for your Classic Load Balancer.

  • If you create a secure listener, you must deploy an SSL server certificate on your load balancer. The load balancer uses the certificate to terminate and then decrypt requests before sending them to the instances. If you don't have an SSL certificate, you can create one. For more information, see SSL/TLS certificates for Classic Load Balancers.

Create an HTTPS/SSL load balancer using the AWS Management Console

New EC2 experience

In this example, you configure two listeners for your load balancer. The first listener accepts HTTP requests on port 80 and sends them to the instances on port 80 using HTTP. The second listener accepts HTTPS requests on port 443 and sends them to the instances using HTTP on port 80 (or using HTTPS on port 443 if you want to configure back-end instance authentication).

A listener is a process that checks for connection requests. It is configured with a protocol and a port for front-end (client to load balancer) connections and a protocol and a port for back-end (load balancer to instance) connections. For information about the ports, protocols, and listener configurations supported by Elastic Load Balancing, see Listeners for your Classic Load Balancer.

To create your secure Classic Load Balancer
  1. Open the Amazon EC2 console at https://console.aws.amazon.com/ec2/.

  2. On the navigation bar, choose a Region for your load balancer. Be sure to select the same Region that you selected for your EC2 instances.

  3. On the navigation pane, under Load Balancing, choose Load Balancers.

  4. Choose Create Load Balancer.

  5. Expand the Classic Load Balancer section, then choose Create.

  6. Basic configuration

    1. For Load balancer name, type a name for your load balancer.

      The name of your Classic Load Balancer must be unique within your set of Classic Load Balancers for the Region, can have a maximum of 32 characters, can contain only alphanumeric characters and hyphens, and must not begin or end with a hyphen.

    2. For Scheme, select Internet-facing.

  7. Network mapping

    1. For VPC, select the same VPC that you selected for your instances.

    2. For Mappings, first select an Availability Zone, then choose a public subnet from its available subnets. You can only select one subnet per Availability Zone. To improve the availability of your load balancer, select more than one Availability Zone and subnet.

  8. Security groups

    1. For Security groups, select an existing security group that is configured to allow the required HTTP traffic on port 80 and HTTPS traffic on port 443.

      If one doesn't exist, you can create a new security group with the necessary rules.

  9. Listeners and routing

    1. Leave the default listener with the default settings, and select Add listener.

    2. For Listener on the new listener, select HTTPS as the protocol and the port will update to 443. By default, Instance uses the HTTP protocol on port 80.

    3. If back end authentication is needed, change the Instance protocol to HTTPS. This will also update the Instance port to 443

  10. Secure listener settings

    When you use HTTPS or SSL for your front-end listener, you must deploy an SSL certificate on your load balancer. The load balancer uses the certificate to terminate the connection and then decrypt requests from clients before sending them to the instances. You must also specify a security policy. Elastic Load Balancing provides security policies that have predefined SSL negotiation configurations, or you can create your own custom security policy. If you configured HTTPS/SSL on the back-end connection, you can enable authentication of your instances.

    1. For Security policy, verify the policy is set to ELBSecurityPolicy-2016-08. We recommend that you always use the latest predefined security policy, or create a custom policy. See Update the SSL Negotiation Configuration.

    2. For Default SSL/TLS certificate, the following options are available:

      • If you created or imported a certificate using AWS Certificate Manager, select From ACM, then select the certificate from Select a certificate.

      • If you imported a certificate using IAM, select From IAM, and then select your certificate from Select a certificate.

      • If you have a certificate to import but ACM is not available in your Region, select Import, then select To IAM. Type the name of the certificate in the Certificate name field. In Certificate private key, copy and paste the contents of the private key file (PEM-encoded). In Certificate body, copy and paste the contents of the public key certificate file (PEM-encoded). In Certificate Chain, copy and paste the contents of the certificate chain file (PEM-encoded), unless you are using a self-signed certificate and it's not important that browsers implicitly accept the certificate.

    3. (Optional) If you configured the HTTPS listener to communicate with the instances using an encrypted connection, you can optionally set up authentication of the instances in Backend authentication certificate.

      Note

      If you do not see the Backend authentication certificate section, go back to Listeners and routing and select HTTPS as the protocol for Instance.

      1. For Certificate name, type the name of the public key certificate.

      2. For Certificate Body (PEM encoded), copy and paste the contents of the certificate. The load balancer communicates with an instance only if its public key matches this key.

      3. To add another certificate, choose Add new backend certificate. The limit is five.

  11. Health checks

    1. In the Ping target section, select a Ping Protocol and Ping Port. Your EC2 instances must accept traffic on the specified ping port.

    2. For Ping Port, ensure the port is 80.

    3. For Ping Path, replace the default alue with a single forward slash, (/). This tells Elastic Load Balancing to send health check requests to the default home page for your web server, such as index.html.

    4. For Advanced health check settings, use the default values.

  12. Instances

    1. Select Add instances, to bring up the instance selection screen.

    2. Under Available instances, you can select from the current instances that are available to the load balancer, based on the network settings selected before.

    3. After you're satisfied with your selections, select Confirm to add the instances to be registered to the load balancer.

  13. Attributes

    1. For Enable cross-zone load balancing, Enable connection draining, and Timeout (draining interval) keep the default values.

  14. Load balancer tags (optional)

    1. The Key field is required.

    2. The Value field is optional.

    3. To add another tag, select Add new tag then input your values into the Key field, and optionally the Value field.

    4. To remove an existing tag, select Remove next to the tag you want to remove.

  15. Summary and creation

    1. If you need to change any settings, select Edit next to the setting needing to be changed.

    2. After you're satisfied with all the settings shown in the summary, select Create load balancer to begin creation of your load balancer.

    3. On the final creation page, select View load balancer to view your load balancer in the Amazon EC2 console.

  16. Verify

    1. Select your new load balancer.

    2. On the Target instances tab, check the Health status column. After at least one of your EC2 instances is In-service, you can test your load balancer.

    3. In the Details section, copy the load balancers DNS name, which would look similar to my-load-balancer-1234567890.us-east-1.elb.amazonaws.com.

    4. Paste your load balancers DNS name into the address field of a public internet connected web browser. If your load balancer is functioning correctly, you will see the default page of your server.

  17. Delete (optional)

    1. If you have a CNAME record for your domain that points to your load balancer, point it to a new location and wait for the DNS change to take effect before deleting your load balancer.

    2. Open the Amazon EC2 console at https://console.aws.amazon.com/ec2/.

    3. Select the load balancer.

    4. Choose Actions, Delete load balancer.

    5. When prompted for confirmation, type confirm then select Delete.

    6. After you delete a load balancer, the EC2 instances that were registered with the load balancer continue to run. You will be billed for each partial or full hour that they continue running. When you no longer need an EC2 instance, you can stop or terminate it to prevent incurring additional charges.

Old EC2 experience
Step 1: Define your load balancer

First, provide some basic configuration information for your load balancer, such as a name, a network, and one or more listeners.

A listener is a process that checks for connection requests. It is configured with a protocol and a port for front-end (client to load balancer) connections and a protocol and a port for back-end (load balancer to instance) connections. For information about the ports, protocols, and listener configurations supported by Elastic Load Balancing, see Listeners for your Classic Load Balancer.

In this example, you configure two listeners for your load balancer. The first listener accepts HTTP requests on port 80 and sends them to the instances on port 80 using HTTP. The second listener accepts HTTPS requests on port 443 and sends them to the instances using HTTP on port 80 (or using HTTPS on port 443 if you want to configure back-end instance authentication).

To define your load balancer
  1. Open the Amazon EC2 console at https://console.aws.amazon.com/ec2/.

  2. On the navigation pane, under Load Balancing, choose Load Balancers.

  3. Choose Create Load Balancer.

  4. For Select load balancer type, choose Classic Load Balancer.

  5. For Load Balancer name, type a name for your load balancer.

    The name of your Classic Load Balancer must be unique within your set of Classic Load Balancers for the Region, can have a maximum of 32 characters, can contain only alphanumeric characters and hyphens, and must not begin or end with a hyphen.

  6. For Create LB inside, select the same network that you selected for your instances: EC2-Classic or a specific VPC.

  7. [Default VPC] If you selected a default VPC and would like to choose the subnets for your load balancer, select Enable advanced VPC configuration.

  8. For Listener Configuration, leave the default listener, and choose Add to add another listener. For Load Balancer Protocol for the new listener, select HTTPS (Secure HTTP). This updates Load Balancer Port, Instance Protocol, and Instance Port.

    By default, Instance Protocol is HTTP and Instance Port is 80.

    
                                        Define a load balancer with an HTTPS listener

    If you want to set up back-end instance authentication , change the instance protocol to HTTPS (Secure HTTP). This also updates Instance Port.

    
                                        Define a load balancer with an HTTPS listener for back-end
                                            instance authentication
  9. [EC2-VPC] For Available subnets, select at least one available subnet using its add icon. The subnets are moved under Selected subnets. To improve the availability of your load balancer, select subnets from more than one Availability Zone.

    Note

    If you selected EC2-Classic as your network, or you have a default VPC but did not select Enable advanced VPC configuration, you do not see the user interface to select subnets.

    You can add at most one subnet per Availability Zone. If you select a second subnet from an Availability Zone where there is already a selected subnet, this subnet replaces the currently selected subnet for that Availability Zone.

    
                                        Select Subnets
  10. Choose Next: Assign Security Groups.

Step 2: Assign security groups to your load balancer in a VPC

If you selected a VPC as your network, you must assign your load balancer a security group that allows inbound traffic to the ports that you specified for your load balancer and the health checks for your load balancer

Note

If you selected EC2-Classic as your network, you can continue to the next step. By default, Elastic Load Balancing provides a security group for load balancers in EC2-Classic.

To assign security group to your load balancer
  1. On the Assign Security Groups page, select Create a new security group.

  2. Type a name and description for your security group, or leave the default name and description. This new security group contains a rule that allows traffic to the ports that you configured your load balancer to use.

    
                                        Select security groups
  3. Choose Next: Configure Security Settings.

Step 3: Configure security settings

When you use HTTPS or SSL for your front-end listener, you must deploy an SSL certificate on your load balancer. The load balancer uses the certificate to terminate the connection and then decrypt requests from clients before sending them to the instances.

You must also specify a security policy. Elastic Load Balancing provides security policies that have predefined SSL negotiation configurations, or you can create your own custom security policy.

If you configured HTTPS/SSL on the back-end connection, you can enable authentication of your instances.

To configure security settings
  1. For Select Certificate, do one of the following:

    • If you created or imported a certificate using AWS Certificate Manager, select Choose an existing certificate from AWS Certificate Manager (ACM), and then select the certificate from Certificate.

    • If you imported a certificate using IAM, select Choose an existing certificate from AWS Identity and Access Management (IAM), and then select your certificate from Certificate.

    • If you have a certificate to import but ACM is not available in your Region, select Upload a new SSL Certificate to AWS Identity and Access Management (IAM). Type the name of the certificate. In Private Key, copy and paste the contents of the private key file (PEM-encoded). In Public Key Certificate, copy and paste the contents of the public key certificate file (PEM-encoded). In Certificate Chain, copy and paste the contents of the certificate chain file (PEM-encoded), unless you are using a self-signed certificate and it's not important that browsers implicitly accept the certificate.

  2. For Select a Cipher, verify that Predefined Security Policy is selected and set to ELBSecurityPolicy-2016-08. We recommend that you always use the latest predefined security policy. If you need to use a different predefined security policy or create a custom policy, see Update the SSL Negotiation Configuration.

  3. (Optional) If you configured the HTTPS listener to communicate with instances using an encrypted connection, you can optionally set up authentication of the instances.

    1. For Backend Certificate, select Enable backend authentication.

      Note

      If you do not see the Backend Certificate section, go back to Listener Configuration and select HTTPS (Secure HTTP) for Instance Protocol.

    2. For Certificate name, type the name of the public key certificate.

    3. For Certificate Body (pem encoded), copy and paste the contents of the certificate. The load balancer communicates with an instance only if its public key matches this key.

    4. To add another certificate, choose Add another backend certificate.

    
                                        Enable backend authentication
  4. Choose Next: Configure Health Check.

Step 4: Configure health checks

Elastic Load Balancing automatically checks the health of the registered EC2 instances for your load balancer. If Elastic Load Balancing finds an unhealthy instance, it stops sending traffic to the instance and reroutes traffic to the healthy instances. For more information about configuring health checks, see Configure health checks for your Classic Load Balancer.

To configure health checks for your instances
  1. On the Configure Health Check page, select a ping protocol and ping port. Your EC2 instances must accept the specified traffic on the specified ping port.

  2. For Ping Path, replace the default value with a single forward slash ("/"). This tells Elastic Load Balancing to send health check requests to the default home page for your web server, such as index.html.

    
                                        Configure Health Check
  3. Keep the other settings at their default values.

  4. Choose Next: Add EC2 Instances.

Step 5: Register EC2 instances with your load balancer

Your load balancer distributes traffic between the instances that are registered to it. You can select EC2 instances in a single Availability Zone or multiple Availability Zones within the same Region as the load balancer. For more information, see Registered instances for your Classic Load Balancer.

Note

When you register an instance with an elastic network interface (ENI) attached, the load balancer routes traffic to the primary IP address of the primary interface (eth0) of the instance.

To register EC2 instances with your load balancer
  1. On the Add EC2 Instances page, select the instances to register with your load balancer.

  2. Leave cross-zone load balancing and connection draining enabled.

  3. Choose Next: Add Tags.

Step 6: Tag your load balancer (optional)

You can tag your load balancer, or continue to the next step.

To add tags to your load balancer
  1. On the Add Tags page, specify a key and a value for the tag.

  2. To add another tag, choose Create Tag and specify a key and a value for the tag.

  3. After you are finished adding tags, choose Review and Create.

Step 7: Create and verify your load balancer

Before you create the load balancer, review the settings that you selected. After creating the load balancer, you can verify that it's sending traffic to your EC2 instances.

To create and test your load balancer
  1. On the Review page, check your settings. If you need to make changes, choose the corresponding link to edit the settings.

  2. Choose Create.

  3. After you are notified that your load balancer was created, choose Close.

  4. Select your new load balancer.

  5. On the Description tab, check the Status row. If it indicates that some of your instances are not in service, its probably because they are still in the registration process. For more information, see Troubleshoot a Classic Load Balancer: Instance registration.

  6. (Optional) After at least one of your EC2 instances is in service, you can test your load balancer. Copy the string from DNS name (for example, my-load-balancer-1234567890.us-west-2.elb.amazonaws.com) and paste it into the address field of an internet-connected web browser. If your load balancer is working, you see the default page of your server.

Step 8: Delete your load balancer (optional)

As soon as your load balancer becomes available, you are billed for each hour or partial hour that you keep it running. When you no longer need a load balancer, you can delete it. As soon as the load balancer is deleted, you stop incurring charges for it.

To delete your load balancer
  1. Open the Amazon EC2 console at https://console.aws.amazon.com/ec2/.

  2. On the navigation pane, under Load Balancing, choose Load Balancers.

  3. Select the load balancer.

  4. Choose Actions, Delete.

  5. When prompted for confirmation, choose Yes, Delete.

  6. (Optional) After you delete a load balancer, the EC2 instances associated with the load balancer continue to run, and you are billed for each hour or partial hour that you keep them running. For information about stopping or terminating your instances, see Stop and start your instance or Terminate your instance in the Amazon EC2 User Guide for Linux Instances.

Create an HTTPS/SSL load balancer using the AWS CLI

Use the following instructions to create an HTTPS/SSL load balancer using the AWS CLI.

Step 1: Configure listeners

A listener is a process that checks for connection requests. It is configured with a protocol and a port for front-end (client to load balancer) connections and a protocol and port for back-end (load balancer to instance) connections. For information about the ports, protocols, and listener configurations supported by Elastic Load Balancing, see Listeners for your Classic Load Balancer.

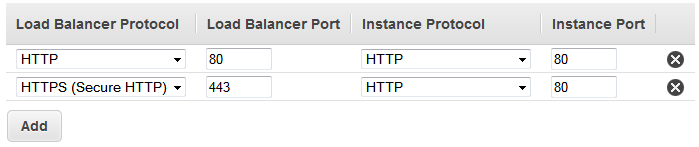
In this example, you configure two listeners for your load balancer by specifying the ports and protocols to use for front-end and back-end connections. The first listener accepts HTTP requests on port 80 and sends the requests to the instances on port 80 using HTTP. The second listener accepts HTTPS requests on port 443 and sends requests to instances using HTTP on port 80.

Because the second listener uses HTTPS for the front-end connection, you must deploy an SSL sever certificate on your load balancer. The load balancer uses the certificate to terminate and then decrypt requests before sending them to the instances.

To configure listeners for your load balancer
  1. Get the Amazon Resource Name (ARN) of the SSL certificate. For example:

    ACM

    arn:aws:acm:region:123456789012:certificate/12345678-1234-1234-1234-123456789012

    IAM

    arn:aws:iam::123456789012:server-certificate/my-server-certificate
  2. Use the following create-load-balancer command to configure the load balancer with the two listeners:

    aws elb create-load-balancer --load-balancer-name my-load-balancer --listeners "Protocol=http,LoadBalancerPort=80,InstanceProtocol=http,InstancePort=80" "Protocol=https,LoadBalancerPort=443,InstanceProtocol=http,InstancePort=80,SSLCertificateId="ARN" --availability-zones us-west-2a

    The following is an example response:

    { "DNSName": "my-loadbalancer-012345678.us-west-2.elb.amazonaws.com" }
  3. (Optional) Use the following describe-load-balancers command to view the details of your load balancer:

    aws elb describe-load-balancers --load-balancer-name my-load-balancer

Step 2: Configure the SSL security policy

You can select one of the predefined security policies, or you can create your own custom security policy. Otherwise, Elastic Load Balancing configures your load balancer with the default predefined security policy, ELBSecurityPolicy-2016-08. We recommend that you use the default security policy. For more information about security policies, see SSL negotiation configurations for Classic Load Balancers.

To verify that your load balancer is associated with the default security policy

Use the following describe-load-balancers command:

aws elb describe-load-balancers --load-balancer-name my-loadbalancer

The following is an example response. Note that ELBSecurityPolicy-2016-08 is associated with the load balancer on port 443.

{ "LoadBalancerDescriptions": [ { ... "ListenerDescriptions": [ { "Listener": { "InstancePort": 80, "SSLCertificateId": "ARN", "LoadBalancerPort": 443, "Protocol": "HTTPS", "InstanceProtocol": "HTTP" }, "PolicyNames": [ "ELBSecurityPolicy-2016-08" ] }, { "Listener": { "InstancePort": 80, "LoadBalancerPort": 80, "Protocol": "HTTP", "InstanceProtocol": "HTTP" }, "PolicyNames": [] } ], ... } ] }

If you prefer, you can configure the SSL security policy for your load balancer instead of using the default security policy.

(Optional) to use a predefined SSL security policy
  1. Use the following describe-load-balancer-policies command to list the names of the predefined security policies:

    aws elb describe-load-balancer-policies

    For information about the configuration for the predefined security policies, see Predefined SSL security policies.

  2. Use the following create-load-balancer-policy command to create an SSL negotiation policy using one of the predefined security policies that you described in the previous step:

    aws elb create-load-balancer-policy --load-balancer-name my-loadbalancer --policy-name my-SSLNegotiation-policy --policy-type-name SSLNegotiationPolicyType --policy-attributes AttributeName=Reference-Security-Policy,AttributeValue=predefined-policy
  3. (Optional) Use the following describe-load-balancer-policies command to verify that the policy is created:

    aws elb describe-load-balancer-policies --load-balancer-name my-loadbalancer --policy-name my-SSLNegotiation-policy

    The response includes the description of the policy.

  4. Use the following set-load-balancer-policies-of-listener command to enable the policy on load balancer port 443:

    aws elb set-load-balancer-policies-of-listener --load-balancer-name my-loadbalancer --load-balancer-port 443 --policy-names my-SSLNegotiation-policy
    Note

    The set-load-balancer-policies-of-listener command replaces the current set of policies for the specified load balancer port with the specified set of policies. The --policy-names list must include all policies to be enabled. If you omit a policy that is currently enabled, it is disabled.

  5. (Optional) Use the following describe-load-balancers command to verify that the policy is enabled:

    aws elb describe-load-balancers --load-balancer-name my-loadbalancer

    The following is an example response showing that the policy is enabled on port 443.

    { "LoadBalancerDescriptions": [ { .... "ListenerDescriptions": [ { "Listener": { "InstancePort": 80, "SSLCertificateId": "ARN", "LoadBalancerPort": 443, "Protocol": "HTTPS", "InstanceProtocol": "HTTP" }, "PolicyNames": [ "my-SSLNegotiation-policy" ] }, { "Listener": { "InstancePort": 80, "LoadBalancerPort": 80, "Protocol": "HTTP", "InstanceProtocol": "HTTP" }, "PolicyNames": [] } ], ... } ] }

When you create a custom security policy, you must enable at least one protocol and one cipher. The DSA and RSA ciphers are specific to the signing algorithm and are used to create the SSL certificate. If you already have your SSL certificate, make sure to enable the cipher that was used to create your certificate. The name of your custom policy must not begin with ELBSecurityPolicy- or ELBSample-, as these prefixes are reserved for the names of the predefined security policies.

(Optional) to use a custom SSL security policy
  1. Use the create-load-balancer-policy command to create an SSL negotiation policy using a custom security policy. For example:

    aws elb create-load-balancer-policy --load-balancer-name my-loadbalancer --policy-name my-SSLNegotiation-policy --policy-type-name SSLNegotiationPolicyType --policy-attributes AttributeName=Protocol-TLSv1.2,AttributeValue=true AttributeName=Protocol-TLSv1.1,AttributeValue=true AttributeName=DHE-RSA-AES256-SHA256,AttributeValue=true AttributeName=Server-Defined-Cipher-Order,AttributeValue=true
  2. (Optional) Use the following describe-load-balancer-policies command to verify that the policy is created:

    aws elb describe-load-balancer-policies --load-balancer-name my-loadbalancer --policy-name my-SSLNegotiation-policy

    The response includes the description of the policy.

  3. Use the following set-load-balancer-policies-of-listener command to enable the policy on load balancer port 443:

    aws elb set-load-balancer-policies-of-listener --load-balancer-name my-loadbalancer --load-balancer-port 443 --policy-names my-SSLNegotiation-policy
    Note

    The set-load-balancer-policies-of-listener command replaces the current set of policies for the specified load balancer port with the specified set of policies. The --policy-names list must include all policies to be enabled. If you omit a policy that is currently enabled, it is disabled.

  4. (Optional) Use the following describe-load-balancers command to verify that the policy is enabled:

    aws elb describe-load-balancers --load-balancer-name my-loadbalancer

    The following is an example response showing that the policy is enabled on port 443.

    { "LoadBalancerDescriptions": [ { .... "ListenerDescriptions": [ { "Listener": { "InstancePort": 80, "SSLCertificateId": "ARN", "LoadBalancerPort": 443, "Protocol": "HTTPS", "InstanceProtocol": "HTTP" }, "PolicyNames": [ "my-SSLNegotiation-policy" ] }, { "Listener": { "InstancePort": 80, "LoadBalancerPort": 80, "Protocol": "HTTP", "InstanceProtocol": "HTTP" }, "PolicyNames": [] } ], ... } ] }

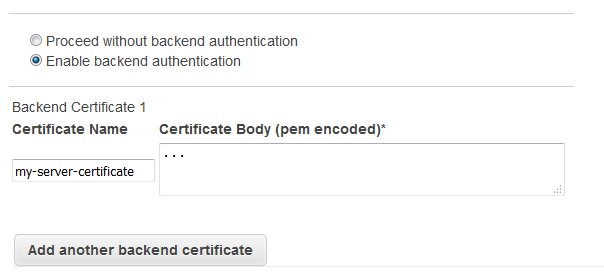
Step 3: Configure back-end instance authentication (optional)

If you set up HTTPS/SSL on the back-end connection, you can optionally set up authentication of your instances.

When you set up back-end instance authentication, you create a public key policy. Next, you use this public key policy to create a back-end instance authentication policy. Finally, you set the back-end instance authentication policy with the instance port for the HTTPS protocol.

The load balancer communicates with an instance only if the public key that the instance presents to the load balancer matches a public key in the authentication policy for your load balancer.

To configure back-end instance authentication
  1. Use the following command to retrieve the public key:

    openssl x509 -in your X509 certificate PublicKey -pubkey -noout
  2. Use the following create-load-balancer-policy command to create a public key policy:

    aws elb create-load-balancer-policy --load-balancer-name my-loadbalancer --policy-name my-PublicKey-policy \ --policy-type-name PublicKeyPolicyType --policy-attributes AttributeName=PublicKey,AttributeValue=MIICiTCCAfICCQD6m7oRw0uXOjANBgkqhkiG9w 0BAQUFADCBiDELMAkGA1UEBhMCVVMxCzAJBgNVBAgTAldBMRAwDgYDVQQHEwdTZ WF0dGxlMQ8wDQYDVQQKEwZBbWF6b24xFDASBgNVBAsTC0lBTSBDb25zb2xlMRIw EAYDVQQDEwlUZXN0Q2lsYWMxHzAdBgkqhkiG9w0BCQEWEG5vb25lQGFtYXpvbi5 jb20wHhcNMTEwNDI1MjA0NTIxWhcNMTIwNDI0MjA0NTIxWjCBiDELMAkGA1UEBh MCVVMxCzAJBgNVBAgTAldBMRAwDgYDVQQHEwdTZWF0dGxlMQ8wDQYDVQQKEwZBb WF6b24xFDASBgNVBAsTC0lBTSBDb25zb2xlMRIwEAYDVQQDEwlUZXN0Q2lsYWMx HzAdBgkqhkiG9w0BCQEWEG5vb25lQGFtYXpvbi5jb20wgZ8wDQYJKoZIhvcNAQE BBQADgY0AMIGJAoGBAMaK0dn+a4GmWIWJ21uUSfwfEvySWtC2XADZ4nB+BLYgVI k60CpiwsZ3G93vUEIO3IyNoH/f0wYK8m9TrDHudUZg3qX4waLG5M43q7Wgc/MbQ ITxOUSQv7c7ugFFDzQGBzZswY6786m86gpEIbb3OhjZnzcvQAaRHhdlQWIMm2nr AgMBAAEwDQYJKoZIhvcNAQEFBQADgYEAtCu4nUhVVxYUntneD9+h8Mg9q6q+auN KyExzyLwaxlAoo7TJHidbtS4J5iNmZgXL0FkbFFBjvSfpJIlJ00zbhNYS5f6Guo EDmFJl0ZxBHjJnyp378OD8uTs7fLvjx79LjSTbNYiytVbZPQUQ5Yaxu2jXnimvw 3rrszlaEXAMPLE=
    Note

    To specify a public key value for --policy-attributes, remove the first and last lines of the public key (the line containing "-----BEGIN PUBLIC KEY-----" and the line containing "-----END PUBLIC KEY-----"). The AWS CLI does not accept white space characters in --policy-attributes.

  3. Use the following create-load-balancer-policy command to create a back-end instance authentication policy using my-PublicKey-policy.

    aws elb create-load-balancer-policy --load-balancer-name my-loadbalancer --policy-name my-authentication-policy --policy-type-name BackendServerAuthenticationPolicyType --policy-attributes AttributeName=PublicKeyPolicyName,AttributeValue=my-PublicKey-policy

    You can optionally use multiple public key policies. The load balancer tries all the keys, one at a time. If the public key presented by an instance matches one of these public keys, the instance is authenticated.

  4. Use the following set-load-balancer-policies-for-backend-server command to set my-authentication-policy to the instance port for HTTPS. In this example, the instance port is port 443.

    aws elb set-load-balancer-policies-for-backend-server --load-balancer-name my-loadbalancer --instance-port 443 --policy-names my-authentication-policy
  5. (Optional) Use the following describe-load-balancer-policies command to list all the policies for your load balancer:

    aws elb describe-load-balancer-policies --load-balancer-name my-loadbalancer
  6. (Optional) Use the following describe-load-balancer-policies command to view details of the policy:

    aws elb describe-load-balancer-policies --load-balancer-name my-loadbalancer --policy-names my-authentication-policy

Step 4: Configure health checks (optional)

Elastic Load Balancing regularly checks the health of each registered EC2 instance based on the health checks that you configured. If Elastic Load Balancing finds an unhealthy instance, it stops sending traffic to the instance and routes traffic to the healthy instances. For more information, see Configure health checks for your Classic Load Balancer.

When you create your load balancer, Elastic Load Balancing uses default settings for the health checks. If you prefer, you can change the health check configuration for your load balancer instead of using the default settings.

To configure the health checks for your instances

Use the following configure-health-check command:

aws elb configure-health-check --load-balancer-name my-loadbalancer --health-check Target=HTTP:80/ping,Interval=30,UnhealthyThreshold=2,HealthyThreshold=2,Timeout=3

The following is an example response:

{ "HealthCheck": { "HealthyThreshold": 2, "Interval": 30, "Target": "HTTP:80/ping", "Timeout": 3, "UnhealthyThreshold": 2 } }

Step 5: Register EC2 instances

After you create your load balancer, you must register your EC2 instances with the load balancer. You can select EC2 instances from a single Availability Zone or multiple Availability Zones within the same Region as the load balancer. For more information, see Registered instances for your Classic Load Balancer.

Use the register-instances-with-load-balancer command as follows:

aws elb register-instances-with-load-balancer --load-balancer-name my-loadbalancer --instances i-4f8cf126 i-0bb7ca62

The following is an example response:

{ "Instances": [ { "InstanceId": "i-4f8cf126" }, { "InstanceId": "i-0bb7ca62" } ] }

Step 6: Verify the instances

Your load balancer is usable as soon as any one of your registered instances is in the InService state.

To check the state of your newly registered EC2 instances, use the following describe-instance-health command:

aws elb describe-instance-health --load-balancer-name my-loadbalancer --instances i-4f8cf126 i-0bb7ca62

The following is an example response:

{ "InstanceStates": [ { "InstanceId": "i-4f8cf126", "ReasonCode": "N/A", "State": "InService", "Description": "N/A" }, { "InstanceId": "i-0bb7ca62", "ReasonCode": "Instance", "State": "OutOfService", "Description": "Instance registration is still in progress" } ] }

If the State field for an instance is OutOfService, it's probably because your instances are still registering. For more information, see Troubleshoot a Classic Load Balancer: Instance registration.

After the state of at least one of your instances is InService, you can test your load balancer. To test your load balancer, copy the DNS name of the load balancer and paste it into the address field of an internet-connected web browser. If your load balancer is working, you see the default page of your HTTP server.

Step 7: Delete your load balancer (optional)

Deleting a the load balancer automatically de-registers its associated EC2 instances. As soon as the load balancer is deleted, you stop incurring charges for that load balancer. However, the EC2 instances continue run and you continue to incur charges.

To delete your load balancer, use the following delete-load-balancer command:

aws elb delete-load-balancer --load-balancer-name my-loadbalancer

To stop your EC2 instances, use the stop-instances command. To terminate your EC2 instances, use the terminate-instances command.