AppStream 2.0 Client Application for Windows
The following information helps you use the AppStream 2.0 client for Windows to connect to AppStream 2.0 and stream applications.
Contents
Features
The AppStream 2.0 client for Windows is an application that you install on your Windows PC. This application provides additional capabilities that are not available when you access AppStream 2.0 by using a web browser. For example, the AppStream 2.0 client lets you do the following:
Use more than two monitors or 4K resolution.
Use your USB devices with applications streamed through AppStream 2.0.
Access your local drives and folders during your streaming sessions.
Redirect print jobs from your streaming application to a printer that is connected to your local computer.
Use your local webcam for video and audio conferencing within your streaming sessions.
Use keyboard shortcuts during your streaming sessions.
Interact with your remote streaming applications in much the same way as you interact with locally installed applications.
Requirements
The AppStream 2.0 client for Windows must be installed on a computer that meets the following requirements:
-
Operating system — Windows 10 (32-bit or 64-bit), Windows 11 (64-bit)
Microsoft Visual C++ 2019 Redistributable or later for AppStream 2.0 client version 1.1.1066 and above. For information about the latest Visual C++ redistributable packages for Visual Studio 2015, 2017, and 2019, see The latest supported Visual C++ downloads
in the Microsoft Support documentation. -
RAM — 2 GB minimum
-
Hard drive space — 200 MB minimum
In addition, to install the AppStream 2.0 USB driver for USB driver support, you must have local administrator rights on your PC.
Setup
Follow these steps to install the client.
On the PC where you want to install the AppStream 2.0 client, download the AppStream 2.0 client for Windows application from AppStream 2.0 supported clients
. Navigate to the location where you downloaded the application .exe file, and then double-click the file to begin the installation.
Important
Contact your network administrator if nothing happens when you double-click the file or if an error message is displayed. Your organization might be using antivirus software that prevents the AppStream 2.0 client installation program from running.
If a message notifies you that Windows Defender SmartScreen prevented an unrecognized app from starting, choose the More info link. For App, verify that AmazonAppStreamClientSetup_<
version-number>.exe is displayed, and then choose Run anyway.The installation wizard displays links to the AWS Customer Agreement, AWS Service Terms, and the AWS Privacy Notice, and third-party notices. Review this information, and then choose Next.
On the Client Diagnostics page, to enable the AppStream 2.0 client to automatically upload device logs to help with troubleshooting issues, keep Client logging selected, and then choose Next.
On the Optional Components page, to enable your USB devices to be used with streaming applications, select the AppStream 2.0 Client USB Driver check box, and then choose Finish.
If the AppStream 2.0 USB driver wizard setup wizard opens, choose Install.
If prompted by User Account Control to choose whether to allow the app to make changes to your device, choose Yes.
When a message notifies you that the USB driver installation is complete, choose Close.
The AppStream 2.0 sign-in page opens. For information about how to connect to AppStream 2.0 and start an application streaming session, see Connect to AppStream 2.0.
Connect to AppStream 2.0
After the AppStream 2.0 client for Windows is installed on your PC, you can use it to connect to AppStream 2.0.
AppStream 2.0 Client Connection Modes
The AppStream 2.0 client provides two connection modes: Native application mode and classic mode. The connection mode that you choose determines the options that are available to you during application streaming, and how your streaming applications function and display. In addition, Desktop view is also available, if your administrator has enabled it.
Native application mode
Native application mode lets you work with remote streaming applications in much the same way that you work with applications that are installed on your local PC.
When you connect to AppStream 2.0 in native application mode, the AppStream 2.0 Application Launcher window opens and displays the list of applications that are available for you to stream. When you open a streaming application in this mode, the AppStream 2.0 Application Launcher window remains open, and the application opens in its own window. During your streaming session, the remote streaming application functions in much the same way as a locally installed application. The application icon is displayed in the taskbar of your local PC, just as the icons do for your local applications. Unlike the icons for your local applications, the icons for your streaming applications in native application mode include the AppStream 2.0 logo.
During your AppStream 2.0 streaming session, you can switch quickly between your locally installed applications and your remote streaming applications by clicking the taskbar icon of the remote or local application you want to work with. You can also switch AppStream 2.0 connection modes. If you want to work in classic mode instead, you can switch from native application mode to classic mode.
Classic mode
When you use classic application mode, you work with remote streaming applications in the AppStream 2.0 session window. If your administrator has made more than one application available to you, you can open multiple applications during your session. All applications that you open are displayed in the same AppStream 2.0 session window.
When you connect to AppStream 2.0 in classic mode, the AppStream 2.0 Application Launcher window opens and displays the list of applications that are available for you to stream. When you open a streaming application in this mode, the Application Launcher window closes, and the application opens in the AppStream 2.0 session window.
If your administrator has not disabled native application mode, you can switch from classic mode to native application mode. For more information, see How to Switch AppStream 2.0 Connection Modes.
Desktop view
When you connect to AppStream 2.0 and choose Desktop view, AppStream 2.0 provides a standard Windows desktop view for your streaming session. The icons of applications that are available for you to stream appear on the Windows desktop. In addition, the AppStream 2.0 toolbar, which enables you to configure settings for your streaming session, appears in the top left area of your streaming session window.
Connect to AppStream 2.0
Follow these steps to connect to AppStream 2.0 and start an application streaming session.
If your administrator requires you to sign in first through your organization's sign-in page, complete the tasks in this step, then proceed to step 3.
If your administrator doesn't require you to sign in through your organization's sign-in page, skip the tasks in this step and proceed to step 2.
Navigate to your organizational sign-in page and enter your domain credentials when prompted.
After you sign in, you are redirected to the AppStream 2.0 portal, which displays one or more applications that are available for your AppStream 2.0 streaming session. Desktop View is also available, if enabled by your administrator.
Choose an application or, if available, Desktop View.
-
If your administrator doesn't require you to sign in first through your organization's sign-in page, complete the following steps to start the AppStream 2.0 client:
On your local computer where the AppStream 2.0 client is installed, in the lower left of your screen, choose the Windows search icon on the taskbar and enter
AppStreamin the Search box.In the search results, select Amazon AppStream to start the AppStream 2.0 client.
On the AppStream 2.0 client sign-in page, you can choose whether to use the client in native application mode or classic mode.
To use native application mode, keep the Start in native application mode check box selected.
To use classic mode, clear the Start in native application mode check box.
Do either of the following:
If the client sign-in page is prepopulated with a web address (URL), choose Connect.
If the client sign-in page is not prepopulated with a URL, enter the URL that your AppStream 2.0 administrator provided for AppStream 2.0, and then choose Connect. If you don't know the URL, contact your administrator.
After a few moments, the AppStream 2.0 portal opens, displaying one or more applications that are available for your AppStream 2.0 streaming session. Desktop View is also available, if enabled by your administrator.
Choose an application or, if available, Desktop View.
Depending on the authentication settings that your AppStream 2.0 administrator enabled, after you choose an application or Desktop View, you might be prompted to enter your Active Directory domain credentials to sign in to your AppStream 2.0 session. If this is the case, do one of the following:
If your organization has enabled password authentication, enter your Active Directory domain password, and then choose Password sign in.
If your organization has enabled smart card authentication, select Choose a smart card, follow the instructions to choose your smart card certificate and enter your smart card PIN, and then choose Smart card sign in.
If your organization has enabled both authentication methods, either enter your Active Directory domain password and choose Password sign in, or select Choose a smart card, and follow the instructions to complete the smart card sign-in.
How to Switch AppStream 2.0 Connection Modes
If your administrator has not disabled native application mode for your streaming sessions, you can switch between native application mode and classic mode.
To switch from native application mode to classic mode
In the upper left of the AppStream 2.0 Application Launcher window, choose the Settings icon, and then choose Switch to classic mode.
When you switch to classic mode, the Application Launcher window closes and the AppStream 2.0 session window opens. Any application that you are streaming in native application mode opens in the AppStream 2.0 session window.
Follow these steps to switch from classic mode to native application mode.
To switch from classic mode to native application mode
In the upper left of the AppStream 2.0 session window, choose the Settings icon, and then choose Switch to native application mode.
When you switch from classic mode back to native application mode, the AppStream 2.0 session window closes and the AppStream 2.0 Application Launcher window opens. Any application that you are streaming in classic mode opens in a separate window.
Monitors and Display Resolution
AppStream 2.0 supports the use of multiple monitors during streaming sessions, including monitors that have different resolutions. To help ensure an optimal streaming experience, we recommend that you set the display scale for your monitors to 100 percent if you use multiple monitors.
The AppStream 2.0 client supports multiple monitors with the following display resolutions:
Multiple monitors (up to 2K resolution) — Up to 4 monitors with a maximum display resolution of 2560x1600 pixels per monitor
Multiple monitors (4K resolution) — Up to 2 monitors with a maximum display resolution of 4096x2160 pixels per monitor
Note
If you are connected to an AppStream 2.0 streaming session using native application mode, you can use monitors with up to 2K resolution. If you use higher-resolution monitors, the AppStream 2.0 client falls back to classic mode. In this case, the AppStream 2.0 classic mode streaming view occupies 2K of the screen, and the remaining portion of the screen is black.
USB Devices
With certain exceptions, USB redirection is required for the AppStream 2.0 client to support USB devices. When USB redirection is required for a device, you must share the device with AppStream 2.0 every time you start a new streaming session.
How to Use a Smart Card During a Streaming Session
Depending on the authentication settings that your administrator has enabled, you might need to use a smart card for authentication during an AppStream 2.0 streaming session. For example, if you open a browser during your streaming session and navigate to an internal organizational site that requires smart card authentication, you must enter your smart card credentials.
By default, smart card redirection is enabled for AppStream 2.0 streaming sessions, which means that you can use the smart card reader that is attached to your local computer without sharing it with AppStream 2.0. During your streaming session, your smart card reader and smart card are available for you to use with local applications, as well as with streaming applications.
If your administrator has disabled smart card redirection, you must share your smart card reader with AppStream 2.0. For more information, see the next section.
How to Share a USB Device with AppStream 2.0
If you are using a drawing tablet, USB redirection might not be required to use it with AppStream 2.0. However, if you are streaming an application such as the Gnu Image Manipulation Program (GIMP), which requires USB redirection to support pressure sensitivity, you must share your drawing tablet with AppStream 2.0. For information about drawing tablets, see Drawing Tablets.
To share a USB device with AppStream 2.0
-
Use the AppStream 2.0 client to start a streaming session.
-
In the top left area, choose the Settings icon, and then choose USB Devices.
-
If your USB device is connected to your computer, the USB device name appears in the dialog box. If your USB device is not detected, contact your AppStream 2.0 administrator for assistance.
-
Switch the Share toggle key next to the name of the USB device that you want to share with the streaming session.
Your USB device is now available for use with your streaming applications.
Important
USB devices can't be simultaneously used between local and remote applications. So after you share a USB device with a streaming session, you can't use it with applications on your local computer. To use your USB device on your local computer, switch the Share toggle key next to the name of the USB device that you want to use locally. This disables sharing with the streaming session.
-
You can also enable your USB device to automatically connect when a new streaming session starts. To do so, select the option next to the toggle key for the USB device that you want to connect. After you enable this option, when your next streaming session starts, the USB device is connected automatically.
Local File Access
AppStream 2.0 file redirection lets you access files on your local computer from your AppStream 2.0 streaming session. To use file redirection, open the AppStream 2.0 client, connect to a streaming session, and choose the drives and folders that you want to share. After you share a local drive or folder, you can access all files in the shared drive or folder from your streaming session. You can stop sharing local drives and folders at any time.
Important
To use AppStream 2.0 file redirection, you must have the AppStream 2.0 client installed on your local computer. File redirection is not available when you connect to AppStream 2.0 by using a web browser.
To share local drives and folders
-
Open the AppStream 2.0 client and connect to a streaming session.
In your AppStream 2.0 session, in the top left area, choose the Settings icon, and then choose Local Resources, Local Drives and Folders.

The Share your local drives and folders dialog box displays the drives and folders that your administrator has made available for you to share. You can share all or specific drives and folders, or just one. You can also add your own drives and folders. To share drives and folders, do one of the following:
To share all local drives and folders displayed in the Share your local drives and folders dialog box, choose Share All. To apply your changes to future streaming sessions, choose Save my configuration.

To share a specific local drive or folder, select the drive or folder that you want to access, and choose Share, Save my configuration. To share another local drive or folder, repeat these steps as needed.

If the local drive or folder that you want to share is not displayed, you can add it. For example, your administrator might make your entire local C Drive available for you to share. However, you might only need to access a specific folder on that drive. In this case, you can add the folder that you need and share only that folder. To choose a folder, do the following:
In the Share your local drives and folders dialog box, choose Add Folder.

Browse to the folder that you want to share, and choose OK.
The folder that you selected is now available to share. Select the folder, and choose Share, Save my configuration. To add another local drive or folder, repeat these steps as needed.

After you share a local drive or folder, perform the following steps to access files in the shared drive or folder from your streaming session.
To access files in a shared local drive or folder
-
Open the AppStream 2.0 client and connect to a streaming session.
In your AppStream 2.0 session, open the application that you want to use.
From your application interface, choose File Open, and browse to the file that you want to access. The following screenshot shows how shared local drives and folders appear in the Notepad++ browse dialog box for Jane Doe when she browses for a file.

In the browse dialog box, the corresponding paths for her shared drives and folders are shown in the red box. The paths appear with backslashes replaced by underscores. At the end of each path is the name of Jane's computer, ExampleCorp-123456, and a drive letter.
When you're done working with the file, use the File Save or File Save As command to save it to the location that you want.
If you want to stop sharing a local drive or folder, perform the following steps.
To stop sharing local drives and folders
-
Open the AppStream 2.0 client and connect to a streaming session.
In your AppStream 2.0 session, in the top left area, choose the Settings icon, and then choose Local Resources, Local Drives and Folders.
The Share your local drives and folders dialog box displays the drives and folders that your administrator has made available for you to share, and any that you added, if applicable. To stop sharing one or more local drives and folders, do either of the following:
To stop sharing all shared local drives and folders, choose Unshare All, Save my configuration.

To stop sharing a specific shared local drive or folder, select the drive or folder, and choose Unshare, Save my configuration. To stop sharing another local drive or folder, repeat these steps as needed.
You can delete local drives and folders that you add to the Share your local drives and folders dialog box. However, you can't delete local drives or folders that your administrator has made available for you to share. Also, if you have already shared a local drive or folder, you must stop sharing it before you can delete it.
To delete local drives and folders
-
Open the AppStream 2.0 client and connect to a streaming session.
In your AppStream 2.0 session, in the top left area, choose the Settings icon, and then choose Local Resources, Local Drives and Folders.
The Share your local drives and folders dialog box displays the drives and folders that your administrator has made available for you to share. If you added any drives or folders, they are also displayed.
Select the local drive or folder that you want to delete, and then choose Delete, Save my configuration.

Printer Redirection
AppStream 2.0 local printer redirection lets you access printers that are connected to your local computer from your AppStream 2.0 streaming session. That way, you can redirect print jobs from your streaming application to a local printer, or to a network printer that you have mapped.
Important
To use AppStream 2.0 printer redirection, you must have the AppStream 2.0 client installed on your local computer, and you must use the client to connect to a streaming session. Printer redirection is not available when you connect to AppStream 2.0 by using a web browser.
To redirect a print job to a local printer
-
Open the AppStream 2.0 client and connect to a streaming session.
In your streaming application, choose File, Print Now.
In the top-right area of the AppStream 2.0 session window, select the new notification that appears next to the notification icon.
In the Notifications dialog box, choose the Print Jobs tab.
On the Print Jobs tab, choose Print.
The Print dialog box for your streaming application opens.
In the Print dialog box, a list of available local printers is displayed. Choose the local printer that you want to use, and then proceed with printing.
Video and Audio Conferencing (Client for Windows)
AppStream 2.0 real-time audio-video (AV) redirects your local webcam video input to AppStream 2.0 streaming sessions. That way, you can use your local devices for video and audio conferencing within your AppStream 2.0 streaming session.
To use a local webcam and microphone within an AppStream 2.0 streaming session
-
Open the AppStream 2.0 client and connect to a streaming session.
-
In the AppStream 2.0 toolbar in the top left of your session window, do either of the following:
-
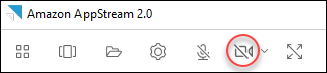
If the video icon has a diagonal line through it (as shown in the following screenshot), this indicates that the AppStream 2.0 real-time AV feature is available for use but no webcams are attached to your streaming session. Choose the video icon to attach one or more webcams.
-
If the video icon does not have a diagonal line through it (as shown in the following screenshot), one or more webcams are already attached to your streaming session. Skip this step and proceed to the next step.

Note
If the video icon doesn't display in the AppStream 2.0 toolbar, contact your AppStream 2.0 administrator. Your administrator might need to perform additional configuration tasks, as described in Real-Time Audio-Video (Client for Windows).
-
-
To display the names of the webcams that are attached to your streaming session, choose the downward arrow next to the video icon. If you have more than one webcam (for example, if you have a USB webcam that is connected to your laptop and a built-in webcam), a check mark appears next to the name of the webcam that is selected for use for video conferencing within your streaming session.

-
To use the selected webcam for video conferencing within your AppStream 2.0 streaming session, start the video conferencing application that you want to use. When the webcam is active (being used for video conferencing within your streaming session), the video icon is red.

-
To enable the microphone, choose the microphone icon.
Note
If you have more than one webcam and want to change the one that you use for streaming within an AppStream 2.0 session, you must first detach your webcams from the session. For more information, see the next procedure.
To change the local webcam to use within an AppStream 2.0 streaming session
-
Within your AppStream 2.0 streaming session, in the AppStream 2.0 toolbar in the top left of your session window, do either of the following:
-
If the video icon does not have a diagonal line through it (as shown in the following screenshot), this indicates that the AppStream 2.0 real-time AV feature is available for use and that webcams are still attached to your streaming session. Choose the video icon to detach the webcams.
-
If the video icon has a diagonal line through it (as shown in the following screenshot), your webcams are already detached from your streaming session. Skip this step and proceed to the next step.
-
-
Display the names of your webcams by choosing the downward arrow next to the video icon, then select the name of the webcam that you want to use.
Note
You must select the name of the webcam you want to use. If you select the check mark next to the name of the webcam you want to use, the webcam won't change.

-
Choose the video icon to reattach the webcams to your AppStream 2.0 streaming session.

Drawing Tablets
Drawing tablets, also known as pen tablets, are computer input devices that let you draw with a stylus (pen). With AppStream 2.0, you can connect a drawing tablet, such as a Wacom drawing tablet, to your local computer and use the tablet with your streaming applications.
Following are requirements and considerations for using drawing tablets with your streaming applications.
To use this feature, you must connect to AppStream 2.0 by using the AppStream 2.0 client, or through the Google Chrome or Mozilla Firefox browsers only.
The applications that you stream must support Windows Ink technology. For more information, see Pen interactions and Windows Ink in Windows apps
. Depending on the streaming applications that you use, your drawing tablet might require USB redirection to function as expected. This is because some applications, such as GIMP, require USB redirection to support pressure sensitivity. If this is the case for your streaming applications, you must connect to AppStream 2.0 by using the AppStream 2.0 client and share the drawing tablet with your streaming session.
This feature is not supported on Chromebooks.
To get started with using a drawing tablet during your application streaming sessions, connect your drawing tablet to your local computer with USB, share the device with AppStream 2.0 if required for pressure sensitivity detection, and then start an AppStream 2.0 streaming session. You can use the AppStream 2.0 client or a supported web browser to start a streaming session.
Relative Mouse Offset
By default, during a streaming session, AppStream 2.0 transmits information about mouse movements by using absolute coordinates and rendering the mouse movements locally. For graphics-intensive applications, such as computer-aided design (CAD)/computer-aided manufacturing (CAM) software or video games, mouse performance improves when relative mouse mode is enabled. Relative mouse mode uses relative coordinates, which represent how far the mouse moved since the last frame, rather than the absolute x-y coordinate values within a window or screen. When you enable relative mouse mode, AppStream 2.0 renders the mouse movements remotely.
You can enable this feature during an AppStream 2.0 streaming session in either of the following ways:
Pressing Ctrl+Shift+F8
Choosing Relative Mouse Position [Ctrl+Shift+F8] from the Settings menu on the AppStream 2.0 toolbar in the top left area of your streaming session window. This method works when you use classic mode or Desktop View.
Logging
To help with troubleshooting if an issue with the AppStream 2.0 client occurs, you can enable diagnostic logging. The log files that are sent to AppStream 2.0 (AWS) include detailed information about your device and connection to the AWS network. You can enable automatic log uploads so that these files are sent to AppStream 2.0 (AWS) automatically. You can also upload log files on an as-needed basis, before or during an AppStream 2.0 streaming session.
Automatic logging
You can enable automatic logging when you install the AppStream 2.0 client. For information about how to enable automatic logging when you install the AppStream 2.0 client, see step 5 in Setup.
On-demand logging
If an issue occurs during an AppStream 2.0 streaming session, you can also send log files on an as-needed basis. If an issue occurs that causes the AppStream 2.0 client to stop responding, a notification prompts you to choose whether to send an error report and the associated log files to AppStream 2.0 (AWS).
The following procedures describe how to send log files before you sign in to an AppStream 2.0 streaming session and during an AppStream 2.0 streaming session.
To send log files before an AppStream 2.0 streaming session
On your local PC where the AppStream 2.0 client is installed, in the lower left of your screen, choose the Windows search icon on the taskbar, and enter
AppStreamin the Search box.In the search results, select Amazon AppStream to start the AppStream 2.0 client.
At the bottom of the AppStream 2.0 sign-in page, choose the Send Diagnostic Logs link.
To continue connecting to AppStream 2.0, if your AppStream 2.0 administrator has provided you with a web address (URL) to use to connect to AppStream 2.0 for application streaming, enter the URL, and then choose Connect.
To send log files during an AppStream 2.0 streaming session
If you are not already connected to AppStream 2.0 and streaming an application, use the AppStream 2.0 client to start a streaming session.
In the upper right of the AppStream 2.0 session window, choose the Profiles icon, and then choose Send Diagnostic Logs.
Troubleshooting
If issues occur when you use the AppStream 2.0 client for Windows, your AppStream 2.0 client ID and version number can help your administrator with troubleshooting. The following sections describe how to find the client ID and client version number.
How to find the AppStream 2.0 client ID
The AppStream 2.0 client ID uniquely identifies your device. This ID is created when you install the AppStream 2.0 client for Windows. To find your client ID, open the AppStream 2.0 client. On the bottom left of the client sign-in page, choose the Client Options link. The client ID is displayed at the top of the AppStream 2.0 Client Options dialog box. You can use your mouse to select the client ID, and then copy it to your clipboard by using your keyboard or mouse.
How to find the AppStream 2.0 client version number
AppStream 2.0 periodically releases new client versions to add features and functionality or resolve issues. To find the version of the AppStream 2.0 client that you have installed, open the AppStream 2.0 client. On the bottom of the client sign-in page, choose the About Amazon AppStream 2.0 link. The client version is displayed below the Amazon AppStream 2.0 logo.
