Previewing running applications in the AWS Cloud9 Integrated Development Environment (IDE)
You can use the AWS Cloud9 IDE to preview a running application from within the IDE.
Topics
Run an application
Before you can preview your application from within the IDE, your application must be running in the AWS Cloud9 development environment. It must use HTTP over the following ports:
808080818082
All of the above ports must use the IP address of 127.0.0.1 localhost, or 0.0.0.0.
Note
You aren't required to run your application using HTTP over port 8080,
8081, or 8082 with the IP address of
127.0.0.1, localhost, or 0.0.0.0. However, if you
don't do so, you can't preview your running application from within the IDE.
Note
The preview application is run within the IDE and is loaded inside an iframe element. Some application servers might by default block requests that come from iframe elements, such as the X-Frame-Options header. If your preview application isn't displayed in the preview tab, make sure that your application server doesn't prohibit displaying the content in iframes.
To write code to run your application on a specific port and IP address, see your application's documentation.
To run your application, see Run Your Code.
To test this behavior, add the following JavaScript code to a file that's named
server.js in the root of your environment. This code runs a server using
a file that's named Node.js.
Note
In the following example, text/html is the Content-Type of
the returned content. To return the content in a different format, specify a different
Content-Type. For example, you can specify text/css for a
CSS file format.
var http = require('http');
var fs = require('fs');
var url = require('url');

http.createServer( function (request, response) {
  var pathname = url.parse(request.url).pathname;
  console.log("Trying to find '" + pathname.substr(1) + "'...");

  fs.readFile(pathname.substr(1), function (err, data) {
    if (err) {
      response.writeHead(404, {'Content-Type': 'text/html'});
      response.write("ERROR: Cannot find '" + pathname.substr(1) + "'.");
      console.log("ERROR: Cannot find '" + pathname.substr(1) + "'.");
    } else {
      console.log("Found '" + pathname.substr(1) + "'.");
      response.writeHead(200, {'Content-Type': 'text/html'});
      response.write(data.toString());
    }
    response.end();
  });
}).listen(8080, 'localhost'); // Or 8081 or 8082 instead of 8080. Or '127.0.0.1' instead of 'localhost'.
In the root of your environment, you can add the following Python code to a file with a name
such as server.py. In the following example, a server is run using
Python.
import os
import http.server
import socketserver

ip = 'localhost' # Or '127.0.0.1' instead of 'localhost'.
port = '8080' # Or '8081' or '8082' instead of '8080'.
Handler = http.server.SimpleHTTPRequestHandler
httpd = socketserver.TCPServer((ip, int(port)), Handler)
httpd.serve_forever()
In the root of your environment, add the following HTML code to a file that's named
index.html.
<html>
  <head>
    <title>Hello Home Page</title>
  </head>
  <body>
    <p style="font-family:Arial;color:blue">Hello, World!</p>
  </body>
</html>
To see the HTML output of this file on the application preview tab, run
server.js with Node.js or server.py file with
Python. Then, follow the steps in the next section to preview it. On the application
preview tab, add /index.html to the end of the URL, and then press
Enter.
Preview a running application
Before you preview your application, confirm the following:
-
Your application runs using the HTTP protocol over port
8080,8081, or8082. -
Your application's IP address in the environment is
127.0.0.1,localhost, or0.0.0.0. -
Your application code file is open and active in the AWS Cloud9 IDE.
After you confirm all of these details, choose one of the following options from the menu bar:
-
Preview, Preview Running Application
-
Tools, Preview, Preview Running Application
Either one of these options opens an application preview tab within the environment, and then displays the application's output on the tab.
Note
If the application preview tab displays an error or is blank, follow the troubleshooting steps in Application preview tab displays an error or is blank. If when you attempt to preview an application or file, you get the following notice "Preview functionality is disabled because your browser has third-party cookies disabled", follow the troubleshooting steps in Application preview or file preview notice: "Third-party cookies disabled".
Note
If the application isn't already running, an error appears on the application preview tab. To resolve this issue, run or restart the application, and then choose the menu bar command again.
Suppose that, for example, your application can't run on any of the ports or IPs
mentioned. Or, your application must run on more than one of these ports at the same
time. For example, your application must run on ports 8080 and
3000 at the same time. If that's the case, then the application preview
tab might display an error or might be blank. This is because the application preview
tab within the environment works only with the preceding ports and IPs. Moreover, the
application works with only a single port at a time.
We don't recommend sharing the URL in the application preview tab with others. (The
URL is in the following format:
https://12a34567b8cd9012345ef67abcd890e1.vfs.cloud9.us-east-2.amazonaws.com/.
In this format, 12a34567b8cd9012345ef67abcd890e1 is the ID that AWS Cloud9
assigns to the environment. us-east-2 is the ID for the AWS Region for the
environment.) This URL works only when the IDE for the environment is open and the application is
running in the same web browser.
If you attempt to visit the IP of 127.0.0.1, localhost, or
0.0.0.0 by using the application preview tab in the IDE or in a
separate web browser tab outside of the IDE, the AWS Cloud9 IDE by default attempts to go to
your local computer, instead of the instance or your own server that's connected to the
environment.
For instructions on how to provide others with a preview of your running application outside of the IDE, see Share a running application over the internet.
Reload an application preview
On the application preview tab, choose the Refresh button (the circular arrow).
Note
This command doesn't restart the server. It only refreshes the contents of the application preview tab.
Change the application preview type
On the application preview tab, choose one of the following from the preview type list:
-
Browser: Previews the output in a web browser format.
-
Raw Content (UTF-8): Attempts to preview the output in Unicode Transformation Format 8-bit (UTF-8) format, if applicable.
-
Markdown: Attempts to preview the output in the Markdown format, if applicable.
Open an application preview in a separate web browser tab
On the application preview tab, choose Pop Out Into New Window.
Note
The AWS Cloud9 IDE must also be running in at least one other tab in the same web browser. Otherwise, the application preview isn't displayed in a separate web browser tab.
The AWS Cloud9 IDE must also be running in at least one other tab in the same web browser. Otherwise, the application preview isn't displayed in a separate web browser tab. If the application preview tab displays an error or is blank, follow the troubleshooting steps in Application preview or file preview notice: "Third-party cookies disabled".
Switch to a different preview URL
On the application preview tab, enter the path to a different URL in the address bar. The address bar is located between the Refresh button and the preview type list.
Share a running application over the internet
After you preview your running application, you can make it available to others over the internet.
If an Amazon EC2 instance is connected to your environment, follow these steps. Otherwise, consult your server's documentation.
Topics
Step 1: Get the ID and the IP address of the instance
In this step, you note the instance ID and public IP address for the Amazon EC2 instance that's connected to the environment. You need the instance ID in a later step to allow incoming application requests. Then, share the public IP address to others so that they can access the running application.
-
Get the Amazon EC2 instance's ID. To get this, do one of the following:
-
In a terminal session in the AWS Cloud9 IDE for the environment, run the following command to get the Amazon EC2 instance's ID.
curl http://169.254.169.254/latest/meta-data/instance-idThe instance ID is in the following format:
i-12a3b456c789d0123. Make a note of this instance ID. -
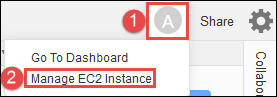
In the IDE for the environment, on the menu bar, choose your user icon, and then choose Manage EC2 Instance.
In the Amazon EC2 console that displays, make a note of the instance ID that displays in the Instance ID column. The instance ID is in this format:
i-12a3b456c789d0123.
-
-
Get the Amazon EC2 instance's public IP address. To get this, do one of the following:
-
In the IDE for the environment, on the menu bar, choose Share. In the Share this environment dialog box, make a note of the public IP address in the Application box. The public IP address is in this format:
192.0.2.0. -
In a terminal session in the IDE for the environment, run the following command to get the Amazon EC2 instance's public IP address.
curl http://169.254.169.254/latest/meta-data/public-ipv4The public IP address is in this format:
192.0.2.0. Make a note of this public IP address. -
In the IDE for the environment, on the menu bar, choose your user icon, and then choose Manage EC2 Instance. In the Amazon EC2 console that displays, on the Description tab, make a note of the public IP address for the IPv4 Public IP field. The public IP address is in this format:
192.0.2.0.
Note
Your application's public IP address might change anytime the instance for your application restarts. To prevent your IP address from changing, allocate an Elastic IP address. Then, assign that address to the running instance. For instructions, see Allocating an Elastic IP Address and Associating an Elastic IP Address with a Running Instance in the Amazon EC2 User Guide for Linux Instances. Allocating an Elastic IP address might cause your AWS account to incur charges. For more information, see Amazon EC2 Pricing
. -
Step 2: Set up the security group for the instance
In this step, on the Amazon EC2 console, set up the Amazon EC2 security group for the instance that's connected to the environment. Set it up to allow incoming HTTP requests over port 8080, 8081, or 8082.
Note
You aren't required run using HTTP over port 8080, 8081,
or 8082. If you don't do this, you can't preview your running
application from within the IDE. For more information, see Preview a running application.
Otherwise, if you're running on a different protocol or port, substitute it in this
step.
For an additional layer of security, set up a network access control list (ACL) for a subnet in a VPC that the instance can use. For more information about security groups and network ACLs, see the following:
-
Security in the Amazon VPC User Guide
-
Security Groups for Your VPC in the Amazon VPC User Guide
-
Network ACLs in the Amazon VPC User Guide
-
In the IDE for the environment, on the menu bar, choose your user icon, and then choose Manage EC2 Instance. Then skip ahead to step 3 in this procedure.
-
If choosing Manage EC2 Instance or other steps in this procedure returns in errors, sign in to the Amazon EC2 console using the credentials for an administrator in your AWS account. Then, complete the following instructions. If you can't do this, check with your AWS account administrator.
-
Sign in to the AWS Management Console at https://console.aws.amazon.com/
if you're not already signed in. -
Open the Amazon EC2 console. To do this, in the navigation bar, choose Services. Then, choose EC2.
-
In the navigation bar, choose the AWS Region where your environment is located.
-
If the EC2 Dashboard is displayed, choose Running Instances. Otherwise, in the service navigation pane, expand Instances if it isn't already expanded and choose Instances.
-
In the list of instances, select the instance with an Instance ID that matches the instance ID that you noted earlier.
-
-
In the Description tab for the instance, choose the security group link that's next to Security groups.
-
With the security group displayed, look on the Inbound tab. If there's a rule with Type set to Custom TCP Rule and Port Range set to 8080, 8081, or 8082, choose Cancel, and skip ahead to Step 3: Set up the subnet for the instance. Otherwise, choose Edit.
-
In the Edit inbound rules dialog box, choose Add Rule.
-
For Type, choose Custom TCP Rule.
-
For Port Range, enter
8080,8081, or8082. -
For Source, choose Anywhere.
Note
By choosing Anywhere for Source, you're allowing incoming requests from any IP address. To restrict this to specific IP addresses, choose Custom and then enter the IP address range. Alternatively, choose My IP to restrict requests to be only from your IP address.
-
Choose Save.
Step 3: Set up the subnet for the instance
Use the Amazon EC2 and Amazon VPC consoles to set up a subnet for the Amazon EC2 instance that's connected to the environment. Then, allow incoming HTTP requests over port 8080, 8081, or 8082.
Note
You aren't required to run using HTTP over port 8080,
8081, or 8082. However, if you don't, you can't preview
your running application from within the IDE. For more information, see Preview a running application.
Otherwise, if you're running on a different protocol or port, substitute it in this
step.
This step describes how to set up a network ACL for a subnet in an Amazon VPC that the instance can use. This isn't required but is recommended. Setting up a network ACL adds an additional layer of security. For more information about network ACLs, see the following:
-
Security in the Amazon VPC User Guide
-
Network ACLs in the Amazon VPC User Guide
-
On the Amazon EC2 console, in the service navigation pane, expand Instances if it isn't already expanded, and choose Instances.
-
In the list of instances, select the instance with an Instance ID that matches the instance ID that you noted earlier.
-
In the Description tab for the instance, note the value of Subnet ID. The subnet ID is in the following format:
subnet-1fab8aEX. -
Open the Amazon VPC console. To do this, in the AWS navigation bar, choose Services and then choose VPC.
For this step, we recommend that you sign in to the Amazon VPC console using an administrator's credentials in your AWS account. If you can't do this, check with your AWS account administrator.
-
If the VPC Dashboard is displayed, choose Subnets. Otherwise, in the service navigation pane, choose Subnets.
-
In the list of subnets, select the subnet with a Subnet ID value that matches the one that you noted earlier.
-
On the Summary tab, choose the network ACL link that's next to Network ACL.
-
In the list of network ACLs, select the network ACL. (There is only one network ACL.)
-
Look on the Inbound Rules tab for the network ACL. If a rule already exists where Type is set to HTTP* (8080), HTTP* (8081), or HTTP* (8082), skip ahead to Step 4: Share your running application's URL. Otherwise, choose Edit.
-
Choose Add another rule.
-
For Rule #, enter a number for the rule (for example,
200). -
For Type, choose Custom TCP Rule.
-
For Port Range, type
8080,8081, or8082. -
For Source, type the range of IP addresses to allow incoming requests from. For example, to allow incoming requests from any IP address, enter
0.0.0.0/0. -
With Allow / Deny set to ALLOW, choose Save.
Step 4: Share your running application's URL
After your application is running, you can share your application with others by
providing your application's URL. For this, you need the public IP address that you
noted earlier. To write your application's full URL, make sure to start your
application's public IP address with the correct protocol. Next, if your application
port isn't the default port for the protocol that it uses, add the port number
information. The following is an example application URL:
http://192.0.2.0:8080/index.html using HTTP over port 8080.
If the resulting web browser tab displays an error, or the tab is blank, follow the troubleshooting steps in Can't display your running application outside of the IDE.
Note
Your application's public IP address might change anytime the instance for your
application restarts. To prevent your IP address from changing, allocate an Elastic
IP address, and then assign that address to the running instance. For instructions,
see Allocating an Elastic IP Address and Associating an Elastic IP Address with a Running Instance in the
Amazon EC2 User Guide for Linux Instances. Allocating an Elastic IP address might
cause your AWS account to incur charges. For more information, see Amazon EC2 Pricing
You're not required to run your application using HTTP over port
8080, 8081, or 8082. However, if you don't,
you can't preview your running application from within the IDE. For more
information, see Preview a running application.
Suppose that, for example, requests that originate from a VPN that blocks traffic over the requested protocol or port. Then, those requests to access your application's URL might fail. Request must be made from a different network that allows traffic over the requested protocol and port. For more information, contact your network administrator.
We don't recommend sharing the URL in your application preview tab in the IDE
with others. (This URL is in the following format:
https://12a34567b8cd9012345ef67abcd890e1.vfs.cloud9.us-east-2.amazonaws.com/.
In this format, 12a34567b8cd9012345ef67abcd890e1 is the ID that AWS Cloud9
assigns to the environment. us-east-2 is the ID of the AWS Region for the
environment.) This URL works only when the IDE for the environment is open and the application
is running in the same web browser.
