Go tutorial for AWS Cloud9
This tutorial enables you to run some Go code in an AWS Cloud9 development environment.
Following this tutorial and creating this sample might result in charges to your AWS account. These include possible
charges for services such as Amazon EC2 and Amazon S3. For more information, see Amazon EC2 Pricing
Topics
Prerequisites
Before you use this sample, make sure that your setup meets the following requirements:
-
You must have an existing AWS Cloud9 EC2 development environment. This sample assumes that you already have an EC2 environment that's connected to an Amazon EC2 instance that runs Amazon Linux or Ubuntu Server. If you have a different type of environment or operating system, you might need to adapt this sample's instructions to set up related tools. For more information, see Creating an environment in AWS Cloud9.
-
You have the AWS Cloud9 IDE for the existing environment already open. When you open an environment, AWS Cloud9 opens the IDE for that environment in your web browser. For more information, see Opening an environment in AWS Cloud9.
Step 1: Install required tools
In this step, you install and configure Go, which is required to run this sample.
-
In a terminal session in the AWS Cloud9 IDE, confirm whether Go is already installed by running the
go versioncommand. (To start a new terminal session, on the menu bar, choose Window, New Terminal.) If successful, the output should contain the Go version number. Otherwise, an error message should be output. If Go is installed, skip ahead to Step 2: Add code. -
Run the
yum updatefor (Amazon Linux) orapt updatefor (Ubuntu Server) command to help ensure the latest security updates and bug fixes are installed.For Amazon Linux:
sudo yum -y updateFor Ubuntu Server:
sudo apt update -
To install Go, run these commands, one at a time.
wget https://storage.googleapis.com/golang/go1.9.3.linux-amd64.tar.gz # Download the Go installer.
sudo tar -C /usr/local -xzf ./go1.9.3.linux-amd64.tar.gz              # Install Go.
rm ./go1.9.3.linux-amd64.tar.gz                                       # Delete the installer.
The preceding commands assume the latest stable version of Go at the time this topic was written. For more information, see Downloads
on The Go Programming Language website. -
Add the path to the Go binary to your
PATHenvironment variable, like this.-
Open your shell profile file (for example,
~/.bashrc) for editing. -
At the end of this line of code, type the following, so that the code now looks like this.
PATH=$PATH:/usr/local/go/bin -
Save the file.
-
-
Source the
~/.bashrcfile so that the terminal can now find the Go binary you just referenced.. ~/.bashrc -
Confirm that Go is now successfully installed and configured by running the
go versioncommand. If successful, the output contains the Go version number.
Step 2: Add code
In the AWS Cloud9 IDE, create a file with this content, and save the file with the name
hello.go. (To create a file, on the menu bar, choose
File, New File. To save the file, choose
File, Save.)
package main

import (
  "fmt"
  "os"
  "strconv"
)

func main() {
  fmt.Printf("Hello, World!\n")

  fmt.Printf("The sum of 2 and 3 is 5.\n")

  first, _ := strconv.Atoi(os.Args[1])
  second, _ := strconv.Atoi(os.Args[2])
  sum := first + second

  fmt.Printf("The sum of %s and %s is %s.",
    os.Args[1], os.Args[2], strconv.Itoa(sum))
}
Step 3: Run the code
-
In the AWS Cloud9 IDE, on the menu bar, choose Run, Run Configurations, New Run Configuration.
-
On the [New] - Idle tab, choose Runner: Auto, and then choose Go.
Note
If Go is not available, you can create a custom runner for Go.
-
On the [New] - Idle tab, choose Runner: Auto, and then choose New Runner.
-
On the My Runner.run tab, replace the tab's contents with this code.
{ "cmd" : ["go", "run", "$file", "$args"], "info" : "Running $project_path$file_name...", "selector" : "source.go" } -
Choose File, Save As on the menu bar, and save the file as
Go.runin the/.c9/runnersfolder. -
On the [New] - Idle tab, choose Runner: Auto, and then choose Go.
-
Choose the hello.go tab to make it active.
-
-
For Command, type
hello.go 5 9. In the code,5representsos.Args[1], and9representsos.Args[2].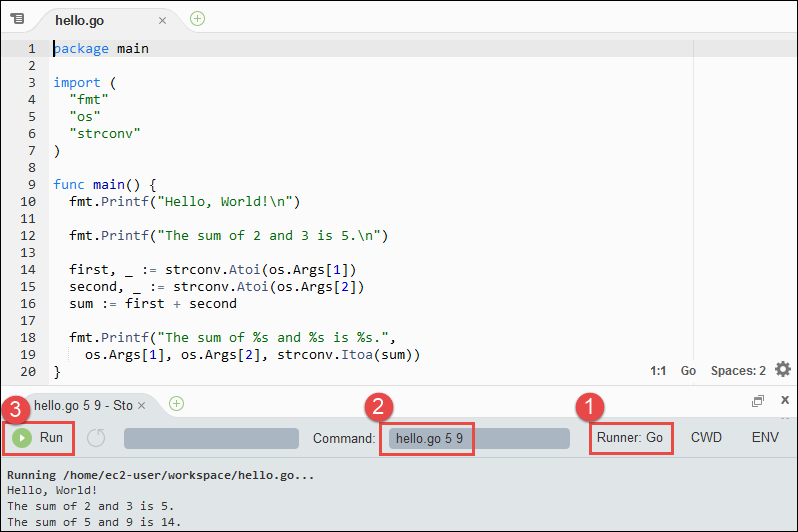
-
Choose the Run button, and compare your output.
Hello, World!
The sum of 2 and 3 is 5.
The sum of 5 and 9 is 14.
Step 4: Install and configure the AWS SDK for Go
You can enhance this sample to use the AWS SDK for Go to create an Amazon S3 bucket, list your available buckets, and then delete the bucket you just created.
In this step, you install and configure the AWS SDK for Go, which provides a convenient way to
interact with AWS services such as Amazon S3, from your Go code. Before you install the
AWS SDK for Go, you must set your GOPATH environment variable. After you install the
AWS SDK for Go and set your GOPATH environment variable, you must set up credentials
management in your environment. The AWS SDK for Go needs these credentials to interact with AWS
services.
To set your GOPATH environment variable
-
Open your
~/.bashrcfile for editing. -
After the last line in the file, type this code.
GOPATH=~/environment/go export GOPATH -
Save the file.
-
Source the
~/.bashrcfile so that the terminal can now find theGOPATHenvironment variable you just referenced.. ~/.bashrc -
Confirm that the
GOPATHenvironment variable is successfully set by running theecho $GOPATHcommand. If successful,/home/ec2-user/environment/goor/home/ubuntu/environment/goshould be output.
To install the AWS SDK for Go
Run the
go get
command, specifying the location of the AWS SDK for Go source.
go get -u github.com/aws/aws-sdk-go/...
Go installs the AWS SDK for Go source into the location specified by your
GOPATH environment variable, which is the go folder
in your environment.
To set up credentials management in your environment
Each time you use the AWS SDK for Go to call an AWS service, you must provide a set of credentials with the call. These credentials determine whether the AWS SDK for Go has the appropriate permissions to make that call. If the credentials don't cover the appropriate permissions, the call will fail.
In this step, you store your credentials within the environment. To do this, follow the instructions in Calling AWS services from an environment in AWS Cloud9, and then return to this topic.
For additional information, see Specifying Credentials in the AWS SDK for Go Developer Guide.
Step 5: Add AWS SDK code
In this step, you add some more code, this time to interact with Amazon S3 to create a bucket, list your available buckets, and then delete the bucket you just created. You will run this code later.
In the AWS Cloud9 IDE, create a file with this content, and save the file with the name
s3.go.
package main

import (
	"fmt"
	"os"

	"github.com/aws/aws-sdk-go/aws"
	"github.com/aws/aws-sdk-go/aws/session"
	"github.com/aws/aws-sdk-go/service/s3"
)

func main() {

	if len(os.Args) < 3 {
		fmt.Printf("Usage: go run s3.go <the bucket name> <the AWS Region to use>\n" +
			"Example: go run s3.go my-test-bucket us-east-2\n")
		os.Exit(1)
	}

	sess := session.Must(session.NewSessionWithOptions(session.Options{
		SharedConfigState: session.SharedConfigEnable,
	}))
	svc := s3.New(sess, &aws.Config{
		Region: aws.String(os.Args[2]),
	})

	listMyBuckets(svc)
	createMyBucket(svc, os.Args[1], os.Args[2])
	listMyBuckets(svc)
	deleteMyBucket(svc, os.Args[1])
	listMyBuckets(svc)
}

// List all of your available buckets in this AWS Region.
func listMyBuckets(svc *s3.S3) {
	result, err := svc.ListBuckets(nil)

	if err != nil {
		exitErrorf("Unable to list buckets, %v", err)
	}

	fmt.Println("My buckets now are:\n")

	for _, b := range result.Buckets {
		fmt.Printf(aws.StringValue(b.Name) + "\n")
	}

	fmt.Printf("\n")
}

// Create a bucket in this AWS Region.
func createMyBucket(svc *s3.S3, bucketName string, region string) {
	fmt.Printf("\nCreating a new bucket named '" + bucketName + "'...\n\n")

	_, err := svc.CreateBucket(&s3.CreateBucketInput{
		Bucket: aws.String(bucketName),
		CreateBucketConfiguration: &s3.CreateBucketConfiguration{
			LocationConstraint: aws.String(region),
		},
	})

	if err != nil {
		exitErrorf("Unable to create bucket, %v", err)
	}

	// Wait until bucket is created before finishing
	fmt.Printf("Waiting for bucket %q to be created...\n", bucketName)

	err = svc.WaitUntilBucketExists(&s3.HeadBucketInput{
		Bucket: aws.String(bucketName),
	})
}

// Delete the bucket you just created.
func deleteMyBucket(svc *s3.S3, bucketName string) {
	fmt.Printf("\nDeleting the bucket named '" + bucketName + "'...\n\n")

	_, err := svc.DeleteBucket(&s3.DeleteBucketInput{
		Bucket: aws.String(bucketName),
	})

	if err != nil {
		exitErrorf("Unable to delete bucket, %v", err)
	}

	// Wait until bucket is deleted before finishing
	fmt.Printf("Waiting for bucket %q to be deleted...\n", bucketName)

	err = svc.WaitUntilBucketNotExists(&s3.HeadBucketInput{
		Bucket: aws.String(bucketName),
	})
}

// If there's an error, display it.
func exitErrorf(msg string, args ...interface{}) {
	fmt.Fprintf(os.Stderr, msg+"\n", args...)
	os.Exit(1)
}
Step 6: Run the AWS SDK code
-
In the AWS Cloud9 IDE, on the menu bar, choose Run, Run Configurations, New Run Configuration.
-
On the [New] - Idle tab, choose Runner: Auto, and then choose Go.
-
For Command, type
s3.go
                     YOUR_BUCKET_NAME
                  THE_AWS_REGION
, whereYOUR_BUCKET_NAMEis the name of the bucket you want to create and then delete, andTHE_AWS_REGIONis the ID of the AWS Region you want to create the bucket in. For example, for the US East (Ohio) Region, useus-east-2. For more IDs, see Amazon Simple Storage Service (Amazon S3) in the Amazon Web Services General Reference.Note
Amazon S3 bucket names must be unique across AWS—not just your AWS account.
-
Choose the Run button, and compare your output.
My buckets now are:

Creating a new bucket named 'my-test-bucket'...

My buckets now are:

my-test-bucket

Deleting the bucket named 'my-test-bucket'...

My buckets now are:
Step 7: Clean up
To prevent ongoing charges to your AWS account after you're done using this sample, you should delete the environment. For instructions, see Deleting an environment in AWS Cloud9.
