Verify the identity and authenticity of your cluster's HSM (optional)
To initialize your cluster, you sign a certificate signing request (CSR) generated by the cluster's first HSM. Before you do this, you might want to verify the identity and authenticity of the HSM.
Note
This process is optional. However, it works only until a cluster is initialized. After the cluster is initialized, you cannot use this process to get the certificates or verify the HSMs.
Topics
Overview
To verify the identity of your cluster's first HSM, complete the following steps:
-
Get the certificates and CSR – In this step, you get three certificates and a CSR from the HSM. You also get two root certificates, one from AWS CloudHSM and one from the HSM hardware manufacturer.
-
Verify the certificate chains – In this step, you construct two certificate chains, one to the AWS CloudHSM root certificate and one to the manufacturer root certificate. Then you verify the HSM certificate with these certificate chains to determine that AWS CloudHSM and the hardware manufacturer both attest to the identity and authenticity of the HSM.
-
Compare public keys – In this step, you extract and compare the public keys in the HSM certificate and the cluster CSR, to ensure that they are the same. This should give you confidence that the CSR was generated by an authentic, trusted HSM.
The following diagram shows the CSR, the certificates, and their relationship to each other. The subsequent list defines each certificate.
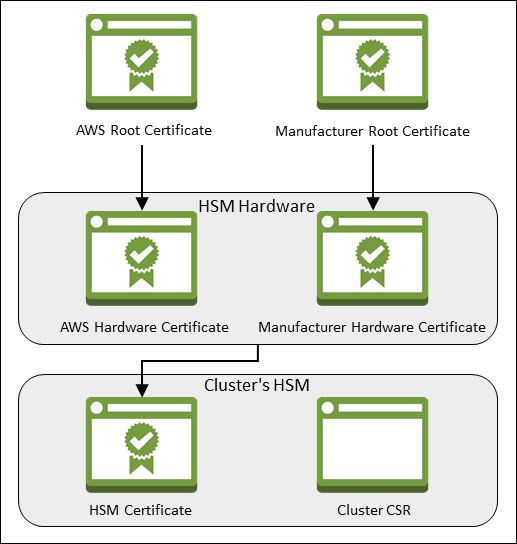
- AWS Root Certificate
-
This is AWS CloudHSM's root certificate.
- Manufacturer Root Certificate
-
This is the hardware manufacturer's root certificate.
- AWS Hardware Certificate
-
AWS CloudHSM created this certificate when the HSM hardware was added to the fleet. This certificate asserts that AWS CloudHSM owns the hardware.
- Manufacturer Hardware Certificate
-
The HSM hardware manufacturer created this certificate when it manufactured the HSM hardware. This certificate asserts that the manufacturer created the hardware.
- HSM Certificate
-
The HSM certificate is generated by the FIPS-validated hardware when you create the first HSM in the cluster. This certificate asserts that the HSM hardware created the HSM.
- Cluster CSR
-
The first HSM creates the cluster CSR. When you sign the cluster CSR, you claim the cluster. Then, you can use the signed CSR to initialize the cluster.
Get certificates from the HSM
To verify the identity and authenticity of your HSM, start by getting a CSR and five
certificates. You get three of the certificates from the HSM, which you can do with the AWS CloudHSM console
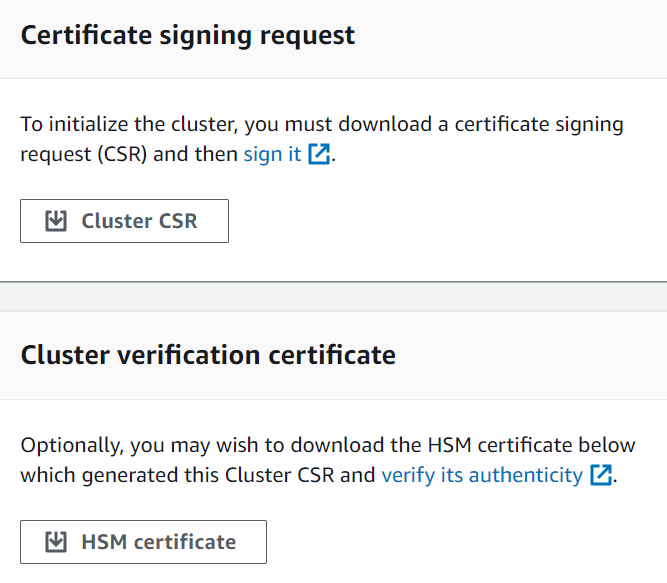
To get the CSR and HSM certificates (console)
Open the AWS CloudHSM console at https://console.aws.amazon.com/cloudhsm/home
. -
Select the radio button next to the cluster ID with the HSM you want to verify.
-
Select Actions. From the drop down menu, choose Initialize.
-
If you did not complete the previous step to create an HSM, choose an Availability Zone (AZ) for the HSM that you are creating. Then select Create.
-
When the certificates and CSR are ready, you see links to download them.
-
Choose each link to download and save the CSR and certificates. To simplify the subsequent steps, save all of the files to the same directory and use the default file names.
To get the CSR and HSM certificates (CLI)
-
At a command prompt, run the describe-clusters command four times, extracting the CSR and different certificates each time and saving them to files.
-
Issue the following command to extract the cluster CSR. Replace
<cluster ID>with the ID of the cluster that you created previously.$aws cloudhsmv2 describe-clusters --filters clusterIds=<cluster ID>\ --output text \ --query 'Clusters[].Certificates.ClusterCsr' \ ><cluster ID>_ClusterCsr.csr -
Issue the following command to extract the HSM certificate. Replace
<cluster ID>with the ID of the cluster that you created previously.$aws cloudhsmv2 describe-clusters --filters clusterIds=<cluster ID>\ --output text \ --query 'Clusters[].Certificates.HsmCertificate' \ ><cluster ID>_HsmCertificate.crt -
Issue the following command to extract the AWS hardware certificate. Replace
<cluster ID>with the ID of the cluster that you created previously.$aws cloudhsmv2 describe-clusters --filters clusterIds=<cluster ID>\ --output text \ --query 'Clusters[].Certificates.AwsHardwareCertificate' \ ><cluster ID>_AwsHardwareCertificate.crt -
Issue the following command to extract the manufacturer hardware certificate. Replace
<cluster ID>with the ID of the cluster that you created previously.$aws cloudhsmv2 describe-clusters --filters clusterIds=<cluster ID>\ --output text \ --query 'Clusters[].Certificates.ManufacturerHardwareCertificate' \ ><cluster ID>_ManufacturerHardwareCertificate.crt
-
To get the CSR and HSM certificates (AWS CloudHSM API)
-
Send a DescribeClusters request, then extract and save the CSR and certificates from the response.
Get the root certificates
Follow these steps to get the root certificates for AWS CloudHSM and the manufacturer. Save the root certificate files to the directory that contains the CSR and HSM certificate files.
To get the AWS CloudHSM and manufacturer root certificates
-
Download the AWS CloudHSM root certificate: AWS_CloudHSM_Root-G1.zip
-
Download the manufacturer root certificate: liquid_security_certificate.zip
To download the certificate from the landing page, https://www.marvell.com/products/security-solutions/liquid-security-hsm-adapters-and-appliances/liquidsecurity-certificate.html
, and then choose Download Certificate. You might need to right-click the Download Certificate link and then choose Save Link As... to save the certificate file.
-
After you download the files, extract (unzip) the contents.
Verify certificate chains
In this step, you construct two certificate chains, one to the AWS CloudHSM root certificate and one to the manufacturer root certificate. Then use OpenSSL to verify the HSM certificate with each certificate chain.
To create the certificate chains, open a Linux shell. You need OpenSSL, which is available in most Linux shells, and you need the root certificate and HSM certificate files that you downloaded. However, you do not need the CLI for this step, and the shell does not need to be associated with your AWS account.
To verify the HSM certificate with the AWS CloudHSM root certificate
-
Navigate to the directory where you saved the root certificate and HSM certificate files that you downloaded. The following commands assume that all of the certificates are in the current directory and use the default file names.
Use the following command to create a certificate chain that includes the AWS hardware certificate and the AWS CloudHSM root certificate, in that order. Replace
<cluster ID>with the ID of the cluster that you created previously.$cat<cluster ID>_AwsHardwareCertificate.crt \ AWS_CloudHSM_Root-G1.crt \ ><cluster ID>_AWS_chain.crt -
Use the following OpenSSL command to verify the HSM certificate with the AWS certificate chain. Replace
<cluster ID>with the ID of the cluster that you created previously.$openssl verify -CAfile<cluster ID>_AWS_chain.crt<cluster ID>_HsmCertificate.crt<cluster ID>_HsmCertificate.crt: OK
To verify the HSM certificate with the manufacturer root certificate
-
Use the following command to create a certificate chain that includes the manufacturer hardware certificate and the manufacturer root certificate, in that order. Replace
<cluster ID>with the ID of the cluster that you created previously.$cat<cluster ID>_ManufacturerHardwareCertificate.crt \ liquid_security_certificate.crt \ ><cluster ID>_manufacturer_chain.crt -
Use the following OpenSSL command to verify the HSM certificate with the manufacturer certificate chain. Replace
<cluster ID>with the ID of the cluster that you created previously.$openssl verify -CAfile<cluster ID>_manufacturer_chain.crt<cluster ID>_HsmCertificate.crt<cluster ID>_HsmCertificate.crt: OK
Extract and compare public keys
Use OpenSSL to extract and compare the public keys in the HSM certificate and the cluster CSR, to ensure that they are the same.
To compare the public keys, use your Linux shell. You need OpenSSL, which is available in most Linux shells, but you do not need the CLI for this step. The shell does not need to be associated with your AWS account.
To extract and compare the public keys
-
Use the following command to extract the public key from the HSM certificate.
$openssl x509 -in<cluster ID>_HsmCertificate.crt -pubkey -noout ><cluster ID>_HsmCertificate.pub -
Use the following command to extract the public key from the cluster CSR.
$openssl req -in<cluster ID>_ClusterCsr.csr -pubkey -noout ><cluster ID>_ClusterCsr.pub -
Use the following command to compare the public keys. If the public keys are identical, the following command produces no output.
$diff<cluster ID>_HsmCertificate.pub<cluster ID>_ClusterCsr.pub
After you verify the identity and authenticity of the HSM, proceed to Initialize the cluster.
