On July 31, 2024, Amazon Web Services (AWS) will discontinue support for creating and viewing AWS CodeStar projects. After July 31, 2024, you will no longer be able to access the AWS CodeStar console or create new projects. However, the AWS resources created by AWS CodeStar, including your source repositories, pipelines, and builds, will be unaffected by this change and will continue to function. AWS CodeStar Connections and AWS CodeStar Notifications will not be impacted by this discontinuation.
If you wish to track work, develop code, and build, test, and deploy
your applications, Amazon CodeCatalyst provides a streamlined getting started
process and additional functionality to manage your software projects. Learn
more about functionality
Tutorial: Create a Project with a GitHub Source Repository
With AWS CodeStar, you can set up your repository to create, review, and merge pull requests with your project team.
In this tutorial, you create a project with sample web application source code in a GitHub repository, a pipeline that deploys your changes, and EC2 instances where your application is hosted in the cloud. After your project is created, this tutorial shows you how to create and merge a GitHub pull request that makes a change to your web application's home page.
Topics
Step 1: Create the project and create your GitHub repository
In this step, use the console to create your project and create a connection to your new GitHub repository. To access your GitHub repository, you create a connection resource that AWS CodeStar uses to manage authorization with GitHub. When the project is created, its additional resources are provisioned for you.
Sign in to the AWS Management Console, and then open the AWS CodeStar console at https://console.aws.amazon.com/codestar/
. -
Choose the AWS Region where you want to create the project and its resources.
-
On the AWS CodeStar page, choose Create project.
-
On the Choose a project template page, select the Web application, Node.js, and Amazon EC2 check boxes. Then choose from the templates available for that set of options.
For more information, see AWS CodeStar Project Templates.
-
Choose Next.
-
For Project name, enter a name for the project (for example,
MyTeamProject). If you use a different name, be sure to use it throughout this tutorial. -
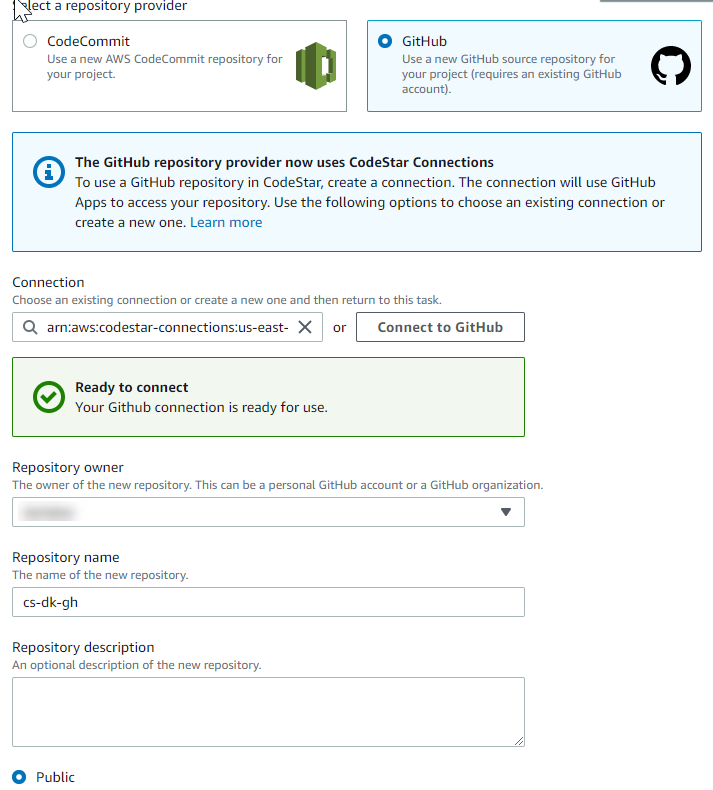
Under Project repository, choose GitHub.
-
If you chose GitHub, you will need to choose or create a connection resource. If you have an existing connection, choose it in the search field. Otherwise, you will create a new connection here. Choose Connect to GitHub.
The Create a connection page displays.
Note
To create a connection, you must have a GitHub account. If you are creating a connection for an organization, you must be the organization owner.

-
Under Create GitHub App connection, in Connection name, enter a name for your connection. Choose Connect to GitHub.
The Connect to GitHub page displays and shows the GitHub Apps field.
-
Under GitHub Apps, choose an app installation or choose Install a new app to create one.
Note
You install one app for all of your connections to a particular provider. If you have already installed the AWS Connector for GitHub app, choose it and skip this step.
-
On the Install AWS Connector for GitHub page, choose the account where you want to install the app.
Note
If you previously installed the app, you can choose Configure to proceed to a modification page for your app installation, or you can use the back button to return to the console.
-
If the Confirm password to continue page is displayed, enter your GitHub password, and then choose Sign in.
-
On the Install AWS Connector for GitHub page, leave the defaults, and choose Install.
-
On the Connect to GitHub page, the installation ID for your new installation appears in GitHub Apps.
After the connection is successfully created, in the CodeStar create project page, the message Ready to connect displays.
Note
You can view your connection under Settings in the Developer Tools console. For more information, see Getting started with connections.
-
For Repository owner, choose the GitHub organization or your personal GitHub account.
-
For Repository name, accept the default GitHub repository name, or enter a different one.
-
Choose Public or Private.
Note
If you want to use AWS Cloud9 as your development environment, you must choose a public repository.
-
(Optional) For Repository description, enter a description for the GitHub repository.
-
-
Configure your Amazon EC2 instances in Amazon EC2 Configuration if your project is deployed to Amazon EC2 instances and you want to make changes. For example, you can choose from available instance types for your project.
In Key pair, choose the Amazon EC2 key pair you created in Step 4: Create an Amazon EC2 Key Pair for AWS CodeStar Projects. Select I acknowledge that I have access to the private key file.
-
Choose Next.
-
Review the resources and configuration details.
-
Choose Next or Create project. (The displayed choice depends on your project template.)
Allow a few minutes while your project is created.
-
After your project is created, choose View application to view your web application.
Step 2: View your source code
In this step, you view your source code and the tools you can use for your source repository.
-
In the navigation bar for your project, choose Repository.
To view a list of commits in GitHub, choose View commits. This opens your commit history in GitHub.
To view issues, choose the Issues tab for your project. To create a new issue in GitHub, choose Create GitHub issue. This opens your repository issue form in GitHub.
-
Under the Repository tab, choose the link under Repository name, and your project's repository opens in a new tab or window. This repository contains the source code for your project.
Step 3: Create a GitHub Pull Request
In this step, you make a minor change to your source code and create a pull request.
-
In GitHub, create a new feature branch in your repository. Choose the main branch drop-down field and enter a new branch in the field named
feature-branch. Choose Create new branch. The branch is created and checked out for you. -
In GitHub, make a change in the
feature-branchbranch. Open the public folder and open theindex.htmlfile. -
In the AWS CodeStar console, under Pull requests, to create a pull request in GitHub, choose Create pull request. This opens your repository pull request form in GitHub. In GitHub, choose the pencil icon to edit the file.
After
Congratulations!, add the stringWell done, <name>!and replace<name>with your name. Choose Commit changes. The change is committed to your feature branch. -
In the AWS CodeStar console, choose your project. Choose the Repository tab. Under Pull requests, choose Create pull request.
The form opens in GitHub. Leave the main branch in the base branch. For Compare to, choose your feature branch. View the diff.
-
In GitHub, choose Create pull request. A pull request named Update index.html is created.
-
In the AWS CodeStar console, view the new pull request. Choose Merge changes to commit the changes to the repository and merge the pull request with the main branch of your repository.
-
Return to the project in AWS CodeStar and check the Pipeline page. You should now see the pipeline deploying.
-
After your project is created, choose View application to view your web application.
