On July 31, 2024, Amazon Web Services (AWS) will discontinue support for creating and viewing AWS CodeStar projects. After July 31, 2024, you will no longer be able to access the AWS CodeStar console or create new projects. However, the AWS resources created by AWS CodeStar, including your source repositories, pipelines, and builds, will be unaffected by this change and will continue to function. AWS CodeStar Connections and AWS CodeStar Notifications will not be impacted by this discontinuation.
If you wish to track work, develop code, and build, test, and deploy
your applications, Amazon CodeCatalyst provides a streamlined getting started
process and additional functionality to manage your software projects. Learn
more about functionality
Getting Started with AWS CodeStar
In this tutorial, you use AWS CodeStar to create a web application. This project includes sample code in a source repository, a continuous deployment toolchain, and a project dashboard where you can view and monitor your project.
By following the steps, you:
-
Create a project in AWS CodeStar.
-
Explore the project.
-
Commit a code change.
-
See your code change deployed automatically.
-
Add other people to work on your project.
-
Clean up project resources when they're no longer needed.
Note
If you haven't already, first complete the steps in Setting Up AWS CodeStar, including Step 2: Create the AWS CodeStar Service Role. You must be signed in with an
account that is an administrative user in IAM. To create a project, you must sign in
to the AWS Management Console using an IAM user that has the
AWSCodeStarFullAccess policy.
Topics
- Step 1: Create an AWS CodeStar Project
- Step 2: Add display information for your AWS CodeStar User Profile
- Step 3: View Your Project
- Step 4: Commit a Change
- Step 5: Add More Team Members
- Step 6: Clean Up
- Step 7: Get Your Project Ready for a Production Environment
- Next Steps
- Tutorial: Creating and Managing a Serverless Project in AWS CodeStar
- Tutorial: Create a Project in AWS CodeStar with the AWS CLI
- Tutorial: Create an Alexa Skill Project in AWS CodeStar
- Tutorial: Create a Project with a GitHub Source Repository
Step 1: Create an AWS CodeStar Project
In this step, you create a JavaScript (Node.js) software development project for a web application. You use an AWS CodeStar project template to create the project.
Note
The AWS CodeStar project template used in this tutorial uses the following options:
-
Application category: Web application
-
Programming language: Node.js
-
AWS Service: Amazon EC2
If you choose other options, your experience might not match what's documented in this tutorial.
To create a project in AWS CodeStar
-
Sign in to the AWS Management Console, and then open the AWS CodeStar console at https://console.aws.amazon.com/codestar/
. Make sure that you are signed in to the AWS Region where you want to create the project and its resources. For example, to create a project in US East (Ohio), make sure you have selected that AWS Region. For information about AWS Regions where AWS CodeStar is available, see Regions and Endpoints in the AWS General Reference .
-
On the AWS CodeStar page, choose Create project.
-
On the Choose a project template page, choose the project type from the list of AWS CodeStar project templates. You can use the filter bar to narrow your choices. For example, for a web application project written in Node.js to be deployed to Amazon EC2 instances, select the Web application, Node.js, and Amazon EC2 check boxes. Then choose from the templates available for that set of options.
For more information, see AWS CodeStar Project Templates.
-
Choose Next.
-
In the Project name text input field, enter a name for the project, such as
My First Project. In Project ID, the ID for the project is derived from this project name, but is limited to 15 characters.For example, the default ID for a project named
My First Projectismy-first-projec. This project ID is the basis for the names of all resources associated with the project. AWS CodeStar uses this project ID as part of the URL for your code repository and for the names of related security access roles and policies in IAM. After the project is created, the project ID cannot be changed. To edit the project ID before you create the project, in Project ID, enter the ID you want to use.For information about the limits on project names and project IDs, see Limits in AWS CodeStar.
Note
Project IDs must be unique for your AWS account in an AWS Region.
-
Choose the repository provider, AWS CodeCommit or GitHub.
-
If you chose AWS CodeCommit, for Repository name, accept the default AWS CodeCommit repository name, or enter a different one. Then skip ahead to step 9.
-
If you chose GitHub, you need to choose or create a connection resource. If you have an existing connection, choose it in the search field. Otherwise, create a new connection now. Choose Connect to GitHub.
The Create a connection page displays.
Note
To create a connection, you must have a GitHub account. If you are creating a connection for an organization, you must be the organization owner.

-
Under Create GitHub App connection, in the Connection name input text field, enter a name for your connection. Choose Connect to GitHub.
The Connect to GitHub page displays and shows the GitHub Apps field.
-
Under GitHub Apps, choose an app installation or choose Install a new app to create one.
Note
You install one app for all of your connections to a particular provider. If you have already installed the AWS Connector for GitHub app, choose it and skip this step.
-
On the Install AWS Connector for GitHub page, choose the account where you want to install the app.
Note
If you previously installed the app, you can choose Configure to proceed to a modification page for your app installation, or you can use the back button to return to the console.
-
If the Confirm password to continue page is displayed, enter your GitHub password, and then choose Sign in.
-
On the Install AWS Connector for GitHub page, keep the defaults, and choose Install.
-
On the Connect to GitHub page, the installation ID for your new installation appears in the GitHub Apps text input field.
After the connection is created, in the CodeStar create project page, the message Ready to connect displays.
Note
You can view your connection under Settings in the Developer Tools console. For more information, see Getting started with connections.
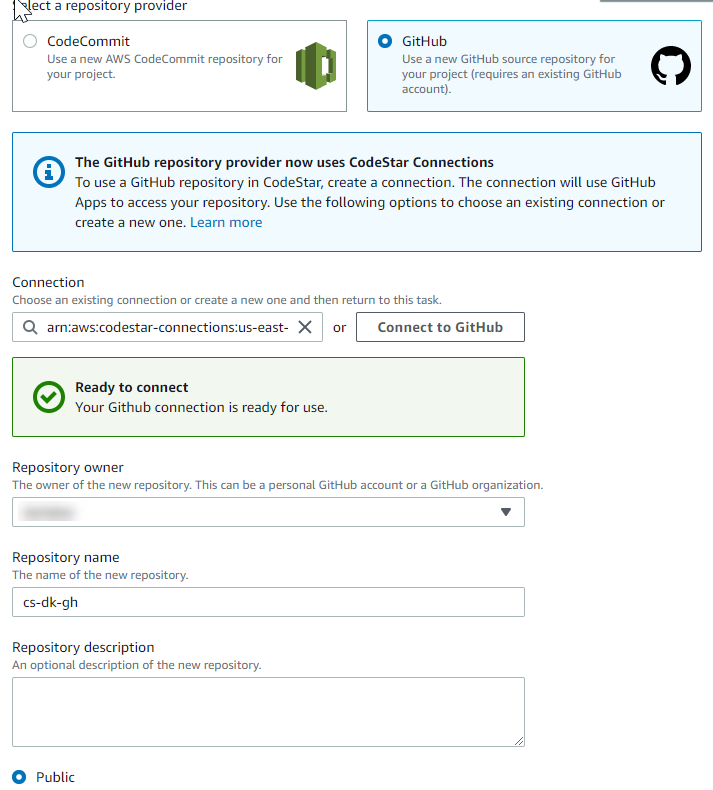
-
For Repository owner, choose the GitHub organization or your personal GitHub account.
-
For Repository name, accept the default GitHub repository name, or enter a different one.
-
Choose Public or Private.
Note
To use AWS Cloud9 as your development environment, you must choose Public.
-
(Optional) For Repository description, enter a description for the GitHub repository.
Note
If you choose an Alexa Skill project template, you need to connect an Amazon developer account. For more information about working with Alexa Skill projects, see Tutorial: Create an Alexa Skill Project in AWS CodeStar.
-
-
If your project is deployed to Amazon EC2 instances and you want to make changes, configure your Amazon EC2 instances in Amazon EC2 Configuration. For example, you can choose from available instance types for your project.
Note
Different Amazon EC2 instance types provide different levels of computing power and might have different associated costs. For more information, see Amazon EC2 Instance Types
and Amazon EC2 Pricing . If you have more than one virtual private cloud (VPC) or multiple subnets created in Amazon Virtual Private Cloud, you can also choose the VPC and subnet to use. However, if you choose an Amazon EC2 instance type that is not supported on dedicated instances, you cannot choose a VPC whose instance tenancy is set to Dedicated.
For more information, see What Is Amazon VPC? and Dedicated Instance Basics.
In Key pair, choose the Amazon EC2 key pair you created in Step 4: Create an Amazon EC2 Key Pair for AWS CodeStar Projects. Select I acknowledge that I have access to the private key file.
-
Choose Next.
-
Review the resources and configuration details.
-
Choose Next or Create project. (The displayed choice depends on your project template.)
It might take a few minutes to create the project, including the repository.
-
After your project has a repository, you can use the Repository page to configure access to it. Use the links in Next steps to configure an IDE, set up issue tracking, or add team members to your project.
Step 2: Add display information for your AWS CodeStar User Profile
When you create a project, you're added to the project team as an owner. If this is the first time you've used AWS CodeStar, you are asked to provide:
-
Your display name to show to other users.
-
The email address to show to other users.
This information is used in your AWS CodeStar user profile. User profiles are not project-specific, but are limited to an AWS Region. You must create a user profile in each AWS Region in which you belong to projects. Each profile can contain different information, if you prefer.
Enter a user name and email address, and then choose Next.
Note
This user name and email address is used in your AWS CodeStar user profile. If your project uses resources outside of AWS (for example, a GitHub repository or issues in Atlassian JIRA), those resource providers might have their own user profiles, with different user names and email addresses. For more information, see the resource provider's documentation.
Step 3: View Your Project
Your AWS CodeStar project page is where you and your team view the status of your project resources, including the latest commits to your project, the state of your continuous delivery pipeline, and the performance of your instances. To see more information about any of these resources, choose the corresponding page from the navigation bar.
In your new project, the navigation bar contains the following pages:
-
The Overview page contains information about your project's activity, project resources, and your project's
READMEcontents. -
The IDE page is where you connect your project to an integrated development environment (IDE) to modify, test, and push source code changes. It contains instructions for configuring IDEs for both GitHub and AWS CodeCommit repositories and information about your AWS Cloud9 environments.
-
The Repository page displays your repository details, including the name, provider, when it was last modified, and clone URLs. You can also see information about the most recent commit and view and create pull requests.
-
The Pipeline page displays CI/CD information about your pipeline. You can view pipeline details such as name, most recent action, and status. You can see the history of the pipeline and release a change. You can also view the status of the individual steps of your pipeline.
-
The Monitoring page displays either Amazon EC2 or AWS Lambda metrics depending on your project's configuration. For example, it displays the CPU utilization of any Amazon EC2 instances deployed to by AWS Elastic Beanstalk or CodeDeploy resources in your pipeline. In projects that use AWS Lambda, it displays invocation and error metrics for the Lambda function. This information is displayed by the hour. If you used the suggested AWS CodeStar project template for this tutorial, you should see a noticeable spike in activity as your application is first deployed to those instances. You can refresh monitoring to see changes in your instance health, which can help you identify problems or the need for more resources.
-
The Issues page is for integrating your AWS CodeStar project with an Atlassian JIRA project. Configuring this tile makes it possible for you and your project team to track JIRA issues from the project dashboard.
The navigation pane on the left side of the console is where you can navigate between your Project, Team, and Settings pages.
Step 4: Commit a Change
First, take a look at the sample application that was included in your project. See what the application looks like by choosing View application from anywhere in your project navigation. Your sample web application will be displayed in a new window or browser tab. This is the project sample that AWS CodeStar built and deployed.
If you'd like to look at the code, in the navigation bar choose
Repository. Choose the link under Repository name and
your project's repository opens in a new tab or window.
Read the contents of the repository's readme file (README.md), and
browse the content of those files.
In this step, you make a change to the code and then push the change to your repository. You can do this in one of several ways:
-
If the project's code is stored in a CodeCommit or GitHub repository, you can use AWS Cloud9 to work with the code directly from your web browser, without installing any tools. For more information, see Create an AWS Cloud9 Environment for a Project.
-
If the project's code is stored in a CodeCommit repository, and you have Visual Studio or Eclipse installed, you can use the AWS Toolkit for Visual Studio or AWS Toolkit for Eclipse to more easily connect to the code. For more information, see Use an IDE with AWS CodeStar. If you don't have Visual Studio or Eclipse, install a Git client, and follow the instructions later in this step.
-
If the project's code is stored in a GitHub repository, you can use your IDE's tools for connecting to GitHub.
-
For Visual Studio, you can use tools such as the GitHub Extension for Visual Studio. For more information, see the Overview
page on the GitHub Extension for Visual Studio website and Getting Started with GitHub for Visual Studio on the GitHub website. -
For Eclipse, you can use a tool such as EGit for Eclipse. For more information, see the EGit Documentation
on the EGit website. -
For other IDEs, consult your IDE's documentation.
-
-
For other types of code repositories, see the repository provider's documentation.
The following instructions show you how to make a minor change to the sample.
To set up your computer to commit changes (IAM user)
Note
In this procedure, we assume that your project's code is stored in a CodeCommit repository. For other types of code repositories, see the repository provider's documentation, and then skip ahead to the next procedure, To clone the project repository and make a change.
If the code is stored in CodeCommit and you are already using CodeCommit or you used the AWS CodeStar console to create an AWS Cloud9 development environment for the project, you don't need more configuration. Skip ahead to the next procedure, To clone the project repository and make a change.
-
Install Git
on your local computer. -
Sign in to the AWS Management Console and open the IAM console at https://console.aws.amazon.com/iam/
. Sign in as the IAM user who will use Git credentials for connections to your AWS CodeStar project repository in CodeCommit.
-
In the IAM console, in the navigation pane, choose Users, and from the list of users, choose your IAM user.
-
On the user details page, choose the Security Credentials tab, and in HTTPS Git credentials for CodeCommit, choose Generate.
Note
You cannot choose your own sign-in credentials for Git credentials. For more information, see Use Git Credentials and HTTPS with CodeCommit.
-
Copy the sign-in credentials that IAM generated for you. You can choose Show and then copy and paste this information into a secure file on your local computer, or you can choose Download credentials to download this information as a .CSV file. You need this information to connect to CodeCommit.
After you have saved your credentials, choose Close.
Important
This is your only chance to save the sign-in credentials. If you do not save them, you can copy the user name from the IAM console, but you cannot look up the password. You must reset the password and then save it.
To set up your computer to commit changes (federated user)
You can use the console to upload files to your repository, or you can use Git to connect from your local computer. If you are using federated access, follow these steps to use Git to connect to and clone your repository from your local computer.
Note
In this procedure, we assume that your project's code is stored in a CodeCommit repository. For other types of code repositories, see the repository provider's documentation, and then skip ahead to the next procedure, To clone the project repository and make a change.
-
Install Git
on your local computer. -
Configure your temporary security credentials for a federated user. For information, see Temporary Access to CodeCommit Repositories. Temporary credentials consist of:
-
AWS access key
-
AWS secret key
-
Session token
For more information about temporary credentials, see Permissions for GetFederationToken.
-
-
Connect to your repository using the AWS CLI credential helper. For information, see Setup Steps for HTTPS Connections to CodeCommit Repositories on Linux, macOS, or Unix with the AWS CLI Credential Helper or Setup Steps for HTTPS Connections to CodeCommit Repositories on Windows with the AWS CLI Credential Helper
-
The following example shows how to connect to a CodeCommit repository and push a commit to it.
Example: To clone the project repository and make a change
Note
This procedure shows how to clone the project's code repository to your
computer, make a change to the project's index.html file,
and then push your change to the remote repository. In this procedure, we assume that
your project's code is stored in a CodeCommit repository and that you're using a Git
client from the command line. For other types of code repositories or tools, see
the provider's documentation for how to clone the repository, change the file,
and then push the code.
-
If you used the AWS CodeStar console to create an AWS Cloud9 development environment for the project, open the development environment, and then skip to step 3 in this procedure. To open the development environment, see Open an AWS Cloud9 Environment for a Project.
With your project open in the AWS CodeStar console, on the navigation bar, choose Repository. In Clone URL, choose the protocol for the connection type you have set up for CodeCommit, and then copy the link. For example, if you followed the steps in the previous procedure to set up Git credentials for CodeCommit, choose HTTPS.
-
On your local computer, open a terminal or command line window and change directories to a temporary directory. Run the git clone command to clone the repository to your computer. Paste the link you copied. For example, for CodeCommit using HTTPS:
git clonehttps://git-codecommit.us-east-2.amazonaws.com/v1/repos/my-first-projecThe first time you connect, you are prompted for the sign-in credentials for the repository. For CodeCommit, enter the Git credentials sign-in credentials you downloaded in the previous procedure.
-
Navigate to the cloned directory on your computer and browse the contents.
-
Open the
index.htmlfile (in the public folder) and make a change to the file. For example, add a paragraph after the<H2>tag such as:<P>Hello, world!</P>Save the file.
-
At the terminal or command prompt, add your changed file, and then commit and push your change:
git add index.html git commit -m "Making my first change to the web app" git push -
On the Repository page, view the changes in progress. You should see that the commit history for the repository is updated with your commit, including the commit message. In the Pipeline page, you can see the pipeline pick up your change to the repository and start building and deploying it. After your web application is deployed, you can choose View application to view your change.
Note
If Failed is displayed for any of the pipeline stages, see the following for troubleshooting help:
-
For the Source stage, see Troubleshooting AWS CodeCommit in the AWS CodeCommit User Guide.
-
For the Build stage, see Troubleshooting AWS CodeBuild in the AWS CodeBuild User Guide.
-
For the Deploy stage, see Troubleshooting AWS CloudFormation in the AWS CloudFormation User Guide.
-
For other issues, see Troubleshooting AWS CodeStar.
-
Step 5: Add More Team Members
Every AWS CodeStar project is already configured with three AWS CodeStar roles. Each role provides its own level of access to the project and its resources:
-
Owner: Can add and remove team members, change the project dashboard, and delete the project.
-
Contributor: Can change the project dashboard and contribute code if the code is stored in CodeCommit, but cannot add or remove team members or delete the project. This is the role you should choose for most team members in an AWS CodeStar project.
-
Viewer: Can view the project dashboard, project code if the code is stored in CodeCommit, and the state of the project, but cannot move, add, or remove tiles from the project dashboard.
Important
If your project uses resources outside of AWS (for example, a GitHub repository or issues in Atlassian JIRA), access to those resources is controlled by the resource provider, not AWS CodeStar. For more information, see the resource provider's documentation.
Anyone who has access to an AWS CodeStar project might be able to use the AWS CodeStar console to access resources that are outside of AWS but are related to the project.
AWS CodeStar does not allow project team members to participate in any related AWS Cloud9 development environments for a project. To allow a team member to participate in a shared environment, see Share an AWS Cloud9 Environment with a Project Team Member.
For more information about teams and project roles, see Working with AWS CodeStar Teams.
To add a team member to an AWS CodeStar project (console)
Open the AWS CodeStar console at https://console.aws.amazon.com/codestar/
. -
Choose Projects from the navigation pane and choose your project.
-
In the side navigation pane for the project, choose Team.
-
On the Team members page, choose Add team member.
-
In Choose user, do one of the following:
If an IAM user already exists for the person you want to add, choose the IAM user from the list.
Note
Users who have already been added to another AWS CodeStar project appear in the Existing AWS CodeStar users list.
In Project role, choose the AWS CodeStar role (Owner, Contributor, or Viewer) for this user. This is an AWS CodeStar project-level role that can only be changed by an owner of the project. When applied to an IAM user, the role provides all permissions required to access AWS CodeStar project resources. It applies policies required for creating and managing Git credentials for code stored in CodeCommit in IAM or uploading Amazon EC2 SSH keys for the user in IAM.
Important
You cannot provide or change the display name or email information for an IAM user unless you are signed in to the console as that user. For more information, see Manage Display Information for Your AWS CodeStar User Profile .
Choose Add team member.
If an IAM user does not exist for the person you want to add to the project, choose Create new IAM user. You will be redirected to the IAM console where you can create a new IAM user, see Creating IAM users in the IAM user guide for more information. After you create your IAM user, return to the AWS CodeStar console, refresh the list of users, and choose the IAM user you created from the dropdown list. Enter the AWS CodeStardisplay name, email address, and project role you want to apply to this new user, and then choose Add team member.
Note
For ease of management, at least one user should be assigned the Owner role for the project.
-
Send the new team member the following information:
-
Connection information for your AWS CodeStar project.
-
If the source code is stored in CodeCommit, instructions for setting up access with Git credentials to the CodeCommit repository from their local computers.
-
Information about how the user can manage their display name, email address, and public Amazon EC2 SSH key, as described in Working with Your AWS CodeStar User Profile .
-
One-time password and connection information, if the user is new to AWS and you created an IAM user for that person. The password expires the first time the user signs in. The user must choose a new password.
-
Step 6: Clean Up
Congratulations! You've finished the tutorial. If you don't want to continue to use this project and its resources, you should delete it to avoid possible continued charges to your AWS account.
To delete a project in AWS CodeStar
Open the AWS CodeStar console at https://console.aws.amazon.com/codestar/
. -
Choose Projects in the navigation pane.
-
Select the project you want to delete and choose Delete.
Or, open the project and choose Settings from the navigation pane on the left side of the console. On the project details page, choose Delete project.
-
In the Delete confirmation page, enter delete. Keep Delete resources selected if you wish to delete project resources. Choose Delete.
Deleting a project can take several minutes. After it's deleted, the project no longer appears in the list of projects in the AWS CodeStar console.
Important
If your project uses resources outside of AWS (for example, a GitHub repository or issues in Atlassian JIRA), those resources are not deleted, even if you select the check box.
Your project cannot be deleted if any AWS CodeStar managed policies have been manually attached to roles that are not IAM users. If you have attached your project's managed policies to a federated user's role, you must detach the policy before you can delete the project. For more information, see Detach an AWS CodeStar Managed Policy from the Federated User's Role.
Step 7: Get Your Project Ready for a Production Environment
After you have created your project, you are ready to create, test, and deploy code. Review the following considerations for maintaining your project in a production environment:
-
Regularly apply patches and review security best practices for the dependencies used by your application. For more information, see Security Best Practices for AWS CodeStar Resources.
-
Regularly monitor the environment settings suggested by the programming language for your project.
Next Steps
Here are some other resources to help you learn about AWS CodeStar:
-
The Tutorial: Creating and Managing a Serverless Project in AWS CodeStar uses a project that creates and deploys a web service using logic in AWS Lambda and can be called by an API in Amazon API Gateway.
-
AWS CodeStar Project Templates describes other types of projects you can create.
-
Working with AWS CodeStar Teams provides information about enabling others to help you work on your projects.
