Launch a Cluster Using the Command Line
If you regularly run an Amazon EMR cluster to analyze web logs or perform analysis of scientific data, you can use AWS Data Pipeline to manage your Amazon EMR clusters. With AWS Data Pipeline, you can specify preconditions that must be met before the cluster is launched (for example, ensuring that today's data been uploaded to Amazon S3.) This tutorial walks you through launching a cluster that can be a model for a simple Amazon EMR-based pipeline, or as part of a more involved pipeline.
Prerequisites
Before you can use the CLI, you must complete the following steps:
-
Install and configure a command line interface (CLI). For more information, see Accessing AWS Data Pipeline.
-
Ensure that the IAM roles named DataPipelineDefaultRole and DataPipelineDefaultResourceRole exist. The AWS Data Pipeline console creates these roles for you automatically. If you haven't used the AWS Data Pipeline console at least once, then you must create these roles manually. For more information, see IAM Roles for AWS Data Pipeline.
Tasks
Creating the Pipeline Definition File
The following code is the pipeline definition file for a simple Amazon EMR cluster that runs an existing Hadoop streaming job provided by Amazon EMR. This sample application is called WordCount, and you can also run it using the Amazon EMR console.
Copy this code into a text file and save it as MyEmrPipelineDefinition.json.
You should replace the Amazon S3 bucket location with the name of an Amazon S3 bucket that
you own. You should also replace the start and end dates. To launch clusters
immediately, set startDateTime to a date one day in the past and
endDateTime to one day in the future. AWS Data Pipeline then starts launching the
"past due" clusters immediately in an attempt to address what it perceives as a backlog
of work. This backfilling means you don't have to wait an hour to see AWS Data Pipeline launch its
first cluster.
{
  "objects": [
    {
      "id": "Hourly",
      "type": "Schedule",
      "startDateTime": "2012-11-19T07:48:00",
      "endDateTime": "2012-11-21T07:48:00",
      "period": "1 hours"
    },
    {
      "id": "MyCluster",
      "type": "EmrCluster",
      "masterInstanceType": "m1.small",
      "schedule": {
        "ref": "Hourly"
      }
    },
    {
      "id": "MyEmrActivity",
      "type": "EmrActivity",
      "schedule": {
        "ref": "Hourly"
      },
      "runsOn": {
        "ref": "MyCluster"
      },
      "step": "/home/hadoop/contrib/streaming/hadoop-streaming.jar,-input,s3n://elasticmapreduce/samples/wordcount/input,-output,s3://myawsbucket/wordcount/output/#{@scheduledStartTime},-mapper,s3n://elasticmapreduce/samples/wordcount/wordSplitter.py,-reducer,aggregate"
    }
  ]
}
This pipeline has three objects:
-
Hourly, which represents the schedule of the work. You can set a schedule as one of the fields on an activity. When you do, the activity runs according to that schedule, or in this case, hourly. -
MyCluster, which represents the set of Amazon EC2 instances used to run the cluster. You can specify the size and number of EC2 instances to run as the cluster. If you do not specify the number of instances, the cluster launches with two, a master node and a task node. You can specify a subnet to launch the cluster into. You can add additional configurations to the cluster, such as bootstrap actions to load additional software onto the Amazon EMR-provided AMI. -
MyEmrActivity, which represents the computation to process with the cluster. Amazon EMR supports several types of clusters, including streaming, Cascading, and Scripted Hive. TherunsOnfield refers back to MyCluster, using that as the specification for the underpinnings of the cluster.
Uploading and Activating the Pipeline Definition
You must upload your pipeline definition and activate your pipeline.
In the following example commands, replace pipeline_name with a label for your pipeline and
pipeline_file with the fully-qualified path for the pipeline definition .json file.
AWS CLI
To create your pipeline definition and activate your pipeline, use the following create-pipeline command. Note the ID of your pipeline, because you'll use this value with most CLI commands.
aws datapipeline create-pipeline --name{ "pipelineId": "df-00627471SOVYZEXAMPLE" }pipeline_name--unique-idtoken
To upload your pipeline definition, use the following put-pipeline-definition command.
aws datapipeline put-pipeline-definition --pipeline-id df-00627471SOVYZEXAMPLE --pipeline-definition file://MyEmrPipelineDefinition.json
If you pipeline validates successfully, the validationErrors field is empty. You should review any warnings.
To activate your pipeline, use the following activate-pipeline command.
aws datapipeline activate-pipeline --pipeline-id df-00627471SOVYZEXAMPLE
You can verify that your pipeline appears in the pipeline list using the following list-pipelines command.
aws datapipeline list-pipelines
Monitor the Pipeline Runs
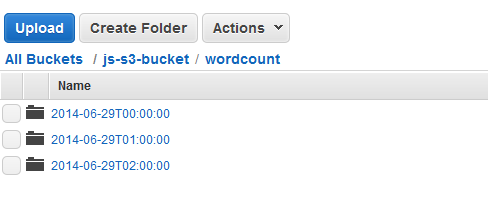
You can view clusters launched by AWS Data Pipeline using the Amazon EMR console and you can view the output folder using the Amazon S3 console.
To check the progress of clusters launched by AWS Data Pipeline
-
Open the Amazon EMR console.
-
The clusters that were spawned by AWS Data Pipeline have a name formatted as follows:
<pipeline-identifier>_@<emr-cluster-name>_<launch-time>.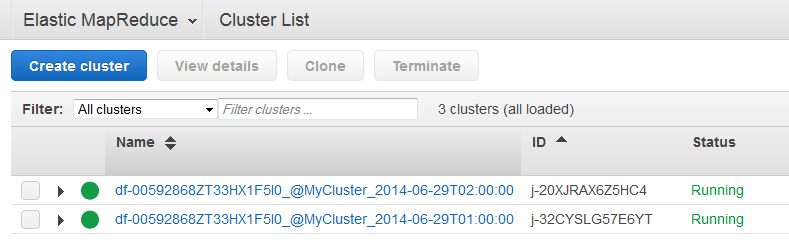
-
After one of the runs is complete, open the Amazon S3 console and check that the time-stamped output folder exists and contains the expected results of the cluster.