Walkthrough: Create and mount a file system on-premises with AWS Direct Connect and VPN
This walkthrough uses the AWS Management Console to create and mount a file system on an on-premises client. You do so using either an AWS Direct Connect connection or a connection on an AWS Virtual Private Network (AWS VPN).
Note
Using Amazon EFS with Microsoft Windows–based clients isn't supported.
Topics
In this walkthrough, we assume that you already have an AWS Direct Connect or VPN connection. If you don't have one, you can begin the connection process now and come back to this walkthrough when your connection is established. For more information on AWS Direct Connect, see the AWS Direct Connect User Guide. For more information on setting up a VPN connection, see VPN Connections in the Amazon VPC User Guide.
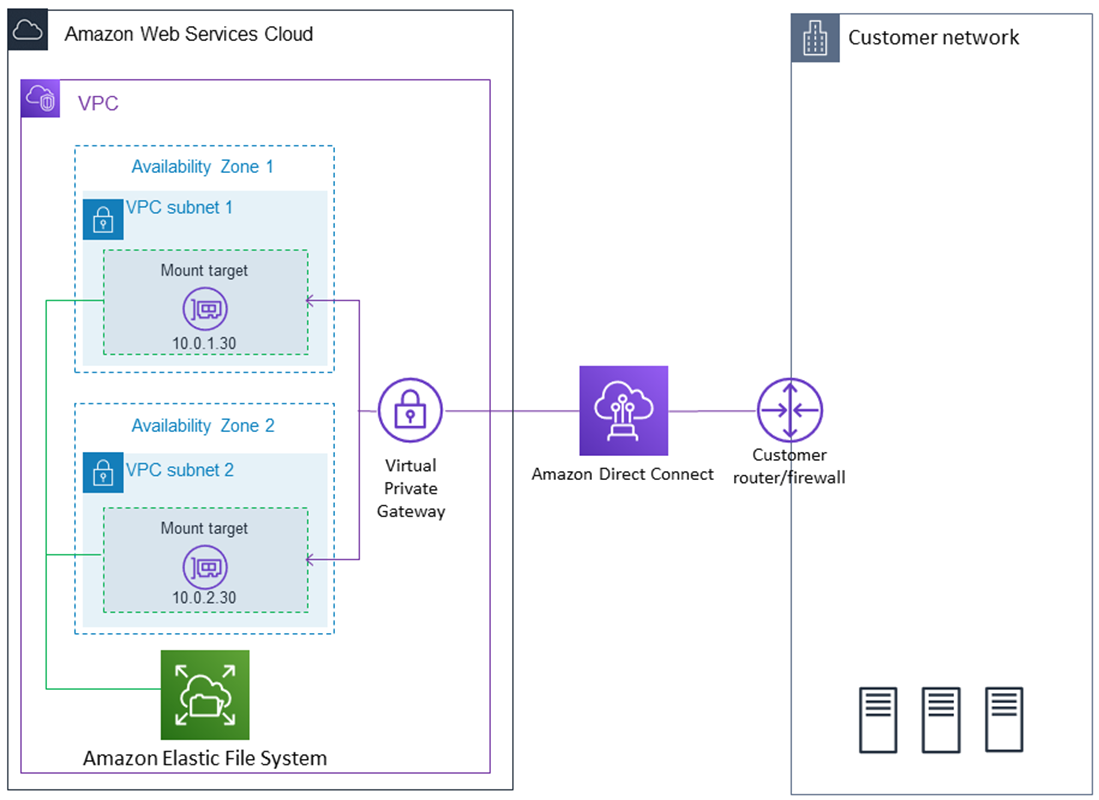
When you have an AWS Direct Connect or VPN connection, you create an Amazon EFS file system and a mount target in your Amazon VPC. After that, you download and install the amazon-efs-utils tools. Then, you test the file system from your on-premises client. Finally, the clean-up step at the end of the walkthrough provides information for you to remove these resources.
The walkthrough creates all these resources in the US West (Oregon) Region
(us-west-2). Whichever AWS Region you use, be sure to use it consistently. All of
your resources—your VPC, your mount target, and your Amazon EFS file system—must be in
the same AWS Region, as shown in the following diagram.
Note
In some cases, your local application might need to know if the EFS file system is available. In these cases, your application should be able to point to a different mount point IP address if the first mount point becomes temporarily unavailable. In this scenario, we recommend that you have two on-premises clients connected to your file system through different Availability Zones (AZs) for higher availability.
Before you begin
You can use the root credentials of your AWS account to sign in to the console and try this exercise. However, AWS Identity and Access Management (IAM) best practices recommend that you don't use the root credentials of your AWS account. Instead, create an administrator user in your account and use those credentials to manage resources in your account. For more information, see Setting up for Amazon EFS.
You can use a default VPC or a custom VPC that you have created in your account. For this walkthrough, the default VPC configuration works. However, if you use a custom VPC, verify the following:
-
The internet gateway is attached to your VPC. For more information, see Internet Gateways in the Amazon VPC User Guide.
-
The VPC route table includes a rule to send all internet-bound traffic to the Internet gateway.
Step 1: Create your Amazon Elastic File System resources
In this step, you create your Amazon EFS file system and mount targets.
To create your Amazon EFS file system
-
Open the Amazon EFS console at https://console.aws.amazon.com/efs/
. -
Choose Create File System.
-
Choose your default VPC from the VPC list.
-
Select the check boxes for all of the Availability Zones. Make sure that they all have the default subnets, automatic IP addresses, and the default security groups chosen. These are your mount targets. For more information, see Creating and managing mount targets and security groups.
-
Choose Next Step.
-
Name your file system, keep general purpose selected as your default performance mode, and choose Next Step.
-
Choose Create File System.
-
Choose your file system from the list and make a note of the Security group value. You need this value for the next step.
The file system you just created has mount targets. Each mount target has an associated security group. The security group acts as a virtual firewall that controls network traffic. If you didn't provide a security group when creating a mount target, Amazon EFS associates the default security group of the VPC with it. If you followed the preceding steps exactly, then your mount targets are using the default security group.
Next, you add a rule to the mount target's security group to allow inbound traffic to the Network File System (NFS) port (2049). You can use the AWS Management Console to add the rule to your mount target's security groups in your VPC.
To allow inbound traffic to the NFS port
-
Sign in to the AWS Management Console and open the Amazon EC2 console at https://console.aws.amazon.com/ec2/
. -
Under NETWORK & SECURITY, choose Security Groups.
-
Choose the security group associated with your file system. You made a note of this at the end of Step 1: Create your Amazon Elastic File System resources.
-
In the tabbed pane that appears below the list of security groups, choose the Inbound tab.
-
Choose Edit.
-
Choose Add Rule, and choose a rule of the following type:
-
Type – NFS
-
Source – Anywhere
We recommend that you only use the Anywhere source for testing. You can create a custom source set to the IP address of the on-premises client, or use the console from the client itself, and choose My IP.
Note
You don't need to add an outbound rule, because the default outbound rule allows all traffic to leave. If you don't have this default outbound rule, add an outbound rule to open a TCP connection on the NFS port, identifying the mount target security group as the destination.
-
Step 2: Install the NFS client
In this step, you install the NFS client.
To install the NFS client on your on-premises server
Note
If you require data to be encrypted in transit, use the Amazon EFS mount helper,
amazon-efs-utils, instead of the NFS client. For information on installing
amazon-efs-utils, see the section Optional: Encrypting Data in
Transit.
-
Access the terminal for your on-premises client.
-
Install NFS.
If you're using Red Hat Linux, install NFS with the following command.
$ sudo yum -y install nfs-utilsIf you're using Ubuntu, install NFS with the following command.
$ sudo apt-get -y install nfs-common
Step 3: Mount the Amazon EFS file system on your on-premises Client
To create a mount directory
-
Make a directory for the mount point with the following command.
mkdir ~/efs -
Choose your preferred IP address of the mount target in the Availability Zone. You can measure the latency from your on-premises Linux clients. To do so, use a terminal-based tool like
pingagainst the IP address of your EC2 instances in different Availability Zones to find the one with the lowest latency.
-
Run the mount command to mount the file system using the IP address of the mount target.
$ sudo mount -t nfs -o nfsvers=4.1,rsize=1048576,wsize=1048576,hard,timeo=600,retrans=2,noresvportmount-target-IP:/ ~/efs
Now that you've mounted your Amazon EFS file system, you can test it out with the following procedure.
To test the Amazon EFS file system connection
-
Change directories to the new directory that you created with the following command.
$ cd ~/efs -
Make a subdirectory and change the ownership of that subdirectory to your EC2 instance user. Then, navigate to that new directory with the following commands.
$ sudo mkdir getting-started $ sudo chown ec2-user getting-started $ cd getting-started -
Create a text file with the following command.
$ touch test-file.txt -
List the directory contents with the following command.
$ ls -al
As a result, the following file is created.
-rw-rw-r-- 1usernameusername0 Nov 15 15:32 test-file.txt
You can also mount your file system automatically by adding an entry to the
/etc/fstab file. For more information, see Mounting your Amazon EFS file system
automatically.
Warning
Use the _netdev option, used to identify network file systems, when
mounting your file system automatically. If _netdev is missing, your EC2
instance might stop responding. This result is because network file systems need to be
initialized after the compute instance starts its networking. For more information, see
Automatic mounting fails and the instance is
unresponsive.
Step 4: Clean up resources and protect your AWS account
After you have finished this walkthrough, or if you don't want to explore the walkthroughs, you should follow these steps to clean up your resources and protect your AWS account.
To clean up resources and protect your AWS account
-
Unmount the Amazon EFS file system with the following command.
$ sudo umount ~/efs -
Open the Amazon EFS console at https://console.aws.amazon.com/efs/
. -
Choose the Amazon EFS file system that you want to delete from the list of file systems.
-
For Actions, choose Delete file system.
-
In the Permanently delete file system dialog box, type the file system ID for the Amazon EFS file system that you want to delete, and then choose Delete File System.
Open the Amazon EC2 console at https://console.aws.amazon.com/ec2/
. -
In the navigation pane, choose Security Groups.
-
Select the name of the security group that you added the rule to for this walkthrough.
Warning
Don't delete the default security group for your VPC.
-
For Actions, choose Edit inbound rules.
-
Choose the X at the end of the inbound rule you added, and choose Save.
Optional: Encrypting data in transit
To encrypt data in transit, use the Amazon EFS mount helper, amazon-efs-utils, instead of the NFS client.
The amazon-efs-utils package is an open-source collection of Amazon EFS tools. The amazon-efs-utils collection comes with a mount helper and tooling that makes it easier to encrypt data in transit for Amazon EFS. For more information on this package, see Using Amazon EFS client. This package is available as a free download from GitHub, which you can get by cloning the package's repository.
To clone amazon-efs-utils from GitHub
-
Access the terminal for your on-premises client.
-
From the terminal, clone the amazon-efs-utils tool from GitHub to a directory of your choice, with the following command.
git clone https://github.com/aws/efs-utils
Now that you have the package, you can install it. This installation is handled differently depending on the Linux distribution of your on-premises client. The following distributions are supported:
-
Amazon Linux 2
-
Amazon Linux
-
Red Hat Enterprise Linux (and derivatives such as CentOS) version 7 and newer
-
Ubuntu 16.04 LTS and newer
To build and install amazon-efs-utils as an RPM package
-
Open a terminal on your client and navigate to the directory that has the cloned amazon-efs-utils package from GitHub.
-
Build the package with the following command.
make rpmNote
If you haven't already, install the rpm-builder package with the following command.
sudo yum -y install rpm-build -
Install the package with the following command.
sudo yum -y install build/amazon-efs-utils*rpm
To build and install amazon-efs-utils as an deb package
-
Open a terminal on your client and navigate to the directory that has the cloned amazon-efs-utils package from GitHub.
-
Build the package with the following command.
./build-deb.sh -
Install the package with the following command.
sudo apt-get install build/amazon-efs-utils*deb
After the package is installed, configure amazon-efs-utils for use in your AWS Region with AWS Direct Connect or VPN.
To configure amazon-efs-utils for use in your AWS Region
-
Using your text editor of choice, open
/etc/amazon/efs/efs-utils.conffor editing. -
Find the line
“dns_name_format = {fs_id}.efs..{region}.amazonaws.com” -
Change
{region}us-west-2.
To mount the EFS file system on your on-premises client, first open a terminal on your on-premises Linux client. To mount the system, you need the file system ID, the mount target IP address for one of your mount targets, and the file system's AWS Region. If you created multiple mount targets for your file system, then you can choose any one of these.
When you have that information, you can mount your file system in three steps:
To create a mount directory
-
Make a directory for the mount point with the following command.
mkdir ~/efs -
Choose your preferred IP address of the mount target in the Availability Zone. You can measure the latency from your on-premises Linux clients. To do so, use a terminal-based tool like
pingagainst the IP address of your EC2 instances in different Availability Zones to find the one with the lowest latency.
To update /etc/hosts
-
Add an entry to your local
/etc/hostsfile with the file system ID and the mount target IP address, in the following format.mount-target-IP-Addressfile-system-ID.efs.region.amazonaws.com192.0.2.0 fs-12345678.efs.us-west-2.amazonaws.com
To make a mount directory
-
Make a directory for the mount point with the following command.
mkdir ~/efs -
Run the mount command to mount the file system.
sudo mount -t efs fs-12345678 ~/efsIf you want to use encryption of data in transit, your mount command looks something like the following.
sudo mount -t efs -o tls fs-12345678 ~/efs
