Getting started with Gateway Load Balancers
Gateway Load Balancers make it easy to deploy, scale, and manage third-party virtual appliances, such as security appliances.
In this tutorial, we'll implement an inspection system using a Gateway Load Balancer and a Gateway Load Balancer endpoint.
Contents
Overview
A Gateway Load Balancer endpoint is a VPC endpoint that provides private connectivity between virtual appliances in the service provider VPC, and application servers in the service consumer VPC. The Gateway Load Balancer is deployed in the same VPC as that of the virtual appliances. These appliances are registered as a target group of the Gateway Load Balancer.
The application servers run in one subnet (destination subnet) in the service consumer VPC, while the Gateway Load Balancer endpoint is in another subnet of the same VPC. All traffic entering the service consumer VPC through the internet gateway is first routed to the Gateway Load Balancer endpoint and then routed to the destination subnet.
Similarly, all traffic leaving the application servers (destination subnet) is routed to the Gateway Load Balancer endpoint before it is routed back to the internet. The following network diagram is a visual representation of how a Gateway Load Balancer endpoint is used to access an endpoint service.
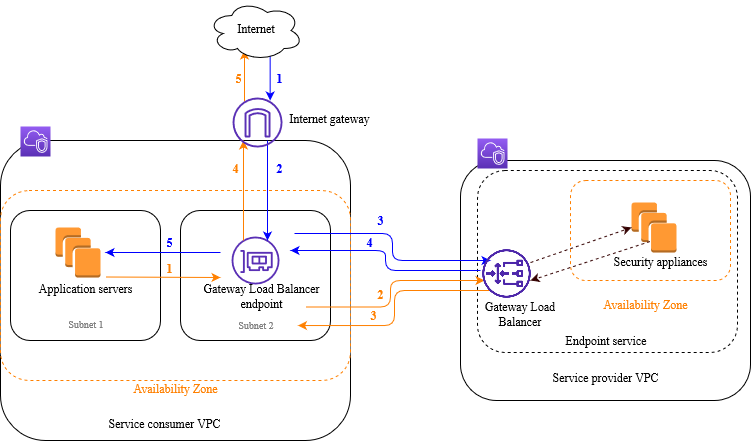
The numbered items that follow, highlight and explain elements shown in the preceding image.
Traffic from the internet to the application (blue arrows):
-
Traffic enters the service consumer VPC through the internet gateway.
-
Traffic is sent to the Gateway Load Balancer endpoint, as a result of ingress routing.
-
Traffic is sent to the Gateway Load Balancer, which distributes the traffic to one of the security appliances.
-
Traffic is sent back to the Gateway Load Balancer endpoint after it is inspected by the security appliance.
-
Traffic is sent to the application servers (destination subnet).
Traffic from the application to the internet (orange arrows):
-
Traffic is sent to the Gateway Load Balancer endpoint as a result of the default route configured on the application server subnet.
-
Traffic is sent to the Gateway Load Balancer, which distributes the traffic to one of the security appliances.
-
Traffic is sent back to the Gateway Load Balancer endpoint after it is inspected by the security appliance.
-
Traffic is sent to the internet gateway based on the route table configuration.
-
Traffic is routed back to the internet.
Routing
The route table for the internet gateway must have an entry that routes traffic destined for the application servers to the Gateway Load Balancer endpoint. To specify the Gateway Load Balancer endpoint, use the ID of the VPC endpoint. The following example shows the routes for a dualstack configuration.
| Destination | Target |
|---|---|
VPC IPv4 CIDR |
Local |
VPC IPv6 CIDR |
Local |
Subnet 1 IPv4 CIDR |
vpc-endpoint-id |
Subnet 1 IPv6 CIDR |
vpc-endpoint-id |
The route table for the subnet with the application servers must have entries that route all traffic from the application servers to the Gateway Load Balancer endpoint.
| Destination | Target |
|---|---|
VPC IPv4 CIDR |
Local |
VPC IPv6 CIDR |
Local |
| 0.0.0.0/0 | vpc-endpoint-id |
| ::/0 | vpc-endpoint-id |
The route table for the subnet with the Gateway Load Balancer endpoint must route traffic that returns from inspection to its final destination. For traffic that originated from the internet, the local route ensures that it reaches the application servers. For traffic that originated from the application servers, add entries that route all traffic to the internet gateway.
| Destination | Target |
|---|---|
VPC IPv4 CIDR |
Local |
VPC IPv6 CIDR |
Local |
| 0.0.0.0/0 | internet-gateway-id |
| ::/0 | internet-gateway-id |
Prerequisites
-
Ensure that the service consumer VPC has at least two subnets for each Availability Zone that contains application servers. One subnet is for the Gateway Load Balancer endpoint, and the other is for the application servers.
-
The Gateway Load Balancer and the targets can be in the same subnet.
-
You cannot use a subnet that is shared from another account to deploy the Gateway Load Balancer.
-
Launch at least one security appliance instance in each security appliance subnet in the service provider VPC. The security groups for these instances must allow UDP traffic on port 6081.
Step 1: Create a Gateway Load Balancer
Use the following procedure to create your load balancer, listener, and target group.
To create the load balancer, listener, and target group
-
Open the Amazon EC2 console at https://console.aws.amazon.com/ec2/
. -
In the navigation pane, under Load Balancing, choose Load Balancers.
-
Choose Create load balancer.
-
Under Gateway Load Balancer, choose Create.
-
Basic configuration
-
For Load balancer name, enter a name for your load balancer.
-
For IP address type, choose IPv4 to support IPv4 addresses only or Dualstack to support both IPv4 and IPv6 addresses.
-
-
Network mapping
-
For VPC, select the service provider VPC.
-
For Mappings, select all of the Availability Zones in which you launched security appliance instances, and one subnet per Availability Zone.
-
-
IP listener routing
-
For Default action, select an existing target group to receive traffic. This target group must use the GENEVE protocol.
If you don't have a target group, choose Create target group, which opens a new tab in your browser. Choose a target type, enter a name for the target group, and keep the GENEVE protocol. Select the VPC with your security appliance instances. Modify the health check settings as needed, and add any tags that you need. Choose Next. You can register your security appliance instances with the target group now, or after you finish this procedure. Choose Create target group and then return to the previous browser tab.
-
(Optional) Expand Listener tags and add the tags that you need.
-
-
(Optional) Expand Load balancer tags and add the tags that you need.
-
Choose Create load balancer.
Step 2: Create a Gateway Load Balancer endpoint service
Use the following procedure to create an endpoint service using your Gateway Load Balancer.
To create a Gateway Load Balancer endpoint service
-
Open the Amazon VPC console at https://console.aws.amazon.com/vpc/
. -
In the navigation pane, choose Endpoint services.
-
Choose Create endpoint service and do the following:
-
For Load balancer type, choose Gateway.
-
For Available load balancers, select your Gateway Load Balancer.
-
For Require acceptance for endpoint, select Acceptance required to accept connection requests to your service manually. Otherwise, they are automatically accepted.
-
For Supported IP address types, do one of the following:
-
Select IPv4 – Enable the endpoint service to accept IPv4 requests.
-
Select IPv6 – Enable the endpoint service to accept IPv6 requests.
-
Select IPv4 and IPv6 – Enable the endpoint service to accept both IPv4 and IPv6 requests.
-
-
(Optional) To add a tag, choose Add new tag and enter the tag key and tag value.
-
Choose Create. Note the service name; you'll need it when you create the endpoint.
-
-
Select the new endpoint service and choose Actions, Allow principals. Enter the ARNs of the service consumers that are allowed to create an endpoint to your service. A service consumer can be a user, IAM role, or AWS account. Choose Allow principals.
Step 3: Create a Gateway Load Balancer endpoint
Use the following procedure to create a Gateway Load Balancer endpoint that connects to your Gateway Load Balancer endpoint service. Gateway Load Balancer endpoints are zonal. We recommend that you create one Gateway Load Balancer endpoint per zone. For more information, see Access virtual appliances through AWS PrivateLink in the AWS PrivateLink Guide.
To create a Gateway Load Balancer endpoint
-
Open the Amazon VPC console at https://console.aws.amazon.com/vpc/
. -
In the navigation pane, choose Endpoints.
-
Choose Create endpoint and do the following:
-
For Service category, choose Other endpoint services.
-
For Service name, enter the service name that you noted earlier, and then choose Verify service.
-
For VPC, select the service consumer VPC.
-
For Subnets, select a subnet for the Gateway Load Balancer endpoint.
-
For IP address type, choose from the following options:
-
IPv4 – Assign IPv4 addresses to your endpoint network interfaces. This option is supported only if all selected subnets have IPv4 address ranges.
-
IPv6 – Assign IPv6 addresses to your endpoint network interfaces. This option is supported only if all selected subnets are IPv6 only subnets.
-
Dualstack – Assign both IPv4 and IPv6 addresses to your endpoint network interfaces. This option is supported only if all selected subnets have both IPv4 and IPv6 address ranges.
-
-
(Optional) To add a tag, choose Add new tag and enter the tag key and tag value.
-
Choose Create endpoint. The initial status is
pending
        acceptance
.
-
To accept the endpoint connection request, use the following procedure.
-
In the navigation pane, choose Endpoint services.
-
Select the endpoint service.
-
From the Endpoint connections tab, select the endpoint connection.
-
To accept the connection request, choose Actions, Accept endpoint connection request. When prompted for confirmation, enter
acceptand then choose Accept.
Step 4: Configure routing
Configure the route tables for the service consumer VPC as follows. This allows the security appliances to perform security inspection on inbound traffic that's destined for the application servers.
To configure routing
-
Open the Amazon VPC console at https://console.aws.amazon.com/vpc/
. -
In the navigation pane, choose Route tables.
-
Select the route table for the internet gateway and do the following:
-
Choose Actions, Edit routes.
-
Choose Add route. For Destination, enter the IPv4 CIDR block of the subnet for the application servers. For Target, select the VPC endpoint.
-
If you support IPv6, choose Add route. For Destination, enter the IPv6 CIDR block of the subnet for the application servers. For Target, select the VPC endpoint.
-
Choose Save changes.
-
-
Select the route table for the subnet with the application servers and do the following:
-
Choose Actions, Edit routes.
-
Choose Add route. For Destination, enter
0.0.0.0/0. For Target, select the VPC endpoint. -
If you support IPv6, choose Add route. For Destination, enter
::/0. For Target, select the VPC endpoint. -
Choose Save changes.
-
-
Select the route table for the subnet with the Gateway Load Balancer endpoint, and do the following:
-
Choose Actions, Edit routes.
-
Choose Add route. For Destination, enter
0.0.0.0/0. For Target, select the internet gateway. -
If you support IPv6, choose Add route. For Destination, enter
::/0. For Target, select the internet gateway. -
Choose Save changes.
-
