Handling error conditions in a Step Functions state machine
In this tutorial, you create an AWS Step Functions state machine with a Task state that invokes an example Lambda function built to throw a custom error.
Tasks are one of the Fallback states, for which you can configure a Catch field. When errors are received by the integration, next steps are chosen by the catch field based on the error name.
Step 1: Create a Lambda function that throws an error
Use a Lambda function to simulate an error condition.
-
Open the AWS Lambda console at https://console.aws.amazon.com/lambda/
. -
Choose Create function.
-
Choose Use a blueprint, search for
Step Functions, and choose Throw a custom error. -
For Function name, enter
ThrowErrorFunction. -
For Role, choose Create a new role with basic Lambda permissions.
-
Choose Create function.
The following code should be displayed in the code pane.
export const handler = async () => {
    function CustomError(message) {
        this.name = 'CustomError';
        this.message = message;
    }
    CustomError.prototype = new Error();

    throw new CustomError('This is a custom error!');
};
Step 2: Test your Lambda function
Before creating a state machine, verify your Lambda function throws your CustomError when invoked.
-
Choose the Test tab.
-
Choose Create a new event and keep the default Event JSON
-
Choose Test to invoke your function with your test event.
-
Expand Executing function to review the details of the thrown error.
You now have a Lambda function ready to throw a custom error.
In the next step, you will set up a state machine to catch and retry on that error.
Step 3: Create your state machine machine
Use the Step Functions console to create a state machine that uses a Task workflow state
with a Catch configuration. The state machine will invoke the Lambda function, which you've built to simulate throwing an error when the function is invoked. Step Functions retries the function using exponential backoff between retries.
-
Open the Step Functions console
, choose State machines from the menu, then choose Create state machine. -
Choose Create from blank, and for State machine name, enter
CatchErrorStateMachine. -
Accept the default type (Standard), then choose Continue to edit your state machine in Workflow Studio.
-
Choose Code to switch to the ASL editor, then replace the code with following state machine definition:
{
  "Comment": "Example state machine that can catch a custom error thrown by a function integration.",
  "StartAt": "CreateAccount",
  "States": {
    "CreateAccount": {
      "Type": "Task",
      "Resource": "arn:aws:states:::lambda:invoke",
      "Output": "{% $states.result.Payload %}",
      "Arguments": {
        "FunctionName": "arn:aws:lambda:region:account-id:function:ThrowErrorFunction:$LATEST",
        "Payload": "{% $states.input %}"
      },
      "Catch": [
        {
          "ErrorEquals": [
            "CustomError"
          ],
          "Next": "CustomErrorFallback"
        },
        {
          "ErrorEquals": [
            "States.ALL"
          ],
          "Next": "CatchAllFallback"
        }
      ],
      "End": true,
      "Retry": [
        {
          "ErrorEquals": [
            "CustomError",
            "Lambda.ServiceException",
            "Lambda.AWSLambdaException",
            "Lambda.SdkClientException",
            "Lambda.TooManyRequestsException"
          ],
          "IntervalSeconds": 1,
          "MaxAttempts": 3,
          "BackoffRate": 2,
          "JitterStrategy": "FULL"
        }
      ]
    },
    "CustomErrorFallback": {
      "Type": "Pass",
      "End": true,
      "Output": {
        "Result": "Fallback from a custom error function."
      }
    },
    "CatchAllFallback": {
      "Type": "Pass",
      "End": true,
      "Output": {
        "Result": "Fallback from all other error codes."
      }
    }
  },
  "QueryLanguage": "JSONata"
}
Step 4: Configure your state machine
Before you run your state machine, you must first connect to the Lambda function that you previously created.
-
Switch back to Design mode and select the Lambda : Invoke task state named CreateAccount.
On the Configuration tab, look for API Arguments. For Function name choose the Lambda function that you created earlier.
Choose Create, review the roles, then choose Confirm to create your state machine.
Step 5: Run the state machine
After you create and configure your state machine, you can run it and examine the flow.
-
In the editor, choose Execute.
Alternatively, from the State machines list, choose Start execution.
-
In the Start execution dialog box, accept the generated ID, and for Input, enter the following JSON:
{ "Cause" : "Custom Function Error" } -
Choose Start execution.
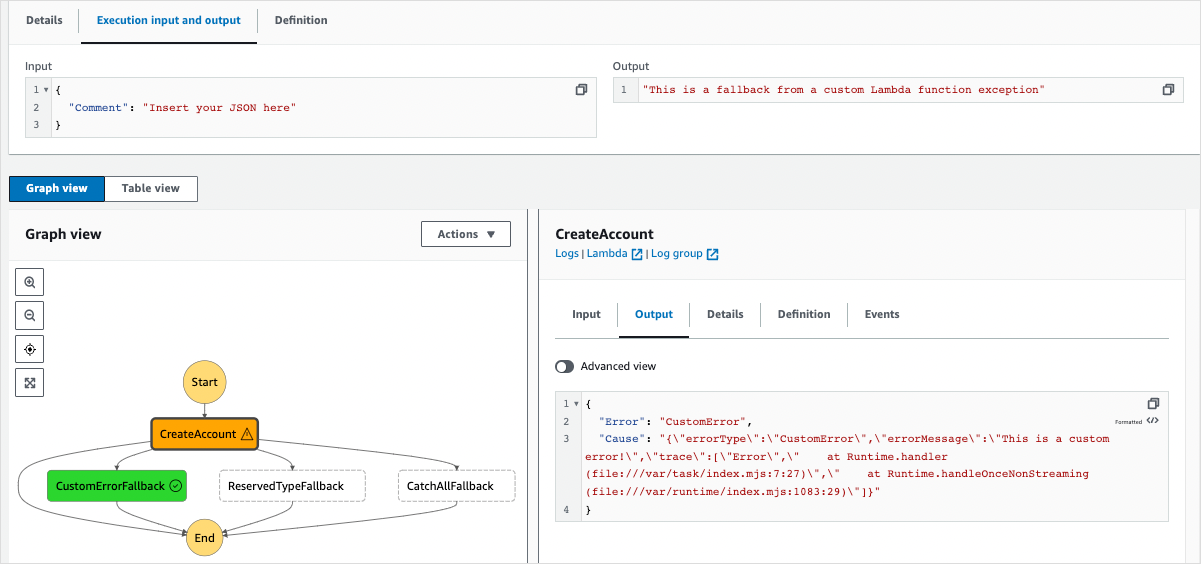
The Step Functions console directs you to a page that's titled with your execution ID, known as the Execution Details page. You can review the execution results as the workflow progresses and after it completes.
To review the execution results, choose individual states on the Graph view, and then choose the individual tabs on the Step details pane to view each state's details including input, output, and definition respectively. For details about the execution information you can view on the Execution Details page, see Execution details overview.
Your state machine invokes the Lambda function, which throws a CustomError. Choose the CreateAccount step in the Graph view to see the state output. Your state machine output should look similar to the following illustration:
Congratulations!
You now have a state machine that can catch and handle error conditions thrown by a Lambda function. You can use this pattern to implement robust error handling in your workflows.
Note
You can also create state machines that Retry on timeouts or those that
use Catch to transition to a specific state when an error or timeout
occurs. For examples of these error handling techniques, see Examples Using Retry and Using
Catch.
