Deploy a Traditional ASP.NET Application to Elastic Beanstalk
This section describes how to use the Publish to Elastic Beanstalk wizard, provided as part of the Toolkit for Visual Studio, to deploy an application through Elastic Beanstalk. To practice, you can use an instance of a web application starter project that is built in to Visual Studio or you can use your own project.
Note
The wizard also supports deploying ASP.NET Core applications. For information about ASP.NET
Core, see the AWS .NET deployment tool
Note
Before you can use the Publish to Elastic Beanstalk wizard, you
must download and install Web Deploy
To create a sample web application starter project
-
In Visual Studio, from the File menu, choose New, and then choose Project.
-
In the navigation pane of the New Project dialog box, expand Installed, expand Templates, expand Visual C#, and then choose Web.
-
In the list of web project templates, choose any template containing the words
WebandApplicationin its description. For this example, choose ASP.NET Web Forms Application.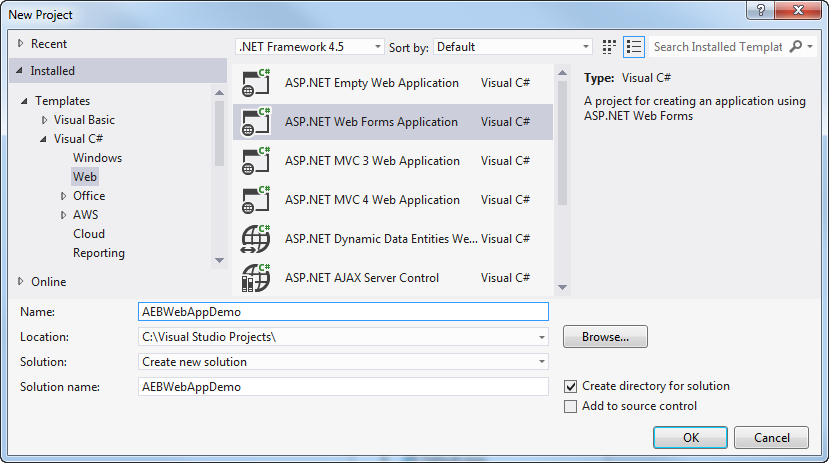
-
In the Name box, type
AEBWebAppDemo. -
In the Location box, type the path to a solution folder on your development machine or choose Browse, and then browse to and choose a solution folder, and choose Select Folder.
-
Confirm the Create directory for solution box is selected. In the Solution drop-down list, confirm Create new solution is selected, and then choose OK. Visual Studio will create a solution and project based on the ASP.NET Web Forms Application project template. Visual Studio will then display Solution Explorer where the new solution and project appear.

To deploy an application by using the Publish to Elastic Beanstalk wizard
-
In Solution Explorer, open the context (right-click) menu for the AEBWebAppDemo project folder for the project you created in the previous section, or open the context menu for the project folder for your own application, and choose Publish to AWS Elastic Beanstalk.

The Publish to Elastic Beanstalk wizard appears.

-
In Profile, from the Account profile to use for deployment drop-down list, choose the AWS account profile you want to use for the deployment.
Optionally, if you have an AWS account you want to use, but you haven't yet created an AWS account profile for it, you can choose the button with the plus symbol (
+) to add an AWS account profile. -
From the Region drop-down list, choose the region to which you want Elastic Beanstalk to deploy the application.
-
In Deployment Target, you can choose either Create a new application environment to perform an initial deployment of an application or Redeploy to an existing environment to redeploy a previously deployed application. (The previous deployments may have been performed with either the wizard or the deprecated Standalone Deployment Tool.) If you choose Redeploy to an existing environment, there may be a delay while the wizard retrieves information from previous deployments that are currently running.
Note
If you choose Redeploy to an existing environment, choose an environment in the list, and then choose Next, the wizard will take you directly to the Application Options page. If you go this route, skip ahead to the instructions later in this section that describe how to use the Application Options page.
-
Choose Next.

-
On the Application Environment page, in the Application area, the Name drop-down list proposes a default name for the application. You can change the default name by choosing a different name from the drop-down list.
-
In the Environment area, in the Name drop-down list, type a name for your Elastic Beanstalk environment. In this context, the term environment refers to the infrastructure Elastic Beanstalk provisions for your application. A default name may already be proposed in this drop-down list. If a default name is not already proposed, you can type one or choose one from the drop-down list, if any additional names are available. The environment name cannot be longer than 23 characters.
-
In the URL area, the box proposes a default subdomain of
.elasticbeanstalk.comthat will be the URL for your web application. You can change the default subdomain by typing a new subdomain name. -
Choose Check availability to make sure the URL for your web application is not already in use.
-
If the URL for your web application is okay to use, choose Next.

-
On the AWS Options page, in Amazon EC2 Launch Configuration, from the Container type drop-down list, choose an Amazon Machine Image (AMI) type that will be used for your application.
-
In the Instance type drop-down list, specify an Amazon EC2 instance type to use. For this example, we recommend you use Micro. This will minimize the cost associated with running the instance. For more information about Amazon EC2 costs, go to the EC2 Pricing
page. -
In the Key pair drop-down list, choose an Amazon EC2 instance key pair to use to sign in to the instances that will be used for your application.
-
Optionally, in the Use custom AMI box, you can specify a custom AMI that will override the AMI specified in the Container type drop-down list. For more information about how to create a custom AMI, go to Using Custom AMIs in the AWS Elastic Beanstalk Developer Guide and Create an AMI from an Amazon EC2 Instance.
-
Optionally, if you want to launch your instances in a VPC, select the Use a VPC box.
-
Optionally, if you want to launch a single Amazon EC2 instance and then deploy your application to it, select the Single instance environment box.
If you select this box, Elastic Beanstalk will still create an Auto Scaling group, but will not configure it. If you want to configure the Auto Scaling group later, you can use the AWS Management Console.
-
Optionally, if you want to control the conditions under which your application is deployed to the instances, select the Enable Rolling Deployments box. You can select this box only if you have not selected the Single instance environment box.
-
If your application uses AWS services such as Amazon S3 and DynamoDB, the best way to provide credentials is to use an IAM role. In the Deployed Application Permissions area, you can either choose an existing IAM role or create one the wizard will use to launch your environment. Applications using the AWS SDK for .NET will automatically use the credentials provided by this IAM role when making a request to an AWS service.
-
If your application accesses an Amazon RDS database, in the drop-down list in the Relational Database Access area, select the boxes next to any Amazon RDS security groups the wizard will update so that your Amazon EC2 instances can access that database.
-
Choose Next.
-
If you selected Use a VPC, the VPC Options page will appear.
-
If you selected Enable Rolling Deployments, but did not select Use a VPC, the Rolling Deployments page will appear. Skip ahead to the instructions later in this section that describe how to use the Rolling Deployments page.
-
If you did not select Use a VPC or Enable Rolling Deployments, the Application Options page will appear. Skip ahead to the instructions later in this section that describe how to use the Application Options page.
-
-
If you selected Use a VPC, specify information on the VPC Options page to launch your application into a VPC.

The VPC must have already been created. If you created the VPC in the Toolkit for Visual Studio, the Toolkit for Visual Studio will populate this page for you. If you created the VPC in the AWS Management Console, type information about your VPC into this page.
Key considerations for deployment to a VPC
-
Your VPC needs at least one public and one private subnet.
-
In the ELB Subnet drop-down list, specify the public subnet. The Toolkit for Visual Studio deploys the Elastic Load Balancing load balancer for your application to the public subnet. The public subnet is associated with a routing table that has an entry that points to an Internet gateway. You can recognize an Internet gateway because it has an ID that begins with
igw-(for example,igw-83cddaex). Public subnets that you create by using the Toolkit for Visual Studio have tag values that identify them as public. -
In the Instances Subnet drop-down list, specify the private subnet. The Toolkit for Visual Studio deploys the Amazon EC2 instances for your application to the private subnet.
-
The Amazon EC2 instances for your application communicate from the private subnet to the Internet through an Amazon EC2 instance in the public subnet that performs network address translation (NAT). To enable this communication, you will need a VPC security group
that allows traffic to flow from the private subnet to the NAT instance. Specify this VPC security group in the Security Group drop-down list.
For more information about how to deploy an Elastic Beanstalk application to a VPC, go to the AWS Elastic Beanstalk Developer Guide.
-
After you have filled in all of the information on the VPC Options page, choose Next.
-
If you selected Enable Rolling Deployments, the Rolling Deployments page will appear.
-
If you did not select Enable Rolling Deployments, the Application Options page will appear. Skip ahead to the instructions later in this section that describe how to use the Application Options page.
-
-
If you selected Enable Rolling Deployments, you specify information on the Rolling Deployments page to configure how new versions of your applications are deployed to the instances in a load-balanced environment. For example, if you have four instances in your environment and you want to change the instance type, you can configure the environment to change two instances at a time. This helps ensure your application is still running while changes are being made.

-
In the Application Versions area, choose an option to control deployments to either a percentage or number of instances at a time. Specify either the desired percentage or number.
-
Optionally, in the Environment Configuration area, select the box if you want to specify the number of instances that remain in service during deployments. If you select this box, specify the maximum number of instances that should be modified at a time, the minimum number of instances that should remain in service at a time, or both.
-
Choose Next.
-
On the Application Options page, you specify information about build, Internet Information Services (IIS), and application settings.

-
In the Build and IIS Deployment Settings area, in the Project build configuration drop-down list, choose the target build configuration. If the wizard can find it, Release appears otherwise, the active configuration is displayed in this box.
-
In the App pool drop-down list, choose the version of the .NET Framework required by your application. The correct .NET Framework version should already be displayed.
-
If your application is 32-bit, select the Enable 32-bit applications box.
-
In the App path box, specify the path IIS will use to deploy the application. By default, Default Web Site/ is specified, which typically translates to the path
c:\inetpub\wwwroot. If you specify a path other than Default Web Site/, the wizard will place a redirect in the Default Web Site/ path that points to the path you specified. -
In the Application Settings area, in the Health check URL box, type a URL for Elastic Beanstalk to check to determine if your web application is still responsive. This URL is relative to the root server URL. The root server URL is specified by default. For example, if the full URL is
example.com/site-is-up.html, you would type/site-is-up.html. -
In the area for Key and Value, you can specify any key and value pairs you want to add to your application's
Web.configfile.Note
Although not recommended, you can use the area for Key and Value, to specify AWS credentials under which your application should run. The preferred approach is to specify an IAM role in the Identity and Access Management Role drop-down list on the AWS Options page. However, if you must use AWS credentials instead of an IAM role to run your application, in the Key row, choose AWSAccessKey. In the Value row, type the access key. Repeat these steps for AWSSecretKey.
-
Choose Next.

-
On the Review page, review the options you configured, and select the Open environment status window when wizard closes box.
-
If everything looks correct, choose Deploy.
Note
When you deploy the application, the active account will incur charges for the AWS resources used by the application.
Information about the deployment will appear in the Visual Studio status bar and the Output window. It may take several minutes. When the deployment is complete, a confirmation message will appear in the Output window.
-
To delete the deployment, in AWS Explorer, expand the Elastic Beanstalk node, open the context (right-click) menu for the subnode for the deployment, and then choose Delete. The deletion process might take a few minutes.
