Using DynamoDB from AWS Explorer
Amazon DynamoDB is a fast, highly scalable, highly available, cost-effective, non-relational database
service. DynamoDB removes traditional scalability limitations on data storage while maintaining low
latency and predictable performance. The Toolkit for Visual Studio provides functionality for working with DynamoDB in
a development context. For more information about DynamoDB, see DynamoDB
In the Toolkit for Visual Studio, AWS Explorer displays all of the DynamoDB tables associated with the active AWS account.

Creating an DynamoDB Table
You can use the Toolkit for Visual Studio to create a DynamoDB table.
To create a table in AWS Explorer
-
In AWS Explorer, open the context (right-click) menu for Amazon DynamoDB, and then choose Create Table.
-
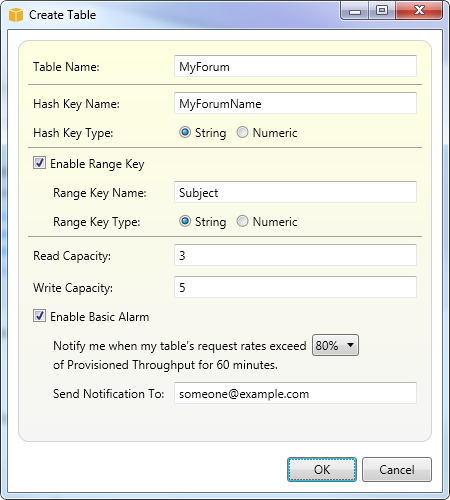
In the Create Table wizard, in Table Name, type a name for the table.
-
In the Hash Key Name field, type a primary hash key attribute and from the Hash Key Type buttons, choose the hash key type. DynamoDB builds an unordered hash index using the primary key attribute and an optional sorted range index using the range primary key attribute. For more information about the primary hash key attribute, go to the Primary Key section in the Amazon DynamoDB Developer Guide.
-
(Optional) Select Enable Range Key. In the Range Key Name field, type a range key attribute, and then from the Range Key Type buttons, choose a range key type.
-
In the Read Capacity field, type the number of read capacity units. In the Write Capacity field, type the number of write capacity units. You must specify a minimum of three read capacity units and five write capacity units. For more information about read and write capacity units, go to Provisioned Throughput in DynamoDB.
-
(Optional) Select Enable Basic Alarm to alert you when your table's request rates are too high. Choose the percentage of provisioned throughput per 60 minutes that must be exceeded before the alert is sent. In Send Notifications To, type an email address.
-
Click OK to create the table.
For more information about DynamoDB tables, go to Data Model Concepts - Tables, Items, and Attributes.
Viewing an DynamoDB Table as a Grid
To open a grid view of one of your DynamoDB tables, in AWS Explorer, double-click the subnode that corresponds to the table. From the grid view, you can view the items, attributes, and values stored in the table. Each row corresponds to an item in the table. The table columns correspond to attributes. Each cell of the table holds the values associated with that attribute for that item.
An attribute can have a value that is a string or a number. Some attributes have a value that consists of a set of strings or numbers. Set values are displayed as a comma-separated list enclosed by square brackets.

Editing and Adding Attributes and Values
By double-clicking a cell, you can edit the values for the item's corresponding attribute. For set-value attributes, you can also add or delete individual values from the set.

In addition to changing the value of an attribute, you can also, with some limitations, change the format of the value for an attribute. For example, any number value can be converted into a string value. If you have a string value, the content of which is a number, such as 125, the cell editor enables you to convert the format of the value from string to number. You can also convert a single-value to a set-value. However, you cannot generally convert from a set-value to a single-value; an exception is when the set-value has, in fact, only one element in the set.

After editing the attribute value, choose the green check mark to confirm your changes. If you want to discard your changes, choose the red X.
After you have confirmed your changes, the attribute value will be displayed in red. This indicates the attribute has been updated, but that the new value has not been written back to the DynamoDB database. To write your changes back to DynamoDB, choose Commit Changes. To discard your changes, choose Scan Table and when the Toolkit asks if you would like to commit your changes before the Scan, choose No.
Adding an Attribute
From the grid view, you can also add attributes to the table. To add a new attribute, choose Add Attribute.

In the Add Attribute dialog box, type a name for your attribute, and then choose OK.

To make the new attribute become part of the table, you must add a value to it for at least one item and then choose the Commit Changes button. To discard the new attribute, just close the grid view of the table without choosing Commit Changes.

Scanning an DynamoDB Table

You can perform Scans on your DynamoDB tables from the Toolkit. In a Scan, you define a set of criteria and the Scan returns all items from the table that match your criteria. Scans are expensive operations and should be used with care to avoid disrupting higher priority production traffic on the table. For more information about using the Scan operation, go to the Amazon DynamoDB Developer Guide.
To perform a Scan on an DynamoDB table from AWS Explorer
-
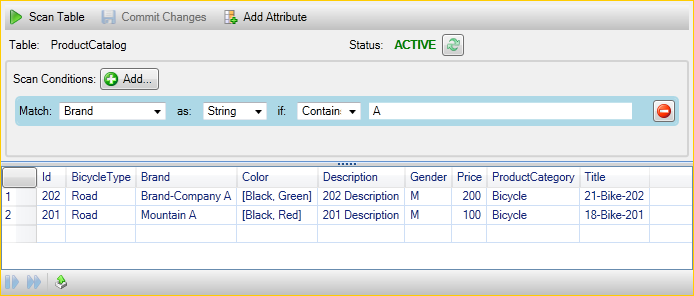
In the grid view, choose the scan conditions: add button.
-
In the Scan clause editor, choose the attribute to match against, how the value of the attribute should be interpreted (string, number, set value), how it should be matched (for example Begins With or Contains), and the literal value it should match.
-
Add more Scan clauses, as needed, for your search. The Scan will return only those items that match the criteria from all of your Scan clauses. The Scan will perform a case-sensitive comparison when matching against string values.
-
On the button bar at the top of the grid view, choose Scan Table.
To remove a Scan clause, choose the red button with the white line to the right of each clause.
To return to the view of the table that includes all items, remove all Scan clauses and choose Scan Table again.
Paginating Scan Results
At the bottom of the view are three buttons.

The first two blue buttons provide pagination for Scan results. The first button will display an additional page of results. The second button will display an additional ten pages of results. In this context, a page is equal to 1 MB of content.
Export Scan Result to CSV
The third button exports the results from the current Scan to a CSV file.
