Working with resources
In addition to accessing AWS services that are listed by default in the AWS Explorer, you can also go to Resources and choose from hundreds of resources to add to the interface. In AWS, a resource is an entity you can work with. Some of the resources that can be added include Amazon AppFlow, Amazon Kinesis Data Streams, AWS IAM roles, Amazon VPC, and Amazon CloudFront distributions.
After making your selection, you can go to Resources and expand the
resource type to list the available resources for that type. For example, if you select the
AWS Toolkit:Lambda::Function resource type, you can access the resources that define
different functions, their properties, and their attributes.
After adding a resource type to Resources, you can interact with it and its resources in the following ways:
-
View a list of existing resources that are available in the current AWS Region for this resource type.
-
View a read-only version of the JSON file that describes a resource.
-
Copy the resource identifier for the resource.
-
View the AWS documentation that explains the purpose of the resource type and the schema (in JSON and YAML formats) for modelling a resource.
-
Create a new resource by editing and saving a JSON-formatted template that conforms to a schema.*
-
Update or delete an existing resource.*
Important
*In the current release of the AWS Toolkit for Visual Studio Code the option to create, edit, and delete resources is an experimental feature. Because experimental features continue to be tested and updated, they may have usability issues. And experimental features may be removed from the AWS Toolkit for Visual Studio Code without notice.
To allow the use of experimental features for resources, open the Settings pane in your VS Code IDE, and expand Extensions and choose AWS Toolkit.
Under AWS Toolkit Experiments, select jsonResourceModification to allow you to create, update, and delete resources.
For more information, see Working with experimental features.
IAM permissions for accessing resources
You require specific AWS Identity and Access Management permissions to access the resources associated with AWS
services. For example, an IAM entity, such as a user or a role, requires Lambda permissions
to access AWS Toolkit:Lambda::Function resources.
In addition to permissions for service resources, an IAM entity requires permissions to permit the Toolkit for VS Code to call AWS Cloud Control API operations on its behalf. Cloud Control API operations allow the IAM user or role to access and update the remote resources.
The easiest way to grant permissions is to attach the AWS managed policy, PowerUserAccess, to the IAM entity that's calling these API operations using the Toolkit interface. This managed policy grants a range of permissions for performing application development tasks, including calling API operations.
For specific permissions that define allowable API operations on remote resources, see the AWS Cloud Control API User Guide.
Adding and interacting with existing resources
-
In the AWS Explorer, right-click Resources and choose Show Resources.
A pane displays a list of resource types that are available for selection.

-
In the selection pane, select the resource types to add to the AWS Explorer and press Return or choose OK to confirm.
The resource types that you selected are listed under Resources.
Note
If you've already added a resource type to the AWS Explorer and then clear the checkbox for that type, it's no longer listed under Resources after you choose OK. Only those resource types that are currently selected are visible in the AWS Explorer.
-
To view the resources that already exist for a resource type, expand the entry for that type.
A list of available resources is displayed under their resource type.
-
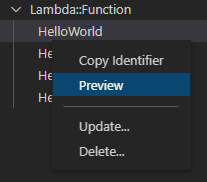
To interact with a specific resource, right-click its name and choose one of the following options:
-
Copy Resource Identifier: Copy the identifier for the specific resource to the clipboard. (For example, the
AWS Toolkit:DynamoDB::Tableresource can be identified using theTableNameproperty.) -
Preview: View a read-only version of the JSON-formatted template that describes the resource.
After the resource template displays, you can modify it by choosing the Update icon at the right of editor tab. To update a resource, you must have the required experimental feature enabled.
-
Update: Edit the JSON-formatted template for the resource in a VS Code editor. For more information, see Creating and editing resources.
-
Delete: Delete the resource by confirming the deletion in a dialog box that is displayed. (Deleting resources is currently an experimental feature in this version of AWS Toolkit for Visual Studio Code.)
Warning
If you delete a resource, any AWS CloudFormation stack that uses that resource will fail to update. To fix this update failure, you need to either recreate the resource or remove the reference to it in the stack's AWS CloudFormation template. For more information, see this Knowledge Center article
.
-
Creating and editing resources
Important
The creation and updating of resources is currently an experimental feature in this version of the AWS Toolkit for Visual Studio Code.
Creating a new resource involves adding a resource type to the Resources list and then editing a JSON-formatted template that defines the resource, its properties, and its attributes.
For example, a resource that belongs to the AWS Toolkit:SageMaker::UserProfile
resource type is defined with a template that creates a user profile for Amazon SageMaker Studio. The
template that defines this user profile resource must conform to the resource type schema for
AWS Toolkit:SageMaker::UserProfile. If the template doesn't comply with the schema
because of missing or incorrect properties, for example, the resource can't be created or
updated.
-
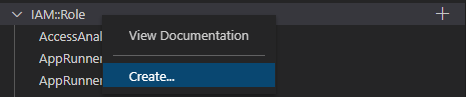
Add the resource type for the resource you want to create by right-clicking Resources and choosing Show Resources.
-
After the resource type is added under Resources, choose the plus ("+") icon to open the template file in a new editor.
Alternatively, you can right-click the resource type's name and choose Create. You can also access information about how to model the resource by choosing View Documentation.
-
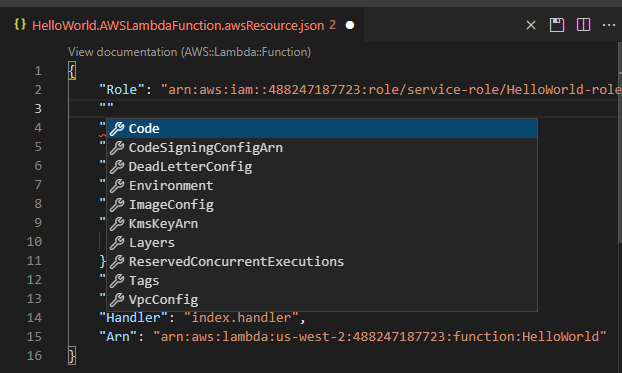
In the editor, start to define properties that make up the resource template. The autocomplete feature suggests property names that conform with your template's schema. When you hover over a property type, a pane displays a description of what it's used for. For detailed information about the schema, choose View Documentation.
Any text that doesn't conform to the resource schema is indicated by a wavy red underline.
-
After you finish declaring your resource, choose the Save icon to validate your template and save the resource to the remote AWS Cloud.
If your template defines the resource in accordance with its schema, a message displays to confirm that the resource was created. (If the resource already exists, the message confirms that the resource was updated.)
After the resource is created, it's added to the list under the resource type heading.
-
If your file contains errors, a message displays to explain that the resource couldn't be created or updated. Choose View Logs to identify the template elements that you need to fix.
