Configuring groups
Groups are a collection of traces that are defined by a filter expression. You can use
groups to generate additional service graphs and supply Amazon CloudWatch metrics. You can use the
AWS X-Ray console or X-Ray API to create and manage groups for your services. This topic
describes how to create and manage groups by using the X-Ray console. For information about how
to manage groups by using the X-Ray API, see Groups.
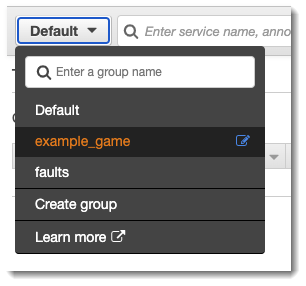
You can create groups of traces for trace maps, traces, or analytics. When you create a group, the group
becomes available as a filter on the group dropdown menu on all three pages: Trace Map,
Traces, and Analytics.
Groups are identified by their name or an Amazon Resource Name (ARN), and contain a filter
expression. The service compares incoming traces to the expression and stores them accordingly.
For more information about how to build a filter expression, see Using filter expressions.
Updating a group's filter expression doesn't change data that's already recorded. The update
applies only to subsequent traces. This can result in a merged graph of the new and old
expressions. To avoid this, delete a current group and create a new one.
Groups are billed by the number of retrieved traces that match the filter expression. For
more information, see AWS X-Ray pricing.
Create a group
You can now configure X-Ray groups from within the Amazon CloudWatch console.
You can also continue to use the X-Ray console.
- CloudWatch console
-
Sign in to the AWS Management Console and open the CloudWatch console at
https://console.aws.amazon.com/cloudwatch/.
-
Choose Settings in the left navigation pane.
-
Choose View settings under Groups within the X-Ray traces section.
-
Choose Create group above the list of groups.
-
On the Create group page, enter a name for the group. A group name can have a maximum
of 32 characters, and contain alphanumeric characters and dashes. Group names are case sensitive.
-
Enter a filter expression. For more information about how to build a filter expression, see Using filter expressions. In the following example, the group
filters for fault traces from the service api.example.com. and requests to the service where the
response time was greater than or equal to five seconds.
fault = true AND http.url CONTAINS "example/game" AND responsetime >= 5
-
In Insights, enable or disable insights access for the group. For more information
about insights, see Using X-Ray insights.
-
In Tags, choose Add new tag to enter a tag key, and optionally, a tag value.
Continue to add additional tags as desired. Tag keys must be unique. To delete a tag, choose Remove
underneath each tag. For more information about tags, see Tagging X-Ray sampling rules and groups.
-
Choose Create group.
- X-Ray console
-
Sign in to the AWS Management Console and open the X-Ray console at
https://console.aws.amazon.com/xray/home.
-
Open the Create group page from the Groups page in the left
navigation pane, or from the group menu on one of the following pages: Trace Map,
Traces, and Analytics.
-
On the Create group page, enter a name for the group. A group name can have a maximum
of 32 characters, and contain alphanumeric characters and dashes. Group names are case sensitive.
-
Enter a filter expression. For more information about how to build a filter expression, see Using filter expressions. In the following example, the group
filters for fault traces from the service api.example.com. and requests to the service where the
response time was greater than or equal to five seconds.
fault = true AND http.url CONTAINS "example/game" AND responsetime >= 5
-
In Insights, enable or disable insights access for the group. For more information
about insights, see Using X-Ray insights.
-
In Tags, enter a tag key, and optionally, a tag value. As you add a tag, a new line
appears for you to enter another tag. Tag keys must be unique. To delete a tag, choose X
at the end of the tag's row. For more information about tags, see Tagging X-Ray sampling rules and groups.
-
Choose Create group.
Apply a group
- CloudWatch console
-
Sign in to the AWS Management Console and open the CloudWatch console at
https://console.aws.amazon.com/cloudwatch/.
-
Open one of the following pages from the navigation pane under X-Ray traces:
-
Enter a group name into the Filter by X-Ray group filter. The data shown on the page changes to
match the filter expression set in the group.
- X-Ray console
-
Sign in to the AWS Management Console and open the X-Ray console at
https://console.aws.amazon.com/xray/home.
-
Open one of the following pages from the navigation pane:
-
Trace Map
-
Traces
-
Analytics
-
On the group menu, choose the group that you created in Create a group. The data shown on the page changes to
match the filter expression set in the group.
Edit a group
- CloudWatch console
-
Sign in to the AWS Management Console and open the CloudWatch console at
https://console.aws.amazon.com/cloudwatch/.
-
Choose Settings in the left navigation pane.
-
Choose View settings under Groups within the X-Ray traces section.
-
Choose a group from the Groups section and then choose Edit.
-
Although you can't rename a group, you can update the filter expression. For more information about how to
build a filter expression, see Using filter expressions. In
the following example, the group filters for fault traces from the service api.example.com, where
the request URL address contains example/game, and response time for requests was greater than or
equal to five seconds.
fault = true AND http.url CONTAINS "example/game" AND responsetime >= 5
-
In Insights, enable or disable insights access for the group. For more information
about insights, see Using X-Ray insights.
-
In Tags, choose Add new tag to enter a tag key, and optionally, a tag value.
Continue to add additional tags as desired. Tag keys must be unique. To delete a tag, choose Remove
underneath each tag. For more information about tags, see Tagging X-Ray sampling rules and groups.
-
When you're finished updating the group, choose Update group.
- X-Ray console
-
Sign in to the AWS Management Console and open the X-Ray console at
https://console.aws.amazon.com/xray/home.
-
Do one of the following to open the Edit group page.
-
On the Groups page, choose the name of a group to edit
it.
-
On the group menu on one of the following pages, point to a group, and then choose
Edit.
-
Trace Map
-
Traces
-
Analytics
-
Although you can't rename a group, you can update the filter expression. For more information about how to
build a filter expression, see Using filter expressions. In
the following example, the group filters for fault traces from the service api.example.com, where
the request URL address contains example/game, and response time for requests was greater than or
equal to five seconds.
fault = true AND http.url CONTAINS "example/game" AND responsetime >= 5
-
In Insights, enable or disable insights and insights notifications for the group. For
more information about insights, see Using X-Ray insights.
-
In Tags, edit tag keys and values. Tag keys must be unique. Tag values are
optional; you can delete values, if you want. To delete a tag, choose X at the end
of the tag's row. For more information about tags, see Tagging X-Ray sampling rules and groups.
-
When you're finished updating the group, choose Update group.
Clone a group
Cloning a group creates a new group that has the filter expression and tags of an existing
group. When you clone a group, the new group has the same name as the group from which it's
cloned, with -clone appended to the name.
- CloudWatch console
-
Sign in to the AWS Management Console and open the CloudWatch console at
https://console.aws.amazon.com/cloudwatch/.
-
Choose Settings in the left navigation pane.
-
Choose View settings under Groups within the X-Ray traces section.
-
Choose a group from the Groups section and then choose Clone.
-
On the Create group page, the name of the group is
group-name-clone. Optionally, enter a new name for the group. A
group name can have a maximum of 32 characters, and contain alphanumeric characters and dashes. Group names
are case sensitive.
You can keep the filter expression from the existing group, or optionally, enter a new
filter expression. For more information about how to build a filter expression, see Using filter expressions. In the following
example, the group filters for fault traces from the service api.example.com.
and requests to the service where the response time was greater than or equal to five
seconds.
service("api.example.com") { fault = true OR responsetime >= 5 }
-
In Tags, edit tag keys and values, if needed. Tag keys must be unique. Tag values are
optional; you can delete values if you want. To delete a tag, choose X at the end of the
tag's row. For more information about tags, see Tagging X-Ray sampling rules and groups.
-
Choose Create group.
- X-Ray console
-
Sign in to the AWS Management Console and open the X-Ray console at
https://console.aws.amazon.com/xray/home.
-
Open the Groups page from the left navigation pane,
and the choose the name of a group that you want to clone.
-
Choose Clone group from the Actions menu.
-
On the Create group page, the name of the group is
group-name-clone. Optionally, enter a new name for the group. A
group name can have a maximum of 32 characters, and contain alphanumeric characters and dashes. Group names
are case sensitive.
You can keep the filter expression from the existing group, or optionally, enter a new
filter expression. For more information about how to build a filter expression, see Using filter expressions. In the following
example, the group filters for fault traces from the service api.example.com.
and requests to the service where the response time was greater than or equal to five
seconds.
service("api.example.com") { fault = true OR responsetime >= 5 }
-
In Tags, edit tag keys and values, if needed. Tag keys must be unique. Tag values are
optional; you can delete values if you want. To delete a tag, choose X at the end of the
tag's row. For more information about tags, see Tagging X-Ray sampling rules and groups.
-
Choose Create group.
Delete a group
Follow steps in this section to delete a group. You can't delete the
Default group.
- CloudWatch console
-
Sign in to the AWS Management Console and open the CloudWatch console at
https://console.aws.amazon.com/cloudwatch/.
-
Choose Settings in the left navigation pane.
-
Choose View settings under Groups within the X-Ray traces section.
-
Choose a group from the Groups section and then choose Delete.
-
When you're prompted to confirm, choose Delete.
- X-Ray console
-
Sign in to the AWS Management Console and open the X-Ray console at
https://console.aws.amazon.com/xray/home.
-
Open the Groups page from the left navigation pane,
and the choose the name of a group that you want to delete.
-
On the Actions menu, choose Delete
group.
-
When you're prompted to confirm, choose Delete.
View group metrics in Amazon CloudWatch
After a group is created, incoming traces are checked against the group’s filter expression as they're stored
in the X-Ray service. Metrics for the number of traces matching each criteria are published to Amazon CloudWatch every
minute. Choosing View metric on the Edit group page opens the CloudWatch
console to the Metric page. For more information about how to use CloudWatch metrics, see Using Amazon CloudWatch
Metrics in the Amazon CloudWatch User Guide.
- CloudWatch console
-
Sign in to the AWS Management Console and open the CloudWatch console at
https://console.aws.amazon.com/cloudwatch/.
-
Choose Settings in the left navigation pane.
-
Choose View settings under Groups within the X-Ray traces section.
-
Choose a group from the Groups section and then choose Edit.
-
On the Edit group page, choose View metric.
The CloudWatch console Metrics page opens in a new tab.
- X-Ray console
-
Sign in to the AWS Management Console and open the X-Ray console at
https://console.aws.amazon.com/xray/home.
-
Open the Groups page from the left navigation pane,
and the choose the name of a group that you want to view metrics for.
-
On the Edit group page, choose View metric.
The CloudWatch console Metrics page opens in a new tab.