Important: We've redesigned the Amazon QuickSight analysis workspace. You might encounter screenshots or procedural text that doesn't reflect the new look in the QuickSight console. We're in the process of updating screenshots and procedural text.
To find a feature or item, use the Quick search bar.
For more information on QuickSight's new look, see Introducing new analysis experience on Amazon QuickSight
Using row-level security (RLS) with tag-based rules to restrict access to a dataset when embedding dashboards for anonymous users
| Applies to: Enterprise Edition |
| Intended audience: Amazon QuickSight Administrators and Amazon QuickSight developers |
When you embed Amazon QuickSight dashboards in your application for users who are not provisioned (registered) in QuickSight, you can use row-level security (RLS) with tags. In this case, you use tags to specify which data your users can see in the dashboard depending on who they are.
For example, let's say you're a logistics company that has a customer-facing application for various retailers. Thousands of users from these retailers access your application to see metrics related to how their orders are getting shipped from your warehouse.
You don't want to manage thousands of users in QuickSight, so you use anonymous embedding to embed the selected dashboards in your application that your authenticated and authorized users can see. However, you want to make sure retailers see only data that is for their business and not for others. You can use RLS with tags to make sure your customers only see data that's relevant to them.
To do so, complete the following steps:
-
Add RLS tags to a dataset.
-
Assign values to those tags at runtime using the
GenerateEmbedUrlForAnonymousUserAPI operation.For more information about embedding dashboards for anonymous users using the
GenerateEmbedUrlForAnonymousUserAPI operation, see Embedding QuickSight data dashboards for anonymous (unregistered) users.
Before you can use RLS with tags, keep in mind the following points:
-
Using RLS with tags is currently only supported for anonymous embedding, specifically for embedded dashboards that use the
GenerateEmbedUrlForAnonymousUserAPI operation. -
Using RLS with tags isn't supported for embedded dashboards that use the
GenerateEmbedURLForRegisteredUserAPI operation or the oldGetDashboardEmbedUrlAPI operation. -
RLS tags aren't supported with AWS Identity and Access Management (IAM) or the QuickSight identity type.
-
When applying SPICE datasets to row-level security, each field in the dataset can contain up to 2,047 Unicode characters. Fields that contain more than this quota are truncated during ingestion. To learn more about SPICE data quotas, see SPICE quotas for imported data.
Step 1: Add RLS tags to a dataset
You can add tag-based rules to a
dataset in Amazon QuickSight. Alternatively, you can call the CreateDataSet or
UpdateDataSet API operation and add tag-based rules that
way. For more information, see Add RLS tags to a dataset using the API.
Use the following procedure to add RLS tags to a dataset in QuickSight.
To add RLS tags to a dataset
-
From the QuickSight start page, choose Datasets at left.
-
On the Datasets page, choose the dataset that you want to add RLS to.
-
On the dataset details page that opens, for Row-level security, choose Set up.

-
On the Set up row-level security page that opens, choose Tag-based rules.
-
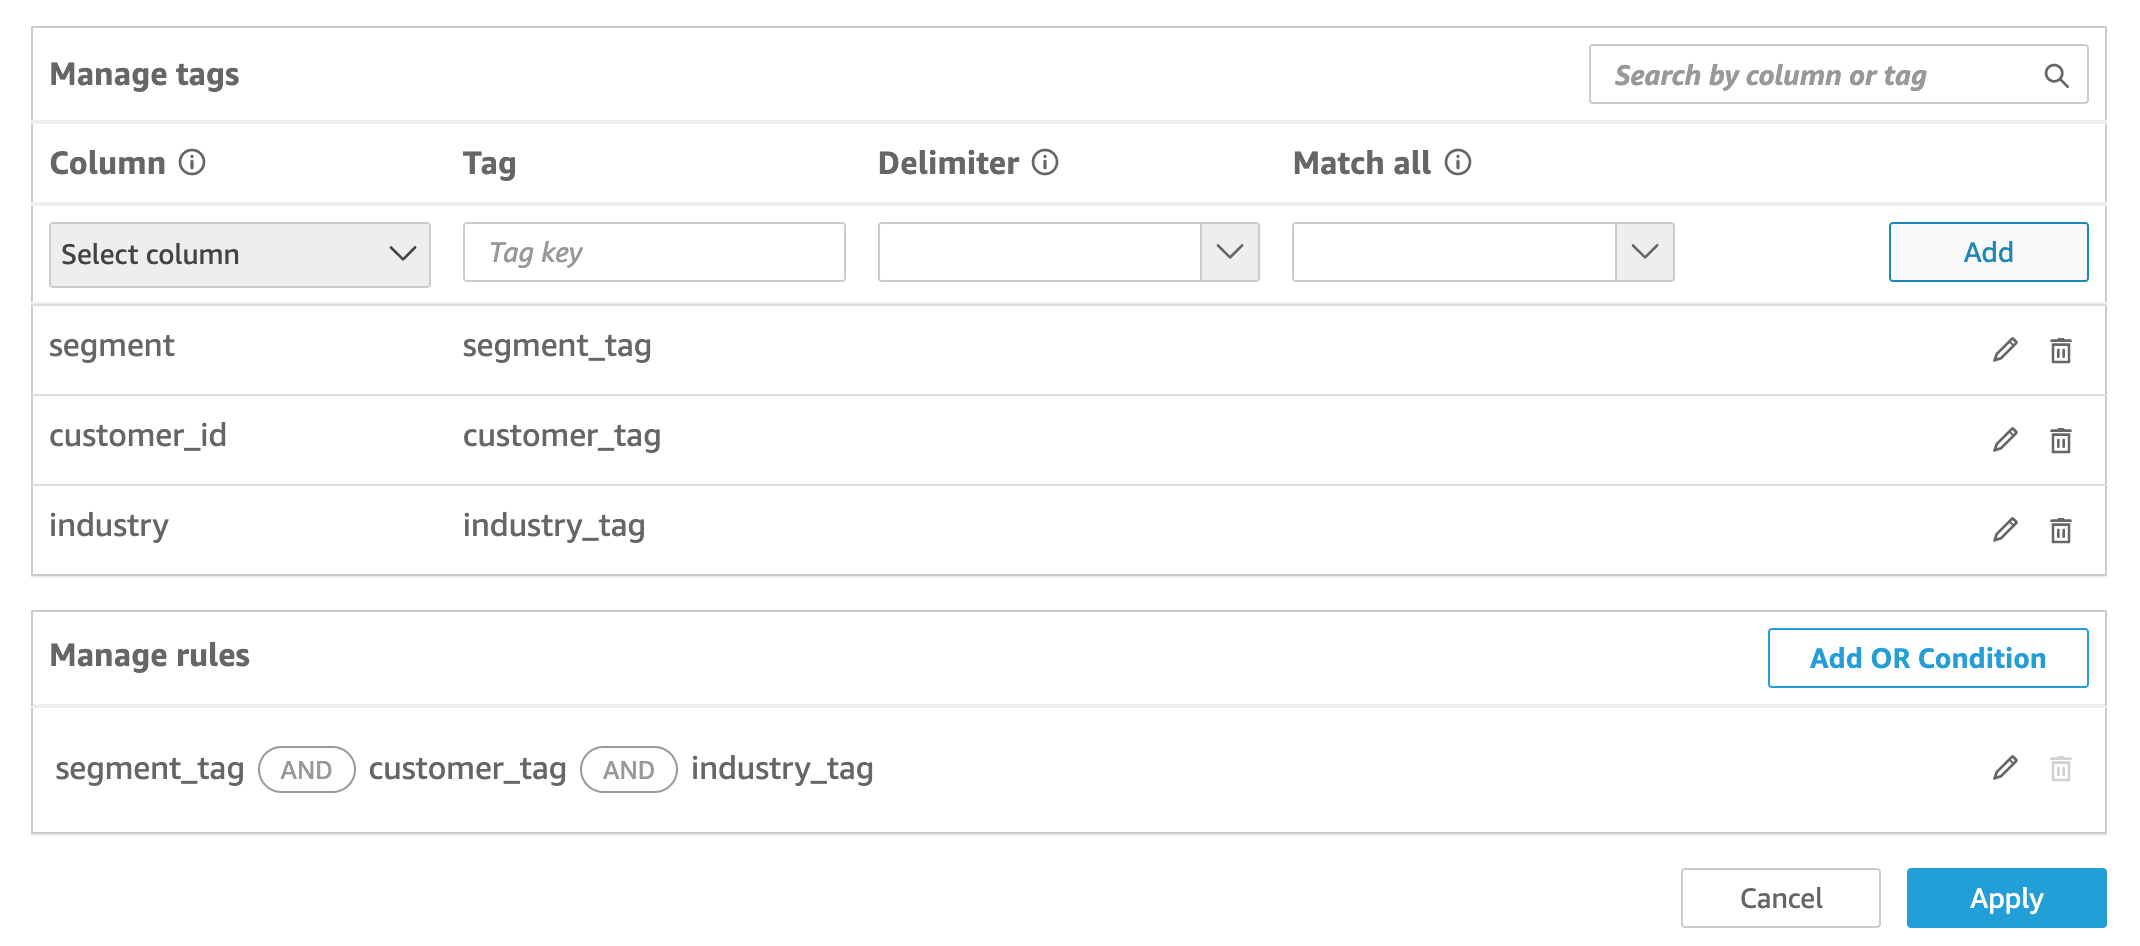
For Column, choose a column that you want to add tag rules to.
For example, in the case for the logistics company, the
retailer_idcolumn is used.Only columns with a string data type are listed.
-
For Tag, enter a tag key. You can enter any tag name that you want.
For example, in the case for the logistics company, the tag key
tag_retailer_idis used. Doing this sets row-level security based on the retailer that's accessing the application. -
(Optional) For Delimiter, choose a delimiter from the list, or enter your own.
You can use delimiters to separate text strings when assigning more than one value to a tag. The value for a delimiter can be 10 characters long, at most.
-
(Optional) For Match all, choose the *, or enter your own character or characters.
This option can be any character that you want to use when you want to filter by all the values in that column in the dataset. Instead of listing the values one by one, you can use the character. If this value is specified, it can be at least one character, or at most 256 characters long

-
Choose Add.
The tag rule is added to the dataset and is listed at the bottom, but it isn't applied yet. To add another tag rule to the dataset, repeat steps 5–9. To edit a tag rule, choose the pencil icon that follows the rule. To delete a tag rule, choose the delete icon that follows the rule. You can add up to 50 tags to a dataset.
-
When you're ready to apply the tag rules to the dataset, choose Apply rules.
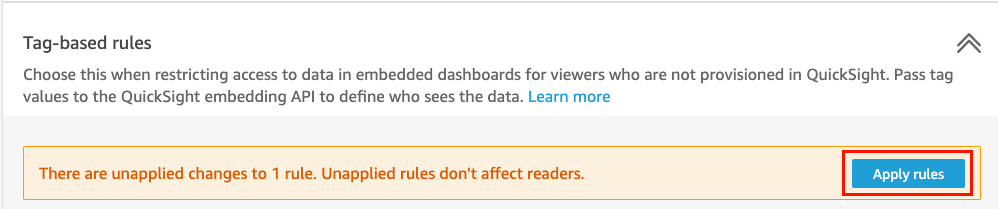
-
On the Turn on tag-based security? page that opens, choose Apply and activate.
The tag-based rules are now active. On the Set up row-level securitypage, a toggle appears for you to turn tag rules on and off for the dataset.
To turn off all tag-based rules for the dataset, switch the Tag-Based rules toggle off, and then enter "confirm" in the text box that appears.

On the Datasets page, a lock icon appears in the dataset row to indicate that tag rules are enabled.
You can now use tag rules to set tag values at runtime, described in Step 2: Assign values to RLS tags at runtime. The rules only affect QuickSight readers when active.
Important
After tags are assigned and enabled on the dataset, make sure to give QuickSight authors permissions to see any of the data in the dataset when authoring a dashboard.
To give QuickSight authors permission to see data in the dataset, create a permissions file or query to use as dataset rules. For more information, see Creating dataset rules for row-level security.
After you create a tag-based rule, a new Manage rules table appears that shows how your tag-based rules relate to each other. To make changes to the rules listed in the Manage rules table, choose the pencil icon that follows the rule. Then add or remove tags, and choose Update. To apply your updated rule to the dataset, choose Apply.
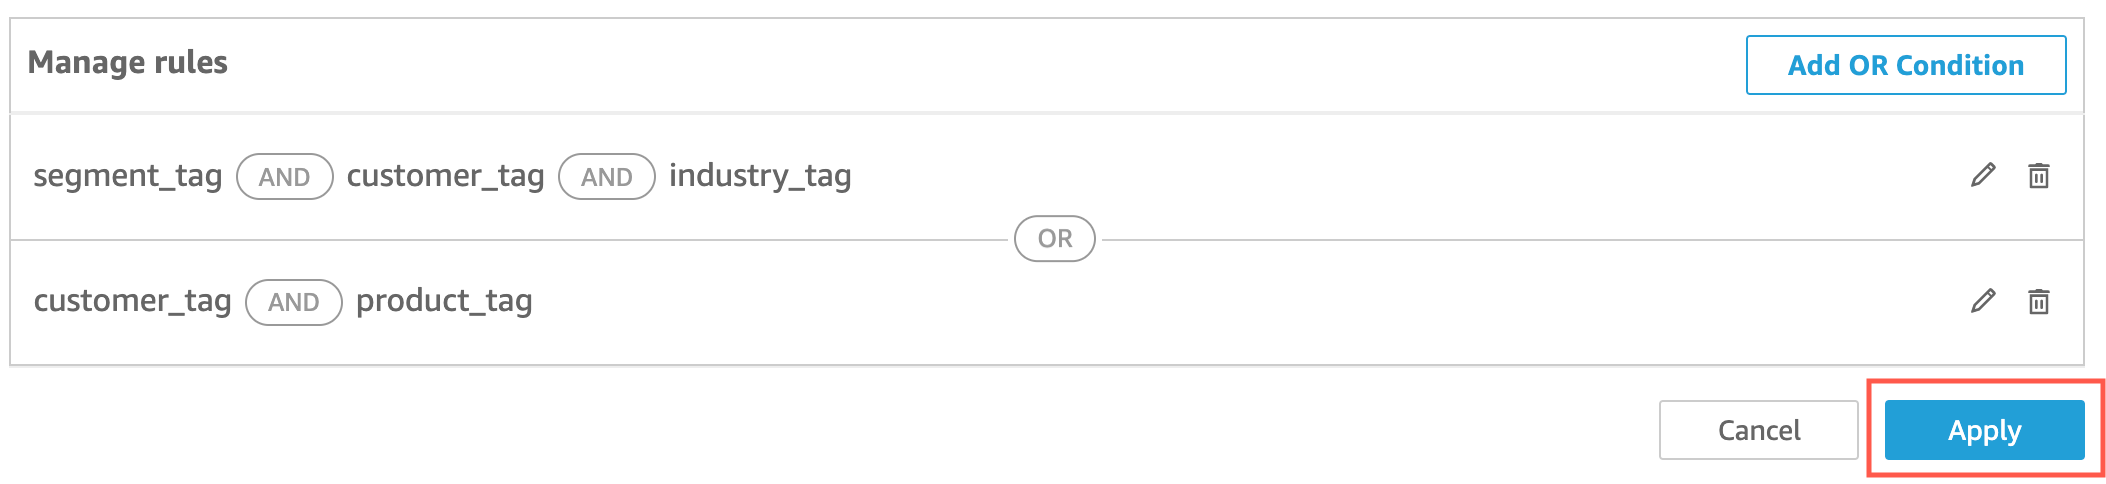
(Optional) Add the OR condition to RLS tags
You can also add the OR condition to your tag-based rules to further customize the way data is presented to your QuickSight account users. When you use the OR condition with your tag-based rules, visuals in QuickSight appear if at least one tag defined in the rule is valid.
To add the OR condition to your tag-based rules
-
In the Manage rules table, choose Add OR condition.

-
In the Select tag dropdown list that appears, choose the tag that you want to create an OR condition for. You can add up to 50 OR conditions to the Manage rules table. You can add multiple tags to a single column in a dataset, but at least one column tag needs to be included in a rule.

-
Choose Update to add the condition to your rule, then choose Apply to apply the updated rule to your dataset.
Add RLS tags to a dataset using the API
Alternatively, you can configure and enable tag-based row-level security on your dataset by calling the
CreateDataSet or UpdateDataSet API
operation. Use the following examples to learn how.
Important
After tags are assigned and enabled on the dataset, make sure to give QuickSight authors permissions to see any of the data in the dataset when authoring a dashboard.
To give QuickSight authors permission to see data in the dataset, create a permissions file or query to use as dataset rules. For more information, see Creating dataset rules for row-level security.
For more information about the RowLevelPermissionTagConfiguration element, see RowLevelPermissionTagConfiguration in the Amazon QuickSight API Reference.
Step 2: Assign values to RLS tags at runtime
You can use tags for RLS only for anonymous embedding. You can set values for tags
using the GenerateEmbedUrlForAnonymousUser API operation.
The following example shows how to assign values to RLS tags that were defined in the dataset in the previous step.
POST /accounts/AwsAccountId/embed-url/anonymous-user
	HTTP/1.1
	Content-type: application/json
	{
		“AwsAccountId”: “string”,
		“SessionLifetimeInMinutes”: integer,
		“Namespace”: “string”, // The namespace to which the anonymous end user virtually belongs
		“SessionTags”:  // Optional: Can be used for row-level security
			[
				{
					“Key”: “tag_retailer_id”,
					“Value”: “West,Central,South”
				}
				{
					“Key”: “tag_role”,
					“Value”: “shift_manager”
				}
			],
		“AuthorizedResourceArns”:
			[
				“string”
			],
		“ExperienceConfiguration”:
			{
				“Dashboard”:
					{
						“InitialDashboardId”: “string”
						// This is the initial dashboard ID the customer wants the user to land on. This ID goes in the output URL.
					}
			}
	}
The following is an example of the response definition.
HTTP/1.1 Status
	Content-type: application/json

	{
	"EmbedUrl": "string",
	"RequestId": "string"
	}
RLS support without registering users in QuickSight is supported only in the
GenerateEmbedUrlForAnonymousUser API operation. In
this operation, under SessionTags, you can define the values for the
tags associated with the dataset columns.
In this case, the following assignments are defined:
-
Values
West,Central, andSouthare assigned to thetag_retailer_idtag at runtime. A comma is used for the delimiter, which was defined inTagMultipleValueDelimiterin the dataset. To use call values in the column, you can set the value to *, which was defined as theMatchAllValuewhen creating the tag. -
The value
shift_manageris assigned to thetag_roletag.
The user using the generated URL can view only the rows having the
shift_manager value in the role column. That
user can view only the value West, Central, or
South in the retailer_id column.
For more information about embedding dashboards for anonymous users using the GenerateEmbedUrlForAnonymousUser API operation, see Embedding QuickSight
data dashboards for anonymous (unregistered) users, or GenerateEmbedUrlForAnonymousUser in the Amazon QuickSight API Reference
