Troubleshoot PV drivers on Windows instances
The following are solutions to issues that you might encounter with older Amazon EC2 images and PV drivers.
Contents
Windows Server 2012 R2 loses network and storage connectivity after an instance reboot
Important
This issue occurs only with AMIs made available before September 2014.
Windows Server 2012 R2 Amazon Machine Images (AMIs) made available before September 10, 2014 can lose network and storage connectivity after an instance reboot. The error in the AWS Management Console system log states: “Difficulty detecting PV driver details for Console Output.” The connectivity loss is caused by the Plug and Play Cleanup feature. This features scans for and disables inactive system devices every 30 days. The feature incorrectly identifies the EC2 network device as inactive and removes it from the system. When this happens, the instance loses network connectivity after a reboot.
For systems that you suspect could be affected by this issue, you can download and run an in-place driver upgrade. If you are unable to perform the in-place driver upgrade, you can run a helper script. The script determines if your instance is affected. If it is affected, and the Amazon EC2 network device has not been removed, the script disables the Plug and Play Cleanup scan. If the network device was removed, the script repairs the device, disables the Plug and Play Cleanup scan, and enables your instance to reboot with network connectivity enabled.
Contents
Choose how to fix problems
There are two methods for restoring network and storage connectivity to an instance affected by this issue. Choose one of the following methods:
| Method | Prerequisites | Procedure Overview |
|---|---|---|
| Method 1 - Enhanced networking | Enhanced networking is only available in a virtual private cloud (VPC) which requires a C3 instance type. If the server does not currently use the C3 instance type, then you must temporarily change it. | You change the server instance type to a C3 instance. Enhanced networking then enables you to connect to the affected instance and fix the problem. After you fix the problem, you change the instance back to the original instance type. This method is typically faster than Method 2 and less likely to result in user error. You will incur additional charges as long as the C3 instance is running. |
| Method 2 - Registry configuration | Ability to create or access a second server. Ability to change Registry settings. | You detach the root volume from the affected instance, attach it to a different instance, connect, and make changes in the Registry. You will incur additional charges as long as the additional server is running. This method is slower than Method 1, but this method has worked in situations where Method 1 failed to resolve the problem. |
Method 1 - Enhanced networking
-
Open the Amazon EC2 console at https://console.aws.amazon.com/ec2/
. -
In the navigation pane, choose Instances.
-
Locate the affected instance. Select the instance and choose Instance state, and then choose Stop instance.
Warning
When you stop an instance, the data on instance store volumes is lost. To preserve this data, back it up to persistent storage.
-
After the instance is stopped, create a backup. Select the instance and choose Actions, then Image and templates, and then choose Create image.
-
Change the instance type to any C3 instance type.
-
Start the instance.
-
Connect to the instance using Remote Desktop and then download
the AWS PV Drivers Upgrade package to the instance. -
Extract the contents of the folder and run
AWSPVDriverSetup.msi.After running the MSI, the instance automatically reboots and then upgrades the drivers. The instance will not be available for up to 15 minutes.
-
After the upgrade is complete and the instance passes both health checks in the Amazon EC2 console, connect to the instance using Remote Desktop and verify that the new drivers were installed. In Device Manager, under Storage Controllers, locate AWS PV Storage Host Adapter. Verify that the driver version is the same as the latest version listed in the Driver Version History table. For more information, see AWS PV driver package history.
-
Stop the instance and change the instance back to its original instance type.
-
Start the instance and resume normal use.
Method 2 - Registry configuration
-
Open the Amazon EC2 console at https://console.aws.amazon.com/ec2/
. -
In the navigation pane, choose Instances.
-
Locate the affected instance. Select the instance, choose Instance state, and then choose Stop instance.
Warning
When you stop an instance, the data on instance store volumes is lost. To preserve this data, back it up to persistent storage.
-
Choose Launch instances and create a temporary Windows Server 2008 or Windows Server 2012 instance in the same Availability Zone as the affected instance. Do not create a Windows Server 2012 R2 instance.
Important
If you do not create the instance in the same Availability Zone as the affected instance you will not be able to attach the root volume of the affected instance to the new instance.
-
In the navigation pane, choose Volumes.
-
Locate the root volume of the affected instance. Detach the volume and then attach the volume to the temporary instance that you created earlier. Attach it with the default device name (xvdf).
-
Use Remote Desktop to connect to the temporary instance, and then use the Disk Management utility to make the volume available for use.
-
On the temporary instance, open the Run dialog box, type
regedit, and press Enter. -
In the Registry Editor navigation pane, choose HKEY_Local_Machine, and then from the File menu choose Load Hive.
-
In the Load Hive dialog box, navigate to Affected Volume\Windows\System32\config\System and type a temporary name in the Key Name dialog box. For example, enter OldSys.
-
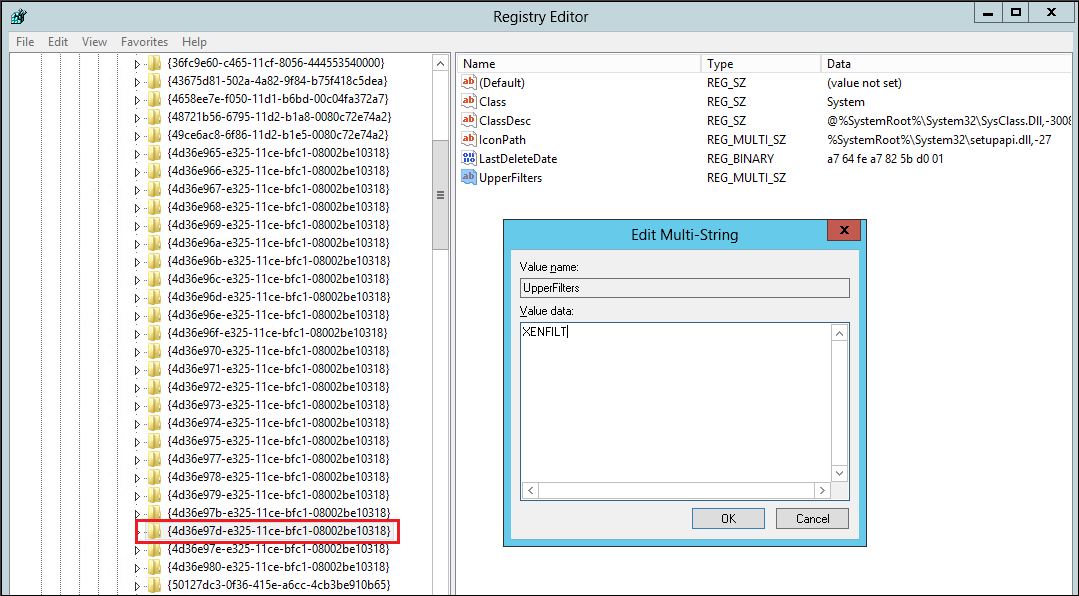
In the navigation pane of the Registry Editor, locate the following keys:
HKEY_LOCAL_MACHINE\
your_temporary_key_name\ControlSet001\Control\Class\4d36e97d-e325-11ce-bfc1-08002be10318HKEY_LOCAL_MACHINE\
your_temporary_key_name\ControlSet001\Control\Class\4d36e96a-e325-11ce-bfc1-08002be10318 -
For each key, double-click UpperFilters, enter a value of XENFILT, and then choose OK.
-
Locate the following key:
HKEY_LOCAL_MACHINE\
your_temporary_key_name\ControlSet001\Services\XENBUS\Parameters -
Create a new string (REG_SZ) with the name ActiveDevice and the following value:
PCI\VEN_5853&DEV_0001&SUBSYS_00015853&REV_01
-
Locate the following key:
HKEY_LOCAL_MACHINE\
your_temporary_key_name\ControlSet001\Services\XENBUS -
Change the Count from 0 to 1.
-
Locate and delete the following keys:
HKEY_LOCAL_MACHINE\
your_temporary_key_name\ControlSet001\Services\xenvbd\StartOverrideHKEY_LOCAL_MACHINE \
your_temporary_key_name\ControlSet001\Services\xenfilt\StartOverride -
In the Registry Editor navigation pane, choose the temporary key that you created when you first opened the Registry Editor.
-
From the File menu, choose Unload Hive.
-
In the Disk Management Utility, choose the drive you attached earlier, open the context (right-click) menu, and choose Offline.
-
In the Amazon EC2 console, detach the affected volume from the temporary instance and reattach it to your Windows Server 2012 R2 instance with the device name /dev/sda1. You must specify this device name to designate the volume as a root volume.
-
Start the instance.
-
Connect to the instance using Remote Desktop and then download
the AWS PV Drivers Upgrade package to the instance. -
Extract the contents of the folder and run
AWSPVDriverSetup.msi.After running the MSI, the instance automatically reboots and then upgrades the drivers. The instance will not be available for up to 15 minutes.
-
After the upgrade is complete and the instance passes both health checks in the Amazon EC2 console, connect to the instance using Remote Desktop and verify that the new drivers were installed. In Device Manager, under Storage Controllers, locate AWS PV Storage Host Adapter. Verify that the driver version is the same as the latest version listed in the Driver Version History table. For more information, see AWS PV driver package history.
-
Delete or stop the temporary instance you created in this procedure.
Run the remediation script
If you are unable to perform an in-place driver upgrade or migrate to a newer instance you can run the remediation script to fix the problems caused by the Plug and Play Cleanup task.
To run the remediation script
-
Open the Amazon EC2 console at https://console.aws.amazon.com/ec2/
. -
In the navigation pane, choose Instances.
-
Select the instance for which you want to run the remediation script. Choose Instance state, and then choose Stop instance.
Warning
When you stop an instance, the data on instance store volumes is lost. To preserve this data, back it up to persistent storage.
-
After the instance is stopped, create a backup. Select the instance, choose Actions, then Image and templates, and then choose Create image.
-
Choose Instance state, and then choose Start instance.
-
Connect to the instance by using Remote Desktop and then download
the RemediateDriverIssue.zip folder to the instance. -
Extract the contents of the folder.
-
Run the remediation script according to the instructions in the Readme.txt file. The file is located in the folder where you extracted RemediateDriverIssue.zip.
TCP offloading
Important
This issue does not apply to instances running AWS PV or Intel network drivers.
By default, TCP offloading is enabled for the Citrix PV drivers in Windows AMIs. If you encounter transport-level errors or packet transmission errors (as visible on the Windows Performance Monitor)—for example, when you're running certain SQL workloads—you may need to disable this feature.
Warning
Disabling TCP offloading may reduce the network performance of your instance.
To disable TCP offloading for Windows Server 2012 and 2008
-
Connect to your instance and log in as the local administrator.
-
If you're using Windows Server 2012, press Ctrl+Esc to access the Start screen, and then choose Control Panel. If you're using Windows Server 2008, choose Start and select Control Panel.
-
Choose Network and Internet, then Network and Sharing Center.
-
Choose Change adapter settings.
-
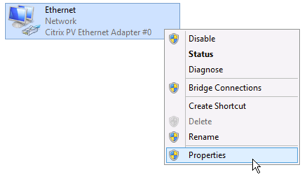
Right-click Citrix PV Ethernet Adapter #0 and select Properties.
-
In the Local Area Connection Properties dialog box, choose Configure to open the Citrix PV Ethernet Adapter #0 Properties dialog box.
-
On the Advanced tab, disable each of the properties, except for Correct TCP/UDP Checksum Value. To disable a property, select it from Property and choose Disabled from Value.
-
Choose OK.
-
Run the following commands from a Command Prompt window.
netsh int ip set global taskoffload=disablednetsh int tcp set global chimney=disablednetsh int tcp set global rss=disablednetsh int tcp set global netdma=disabled -
Reboot the instance.
Time synchronization
Prior to the release of the 2013.02.13 Windows AMI, the Citrix Xen guest agent could set the system time incorrectly. This can cause your DHCP lease to expire. If you have issues connecting to your instance, you might need to update the agent.
To determine whether you have the updated Citrix Xen guest agent, check whether
the C:\Program Files\Citrix\XenGuestAgent.exe file is from
March 2013. If the date on this file is earlier than that, update the Citrix Xen
guest agent service. For more information, see Upgrade your Citrix Xen guest agent service.
Workloads that leverage more than 20,000 disk IOPS experience degradation due to CPU bottlenecks
You can be affected by this issue if you are using Windows instances running AWS
PV drivers that leverage more than 20,000 IOPS, and you experience bug check code
0x9E: USER_MODE_HEALTH_MONITOR.
Disk reads and writes (IOs) in the AWS PV drivers occur in two phases: IO preparation and IO
completion. By default, the preparation phase runs on a single
arbitrary core. The completion phase runs on core 0. The amount of
computation required to process an IO varies based on it size and other properties.
Some IOs use more computation in the preparation phase, and others in the completion
phase. When an instance drives more than 20,000 IOPS, the preparation or completion
phase may result in a bottleneck, where the CPU upon which it runs is at 100%
capacity. Whether or not the preparation or completion phase becomes a bottleneck
depends on the properties of the IOs used by the application.
Starting with AWS PV drivers 8.4.0, the load of the preparation phase and the completion phase can be distributed across multiple cores, eliminating bottlenecks. Each application uses different IO properties. Therefore, applying one of the following configurations may raise, lower, or not impact the performance of your application. After you apply any of these configurations, monitor the application to verify that it is meeting your desired performance.
-
Prerequisites
Before you begin this troubleshooting procedure, verify the following prerequisites:
-
Your instance uses AWS PV drivers version 8.4.0 or later. To upgrade, see Upgrade PV drivers on EC2 Windows instances.
-
You have RDP access to the instance. For steps to connect to your Windows instance using RDP, see Connect to your Windows instance using an RDP client.
-
You have administrator access on the instance.
-
-
Observe CPU load on your instance
You can use Windows Task Manager to view the load on each CPU to determine potential bottlenecks to disk IO.
-
Verify that your application is running and handling traffic similar to your production workload.
-
Connect to your instance using RDP.
-
Choose the Start menu on your instance.
-
Enter
Task Managerin the Start menu to open Task Manager. -
If Task Manager displays the Summary View, choose More details to expand the detailed view.
-
Choose the Performance tab.
-
Select CPU in the left pane.
-
Right-click on the graph in the main pane and select Change graph to>Logical processors to display each individual core.
-
Depending on how many cores are on your instance, you may see lines displaying CPU load over time, or you may just see a number.
-
If you see graphs displaying load over time, look for CPUs where the box is almost entirely shaded.
-
If you see a number on each core, look for cores that consistently show 95% or greater.
-
-
Note whether core
0or a different core is experiencing a heavy load.
-
-
Choose which configuration to apply
Configuration name When to apply this configuration Notes Default configuration Workload is driving less than 20,000 IOPS, or other configurations did not improve performance or stability. For this configuration, IO occurs on a few cores, which may benefit smaller workloads by increasing cache locality and reducing context switching.
Allow driver to choose whether to distribute completion Workload is driving more than 20,000 IOPS and moderate or high load is observed on core 0.This configuration is recommended for all Xen instances using PV 8.4.0 or later and leveraging more than 20,000 IOPS, whether or not problems are encountered. Distribute both preparation and completion Workload is driving more than 20,000 IOPS, and either allowing the driver to choose the distribution did not improve performance, or a core other than 0is experiencing a high load.This configuration enables distribution of both IO preparation and IO completion. Note
We recommend that you do not distribute IO preparation without also distributing IO completion (setting
DpcRedirectionwithout settingNotifierDistributed) because the completion phase is sensitive to overload by the preparation phase when the preparation phase is running in parallel.Registry key values
-
NotifierDistributed
Value
0or not present — The completion phase will run on core0.Value
1— The driver chooses to run the completion phase or core0or one additional core per attached disk.Value
2— The driver runs the completion phase on one additional core per attached disk. -
DpcRedirection
Value
0or not present — The preparation phase will run on a single, arbitrary core.Value
1— The preparation phase is distributed across multiple cores.
Default configuration
Apply the default configuration with AWS PV driver versions prior to 8.4.0, or if performance or stability degradation is observed after applying one of the other configurations in this section.
-
Connect to your instance using RDP.
-
Open a new PowerShell command prompt as an administrator.
-
Run the following commands to remove the
NotifierDistributedandDpcRedirectionregistry keys.Remove-ItemProperty -Path HKLM:\System\CurrentControlSet\Services\xenvbd\Parameters -Name NotifierDistributedRemove-ItemProperty -Path HKLM:\System\CurrentControlSet\Services\xenvbd\Parameters -Name DpcRedirection -
Reboot your instance.
Allow driver to choose whether to distribute completion
Set
NotiferDistributedregistry key to allow the PV storage driver to choose whether or not to distribute IO completion.-
Connect to your instance using RDP.
-
Open a new PowerShell command prompt as an administrator.
-
Run the following command to set the
NotiferDistributedregistry key.Set-ItemProperty -Type DWORD -Path HKLM:\System\CurrentControlSet\Services\xenvbd\Parameters -Value 0x00000001 -Name NotifierDistributed -
Reboot your instance.
Distribute both preparation and completion
Set
NotifierDistributedandDpcRedirectionregistry keys to always distribute both the preparation and completion phases.-
Connect to your instance using RDP.
-
Open a new PowerShell command prompt as an administrator.
-
Run the following commands to set the
NotifierDistributedandDpcRedirectionregistry keys.Set-ItemProperty -Type DWORD -Path HKLM:\System\CurrentControlSet\Services\xenvbd\Parameters -Value 0x00000002 -Name NotifierDistributedSet-ItemProperty -Type DWORD -Path HKLM:\System\CurrentControlSet\Services\xenvbd\Parameters -Value 0x00000001 -Name DpcRedirection -
Reboot your instance.
-
