Tutorial: Detecting and redacting PII data with S3 Object Lambda and Amazon Comprehend
When you're using Amazon S3 for shared datasets for multiple applications and users to access, it's important to restrict privileged information, such as personally identifiable information (PII), to only authorized entities. For example, when a marketing application uses some data containing PII, it might need to first mask PII data to meet data privacy requirements. Also, when an analytics application uses a production order inventory dataset, it might need to first redact customer credit card information to prevent unintended data leakage.
With S3 Object Lambda
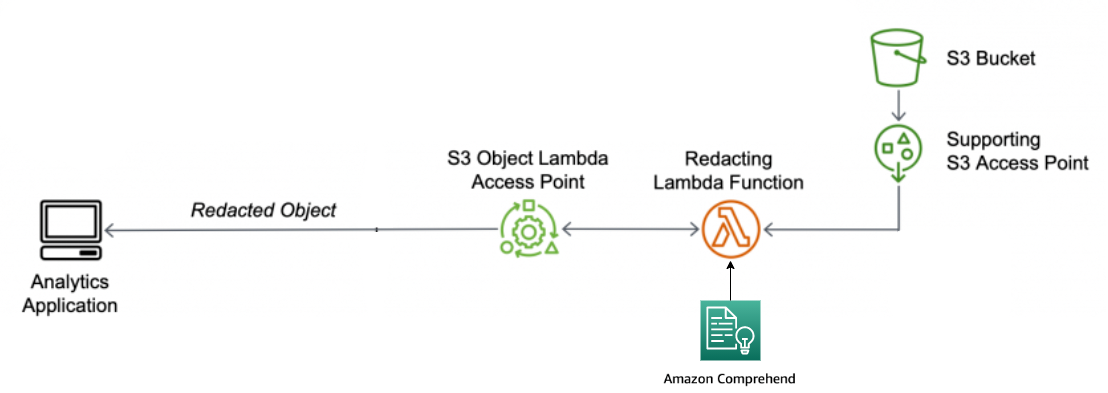
In the process, the prebuilt Lambda function uses Amazon Comprehend
Objective
In this tutorial, you learn how to use S3 Object Lambda with the prebuilt
Lambda function ComprehendPiiRedactionS3ObjectLambda.
This function uses Amazon Comprehend to detect PII entities. It then redacts
these entities by replacing them with asterisks. By redacting PII,
you conceal sensitive data, which can help with security and
compliance.
You also learn how to use and configure a prebuilt AWS Lambda function
in the AWS Serverless Application Repository
Topics
- Prerequisites: Create an IAM user with permissions
- Step 1: Create an S3 bucket
- Step 2: Upload a file to the S3 bucket
- Step 3: Create an S3 access point
- Step 4: Configure and deploy a prebuilt Lambda function
- Step 5: Create an S3 Object Lambda Access Point
- Step 6: Use the S3 Object Lambda Access Point to retrieve the redacted file
- Step 7: Clean up
- Next steps
Prerequisites: Create an IAM user with permissions
Before you start this tutorial, you must have an AWS account that you can sign in to as an AWS Identity and Access Management user (IAM user) with correct permissions.
You can create an IAM user for the tutorial. To complete this tutorial, your IAM user must attach the following IAM policies to access relevant AWS resources and perform specific actions.
Note
For simplicity, this tutorial creates and uses an IAM user. After completing this tutorial, remember to Delete the IAM user. For production use, we recommend that you follow the Security best practices in IAM in the IAM User Guide. A best practice requires human users to use federation with an identity provider to access AWS with temporary credentials. Another best practice is to require workloads to use temporary credentials with IAM roles to access AWS. To learn about using AWS IAM Identity Center to create users with temporary credentials, see Getting started in the AWS IAM Identity Center User Guide.
This tutorial also uses full-access policies. For production use, we recommend that you instead grant only the minimum permissions necessary for your use case, in accordance with security best practices.
Your IAM user requires the following AWS managed policies:
-
AmazonS3FullAccess
– Grants permissions to all Amazon S3 actions, including permissions to create and use an Object Lambda Access Point. -
AWSLambda_FullAccess
– Grants permissions to all Lambda actions. -
AWSCloudFormationFullAccess
– Grants permissions to all AWS CloudFormation actions. -
IAMFullAccess
– Grants permissions to all IAM actions. -
IAMAccessAnalyzerReadOnlyAccess
– Grants permissions to read all access information provided by IAM Access Analyzer.
You can directly attach these existing policies when creating an IAM user. For more information about how to create an IAM user, see Creating IAM users (console) in the IAM User Guide.
In addition, your IAM user requires a customer managed policy. To grant the IAM user permissions to all AWS Serverless Application Repository resources and actions, you must create an IAM policy and attach the policy to the IAM user.
To create and attach an IAM policy to your IAM user
Sign in to the AWS Management Console and open the IAM console at https://console.aws.amazon.com/iam/
. -
In the left navigation pane, choose Policies.
-
Choose Create policy.
-
On the Visual editor tab, for Service, choose Choose a service. Then, choose Serverless Application Repository.
-
For Actions, under Manual actions, select All Serverless Application Repository actions (serverlessrepo:*) for this tutorial.
As a security best practice, you should allow permissions to only those actions and resources that a user needs, based on your use case. For more information, see Security best practices in IAM in the IAM User Guide.
-
For Resources, choose All resources for this tutorial.
As a best practice, you should define permissions for only specific resources in specific accounts. Alternatively, you can grant least privilege using condition keys. For more information, see Grant least privilege in the IAM User Guide.
-
Choose Next: Tags.
-
Choose Next: Review.
-
On the Review policy page, enter a Name (for example,
tutorial-serverless-application-repository) and a Description (optional) for the policy that you are creating. Review the policy summary to make sure that you have granted the intended permissions, and then choose Create policy to save your new policy. -
In the left navigation pane, choose Users. Then, choose the IAM user for this tutorial.
-
On the Summary page of the chosen user, choose the Permissions tab, and then choose Add permissions.
-
Under Grant permissions, choose Attach existing policies directly.
-
Select the check box next to the policy that you just created (for example,
tutorial-serverless-application-repository) and then choose Next: Review. -
Under Permissions summary, review the summary to make sure that you attached the intended policy. Then, choose Add permissions.
Step 1: Create an S3 bucket
Create a bucket to store the original data that you plan to transform.
To create a bucket
Sign in to the AWS Management Console and open the Amazon S3 console at https://console.aws.amazon.com/s3/
. -
In the left navigation pane, choose Buckets.
-
Choose Create bucket.
The Create bucket page opens.
-
For Bucket name, enter a name (for example,
tutorial-bucket) for your bucket.For more information about naming buckets in Amazon S3, see Bucket naming rules.
-
For Region, choose the AWS Region where you want the bucket to reside.
For more information about the bucket Region, see Buckets overview.
-
For Block Public Access settings for this bucket, keep the default settings (Block all public access is enabled).
We recommend that you keep all Block Public Access settings enabled unless you need to turn off one or more of them for your use case. For more information about blocking public access, see Blocking public access to your Amazon S3 storage.
-
For the remaining settings, keep the defaults.
(Optional) If you want to configure additional bucket settings for your specific use case, see Creating a bucket.
-
Choose Create bucket.
Step 2: Upload a file to the S3 bucket
Upload a text file containing known PII data of various types, such as names, banking information, phone numbers, and SSNs, to the S3 bucket as the original data that you will redact PII from later in this tutorial.
For example, you can upload following the
tutorial.txt file. This is an example input
file from Amazon Comprehend.
Hello Zhang Wei, I am John. Your AnyCompany Financial Services,
LLC credit card account 1111-0000-1111-0008 has a minimum payment
of $24.53 that is due by July 31st. Based on your autopay settings,
we will withdraw your payment on the due date from your
bank account number XXXXXX1111 with the routing number XXXXX0000.

Your latest statement was mailed to 100 Main Street, Any City,
WA 98121.
After your payment is received, you will receive a confirmation
text message at 206-555-0100.
If you have questions about your bill, AnyCompany Customer Service
is available by phone at 206-555-0199 or
email at support@anycompany.com.
To upload a file to a bucket
Sign in to the AWS Management Console and open the Amazon S3 console at https://console.aws.amazon.com/s3/
. -
In the left navigation pane, choose Buckets.
-
In the Buckets list, choose the name of the bucket that you created in Step 1 (for example,
tutorial-bucket) to upload your file to. -
On the Objects tab for your bucket, choose Upload.
-
On the Upload page, under Files and folders, choose Add files.
-
Choose a file to upload, and then choose Open. For example, you can upload the
tutorial.txtfile example mentioned earlier. -
Choose Upload.
Step 3: Create an S3 access point
To use an S3 Object Lambda Access Point to access and transform the original data, you must create an S3 access point and associate it with the S3 bucket that you created in Step 1. The access point must be in the same AWS Region as the objects you want to transform.
Later in this tutorial, you'll use this access point as a supporting access point for your Object Lambda Access Point.
To create an access point
Sign in to the AWS Management Console and open the Amazon S3 console at https://console.aws.amazon.com/s3/
. -
In the left navigation pane, choose Access Points.
-
On the Access Points page, choose Create access point.
-
In the Access point name field, enter the name (for example,
tutorial-pii-access-point) for the access point.For more information about naming access points, see Rules for naming Amazon S3 access points.
-
In the Bucket name field, enter the name of the bucket that you created in Step 1 (for example,
tutorial-bucket). S3 attaches the access point to this bucket.(Optional) You can choose Browse S3 to browse and search the buckets in your account. If you choose Browse S3, choose the desired bucket, and then choose Choose path to populate the Bucket name field with that bucket's name.
-
For Network origin, choose Internet.
For more information about network origins for access points, see Creating access points restricted to a virtual private cloud.
-
By default, all block public access settings are turned on for your access point. We recommend that you keep Block all public access enabled. For more information, see Managing public access to access points.
-
For all other access point settings, keep the default settings.
(Optional) You can modify the access point settings to support your use case. For this tutorial, we recommend keeping the default settings.
(Optional) If you need to manage access to your access point, you can specify an access point policy. For more information, see Access point policy examples.
-
Choose Create access point.
Step 4: Configure and deploy a prebuilt Lambda function
To redact PII data, configure and deploy the prebuilt AWS Lambda
function ComprehendPiiRedactionS3ObjectLambda for use
with your S3 Object Lambda Access Point.
To configure and deploy the Lambda function
-
Sign in to the AWS Management Console and view the
ComprehendPiiRedactionS3ObjectLambdafunction in the AWS Serverless Application Repository. -
For Application settings, under Application name, keep the default value (
ComprehendPiiRedactionS3ObjectLambda) for this tutorial.(Optional) You can enter the name that you want to give to this application. You might want to do this if you plan to configure multiple Lambda functions for different access needs for the same shared dataset.
-
For MaskCharacter, keep the default value (
*). The mask character replaces each character in the redacted PII entity. -
For MaskMode, keep the default value (MASK). The MaskMode value specifies whether the PII entity is redacted with the
MASKcharacter or thePII_ENTITY_TYPEvalue. -
To redact the specified types of data, for PiiEntityTypes, keep the default value ALL. The PiiEntityTypes value specifies the PII entity types to be considered for redaction.
For more information about the list of supported PII entity types, see Detect Personally Identifiable Information (PII) in the Amazon Comprehend Developer Guide.
-
Keep the remaining settings set to the defaults.
(Optional) If you want to configure additional settings for your specific use case, see the Readme file section on the left side of the page.
-
Select the check box next to I acknowledge that this app creates custom IAM roles.
-
Choose Deploy.
-
On the new application's page, under Resources, choose the Logical ID of the Lambda function that you deployed to review the function on the Lambda function page.
Step 5: Create an S3 Object Lambda Access Point
An S3 Object Lambda Access Point provides the flexibility to invoke a Lambda function directly from an S3 GET request so that the function can redact PII data retrieved from an S3 access point. When creating and configuring an S3 Object Lambda Access Point, you must specify the redacting Lambda function to invoke and provide the event context in JSON format as custom parameters for Lambda to use.
The event context provides information about the request being made in the event passed from S3 Object Lambda to Lambda. For more information about all the fields in the event context, see Event context format and usage.
To create an S3 Object Lambda Access Point
Sign in to the AWS Management Console and open the Amazon S3 console at https://console.aws.amazon.com/s3/
. -
In the left navigation pane, choose Object Lambda Access Points.
-
On the Object Lambda Access Points page, choose Create Object Lambda Access Point.
-
For Object Lambda Access Point name, enter the name that you want to use for the Object Lambda Access Point (for example,
tutorial-pii-object-lambda-accesspoint). -
For Supporting Access Point, enter or browse to the standard access point that you created in Step 3 (for example,
tutorial-pii-access-point), and then choose Choose supporting Access Point. -
For S3 APIs, to retrieve objects from the S3 bucket for Lambda function to process, select GetObject.
-
For Invoke Lambda function, you can choose either of the following two options for this tutorial.
-
Choose Choose from functions in your account and choose the Lambda function that you deployed in Step 4 (for example,
serverlessrepo-ComprehendPiiRedactionS3ObjectLambda) from the Lambda function dropdown list. -
Choose Enter ARN, and then enter the Amazon Resource Name (ARN) of the Lambda function that you created in Step 4.
-
-
For Lambda function version, choose $LATEST (the latest version of the Lambda function that you deployed in Step 4).
-
(Optional) If you need your Lambda function to recognize and process GET requests with range and part number headers, select Lambda function supports requests using range and Lambda function supports requests using part numbers. Otherwise, clear these two check boxes.
For more information about how to use range or part numbers with S3 Object Lambda, see Working with Range and partNumber headers.
-
(Optional) Under Payload - optional, add JSON text to provide your Lambda function with additional information.
A payload is optional JSON text that you can provide to your Lambda function as input for all invocations coming from a specific S3 Object Lambda Access Point. To customize the behaviors for multiple Object Lambda Access Points that invoke the same Lambda function, you can configure payloads with different parameters, thereby extending the flexibility of your Lambda function.
For more information about payload, see Event context format and usage.
-
(Optional) For Request metrics - optional, choose Disable or Enable to add Amazon S3 monitoring to your Object Lambda Access Point. Request metrics are billed at the standard Amazon CloudWatch rate. For more information, see CloudWatch pricing
. -
Under Object Lambda Access Point policy - optional, keep the default setting.
(Optional) You can set a resource policy. This resource policy grants the
GetObjectAPI permission to use the specified Object Lambda Access Point. -
Keep the remaining settings set to the defaults, and choose Create Object Lambda Access Point.
Step 6: Use the S3 Object Lambda Access Point to retrieve the redacted file
Now, S3 Object Lambda is ready to redact PII data from your original file.
To use the S3 Object Lambda Access Point to retrieve the redacted file
When you request to retrieve a file through your S3 Object Lambda Access Point,
you make a GetObject API call to S3 Object Lambda. S3 Object Lambda invokes
the Lambda function to redact your PII data and returns the
transformed data as the response to the standard S3
GetObject API call.
Sign in to the AWS Management Console and open the Amazon S3 console at https://console.aws.amazon.com/s3/
. -
In the left navigation pane, choose Object Lambda Access Points.
-
On the Object Lambda Access Points page, choose the S3 Object Lambda Access Point that you created in Step 5 (for example,
tutorial-pii-object-lambda-accesspoint). -
On the Objects tab of your S3 Object Lambda Access Point, select the file that has the same name (for example,
tutorial.txt) as the one that you uploaded to the S3 bucket in Step 2.This file should contain all the transformed data.
-
To view the transformed data, choose Open or Download.
You should be able to see the redacted file, as shown in the following example.
Hello *********. Your AnyCompany Financial Services,
LLC credit card account ******************* has a minimum payment
of $24.53 that is due by *********. Based on your autopay settings,
we will withdraw your payment on the due date from your
bank account ********** with the routing number *********.

Your latest statement was mailed to **********************************.
After your payment is received, you will receive a confirmation
text message at ************.
If you have questions about your bill, AnyCompany Customer Service
is available by phone at ************ or
email at **********************.
Step 7: Clean up
If you redacted your data through S3 Object Lambda only as a learning exercise, delete the AWS resources that you allocated so that you no longer accrue charges.
Substeps
- Delete the Object Lambda Access Point
- Delete the S3 access point
- Delete the Lambda function
- Delete the CloudWatch log group
- Delete the original file in the S3 source bucket
- Delete the S3 source bucket
- Delete the IAM role for your Lambda function
- Delete the customer managed policy for your IAM user
- Delete the IAM user
Delete the Object Lambda Access Point
Sign in to the AWS Management Console and open the Amazon S3 console at https://console.aws.amazon.com/s3/
. -
In the left navigation pane, choose Object Lambda Access Points.
-
On the Object Lambda Access Points page, choose the option button to the left of the S3 Object Lambda Access Point that you created in Step 5 (for example,
tutorial-pii-object-lambda-accesspoint). -
Choose Delete.
-
Confirm that you want to delete your Object Lambda Access Point by entering its name in the text field that appears, and then choose Delete.
Delete the S3 access point
Sign in to the AWS Management Console and open the Amazon S3 console at https://console.aws.amazon.com/s3/
. -
In the left navigation pane, choose Access Points.
-
Navigate to the access point that you created in Step 3 (for example,
tutorial-pii-access-point), and choose the option button next to the name of the access point. -
Choose Delete.
-
Confirm that you want to delete your access point by entering its name in the text field that appears, and then choose Delete.
Delete the Lambda function
-
In the AWS Lambda console at https://console.aws.amazon.com/lambda/
, choose Functions in the left navigation pane. -
Choose the function that you created in Step 4 (for example,
serverlessrepo-ComprehendPiiRedactionS3ObjectLambda). -
Choose Actions, and then choose Delete.
-
In the Delete function dialog box, choose Delete.
Delete the CloudWatch log group
Open the CloudWatch console at https://console.aws.amazon.com/cloudwatch/
. -
In the left navigation pane, choose Log groups.
-
Find the log group whose name ends with the Lambda function that you created in Step 4 (for example,
serverlessrepo-ComprehendPiiRedactionS3ObjectLambda). -
Choose Actions, and then choose Delete log group(s).
-
In the Delete log group(s) dialog box, choose Delete.
Delete the original file in the S3 source bucket
Sign in to the AWS Management Console and open the Amazon S3 console at https://console.aws.amazon.com/s3/
. -
In the left navigation pane, choose Buckets.
-
In the Bucket name list, choose the name of the bucket that you uploaded the original file to in Step 2 (for example,
tutorial-bucket). -
Select the check box to the left of the name of the object that you want to delete (for example,
tutorial.txt). -
Choose Delete.
-
On the Delete objects page, in the Permanently delete objects? section, confirm that you want to delete this object by entering
permanently deletein the text box. -
Choose Delete objects.
Delete the S3 source bucket
Sign in to the AWS Management Console and open the Amazon S3 console at https://console.aws.amazon.com/s3/
. -
In the left navigation pane, choose Buckets.
-
In the Buckets list, choose the option button next to the name of the bucket that you created in Step 1 (for example,
tutorial-bucket). -
Choose Delete.
-
On the Delete bucket page, confirm that you want to delete the bucket by entering the bucket name in the text field, and then choose Delete bucket.
Delete the IAM role for your Lambda function
Sign in to the AWS Management Console and open the IAM console at https://console.aws.amazon.com/iam/
. -
In the left navigation pane, choose Roles, and then select the check box next to the role name that you want to delete. The role name starts with the name of the Lambda function that you deployed in Step 4 (for example,
serverlessrepo-ComprehendPiiRedactionS3ObjectLambda). -
Choose Delete.
-
In the Delete dialog box, enter the role name in the text input field to confirm deletion. Then, choose Delete.
Delete the customer managed policy for your IAM user
Sign in to the AWS Management Console and open the IAM console at https://console.aws.amazon.com/iam/
. -
In the left navigation pane, choose Policies.
-
On the Policies page, enter the name of the customer managed policy that you created in the Prerequisites (for example,
tutorial-serverless-application-repository) in the search box to filter the list of policies. Select the option button next to the name of the policy that you want to delete. -
Choose Actions, and then choose Delete.
-
Confirm that you want to delete this policy by entering its name in the text field that appears, and then choose Delete.
Delete the IAM user
Sign in to the AWS Management Console and open the IAM console at https://console.aws.amazon.com/iam/
. -
In the left navigation pane, choose Users, and then select the check box next to the user name that you want to delete.
-
At the top of the page, choose Delete.
-
In the Delete
user
                                name
? dialog box, enter the user name in the text input field to confirm the deletion of the user. Choose Delete.
Next steps
After completing this tutorial, you can further explore the following related use cases:
-
You can create multiple S3 Object Lambda Access Points and enable them with prebuilt Lambda functions that are configured differently to redact specific types of PII depending on the data accessors' business needs.
Each type of user assumes an IAM role and only has access to one S3 Object Lambda Access Point (managed through IAM policies). Then, you attach each
ComprehendPiiRedactionS3ObjectLambdaLambda function configured for a different redaction use case to a different S3 Object Lambda Access Point. For each S3 Object Lambda Access Point, you can have a supporting S3 access point to read data from an S3 bucket that stores the shared dataset.For more information about how to create an S3 bucket policy that allows users to read from the bucket only through S3 access points, see Configuring IAM policies for using access points.
For more information about how to grant a user permission to access the Lambda function, the S3 access point, and the S3 Object Lambda Access Point, see Configuring IAM policies for Object Lambda Access Points.
-
You can build your own Lambda function and use S3 Object Lambda with your customized Lambda function to meet your specific data needs.
For example, to explore various data values, you can use S3 Object Lambda and your own Lambda function that uses additional Amazon Comprehend features
, such as entity recognition, key phrase recognition, sentiment analysis, and document classification, to process data. You can also use S3 Object Lambda together with Amazon Comprehend Medical , a HIPAA-eligible NLP service, to analyze and extract data in a context-aware manner. For more information about how to transform data with S3 Object Lambda and your own Lambda function, see Tutorial: Transforming data for your application with S3 Object Lambda.
