Salesforce connector for Amazon AppFlow
Salesforce provides customer relationship management (CRM) software that help you with sales, customer service, e-commerce, and more. If you're a Salesforce user, you can connect Amazon AppFlow to your Salesforce account. Then, you can use Salesforce as a data source or destination in your flows. Run these flows to transfer data between Salesforce and AWS services or other supported applications.
Amazon AppFlow support for Salesforce
Amazon AppFlow supports Salesforce as follows.
- Supported as a data source?
Yes. You can use Amazon AppFlow to transfer data from Salesforce.
- Supported as a data destination?
Yes. You can use Amazon AppFlow to transfer data to Salesforce.
- Supported API version
-
Amazon AppFlow transfers data with version 58.0 of the Salesforce Platform API.
Amazon AppFlow began supporting this version on June 30, 2023. If you have a Salesforce connection that you created before this date, the connection uses a prior API version. The version depends on when you created the connection. For more information, see History of supported Salesforce Platform API versions.
Before you begin
Before you can use Amazon AppFlow to transfer data to or from Salesforce, you must meet these requirements.
Minimum requirements
-
You have a Salesforce account.
-
Your Salesforce account is enabled for API access. API access is enabled by default for the Enterprise, Unlimited, Developer, and Performance editions.
-
Your Salesforce account allows you to install connected apps. If you lack access to this functionality, contact your Salesforce administrator. For more information, see Connected Apps
in the Salesforce help.
Optional requirements
-
If you want to use event-driven flow triggers, you must enable change data capture in Salesforce. For more information on how to enable this, see Select Objects for Change Notifications in the User Interface
in the Salesforce documentation. -
If you want to create private connections using AWS PrivateLink, you must enable both
Manage MetadataandManage External Connectionsuser permissions in your Salesforce account. Private connections are currently available in the us-east-1, us-west-2, ap-northeast-1, ap-south-1, ap-southeast-2, ca-central-1, and eu-central-1 AWS Regions.
If you meet those requirements, you're ready to connect Amazon AppFlow to your Salesforce account. For typical connections, you don't need do anything else in Salesforce. Amazon AppFlow handles the remaining requirements with the AWS managed connected app.
The AWS managed connected app for Salesforce
The AWS managed connected app helps you create Salesforce connections in fewer steps. Amazon AppFlow creates this connected app for you in your Salesforce account. In Salesforce, a connected app is a framework that authorizes external applications, like Amazon AppFlow, to access your Salesforce data. Amazon AppFlow configures the connected app with the required settings and names it Amazon AppFlow Embedded Login App.
Amazon AppFlow creates the connected app only when you do both of the following:
-
Create a Salesforce connection by using the Amazon AppFlow console.
-
When you configure the connection, set OAuth grant type to Authorization code.
Requirements for the OAuth grant types for Salesforce
When you use the Amazon AppFlow console to configure a Salesforce connection, you choose the OAuth grant type. The grant type determines how Amazon AppFlow communicates with Salesforce to request access to your data. Your choice affects the requirements that you must meet before you create the connection. You can choose either of these types:
- Authorization code
-
If you choose this grant type, the Amazon AppFlow console shows a window that prompts you for authorization. In the window, you sign in to your Salesforce account if you haven't signed in already. Then, you choose Allow to allow Amazon AppFlow to access your data. After you authorize Amazon AppFlow, it creates the AWS managed connected app in your Salesforce account.
If you want to use this grant type, you don't need to meet any additional requirements in your Salesforce account.
- JSON Web Token (JWT)
-
If you choose this grant type, you provide a JWT that authorizes Amazon AppFlow to access your Salesforce data. Then, when Amazon AppFlow attempts to access your data, it passes the JWT to Salesforce, and Salesforce grants the access.
If you want to use this grant type, you must create a JWT ahead of time, but you won't need to sign in to Salesforce when Amazon AppFlow connects to your account.
For more information about the JWT authorization flow, and for the steps to create a JWT, see OAuth 2.0 JWT Bearer Flow for Server-to-Server Integration
in the Salesforce help. Before you can create a JWT, you must create your own connected app in your Salesforce account. Also, you must configure this connected app to meet the requirements for Amazon AppFlow integration.
Requirements for using your own connected app
Unless you use the AWS managed connected app that Amazon AppFlow creates for you, you must meet these requirements:
-
In your Salesforce account, you've created a connected app for Amazon AppFlow. For more information about connected apps, and for the steps to create one, see Create a Connected App
in the Salesforce help. -
You've configured the connected app as follows:
-
You've activated the Enable OAuth Settings check box.
-
In the Callback URL text field, you've entered one or more redirect URLs for Amazon AppFlow.
Redirect URLs have the following format:
https://region.console.aws.amazon.com/appflow/oauthIn this URL, region is the code for the AWS Region where you use Amazon AppFlow to transfer data from Salesforce. For example, the code for the US East (N. Virginia) Region is
us-east-1. For that Region, the URL is the following:https://us-east-1.console.aws.amazon.com/appflow/oauthFor the AWS Regions that Amazon AppFlow supports, and their codes, see Amazon AppFlow endpoints and quotas in the AWS General Reference.
-
You've activated the Require Secret for Web Server Flow check box.
-
In the Available OAuth Scopes list, you've added the following scopes:
-
Manage user data via APIs (api)
-
Access custom permissions (custom_permissions)
-
Access the identity URL service (id, profile, email, address, phone)
-
Access unique user identifiers (openid)
-
Perform requests at any time (refresh_token, offline_access)
-
-
You've set the refresh token policy for the connected app to Refresh token is valid until revoked. Otherwise, your flows will fail when your refresh token expires. For more information on how to check and edit the refresh token policy, see Manage OAuth Access Policies for a Connected App
in the Salesforce documentation. -
If you configured your connected app to enforce IP address restrictions, you must grant access to the addresses used by Amazon AppFlow. For more information, see AWS IP address ranges in the Amazon Web Services General Reference.
-
Connecting Amazon AppFlow to your Salesforce account
To grant Amazon AppFlow access to your Salesforce data, create a Salesforce connection in the Amazon AppFlow console. If you haven't yet configured your Salesforce account for Amazon AppFlow integration, see Before you begin.
To connect to Salesforce
Sign in to the AWS Management Console and open the Amazon AppFlow console at https://console.aws.amazon.com/appflow/
. -
In the navigation pane on the left, choose Connections.
-
On the Manage connections page, for Connectors, choose Salesforce.
-
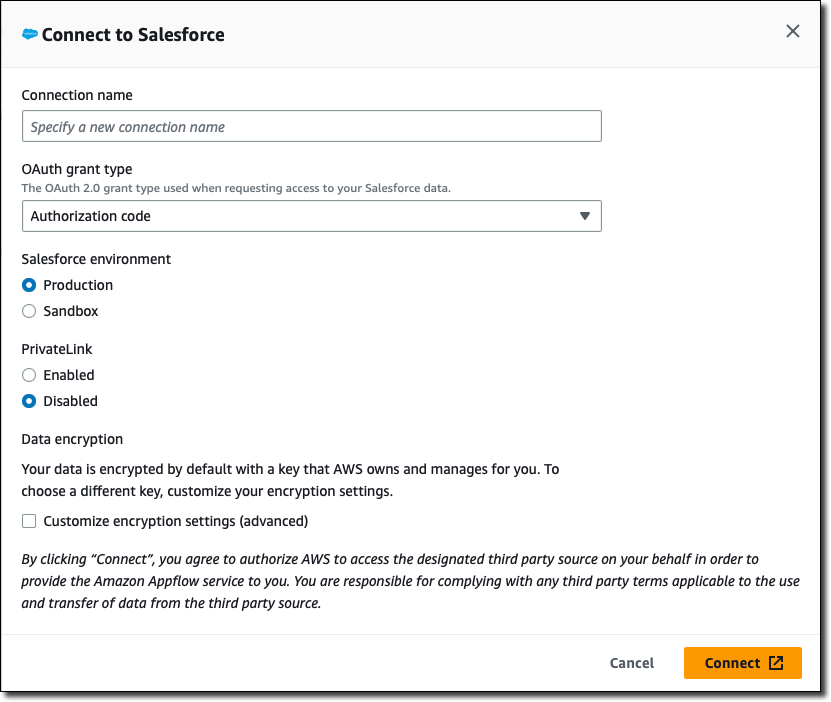
Choose Create connection. The console shows the Connect to Salesforce window.
-
For Connection name, enter a custom name that will help you recognize the connection later.
-
For OAuth grant type, choose how to authorize Amazon AppFlow to access your Salesforce data:
-
Authorization code — Authorize Amazon AppFlow in a window that the console shows after you finish configuring the connection.
-
JSON Web Token (JWT) — Authorize Amazon AppFlow by providing a JWT.
-
-
For Salesforce environment, choose one of the following:
-
Production — Connects Amazon AppFlow to your Salesforce production org.
-
Sandbox — Connects Amazon AppFlow to a Salesforce sandbox.
-
-
For PrivateLink, choose Enabled if you want to connect to your Salesforce account privately through an AWS PrivateLink connection. Otherwise, leave this open set to Disabled.
-
Optionally, under Data encryption, choose Customize encryption settings (advanced) if you want to encrypt your data with a customer managed key in the AWS Key Management Service (AWS KMS).
By default, Amazon AppFlow encrypts your data with a KMS key that AWS creates, uses, and manages for you. Choose this option if you want to encrypt your data with your own KMS key instead.
Amazon AppFlow always encrypts your data during transit and at rest. For more information, see Data protection in Amazon AppFlow.
If you want to use a KMS key from the current AWS account, select this key under Choose an AWS KMS key. If you want to use a KMS key from a different AWS account, enter the Amazon Resource Name (ARN) for that key.
-
Choose Connect.
-
If you chose Authorization code for OAuth grant type, the console shows a window. In the window, sign in to your Salesforce account if needed. Then, choose Allow to allow Amazon AppFlow to access your Salesforce data.
On the Manage connections page, your new connection appears in the Connections table. When you create a flow that uses Salesforce as the data source, you can select this connection.
AWS PrivateLink connections
If you enabled the option to connect to Salesforce through AWS PrivateLink, wait for Amazon AppFlow to set up the private connection before you create a flow. To set up the connection, Amazon AppFlow provisions an interface VPC endpoint and attempts to connect to your VPC endpoint service. This can take several minutes. Until the process completes, you can't transfer your Salesforce objects with a flow.
For more information about AWS PrivateLink, see the AWS PrivateLink Guide.
Additional flow settings for Salesforce
When you configure a flow that uses a Salesforce connection, the Amazon AppFlow console shows some unique settings that aren't available for other types of flows.
Salesforce API preference
When you use Salesforce as the source or destination, you can configure the Salesforce API preference setting. Use this setting to specify what Salesforce API Amazon AppFlow uses when your flow transfers data to or from Salesforce. Your choice optimizes your flow for small to medium-sized data transfers, large data transfers, or both.
The Amazon AppFlow console provides this setting on the Configure flow page under Source details or Destination details. To view it, expand the Additional settings section.

You can choose one of these options:
-
Automatic (default) — For each flow run, Amazon AppFlow selects the API to use based on the number of records that the run transfers. The threshold of records that determines the API varies based on whether Salesforce is the source or the destination, as shown in the following table:
Is Salesforce the source or destination?
Number of records transferred
API used to transfer records
Source
Fewer than 1,000,000
Salesforce REST API
1,000,000 or more
Salesforce Bulk API 2.0
Destination
Fewer than 1,000
Salesforce REST API
1,000 or more
Salesforce Bulk API 2.0
Notes
-
If you choose this option, be aware that each of the potential Salesforce APIs structures data differently. For recurring flows, the data output might vary from one flow run to the next. For example, if a flow runs daily, it might use REST API on one day to transfer 900 records, and it might use Bulk API 2.0 on the next day to transfer 1,100 records. For each of these runs, the respective Salesforce API formats the data differently. Some of the differences include how dates are formatted and how null values are represented.
-
Flow runs that use Bulk API 2.0 can't transfer Salesforce compound fields.
If you choose this option, you optimize flow performance for all data transfer sizes, but the tradeoff is inconsistent formatting in the output.
-
-
Standard — Amazon AppFlow uses only Salesforce REST API. This option optimizes your flow for small to medium-sized data transfers. By choosing this option, you ensure that your flow writes consistent output, but you decrease performance for large data transfers that are better suited for Bulk API 2.0.
Note
If you choose this option and your flow attempts to transfer a very large dataset, it might fail with a timeout error.
-
Bulk — Amazon AppFlow uses only Salesforce Bulk API 2.0. This API runs asynchronous data transfers, and it's optimal for large datasets. If you choose this option, you ensure that your flow writes consistent output, but you optimize performance only for large data transfers.
Note
If you choose this option, your flow can't transfer Salesforce compound fields because Bulk API 2.0 doesn't support them.
Salesforce destination record preference
When you use Salesforce as a destination, the Amazon AppFlow console shows additional settings on the Map data fields page under Destination record preference.
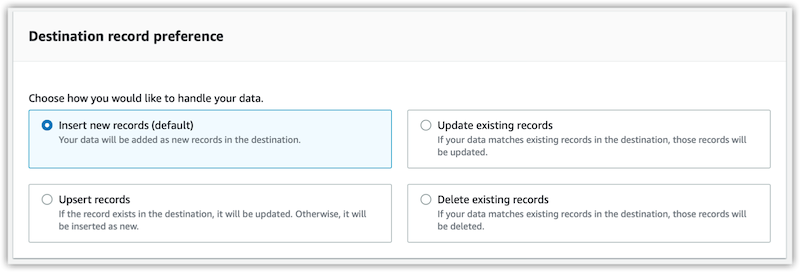
You can choose one of these options:
- Insert new records
-
This is the default data transfer option. When you choose this setting, Amazon AppFlow inserts your source data into the chosen Salesforce object as a new record.
- Update existing records
-
When you choose this setting, Amazon AppFlow uses your source data to update existing records in Salesforce. For every source record, Amazon AppFlow looks for a matching record in Salesforce based on your criteria. You can specify matching criteria on the Map data fields page. To do so, select a field in the source application and map it to a Salesforce record ID field with the dropdown list.
When a matching record is found, Amazon AppFlow updates the record in Salesforce. If no matching record is found, Amazon AppFlow ignores the record or fails the flow per your chosen error handling option. You can specify your error handling preferences on the Configure flow page.
Note that you must use the upsert operation in order to update existing records using an external id field. The standard update operation does not support use of an external id field.
- Upsert records
-
When you choose this setting, Amazon AppFlow performs an upsert operation in Salesforce. For every source record, Amazon AppFlow looks for a matching record in Salesforce based on your criteria. You can specify matching criteria on the Map data fields page. To do so, select a field in the source application and map it to a Salesforce external field using the dropdown list.
When Amazon AppFlow finds a matching record, it updates the record in Salesforce. If Amazon AppFlow finds no matching record, it inserts the data as a new record. Any errors in performing the operation are handled according to your chosen error handling option. You can specify your error handling preferences on the Configure flow page.
- Delete existing records
-
When you choose this setting, Amazon AppFlow deletes Salesforce records that you specify. To specify the records, create a file that contains the IDs that Salesforce assigned to them. Provide that file as the source data for your flow.
For example, the following CSV file lists the IDs of two Salesforce records to delete.
salesforce_id
A1B2C3D4E5F6G7H8I9
J1K2L3M4N5O6P7Q9R0
In this example, the IDs appear under the one source field in the file,
salesforce_id.In your flow definition, you must specify the source field that contains the IDs of the objects to delete. You do this when you map data fields. At that point, you map the source field to the corresponding destination field in Salesforce. For example, if you assigned the Salesforce object Opportunity to your flow, then the destination field name is Opportunity ID.
You can provide a source data file that has other fields besides the one with the IDs, but Amazon AppFlow ignores them.
Each flow can delete only one type of object, which is the Salesforce object that you choose when you configure the destination details.
After your flow runs, you can view the records that it deleted in your Salesforce recycle bin. You can recover your files from the recycle bin if needed. However, you must do so before its retention period elapses or before the files are manually purged.
If any errors occur when you run the flow, Amazon AppFlow handles them according to the error handling option that you chose when you configured the flow.
Notes
-
Amazon AppFlow only supports the automatic import of newly created Salesforce fields into Amazon S3 without requiring the user to update their flow configurations.
-
When you use Salesforce as a source, you can import 15 GB of data as part of a single flow run. To transfer over 15 GB of data, you can split your workload into multiple flows by applying the appropriate filters to each flow. Salesforce records are typically 2 KB in size, but can be up to 4 KB. Therefore, 15 GB would be approximately 7.5 million Salesforce records.
-
When you use Salesforce as a source, you can run schedule-triggered flows at a maximum frequency of one flow run per minute.
-
Amazon AppFlow supports Change Data Capture Events and Platform events from Salesforce.
Supported destinations
When you create a flow that uses Salesforce as the data source, you can set the destination to any of the following connectors:
-
Amazon Connect
-
Amazon EventBridge
-
Amazon Honeycode
-
Lookout for Metrics
-
Amazon Redshift
-
Amazon S3
-
Marketo
-
Salesforce
-
Snowflake
-
Upsolver
-
Zendesk
You can also set the destination to any custom connectors that you
create with the Amazon AppFlow Custom Connector SDKs for
Python
Related resources
-
Building Salesforce integrations with EventBridge and Amazon AppFlow
in the AWS Compute blog -
Building Secure and Private Data Flows Between AWS and Salesforce Using Amazon AppFlow
in the AWS Partner Network (APN) blog -
Using Amazon AppFlow to Achieve Bi-Directional Sync Between Salesforce and Amazon RDS for PostgreSQL
in the AWS Partner Network (APN) blog -
Salesforce Private Connect Demo
in the Salesforce documentation -
Manage OAuth Access Policies for a Connected App
in the Salesforce documentation -
Select Objects for Change Notifications in the User Interface
in the Salesforce documentation -
How to insert new Salesforce records with data in Amazon S3 using Amazon AppFlow
Using a connected app with the Amazon AppFlow API
You can use your own connected app for Salesforce with Amazon AppFlow API.
To use your own connected app, you need to pass on the clientId, clientSecret, and Secrets Manager secret ARN to Amazon AppFlow.
You must attach a resource policy to the Secrets Manager secret and the KMS key which is used to encrypt the secret. This resource policy allows Amazon AppFlow to read the secret and use it.
The following is the policy to be attached for the KMS key. Replace the
placeholder with your own information.
Additionally, you can add confused deputy protection to this KMS key policy. To learn
about the confused deputy problem and mitigations, refer to our Amazon S3 documentation. The following example shows how you can use the
aws:SourceArn and aws:SourceAccount global condition context keys
in your AWS KMS key to prevent the confused deputy problem. Replace Account ID
with your AWS account ID and Resource ARNs with a
list of ARNs for any connector profiles created with the client credentials secret.
Additionally you may use wildcards in the aws:SourceAccount key (*). For example, you can
replace Resource ARNs with
arn:aws:appflow:
to give access to all Amazon AppFlow resources created on your behalf.region:accountId:*
The following is the policy to be attached for the secret. Replace the
placeholder with your own information.
History of supported Salesforce Platform API versions
When you run a flow with Salesforce as the source or destination, Amazon AppFlow transfers data by using a version of the Salesforce Platform API. The version depends on when you created the Salesforce connection that you assigned to the flow.
| Date when connection created | API version used |
|---|---|
| June 30, 2023 to present | 58.0 |
| August 30, 2022 to June 29, 2023 | 55.0 |
| January 19th, 2021 to August 29, 2022 | 50.0 |
| Before January 19th, 2021 | 47.0 |
