Step 1: Prepare your self-managed AD Domain
First you need to complete several prerequisite steps on your self-managed (on-premises) domain.
Configure your self-managed firewall
You must configure your self-managed firewall so that the following ports are open to the CIDRs for all subnets used by the VPC that contains your AWS Managed Microsoft AD. In this tutorial, we allow both incoming and outgoing traffic from 10.0.0.0/16 (the CIDR block of our AWS Managed Microsoft AD's VPC) on the following ports:
-
TCP/UDP 53 - DNS
-
TCP/UDP 88 - Kerberos authentication
-
TCP/UDP 389 - Lightweight Directory Access Protocol (LDAP)
-
TCP 445 - Server Message Block (SMB)
-
TCP 9389 - Active Directory Web Services (ADWS) (Optional - This port needs to be open if you want to use your NetBIOS name instead of your full domain name for authentication with AWS applications like Amazon WorkDocs or Amazon QuickSight.)
Note
SMBv1 is no longer supported.
These are the minimum ports that are needed to connect the VPC to the self-managed directory. Your specific configuration may require additional ports be open.
Ensure that Kerberos pre-authentication is enabled
User accounts in both directories must have Kerberos preauthentication enabled. This is the default, but let's check the properties of any random user to make sure nothing has changed.
To view user's Kerberos settings
-
On your self-managed domain controller, open Server Manager.
-
On the Tools menu, choose Active Directory Users and Computers.
-
Choose the Users folder and open the context (right-click) menu. Select any random user account listed in the right pane. Choose Properties.
-
Choose the Account tab. In the Account options list, scroll down and ensure that Do not require Kerberos preauthentication is not checked.

Configure DNS conditional forwarders for your self-managed domain
You must set up DNS conditional forwarders on each domain. Before doing this on your self-managed domain, you will first get some information about your AWS Managed Microsoft AD.
To configure conditional forwarders on your self-managed domain
-
Sign into the AWS Management Console and open the AWS Directory Service console
. -
In the navigation pane, select Directories.
-
Choose the directory ID of your AWS Managed Microsoft AD.
-
On the Details page, take note of the values in Directory name and the DNS address of your directory.
-
Now, return to your self-managed domain controller. Open Server Manager.
-
On the Tools menu, choose DNS.
-
In the console tree, expand the DNS server of the domain for which you are setting up the trust. Our server is WIN-5V70CN7VJ0.corp.example.com.
-
In the console tree, choose Conditional Forwarders.
-
On the Action menu, choose New conditional forwarder.
-
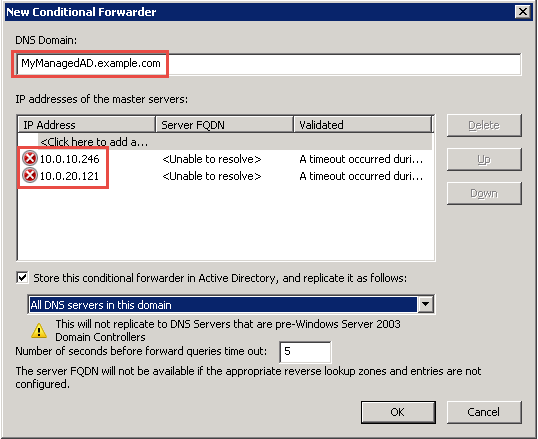
In DNS domain, type the fully qualified domain name (FQDN) of your AWS Managed Microsoft AD, which you noted earlier. In this example, the FQDN is MyManagedAD.example.com.
-
Choose IP addresses of the primary servers and type the DNS addresses of your AWS Managed Microsoft AD directory, which you noted earlier. In this example those are: 10.0.10.246, 10.0.20.121
After entering the DNS addresses, you might get a "timeout" or "unable to resolve" error. You can generally ignore these errors.

-
Select Store this conditional forwarder in Active Directory, and replicate it as follows.
-
Select All DNS servers in this domain, and then choose OK.
Next Step
Step 2: Prepare your AWS Managed Microsoft AD