Installing and configuring a data collector in AWS DMS
Learn how to install your DMS data collector, how to specify data forwarding credentials, and how to add an LDAP server to your project.
The following table describes hardware and software requirements for installing an DMS data collector.
| Minimum | Recommended |
|---|---|
|
Processor: 2 cores with CPU benchmark score greater than 8,000 |
Processor: 4 cores with CPU benchmark score greater than 11,000 |
|
RAM: 8 GB |
RAM: 16 GB |
|
Hard drive size: 256 GB |
Hard drive size: 512 GB |
|
Operating system: Microsoft Windows Server 2012 or higher |
Operating system: Windows Server 2016 or higher |
To install a data collector on a client on your network
-
Run the .MSI installer. The AWS DMS Fleet Advisor Collector Setup Wizard page appears.
-
Choose Next. The End-user license agreement appears.
-
Read and accept the End-user license agreement.
-
Choose Next. The Destination folder page appears.
-
Choose Next to install the data collector in the default directory.
Or choose Change to enter another install directory. Then choose Next.
-
On the Desktop shortcut page, select the box to install an icon on your desktop.
-
Choose Install. The data collector is installed in the directory that you chose.
-
On the Completed DMS Collector Setup Wizard page, choose Launch AWS DMS Collector, and then choose Finish.
Your DMS data collector uses .NET libraries, connectors, and data providers to connect to your source databases. The DMS data collector installer automatically installs this required software for all supported databases on your server.
After you install the data collector, you can run it from a browser by entering
http://localhost:11000/ as the address. Optionally, from the
Microsoft Windows Start menu, choose AWS DMS
Collector in the list of programs. When you first run DMS data collector, you are
asked to configure credentials. Create the user name and password for signing in to the
data collector.
On the DMS data collector home page, you can find information for preparing and running metadata collection, including the following status conditions:
-
Status and health of your data collection.
-
Accessibility to your Amazon S3 bucket and to AWS DMS so the data collector can forward data to AWS DMS.
-
Connectivity to your installed database drivers.
-
Credentials of an LDAP server to perform initial discovery.
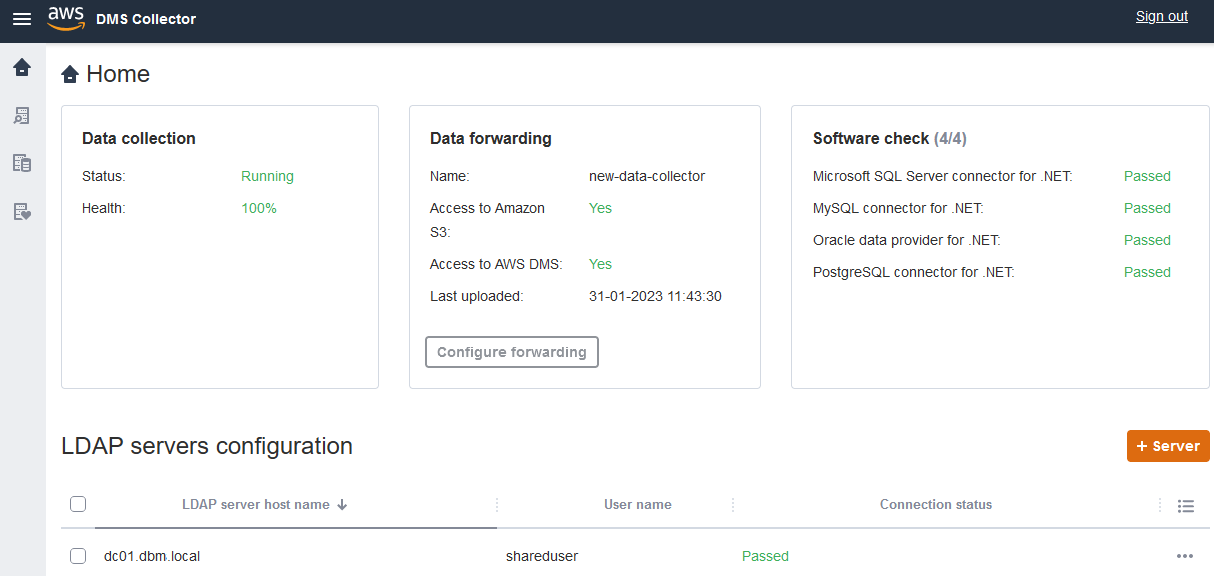
DMS data collector uses an LDAP directory to gather information about the machines and database servers in your network. Lightweight Directory Access Protocol (LDAP) is an open standard application protocol. It's used for accessing and maintaining distributed directory information services over an IP network. You can add an existing LDAP server to your project for data collector that you can use for discovering information about the infrastructure of your systems. To do so, choose the +Server option, then specify a fully qualified domain name (FQDN) and the credentials for your domain controller. After adding the server, validate the connection check. To get started with the discovery process, see Discovering OS and database servers to monitor in AWS DMS.
Configuring credentials for data forwarding
After you install the data collector, make sure that this application can send the collected data to AWS DMS Fleet Advisor.
To configure credentials for data forwarding in AWS DMS Fleet Advisor
-
On the DMS data collector home page, in the Data forwarding section, choose Configure forwarding. The Configure credentials for data forwarding dialog box opens.
-
Choose the AWS Region where you intend to use DMS Fleet Advisor.
-
Enter your AWS Access Key ID and your AWS Secret Access Key obtained earlier when you created IAM resources. For more information, see Create IAM resources.
-
Choose Browse data collectors.
If you haven't created a data collector in the specified Region yet, create a data collector before proceeding. For more information, see Creating a data collector.
-
In the Choose data collector window, select a data collector in the list and select Choose.
-
In the Configure credentials for data forwarding dialog box, choose Save.
On the DMS Collector home page, in the Data forwarding card, verify that the statuses of Access to Amazon S3 and Access to AWS DMS are set to Yes.
If you see that the status of Access to Amazon S3 or Access to AWS DMS is set to No, make sure that you created IAM resources for accessing Amazon S3 and DMS Fleet Advisor. After you create these IAM resources with all required permissions, configure data forwarding again. For more information, see Create IAM resources.
