Configure your cluster for Kubernetes network policies
By default, there are no restrictions in Kubernetes for IP addresses, ports, or connections
between any Pods in your cluster or between your Pods and
resources in any other network. You can use Kubernetes network policy to
restrict network traffic to and from your Pods. For more information, see Network
Policies
If you have version 1.13 or earlier of the Amazon VPC CNI plugin for Kubernetes on your cluster,
you need to implement a third party solution to apply Kubernetes network policies to your cluster.
Version 1.14 or later of the plugin can implement network policies, so you don't need
to use a third party solution. In this topic, you learn how to configure your cluster to use
Kubernetes network policy on your cluster without using a third party add-on.
Network policies in the Amazon VPC CNI plugin for Kubernetes are supported in the following configurations.
-
Amazon EKS clusters of version
1.25and later. -
Version 1.14 or later of the Amazon VPC CNI plugin for Kubernetes on your cluster.
-
Cluster configured for
IPv4orIPv6addresses. -
You can use network policies with security groups for Pods. With network policies, you can control all in-cluster communication. With security groups for Pods, you can control access to AWS services from applications within a Pod.
-
You can use network policies with custom networking and prefix delegation.
Considerations
-
When applying Amazon VPC CNI plugin for Kubernetes network policies to your cluster with the Amazon VPC CNI plugin for Kubernetes , you can apply the policies to Amazon EC2 Linux nodes only. You can't apply the policies to Fargate or Windows nodes.
-
If your cluster is currently using a third party solution to manage Kubernetes network policies, you can use those same policies with the Amazon VPC CNI plugin for Kubernetes. However you must remove your existing solution so that it isn't managing the same policies.
-
You can apply multiple network policies to the same Pod. When two or more policies that select the same Pod are configured, all policies are applied to the Pod.
-
The maximum number of unique combinations of ports for each protocol in each
ingress:oregress:selector in a network policy is 24. -
For any of your Kubernetes services, the service port must be the same as the container port. If you're using named ports, use the same name in the service spec too.
-
Policy enforcement at Pod startup
The Amazon VPC CNI plugin for Kubernetes configures network policies for pods in parallel with the pod provisioning. Until all of the policies are configured for the new pod, containers in the new pod will start with a default allow policy. This is called standard mode. A default allow policy means that all ingress and egress traffic is allowed to and from the new pods.
You can change this default network policy by setting the environment variable
NETWORK_POLICY_ENFORCING_MODEtostrictin theaws-nodecontainer of the VPC CNIDaemonSet.env: - name: NETWORK_POLICY_ENFORCING_MODE value: "strict"With the
NETWORK_POLICY_ENFORCING_MODEvariable set tostrict, pods that use the VPC CNI start with a default deny policy, then policies are configured. This is called strict mode. In strict mode, you must have a network policy for every endpoint that your pods need to access in your cluster. Note that this requirement applies to the CoreDNS pods. The default deny policy isn’t configured for pods with Host networking. -
The network policy feature creates and requires a
PolicyEndpointCustom Resource Definition (CRD) calledpolicyendpoints.networking.k8s.aws.PolicyEndpointobjects of the Custom Resource are managed by Amazon EKS. You shouldn't modify or delete these resources. -
If you run pods that use the instance role IAM credentials or connect to the EC2 IMDS, be careful to check for network policies that would block access to the EC2 IMDS. You may need to add a network policy to allow access to EC2 IMDS. For more information, see Instance metadata and user data in the Amazon EC2 User Guide for Linux Instances.
Pods that use IAM roles for service accounts don't access EC2 IMDS.
-
The Amazon VPC CNI plugin for Kubernetes doesn't apply network policies to additional network interfaces for each pod, only the primary interface for each pod (
eth0). This affects the following architectures:-
IPv6pods with theENABLE_V4_EGRESSvariable set totrue. This variable enables theIPv4egress feature to connect the IPv6 pods toIPv4endpoints such as those outside the cluster. TheIPv4egress feature works by creating an additional network interface with a local loopback IPv4 address. -
When using chained network plugins such as Multus. Because these plugins add network interfaces to each pod, network policies aren't applied to the chained network plugins.
-
-
The network policy feature uses port
8162on the node for metrics by default. Also, the feature used port8163for health probes. If you run another application on the nodes or inside pods that needs to use these ports, the app fails to run. In VPC CNI versionv1.14.1or later, you can change these ports port in the following places:
Prerequisites
-
Minimum cluster version
An existing Amazon EKS cluster. To deploy one, see Getting started with Amazon EKS. The cluster must be Kubernetes version
1.25or later. The cluster must be running one of the Kubernetes versions and platform versions listed in the following table. Note that any Kubernetes and platform versions later than those listed are also supported. You can check your current Kubernetes version by replacingmy-clusterin the following command with the name of your cluster and then running the modified command:aws eks describe-cluster --namemy-cluster--query cluster.version --output textKubernetes version
Platform version
1.27.4eks.51.26.7eks.61.25.12eks.7 -
Minimum VPC CNI version
Version
1.14or later of the Amazon VPC CNI plugin for Kubernetes on your cluster. You can see which version that you currently have with the following command.kubectl describe daemonset aws-node --namespace kube-system | grep amazon-k8s-cni: | cut -d : -f 3If your version is earlier than
1.14, see Updating the Amazon EKS add-on to upgrade to version1.14or later. -
Minimum Linux kernel version
Your nodes must have Linux kernel version
5.10or later. You can check your kernel version withuname -r. If you're using the latest versions of the Amazon EKS optimized Amazon Linux, Amazon EKS optimized accelerated Amazon Linux AMIs, and Bottlerocket AMIs, they already have the required kernel version.The Amazon EKS optimized accelerated Amazon Linux AMI version
v20231116or later have kernel version5.10.
To configure your cluster to use Kubernetes network policies
-
Mount the BPF filesystem
Note
If your cluster is version
1.27or later, you can skip this step as all Amazon EKS optimized Amazon Linux and Bottlerocket AMIs for1.27or later have this feature already.For all other cluster versions, if you upgrade the Amazon EKS optimized Amazon Linux to version
v20230703or later or you upgrade the Bottlerocket AMI to versionv1.0.2or later, you can skip this step.-
Mount the Berkeley Packet Filter (BPF) file system on each of your nodes.
sudo mount -t bpf bpffs /sys/fs/bpf -
Then, add the same command to your user data in your launch template for your Amazon EC2 Auto Scaling Groups.
-
-
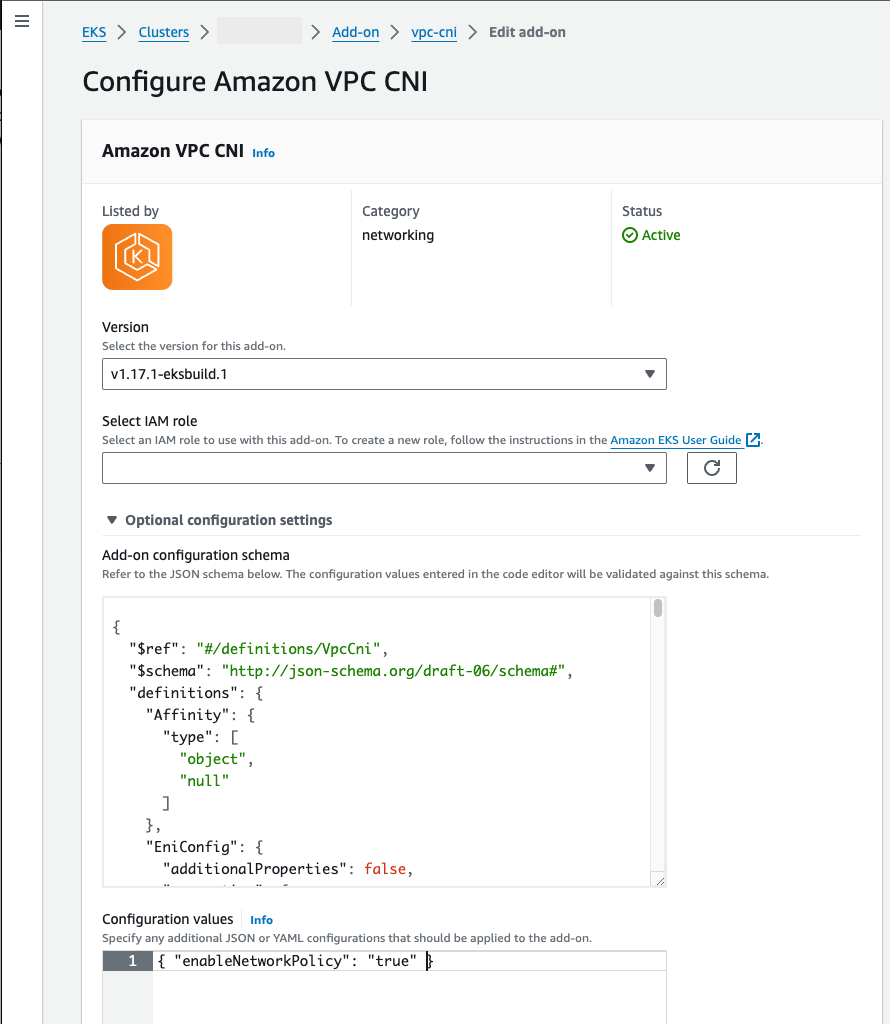
Enable network policy in the VPC CNI
-
See which type of the add-on is installed on your cluster. Depending on the tool that you created your cluster with, you might not currently have the Amazon EKS add-on type installed on your cluster. Replace
my-clusterwith the name of your cluster.aws eks describe-addon --cluster-namemy-cluster--addon-name vpc-cni --query addon.addonVersion --output textIf a version number is returned, you have the Amazon EKS type of the add-on installed on your cluster and don't need to complete the remaining steps in this procedure. If an error is returned, you don't have the Amazon EKS type of the add-on installed on your cluster.
-
-
Amazon EKS add-on
-
Self-managed add-on
-
-
-
Confirm that the
aws-nodepods are running on your cluster.kubectl get pods -n kube-system | grep 'aws-node\|amazon'An example output is as follows.
aws-node-
gmqp72/2 Running 1 (24h ago) 24h aws-node-prnsh2/2 Running 1 (24h ago) 24hIf network policy is enabled, there are 2 containers in the
aws-nodepods. In previous versions and if network policy is disabled, there is only a single container in theaws-nodepods.You can now deploy Kubernetes network policies to your cluster. For more information, see Kubernetes network policies.
Stars demo of network policy
This demo creates a front-end, back-end, and client service on your Amazon EKS cluster. The demo also creates a management graphical user interface that shows the available ingress and egress paths between each service. We recommend that you complete the demo on a cluster that you don't run production workloads on.
Before you create any network policies, all services can communicate bidirectionally. After you apply the network policies, you can see that the client can only communicate with the front-end service, and the back-end only accepts traffic from the front-end.
To run the Stars policy demo
-
Apply the front-end, back-end, client, and management user interface services:
kubectl apply -f https://eksworkshop.com/beginner/120_network-policies/calico/stars_policy_demo/create_resources.files/namespace.yaml kubectl apply -f https://eksworkshop.com/beginner/120_network-policies/calico/stars_policy_demo/create_resources.files/management-ui.yaml kubectl apply -f https://eksworkshop.com/beginner/120_network-policies/calico/stars_policy_demo/create_resources.files/backend.yaml kubectl apply -f https://eksworkshop.com/beginner/120_network-policies/calico/stars_policy_demo/create_resources.files/frontend.yaml kubectl apply -f https://eksworkshop.com/beginner/120_network-policies/calico/stars_policy_demo/create_resources.files/client.yaml -
View all Pods on the cluster.
kubectl get pods -AAn example output is as follows.
In your output, you should see pods in the namespaces shown in the following output. The
NAMESof your pods and the number of pods in theREADYcolumn are different than those in the following output. Don't continue until you see pods with similar names and they all haveRunningin theSTATUScolumn.NAMESPACE NAME READY STATUS RESTARTS AGE [...] client client-xlffc1/1Running 05m19s[...] management-ui management-ui-qrb2g1/1Running 05m24sstars backend-sz87q1/1Running 05m23sstars frontend-cscnf1/1Running 05m21s[...] -
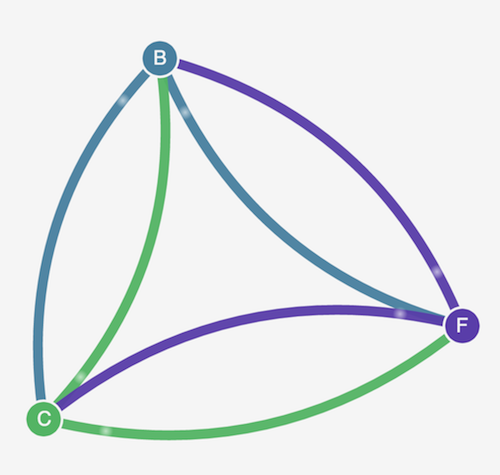
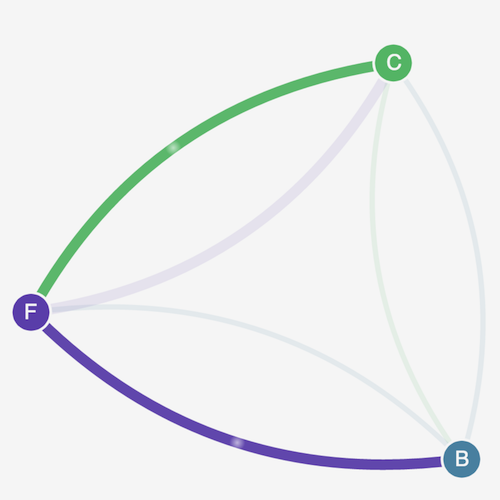
To connect to the management user interface, connect to the
EXTERNAL-IPof the service running on your cluster:kubectl get service/management-ui -n management-ui -
Open the a browser to the location from the previous step. You should see the management user interface. The C node is the client service, the F node is the front-end service, and the B node is the back-end service. Each node has full communication access to all other nodes, as indicated by the bold, colored lines.
-
Apply the following network policy in both the
starsandclientnamespaces to isolate the services from each other:kind: NetworkPolicy apiVersion: networking.k8s.io/v1 metadata: name: default-deny spec: podSelector: matchLabels: {}You can use the following commands to apply the policy to both namespaces:
kubectl apply -n stars -f https://eksworkshop.com/beginner/120_network-policies/calico/stars_policy_demo/apply_network_policies.files/default-deny.yaml kubectl apply -n client -f https://eksworkshop.com/beginner/120_network-policies/calico/stars_policy_demo/apply_network_policies.files/default-deny.yaml -
Refresh your browser. You see that the management user interface can no longer reach any of the nodes, so they don't show up in the user interface.
-
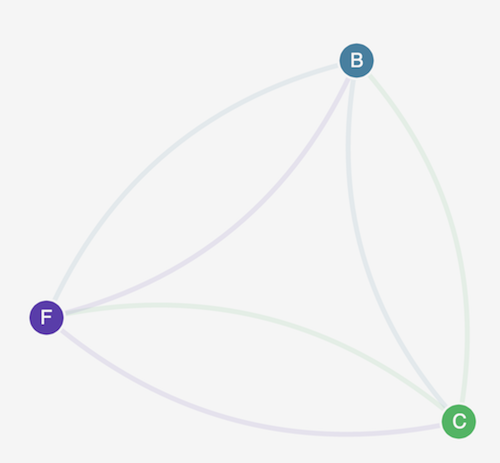
Apply the following different network policies to allow the management user interface to access the services. Apply this policy to allow the UI:
kind: NetworkPolicy
apiVersion: networking.k8s.io/v1
metadata:
  namespace: stars
  name: allow-ui
spec:
  podSelector:
    matchLabels: {}
  ingress:
    - from:
        - namespaceSelector:
            matchLabels:
              role: management-ui
Apply this policy to allow the client:
kind: NetworkPolicy
apiVersion: networking.k8s.io/v1
metadata:
  namespace: client
  name: allow-ui
spec:
  podSelector:
    matchLabels: {}
  ingress:
    - from:
        - namespaceSelector:
            matchLabels:
              role: management-ui
You can use the following commands to apply both policies:
kubectl apply -f https://eksworkshop.com/beginner/120_network-policies/calico/stars_policy_demo/apply_network_policies.files/allow-ui.yaml kubectl apply -f https://eksworkshop.com/beginner/120_network-policies/calico/stars_policy_demo/apply_network_policies.files/allow-ui-client.yaml -
Refresh your browser. You see that the management user interface can reach the nodes again, but the nodes cannot communicate with each other.
-
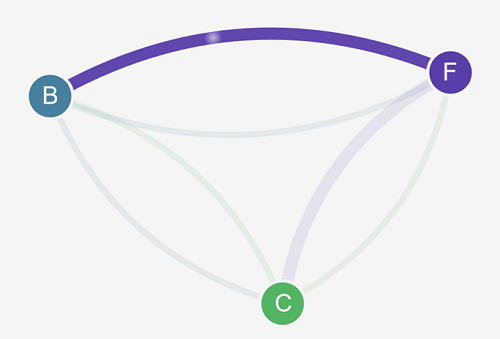
Apply the following network policy to allow traffic from the front-end service to the back-end service:
kind: NetworkPolicy apiVersion: networking.k8s.io/v1 metadata: namespace: stars name: backend-policy spec: podSelector: matchLabels: role: backend ingress: - from: - podSelector: matchLabels: role: frontend ports: - protocol: TCP port: 6379 -
Refresh your browser. You see that the front-end can communicate with the back-end.
-
Apply the following network policy to allow traffic from the client to the front-end service:
kind: NetworkPolicy apiVersion: networking.k8s.io/v1 metadata: namespace: stars name: frontend-policy spec: podSelector: matchLabels: role: frontend ingress: - from: - namespaceSelector: matchLabels: role: client ports: - protocol: TCP port: 80 -
Refresh your browser. You see that the client can communicate to the front-end service. The front-end service can still communicate to the back-end service.
-
(Optional) When you are done with the demo, you can delete its resources.
kubectl delete -f https://eksworkshop.com/beginner/120_network-policies/calico/stars_policy_demo/create_resources.files/client.yaml
kubectl delete -f https://eksworkshop.com/beginner/120_network-policies/calico/stars_policy_demo/create_resources.files/frontend.yaml
kubectl delete -f https://eksworkshop.com/beginner/120_network-policies/calico/stars_policy_demo/create_resources.files/backend.yaml
kubectl delete -f https://eksworkshop.com/beginner/120_network-policies/calico/stars_policy_demo/create_resources.files/management-ui.yaml
kubectl delete -f https://eksworkshop.com/beginner/120_network-policies/calico/stars_policy_demo/create_resources.files/namespace.yaml
Even after deleting the resources, there can still be network policy endpoints on the nodes that might interfere in unexpected ways with networking in your cluster. The only sure way to remove these rules is to reboot the nodes or terminate all of the nodes and recycle them. To terminate all nodes, either set the Auto Scaling Group desired count to 0, then back up to the desired number, or just terminate the nodes.
Troubleshooting network policies
You can troubleshoot and investigate network connections that use network policies by reading the Network policy logs and by running tools from the eBPF SDK.
Network policy logs
Whether connections are allowed or denied by a network policies is logged in
flow logs. The network policy logs on each node include the flow logs
for every pod that has a network policy. Network policy logs are stored at
/var/log/aws-routed-eni/network-policy-agent.log. The following example is
from a network-policy-agent.log file:
{"level":"info","timestamp":"2023-05-30T16:05:32.573Z","logger":"ebpf-client","msg":"Flow Info: ","Src
IP":"192.168.87.155","Src Port":38971,"Dest IP":"64.6.160","Dest
Port":53,"Proto":"UDP","Verdict":"ACCEPT"}
Network policy logs are disabled by default. To enable the network policy logs, follow these steps:
Note
Network policy logs require an additional 1 vCPU for the
aws-network-policy-agent container in the VPC CNI aws-node
daemonset manifest.
Amazon EKS add-on
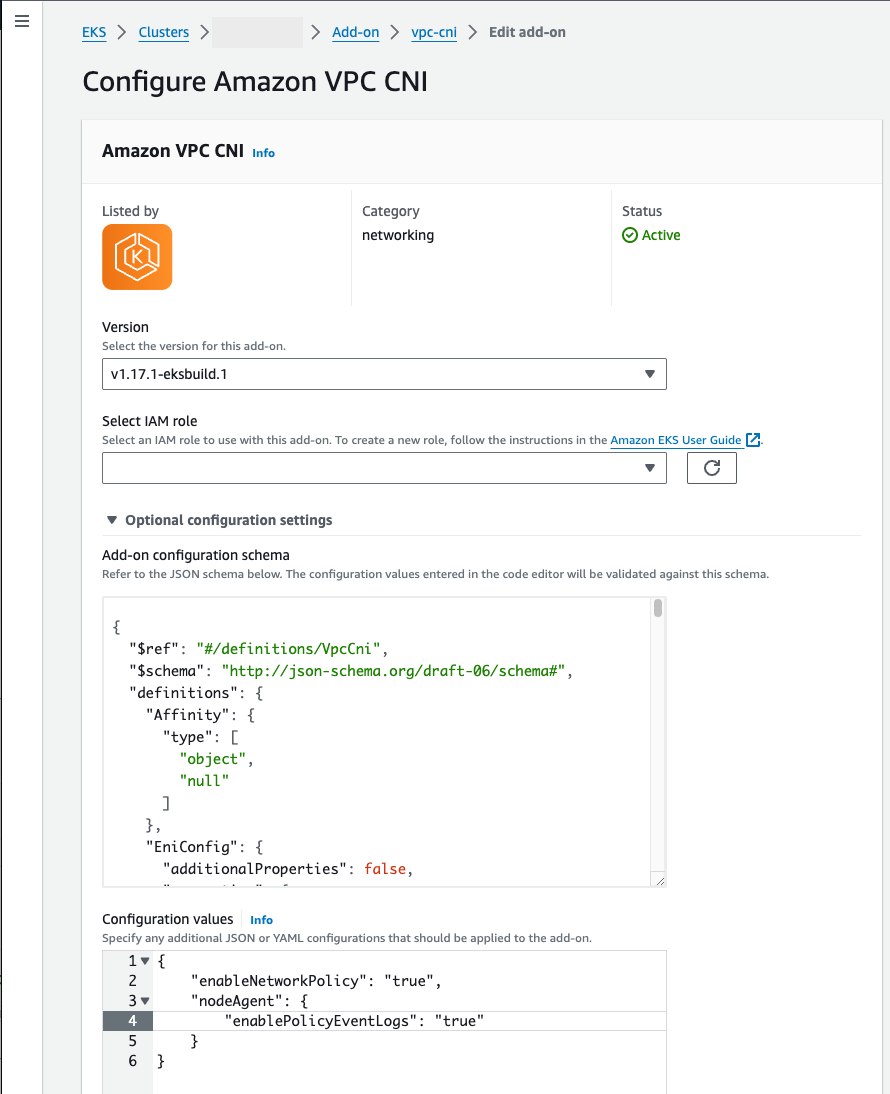
Self-managed add-on
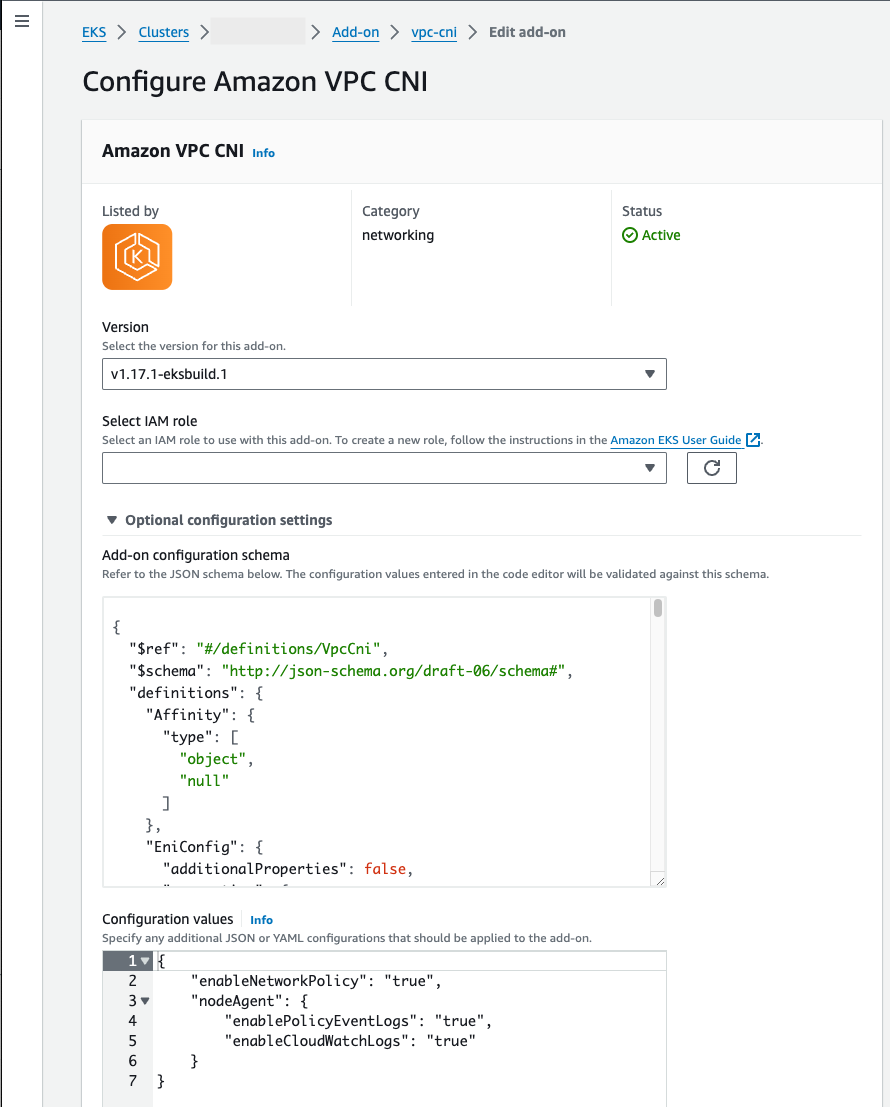
Send network policy logs to Amazon CloudWatch Logs
You can monitor the network policy logs using services such as Amazon CloudWatch Logs. You can use the following methods to send the network policy logs to CloudWatch Logs.
For EKS clusters, the policy logs will be located under
/aws/eks/ and for
self-managed K8S clusters, the logs will be placed under
cluster-name/cluster//aws/k8s-cluster/cluster/.
Send network policy logs with Amazon VPC CNI plugin for Kubernetes
If you enable network policy, a second container is add to the aws-node
pods for a node agent. This node agent can send the network policy
logs to CloudWatch Logs.
Note
Only the network policy logs are sent by the node agent. Other logs made by the VPC CNI aren't included.
Prerequisites
-
Add the following permissions as a stanza or separate policy to the IAM role that you are using for the VPC CNI.
{
    "Version": "2012-10-17",
    "Statement": [
        {
            "Sid": "VisualEditor0",
            "Effect": "Allow",
            "Action": [
                "logs:DescribeLogGroups",
                "logs:CreateLogGroup",
                "logs:CreateLogStream",
                "logs:PutLogEvents"
            ],
            "Resource": "*"
        }
    ]
}
Amazon EKS add-on
Self-managed add-on
Send network policy logs with a Fluent Bit daemonset
If you are using Fluent Bit in a daemonset to send logs from your nodes, you can add configuration to include the network policy logs from network policies. You can use the following example configuration:
    [INPUT]
        Name              tail
        Tag               eksnp.*
        Path              /var/log/aws-routed-eni/network-policy-agent*.log
        Parser            json
        DB                /var/log/aws-routed-eni/flb_npagent.db
        Mem_Buf_Limit     5MB
        Skip_Long_Lines   On
        Refresh_Interval  10
Included eBPF SDK
The Amazon VPC CNI plugin for Kubernetes installs eBPF SDK collection of tools on the nodes. You can use the eBPF SDK tools to identify issues with network policies. For example, the following command lists the programs that are running on the node.
sudo /opt/cni/bin/aws-eks-na-cli ebpf progs
To run this command, you can use any method to connect to the node.
Kubernetes network policies
To implement Kubernetes network policies you create Kubernetes NetworkPolicy objects
and deploy them to your cluster. NetworkPolicy objects are scoped to a namespace.
You implement policies to allow or deny traffic between Pods based on label
selectors, namespaces, and IP address ranges. For more information about creating
NetworkPolicy objects, see Network Policies
Enforcement of Kubernetes NetworkPolicy objects is implemented using the
Extended Berkeley Packet Filter (eBPF). Relative to iptables based implementations, it offers lower latency
and performance characteristics, including reduced CPU utilization and avoiding sequential
lookups. Additionally, eBPF probes provide access to context rich data that helps debug
complex kernel level issues and improve observability. Amazon EKS supports an eBPF-based exporter
that leverages the probes to log policy results on each node and export the data to external
log collectors to aid in debugging. For more information, see the eBPF documentation
