EC2Launch v2 settings
This section contains information about how to configure settings for EC2Launch v2.
Topics include:
Change settings using the EC2Launch v2 settings dialog box
The following procedure describes how to use the EC2Launch v2 settings dialog box to enable or disable settings.
Note
If you improperly configure custom tasks in the agent-config.yml file, and you attempt to open the Amazon EC2Launch settings dialog box, you will receive an error. For example schema, see Example: agent-config.yml.
-
Launch and connect to your Windows instance.
-
From the Start menu, choose All Programs, and then navigate to EC2Launch settings.
-
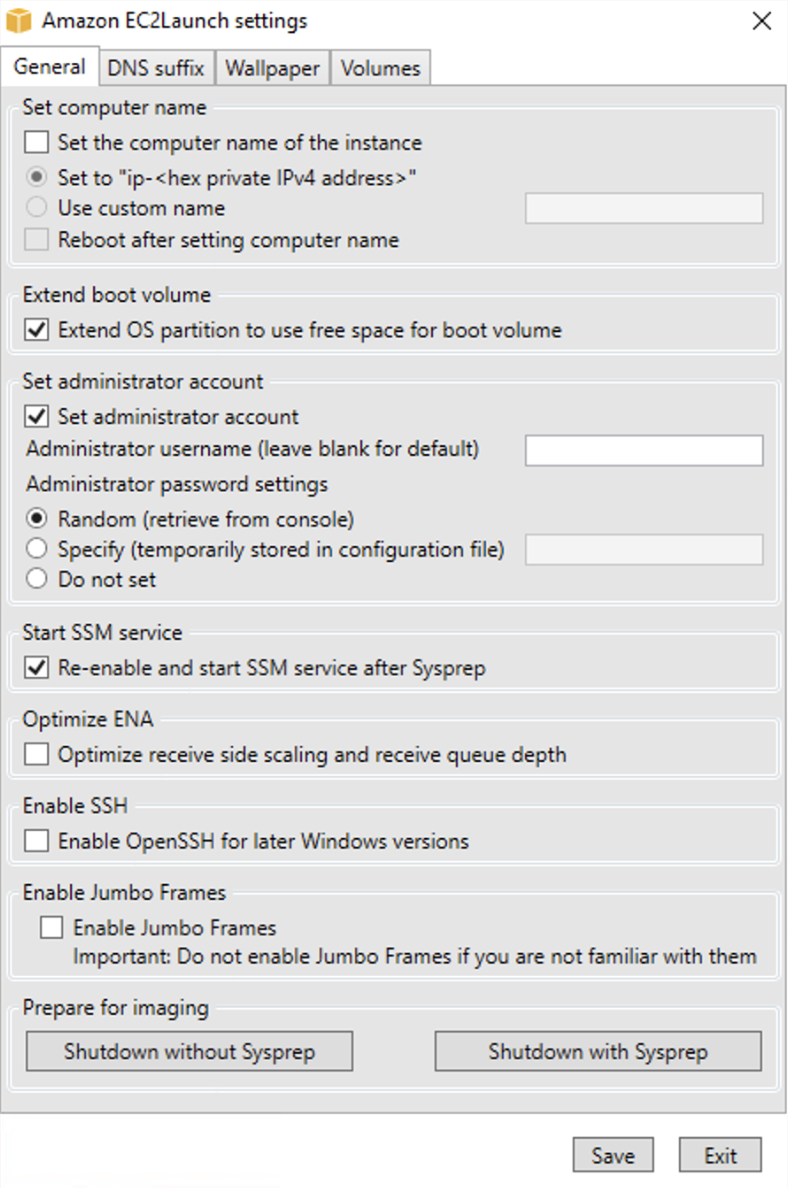
On the General tab of the EC2Launch settings dialog box, you can enable or disable the following settings.
-
Set Computer Name
If this setting is enabled (it is disabled by default), the current host name is compared to the desired host name at each boot. If the host names do not match, the host name is reset, and the system then optionally reboots to pick up the new host name. If a custom host name is not specified, it is generated using the hexadecimal-formatted private IPv4 address, for example,
ip-AC1F4E6. To prevent your existing host name from being modified, do not enable this setting. -
Extend Boot Volume
This setting dynamically extends
Disk 0/Volume 0to include any unpartitioned space. This can be useful when the instance is booted from a root device volume that has a custom size. -
Set Administrator Account
When enabled, you can set the username and password attributes for the administrator account that is created on your local machine. If this feature is not enabled, an administrator account is not created on the system following Sysprep. Provide a password in
adminPasswordonly ifadminPasswordtypeisSpecify.The password types are defined as follows:
-
RandomEC2Launch generates a password and encrypts it using the user's key. The system disables this setting after the instance is launched so that this password persists if the instance is rebooted or stopped and started.
-
SpecifyEC2Launch uses the password that you specify in
adminPassword. If the password does not meet the system requirements, EC2Launch generates a random password instead. The password is stored inagent-config.ymlas clear text and is deleted after Sysprep sets the administrator password. EC2Launch encrypts the password using the user's key. -
Do not setEC2Launch uses the password that you specify in the unattend.xml file. If you don't specify a password in unattend.xml, the administrator account is disabled.
-
-
Start SSM Service
When selected, the Systems Manager service is enabled to start following Sysprep. EC2Launch v2 performs all of the tasks described earlier, and the SSM Agent processes requests for Systems Manager capabilities, such as Run Command and State Manager.
You can use Run Command to upgrade your existing instances to use the latest version of the EC2Launch v2 service and SSM Agent. For more information, see Update SSM Agent by using Run Command in the AWS Systems Manager User Guide.
-
Optimize ENA
When selected, ENA settings are configured to ensure that ENA Receive Side Scaling and Receive Queue Depth settings are optimized for AWS. For more information, see Configure RSS CPU affinity.
-
Enable SSH
This setting enables OpenSSH for later Windows versions to allow for remote system administration.
-
Enable Jumbo Frames
Select to enable Jumbo Frames. Jumbo Frames can have unintended effects on your network communications, so ensure you understand how Jumbo Frames will impact your system before enabling. For more information about Jumbo Frames, see Jumbo frames (9001 MTU).
-
Prepare for Imaging
Select whether you want your EC2 instance to shut down with or without Sysprep. When you want to run Sysprep with EC2Launch v2, choose Shutdown with Sysprep.
-
-
On the DNS Suffix tab, you can select whether you want to add a DNS suffix list for DNS resolution of servers running in EC2, without providing the fully qualified domain name. DNS suffixes can contain the variables
$REGIONand$AZ. Only suffixes that do not already exist will be added to the list.
-
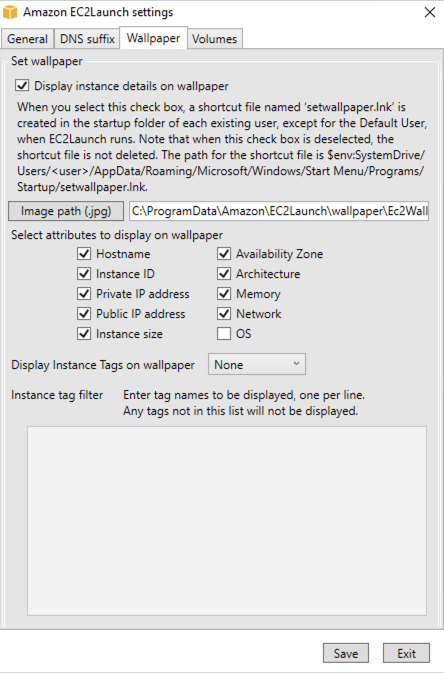
On the Wallpaper tab, you can configure your instance wallpaper with a background image, and specify instance details for the wallpaper to display. Amazon EC2 generates the details each time you log in.
You can configure your wallpaper with the following controls.
-
Display instance details on wallpaper – This checkbox activates or deactivates instance detail display on the wallpaper.
-
Image path (.jpg) – Specify the path to the image to use as the wallpaper background.
-
Select attributes to display on wallpaper – Select the check boxes for the instance details that you want to appear on the wallpaper. Clear the check boxes for previously selected instance details that you want to remove from the wallpaper.
-
Display Instance Tags on wallpaper – Select one of the following settings to display instance tags on the wallpaper:
-
None – Don't display any instance tags on the wallpaper.
-
Show all – Display all instance tags on the wallpaper.
-
Show filtered – Display specified instance tags on the wallpaper. When you select this setting, you can add instance tags that you want to display on your wallpaper in the Instance tag filter box.
Note
You must enable tags in metadata to show tags on the wallpaper. For more information about instance tags and metadata, see Work with instance tags in instance metadata.
-
-
-
On the Volumes tab, select whether you want to initialize the volumes that are attached to the instance. Enabling sets drive letters for any additional volumes and extends them to use available space. If you select All, all of the storage volumes are initialized. If you select Devices, only devices that are specified in the list are initialized. You must enter the device for each device to be initialized. Use the devices listed on the EC2 console, for example,
xvdbor/dev/nvme0n1. The dropdown list displays the storage volumes that are attached to the instance. To enter a device that is not attached to the instance, enter it in the text field.Name, Letter, and Partition are optional fields. If no value is specified for Partition, storage volumes larger than 2 TB are initialized with the GPT partition type, and those smaller than 2 TB are initialized with the MBR partition type. If devices are configured, and a non-NTFS device either contains a partition table, or the first 4 KB of the disk contain data, then the disk is skipped and the action logged.

The following is an example configuration YAML file created from the settings entered in the EC2Launch dialog.
version: 1.0
config:
  - stage: boot
	tasks:
      - task: extendRootPartition
  - stage: preReady
    tasks:
      - task: activateWindows
        inputs:
          activation:
            type: amazon
      - task: setDnsSuffix
        inputs:
          suffixes:
            - $REGION.ec2-utilities.amazonaws.com
      - task: setAdminAccount
        inputs:
          password:
            type: random
      - task: setWallpaper
        inputs:
          path: C:\ProgramData\Amazon\EC2Launch\wallpaper\Ec2Wallpaper.jpg
          attributes:
            - hostName
            - instanceId
            - privateIpAddress
            - publicIpAddress
            - instanceSize
            - availabilityZone
            - architecture
            - memory
            - network
  - stage: postReady
    tasks:
      - task: startSsm
EC2Launch v2 directory structure
EC2Launch v2 should be installed in the following directories:
-
Service binaries:
%ProgramFiles%\Amazon\EC2Launch -
Service data (settings, log files, and state files):
%ProgramData%\Amazon\EC2Launch
Note
By default, Windows hides files and folders under C:\ProgramData.
To view EC2Launch v2 directories and files, you must either enter the path in
Windows Explorer or change the folder properties to show hidden files and
folders.
The %ProgramFiles%\Amazon\EC2Launch directory contains binaries and
supporting libraries. It includes the following subdirectories:
-
settings-
EC2LaunchSettingsUI.exe— user interface for modifying theagent-config.ymlfile -
YamlDotNet.dll— DLL for supporting some operations in the user interface
-
-
tools-
ebsnvme-id.exe— tool for examining the metadata of the EBS volumes on the instance -
AWSAcpiSpcrReader.exe— tool for determining the correct COM port to use -
EC2LaunchEventMessage.dll— DLL for supporting the Windows event logging for EC2Launch.
-
-
service-
EC2LaunchService.exe— Windows service executable that is launched when the launch agent runs as a service.
-
-
EC2Launch.exe— main EC2Launch executable -
EC2LaunchAgentAttribution.txt— attribution for code used within EC2 Launch
The %ProgramData%\Amazon\EC2Launch directory contains the following
subdirectories. All of the data produced by the service, including logs,
configuration, and state, is stored in this directory.
-
config— ConfigurationThe service configuration file is stored in this directory as
agent-config.yml. This file can be updated to modify, add, or remove default tasks run by the service. Permission to create files in this directory is restricted to the administrator account to prevent privilege escalation. -
log— Instance logsLogs for the service (
agent.log), console (console.log), performance (bench.log), and errors (error.log) are stored in this directory. Log files are appended to on subsequent executions of the service. -
state— Service state dataThe state that the service uses to determine which tasks should run is stored here. There is a
.run-oncefile that indicates whether the service has already run after Sysprep (so tasks with a frequency of once will be skipped on the next run). This subdirectory includes astate.jsonandprevious-state.jsonto track the status of each task. -
sysprep— SysprepThis directory contains files that are used to determine which operations to perform by Sysprep when it creates a customized Windows AMI that can be reused.
Configure EC2Launch v2 using the CLI
You can use the Command Line Interface (CLI) to configure your EC2Launch settings and manage the service. The following section contains descriptions and usage information for the CLI commands that you can use to manage EC2Launch v2.
collect-logs
Collects log files for EC2Launch, zips the files, and places them in a specified directory.
Example
ec2launch collect-logs -o C:\Mylogs.zip
Usage
ec2launch collect-logs [flags]
Flags
-h, --help
help for collect-logs
-o, --output string
path to zipped output log files
get-agent-config
Prints agent-config.yml in the format specified (JSON or YAML).
If no format is specified, agent-config.yml is printed in the
format previously specified.
Example
ec2launch get-agent-config -f json
Example 2
The following PowerShell commands show how to edit and save the
agent-config file in JSON format.
$config = & "$env:ProgramFiles/Amazon/EC2Launch/EC2Launch.exe" --format json | ConvertFrom-Json
$jumboFrame =@"
{
   "task": "enableJumboFrames"
}
"@
$config.config | %{if($_.stage -eq 'postReady'){$_.tasks += (ConvertFrom-Json -InputObject $jumboFrame)}}
$config | ConvertTo-Json -Depth 6 | Out-File -encoding UTF8
$env:ProgramData/Amazon/EC2Launch/config/agent-config.yml
Usage
ec2launch get-agent-config [flags]
Flags
-h, --help
help for get-agent-config
-f, --format string
output format of agent-config file: json,
yaml
list-volumes
Lists all of the storage volumes attached to the instance, including ephemeral and EBS volumes.
Example
ec2launch list-volumes
Usage
ec2launch list-volumes
Flags
-h, --help
help for list-volumes
reset
The main goal of this task is to reset the agent for the next time that it runs. To do
that, the reset command deletes all of the agent state data
for EC2Launch v2 from the local EC2Launch directory (see EC2Launch v2 directory structure).
Reset optionally deletes the service and Sysprep logs.
Script behavior depends on what mode the agent runs the scripts in – inline, or detached.
- Inline (default)
-
The EC2Launch v2 agent runs scripts one at a time (
detach: false). This is the default setting.Note
When your inline script issues a reset or sysprep command, it runs immediately and resets the agent. The current task finishes, then the agent shuts down without running any further tasks.
For example, if the task that issues the command would have been followed by a
startSsmtask (included by default after user data runs), the task doesn't run and the Systems Manager service never starts. - Detached
-
The EC2Launch v2 agent runs scripts concurrently with other tasks (
detach: true).Note
When your detached script issues a reset or sysprep command, those commands wait for the agent to finish before they run. Tasks after the executeScript will still run.
Example
ec2launch reset -c
Usage
ec2launch reset [flags]
Flags
-c, --clean
cleans instance logs before reset
-h, --help
help for reset
run
Runs EC2Launch v2.
Example
ec2launch run
Usage
ec2launch run [flags]
Flags
-h, --help
help for run
status
Gets the status of the EC2Launch v2 agent. Optionally blocks the process until the agent is finished. The process exit code determines the agent state:
-
0–the agent ran and was successful. -
1– the agent ran and failed. -
2– the agent is still running. -
3– the agent is in an unknown state. The agent state is not running or stopped. -
4– an error occurred when attempting to retrieve the agent state. -
5– the agent is not running and the status of the last known run is unknown. This could mean one of the following:-
both the
state.jsonandprevious-state.jsonare deleted. -
the
previous-state.jsonis corrupted.
This is the agent state after running the reset command.
-
Example:
ec2launch status -b
Usage
ec2launch status [flags]
Flags
-b,--block
blocks the process until the agent finishes running
-h,--help
help for status
sysprep
The main goal of this task is to reset the agent for the next time that it
runs. To do that, the sysprep command resets the agent state,
updates the unattend.xml file, disables RDP, and runs Sysprep.
Script behavior depends on what mode the agent runs the scripts in – inline, or detached.
- Inline (default)
-
The EC2Launch v2 agent runs scripts one at a time (
detach: false). This is the default setting.Note
When your inline script issues a reset or sysprep command, it runs immediately and resets the agent. The current task finishes, then the agent shuts down without running any further tasks.
For example, if the task that issues the command would have been followed by a
startSsmtask (included by default after user data runs), the task doesn't run and the Systems Manager service never starts. - Detached
-
The EC2Launch v2 agent runs scripts concurrently with other tasks (
detach: true).Note
When your detached script issues a reset or sysprep command, those commands wait for the agent to finish before they run. Tasks after the executeScript will still run.
Example:
ec2launch sysprep
Usage
ec2launch sysprep [flags]
Flags
-c,--clean
cleans instance logs before sysprep
-h,--help
help for Sysprep
-s,--shutdown
shuts down the instance after sysprep
validate
Validates the agent-config file
C:\ProgramData\Amazon\EC2Launch\config\agent-config.yml.
Example
ec2launch validate
Usage
ec2launch validate [flags]
Flags
-h , --help
help for validate
version
Gets the executable version.
Example
ec2launch version
Usage
ec2launch version [flags]
Flags
-h, --help
help for version
wallpaper
Sets new wallpaper to the wallpaper path that is provided (.jpg file), and displays the selected instance details.
Syntax
ec2launch wallpaper ^
--path="C:\ProgramData\Amazon\EC2Launch\wallpaper\Ec2Wallpaper.jpg" ^
--all-tags ^
--attributes=hostName,instanceId,privateIpAddress,publicIpAddress,instanceSize,availabilityZone,architecture,memory,network
Inputs
Parameters
- --allowed-tags [
tag-name-1,tag-name-n] -
(Optional) Base64 encoded JSON array of instance tag names to display on the wallpaper. You can use this tag or the
--all-tags, but not both. - --attributes
attribute-string-1,attribute-string-n -
(Optional) A comma-separated list of
wallpaperattribute strings to apply settings to the wallpaper. - [--path | -p]
path-string -
(Required) Specifies the
wallpaperbackground image file path.
Flags
- --all-tags
-
(Optional) Displays all of the instance tags on the wallpaper. You can use this tag or the
--allowed-tags, but not both. - [--help | -h]
-
Displays help for the wallpaper command.
EC2Launch v2 task configuration
This section includes the configuration schema, tasks, details, and examples for
agent-config.yml and user data.
Tasks and examples
Schema:
agent-config.yml
The structure of the agent-config.yml file is shown below. Note that a task cannot be repeated
in the same stage. For task properties, see the task descriptions that follow.
Document structure: agent-config.yml
JSON
{
	"version": "1.0",
	"config": [
		{
			"stage": "string",
			"tasks": [
				{
					"task": "string",
					"inputs": {
						...
					}
				},
				...
			]
		},
		...
	]
}
YAML
version: 1.0
config:
- stage: string
  tasks:
  - task: string
	inputs:
	  ...
  ...
...
Example:
agent-config.yml
The following example shows settings for the agent-config.yml
configuration file.
version: 1.0
config:
- stage: boot
  tasks:
  - task: extendRootPartition
- stage: preReady
  tasks:
  - task: activateWindows
    inputs:
      activation:
        type: amazon
  - task: setDnsSuffix
    inputs:
      suffixes:
      - $REGION.ec2-utilities.amazonaws.com
  - task: setAdminAccount
    inputs:
      password:
        type: random
  - task: setWallpaper
    inputs:
      path: C:\ProgramData\Amazon\EC2Launch\wallpaper\Ec2Wallpaper.jpg
      attributes:
      - hostName
      - instanceId
      - privateIpAddress
      - publicIpAddress
      - instanceSize
      - availabilityZone
      - architecture
      - memory
      - network
- stage: postReady
  tasks:
  - task: startSsm
Schema: user data
The following JSON and YAML examples show the document structure for user data.
Amazon EC2 parses each task named in the tasks array that you specify
in the document. Each task has its own set of properties and requirements. For details,
see the Task definitions.
Note
A task must only appear once in user data tasks array.
Document structure: user data
JSON
{
	"version": "1.1",
	"tasks": [
		{
			"task": "string",
			"inputs": {
				...
			},
		},
		...
	]
}
YAML
version: 1.1
tasks:
- task: string
  inputs:
    ...
...
Example: user data
For more information about user data, see Run commands on your Windows instance at launch.
The following YAML document example shows a PowerShell script that EC2Launch v2 runs as user data to create a file.
version: 1.1
tasks:
- task: executeScript
  inputs:
  - frequency: always
    type: powershell
    runAs: localSystem
    content: |-
      New-Item -Path 'C:\PowerShellTest.txt' -ItemType File
You can use an XML format for the user data that's compatible
with previous versions of the launch agent. EC2Launch v2 runs the script
as an executeScript task in the UserData
stage. To conform with EC2Launch v1 and EC2Config behavior, the user data
script runs as an attached/inline process by default.
You can add optional tags to customize how your script runs. For example, to run the user data script when the instance reboots in addition to one time when the instance launches, you can use the following tag:
<persist>true</persist>
Example:
<powershell>
  $file = $env:SystemRoot + "\Temp" + (Get-Date).ToString("MM-dd-yy-hh-mm")
  New-Item $file -ItemType file
</powershell>
<persist>true</persist>
To run an XML user data script as a detached process, add the following tag to your user data.
<detach>true</detach>
Example:
<powershell>
  $file = $env:SystemRoot + "\Temp" + (Get-Date).ToString("MM-dd-yy-hh-mm")
  New-Item $file -ItemType file
</powershell>
<detach>true</detach>
Note
The detach tag is not supported on previous launch agents.
Change log: user data
The following table lists changes for user data, and cross-references them to the EC2Launch v2 agent version that applies.
| User data version | Details | Introduced in |
|---|---|---|
| 1.1 |
|
EC2Launch v2 version 2.0.1245 |
| 1.0 |
|
EC2Launch v2 version 2.0.0 |
* When used with the default agent-config.yml file.
Task definitions
Each task has its own set of properties and requirements. For details, see the individual tasks that you want to include in your document.
Tasks
activateWindows
Activates Windows against a set of AWS KMS servers. Activation is skipped if the instance is detected as Bring-Your-Own-License (BYOL).
Frequency — once
AllowedStages — [PreReady]
Inputs —
activation: (map)
type: (string) activation type to use, set to
amazon
Example
task: activateWindows
inputs:
  activation:
    type: amazon
enableJumboFrames
Enables Jumbo Frames, which increase the maximum transmission unit (MTU) of the network adapter. For more information, see Jumbo frames (9001 MTU).
Frequency — always
AllowedStages — [PostReady, UserData]
Inputs — none
Example
task: enableJumboFrames
enableOpenSsh
Enables Windows OpenSSH and adds the public key for the instance to the authorized keys folder.
Frequency — once
AllowedStages — [PreReady, UserData]
Inputs — none
Example
The following example shows how to enable OpenSSH on an instance, and to add the public key for the instance to the authorized keys folder. This configuration works only on instances running Windows Server 2019 and later versions.
task: enableOpenSsh
executeProgram
Runs a program with optional arguments and a specified frequency.
Stages: You can run the executeProgram
task during the PreReady, PostReady, and UserData stages.
Frequency: configurable, see Inputs.
- Inputs
-
You can configure runtime parameters as follows:
- frequency (string)
-
(Required) Specify exactly one of the following values:
-
once -
always
-
- path (string)
-
(Required) The file path for the executable to run.
- arguments (list of strings)
-
(Optional) A comma separated list of arguments to provide to the program as input.
- runAs (string)
-
(Required) Must be set to
localSystem
- Output
-
All of the tasks write logfile entries to the
agent.logfile. Additional output from theexecuteProgramtask is stored separately in a dynamically named folder, as follows:%LocalAppData%\Temp\EC2Launch#########\outputfilename.tmpThe exact path to the output files is included in the
agent.logfile, for example:Program file is created at: C:\Windows\system32\config\systemprofile\AppData\Local\Temp\EC2Launch123456789\ExecuteProgramInputs.tmp Output file is created at: C:\Windows\system32\config\systemprofile\AppData\Local\Temp\EC2Launch123456789\Output.tmp Error file is created at: C:\Windows\system32\config\systemprofile\AppData\Local\Temp\EC2Launch123456789\Err.tmpOutput files for the
executeProgramtaskExecuteProgramInputs.tmp-
Contains the path for the executable, and all of the input parameters that the
executeProgramtask passes to it when it runs. Output.tmp-
Contains runtime output from the program that the
executeProgramtask runs. Err.tmp-
Contains runtime error messages from the program that the
executeProgramtask runs.
- Examples
-
The following examples show how to run an executable file from a local directory on an instance with the
executeProgramtask.Example 1: Setup executable with one argument
This example shows an
executeProgramtask that runs a setup executable in quiet mode.task: executeProgram inputs: - frequency: always path: C:\Users\Administrator\Desktop\setup.exe arguments: ['-quiet']Example 2: VLC executable with two arguments
This example shows an
executeProgramtask that runs a VLC executable file with two arguments passed as input parameters.task: executeProgram inputs: - frequency: always path: C:\vlc-3.0.11-win64.exe arguments: ['/L=1033','/S'] runAs: localSystem
executeScript
Runs a script with optional arguments and a specified frequency. Script behavior depends on what mode the agent runs the scripts in – inline, or detached.
- Inline (default)
-
The EC2Launch v2 agent runs scripts one at a time (
detach: false). This is the default setting.Note
When your inline script issues a reset or sysprep command, it runs immediately and resets the agent. The current task finishes, then the agent shuts down without running any further tasks.
For example, if the task that issues the command would have been followed by a
startSsmtask (included by default after user data runs), the task doesn't run and the Systems Manager service never starts. - Detached
-
The EC2Launch v2 agent runs scripts concurrently with other tasks (
detach: true).Note
When your detached script issues a reset or sysprep command, those commands wait for the agent to finish before they run. Tasks after the executeScript will still run.
Stages: You can run the executeScript
task during the PreReady, PostReady, and UserData stages.
Frequency: configurable, see Inputs.
- Inputs
-
You can configure runtime parameters as follows:
- frequency (string)
-
(Required) Specify exactly one of the following values:
-
once -
always
-
- type (string)
-
(Required) Specify exactly one of the following values:
-
batch -
powershell
-
- arguments (list of strings)
-
(Optional) A list of string arguments to pass to the shell. This parameter isn't supported for
type: batch. - content (string)
-
(Required) Script content.
- runAs (string)
-
(Required) Specify exactly one of the following values:
-
admin -
localSystem
-
- detach (Boolean)
-
(Optional) The EC2Launch v2 agent defaults to run scripts one at a time (
detach: false). To run the script concurrently with other tasks, set the value totrue(detach: true).Note
Script exit codes (including
3010) have no effect whendetachis set totrue.
- Output
-
All of the tasks write logfile entries to the
agent.logfile. Additional output from script that theexecuteScripttask runs is stored separately in a dynamically named folder, as follows:%LocalAppData%\Temp\EC2Launch#########\outputfilename.extThe exact path to the output files is included in the
agent.logfile, for example:Program file is created at: C:\Windows\system32\config\systemprofile\AppData\Local\Temp\EC2Launch123456789\UserScript.ps1 Output file is created at: C:\Windows\system32\config\systemprofile\AppData\Local\Temp\EC2Launch123456789\Output.tmp Error file is created at: C:\Windows\system32\config\systemprofile\AppData\Local\Temp\EC2Launch123456789\Err.tmpOutput files for the
executeScripttaskUserScript.ext-
Contains the script that the
executeScripttask ran. The file extension depends on the type of script you specified in thetypeparameter for theexecuteScripttask, as follows:-
If the type is
batch, then the file extension is.bat. -
If the type is
powershell, then the file extension is.ps1.
-
Output.tmp-
Contains runtime output from the script that the
executeScripttask runs. Err.tmp-
Contains runtime error messages from the script that the
executeScripttask runs.
- Examples
-
The following examples show how to run an inline script with the
executeScripttask.Example 1: Hello world output text file
This example shows an
executeScripttask that runs a PowerShell script to create a "Hello world" text file on theC:drive.task: executeScript inputs: - frequency: always type: powershell runAs: admin content: |- New-Item -Path 'C:\PowerShellTest.txt' -ItemType File Set-Content 'C:\PowerShellTest.txt' "Hello world"Example 2: Run two scripts
This example shows that the
executeScripttask can run more than one script, and the script type doesn't necessarily need to match.The first script (
type: powershell) writes a summary of the processes that are currently running on the instance to a text file located on theC:drive.The second script (
batch) writes the system information to theOutput.tmpfile.task: executeScript inputs: - frequency: always type: powershell content: | Get-Process | Out-File -FilePath C:\Process.txt runAs: localSystem - frequency: always type: batch content: | systeminfoExample 3: Idempotent system configuration with reboots
This example shows an
executeScripttask that runs an idempotent script to perform the following system configuration with a reboot between each step:-
Rename the computer.
-
Join the computer to the domain.
-
Enable Telnet.
The script ensures that each operation runs one time only. This prevents a reboot loop and makes the script idempotent.
task: executeScript inputs: - frequency: always type: powershell runAs: localSystem content: |- $name = $env:ComputerName if ($name -ne $desiredName) { Rename-Computer -NewName $desiredName exit 3010 } $domain = Get-ADDomain if ($domain -ne $desiredDomain) { Add-Computer -DomainName $desiredDomain exit 3010 } $telnet = Get-WindowsFeature -Name Telnet-Client if (-not $telnet.Installed) { Install-WindowsFeature -Name "Telnet-Client" exit 3010 } -
extendRootPartition
Extends the root volume to use all of the available space on the disk.
Frequency — once
AllowedStages — [Boot]
Inputs — none
Example
task: extendRootPartition
initializeVolume
Initializes empty volumes that are attached to the instance so that they're
activated and partitioned. The launch agent skips initialization if it detects
that the volume is not empty. A volume is considered empty if the first
4 KiB of the volume are empty, or if the volume doesn't have a Windows-recognizable drive layout
The letter input parameter is always applied when this task runs,
regardless of whether the drive is already initialized.
The initializeVolume task performs the following actions.
-
Set disk attributes
offlineandreadonlyto false. -
Create a partition. If no partition type is specified in the
partitioninput parameter, the following defaults apply:-
If the disk size is smaller than 2 TB, set the partition type to
MBR. -
If the disk size is 2 TB or larger, set the partition type to
GPT.
-
-
Format the volume as NTFS.
-
Set the volume label as follows:
-
Use the value of the
nameinput parameter, if specified. -
If the volume is ephemeral, and no name was specified, set the volume label to
Temporary Storage Z.
-
-
If the volume is ephemeral (SSD or HDD – not Amazon EBS), create an
Important.txtfile at the root of the volume with the following content:This is an 'Instance Store' disk and is provided at no additional charge. *This disk offers increased performance since it is local to the host *The number of Instance Store disks available to an instance vary by instance type *DATA ON THIS DRIVE WILL BE LOST IN CASES OF IMPAIRMENT OR STOPPING THE INSTANCE. PLEASE ENSURE THAT ANY IMPORTANT DATA IS BACKED UP FREQUENTLY For more information, please refer to: Amazon EC2 instance store. -
Set the drive letter to the value specified in the
letterinput parameter.
Stages: You can run the initializeVolume
task during the PostReady and UserData stages.
Frequency: always.
- Inputs
-
You can configure runtime parameters as follows:
- devices (list of maps)
-
(Conditional) Configuration for each device that the launch agent initializes. This is required if the
initializeinput parameter is set todevices.-
device (string, required) – Identifies the device during instance creation. For example,
xvdb,xvdf, or\dev\nvme0n1. -
letter (string, optional) – One character. The drive letter to assign.
-
name (string, optional) – The volume name to assign.
-
partition (string, optional) – Specify one of the following values for the type of partition to create, or let the launch agent default based on volume size:
-
MBR
-
GPT
-
-
- initialize (string)
-
(Required) Specify exactly one of the following values:
-
all -
devices
-
- Examples
-
The following examples show sample input configurations for the
initializeVolumetask.Example 1: Initialize two volumes on an instance
This example shows an
initializeVolumetask that initializes two secondary volumes on an instance. The device namedDataVolume2in the example is ephemeral.task: initializeVolume inputs: initialize: devices devices: - device: xvdb name: DataVolume1 letter: D partition: mbr - device: /dev/nvme0n1 name: DataVolume2 letter: E partition: gpt
Example 2: Initialize EBS volumes attached to an instance
This example shows an initializeVolume task
that initializes all empty EBS volumes that are attached to
the instance.
task: initializeVolume
inputs:
  initialize: all
optimizeEna
Optimizes ENA settings based on the current instance type; might reboot the instance.
Frequency — always
AllowedStages — [PostReady, UserData]
Inputs — none
Example
task: optimizeEna
setAdminAccount
Sets attributes for the default administrator account that is created on the local machine.
Frequency — once
AllowedStages — [PreReady]
Inputs —
name: (string) name of the administrator account
password: (map)
type: (string) strategy to set the password, either as
static, random, or doNothing
data: (string) stores data if the type field is
static
Example
task: setAdminAccount
inputs:
  name: Administrator
  password:
    type: random
setDnsSuffix
Adds DNS suffixes to the list of search suffixes. Only suffixes that do not already exist are added to the list. For more information about how launch agents set DNS suffixes, see Configure DNS Suffix.
Frequency — always
AllowedStages — [PreReady]
Inputs —
suffixes: (list of strings) list of one or more valid DNS
suffixes; valid substitution variables are $REGION and
$AZ
Example
task: setDnsSuffix
inputs:
  suffixes:
  - $REGION.ec2-utilities.amazonaws.com
setHostName
Sets the hostname of the computer to a custom string or, if
hostName is not specified, the private IPv4 address.
Frequency — always
AllowedStages — [PostReady, UserData]
Inputs —
hostName: (string) optional host name, which must be formatted as
follows.
-
Must be 15 characters or less
-
Must contain only alphanumeric (a-z, A-Z, 0-9) and hyphen (-) characters.
-
Must not consist entirely of numerical characters.
reboot: (boolean) denotes whether a reboot is permitted when the
hostname is changed
Example
task: setHostName
inputs:
  reboot: true
setWallpaper
Creates the setwallpaper.lnk shortcut file in the startup folder
of each existing user except for Default User. This shortcut file
runs when the user logs in for the first time after instance boot. It sets up
the instance with a custom wallpaper that displays the instance attributes.
The shortcut file path is:
$env:SystemDrive/Users/<user>/AppData/Roaming/Microsoft/Windows/Start Menu/Programs/Startup/setwallpaper.lnk
Note
When you remove the setWallpaper task, it does not delete this
shortcut file. For more information, see setWallpaper task is not enabled but the wallpaper resets
at reboot.
Stages: You can configure wallpaper during the
PreReady and UserData stages.
Frequency: always
Wallpaper configuration
You can use the following settings to configure your wallpaper.
- Inputs
-
Input parameters that you provide, and attributes that you can set to configure your wallpaper:
- attributes (list of strings)
-
(Optional) You can add one or more of the following attributes to your wallpaper:
-
architecture -
availabilityZone -
hostName -
instanceId -
instanceSize -
memory -
network -
privateIpAddress -
publicIpAddress
-
- instanceTags
-
(Optional) You can use exactly one of the following options for this setting.
-
AllTags (string) – Add all instance tags to your wallpaper.
instanceTags: AllTags -
instanceTags (list of strings) – Specify a list of instance tag names to add to your wallpaper. For example:
instanceTags:
  - Tag 1
  - Tag 2
-
- path (string)
-
(Required) The filename path of the local .jpg format image file to use for your wallpaper image.
Example
The following example shows wallpaper configuration inputs that set the
file path for the wallpaper background image, along with instance tags named
Tag 1 and Tag 2, and attributes that
include the host name, instance ID, and private and public IP addresses for
the instance.
task: setWallpaper
inputs:
  path: C:\ProgramData\Amazon\EC2Launch\wallpaper\Ec2Wallpaper.jpg
  attributes:
  - hostName
  - instanceId
  - privateIpAddress
  - publicIpAddress
  instanceTags:
  - Tag 1
  - Tag 2
Note
You must enable tags in metadata to show tags on the wallpaper. For more information about instance tags and metadata, see Work with instance tags in instance metadata.
startSsm
Starts the Systems Manager (SSM) service following Sysprep.
Frequency — always
AllowedStages — [PostReady, UserData]
Inputs — none
Example
task: startSsm
sysprep
Resets the service state, updates unattend.xml, disables RDP, and
runs Sysprep. This task runs only after all other tasks are completed.
Frequency — once
AllowedStages — [UserData]
Inputs —
clean: (boolean) cleans instance logs before running
Sysprep
shutdown: (boolean) shuts down the instance after running
Sysprep
Example
task: sysprep
inputs:
  clean: true
  shutdown: true
writeFile
Writes a file to a destination.
Frequency — see Inputs
AllowedStages — [PostReady, UserData]
Inputs —
frequency: (string) one of once or
always
destination: (string) path to which to write the content
content: (string) text to write to the destination
Example
task: writeFile
inputs:
- frequency: once
  destination: C:\Users\Administrator\Desktop\booted.txt
  content: Windows Has Booted
EC2Launch v2 exit codes and reboots
You can use EC2Launch v2 to define how exit codes are handled by your scripts. By
default, the exit code of the last command that is run in a script is reported as
the exit code for the entire script. For example, if a script includes three
commands and the first command fails but the following ones succeed, the run status
is reported as success because the final command succeeded.
If you want a script to reboot an instance, then you must specify exit
3010 in your script, even when the reboot is the last step in your
script. exit 3010 instructs EC2Launch v2 to reboot the instance and
call the script again until it returns an exit code that is not 3010,
or until the maximum reboot count has been reached. EC2Launch v2 permits a maximum
of 5 reboots per task. If you attempt to reboot an instance from a script by using a
different mechanism, such as Restart-Computer, then the script run
status will be inconsistent. For example, it may get stuck in a restart loop or not
perform the restart.
If you are using an XML user data format that is compatible with older agents, the user data may run more times than you intend it to. For more information, see Service runs user data more than once in the Troubleshooting section.
EC2Launch v2 and Sysprep
The EC2Launch v2 service runs Sysprep, a Microsoft tool that enables you to create
a customized Windows AMI that can be reused. When EC2Launch v2 calls Sysprep, it
uses the files in %ProgramData%\Amazon\EC2Launch to determine which
operations to perform. You can edit these files indirectly using the
EC2Launch settings dialog box, or directly using a YAML
editor or a text editor. However, there are some advanced settings that aren't
available in the EC2Launch settings dialog box, so you must
edit those entries directly.
If you create an AMI from an instance after updating its settings, the new settings are applied to any instance that's launched from the new AMI. For information about creating an AMI, see Create a custom Windows AMI.
