Using CloudFront continuous deployment to safely test CDN configuration changes - Amazon CloudFront

Using CloudFront continuous deployment to safely test CDN configuration changes

With Amazon CloudFront continuous deployment you can safely deploy changes to your CDN configuration by testing first with a subset of production traffic. You can use a staging distribution and a continuous deployment policy to send some traffic from real (production) viewers to the new CDN configuration and validate that it works as expected. You can monitor the performance of the new configuration in real time, and promote the new configuration to serve all traffic via the primary distribution when you're ready.

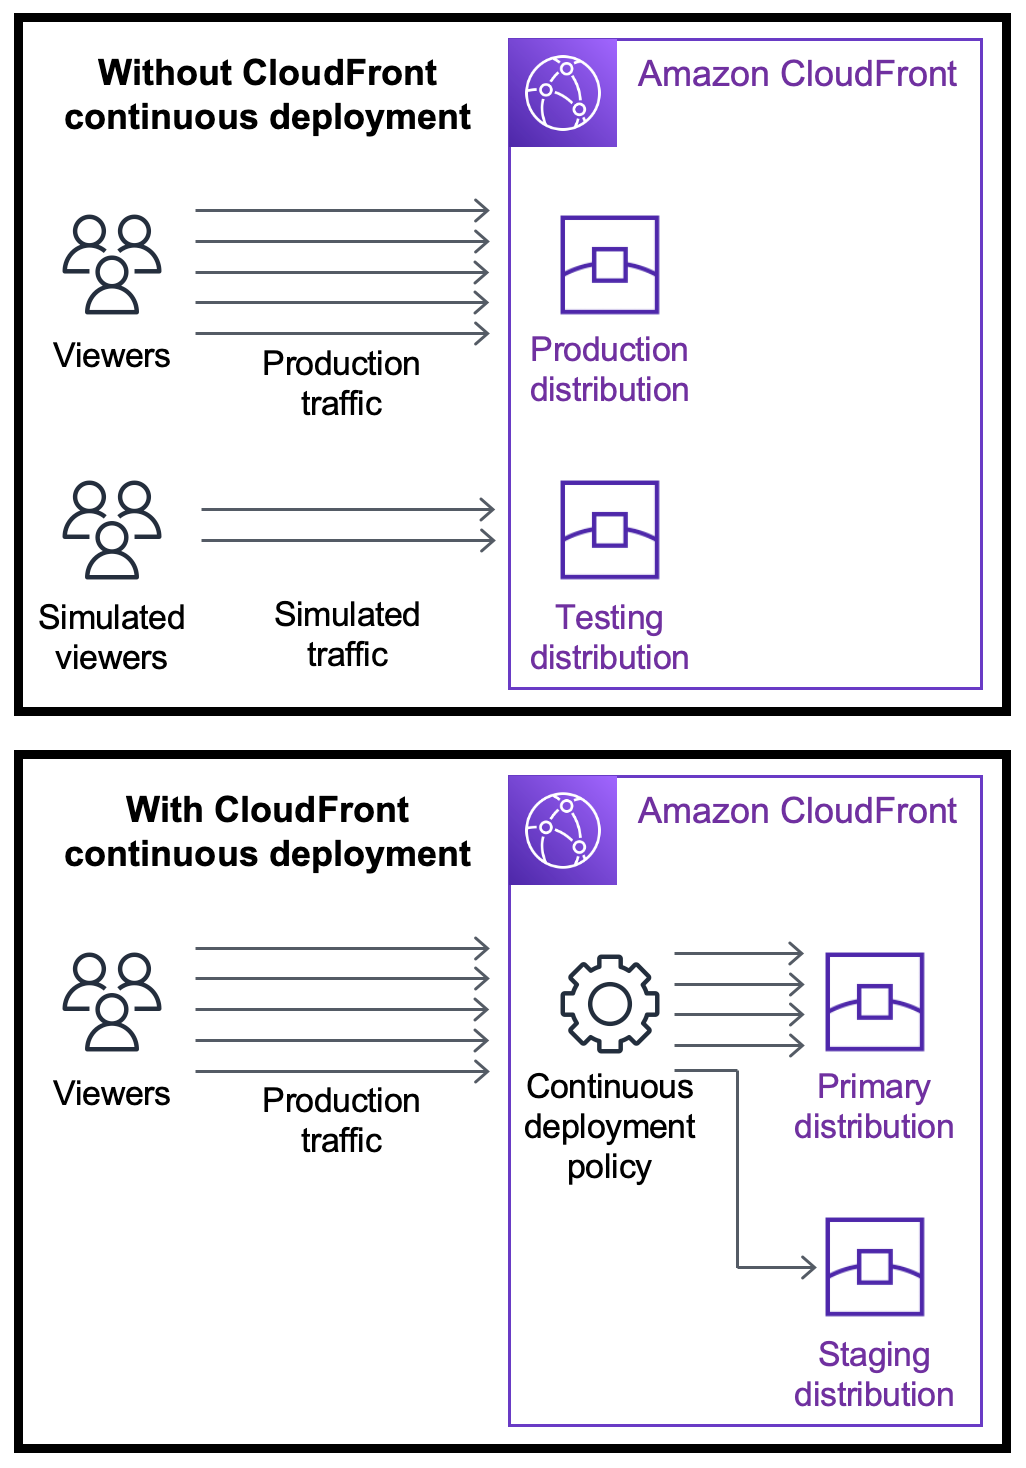
The following diagram shows the benefit of using CloudFront continuous deployment. Without it, you would have to test CDN configuration changes with simulated traffic. With continuous deployment you can test the changes with a subset of production traffic, then promote the changes to the primary distribution when you're ready.


            With CloudFront continuous deployment and a continuous deployment policy, you can send
                a portion of production traffic to a staging distribution instead of using simulated
                traffic.

Workflow for using CloudFront continuous deployment

The following high-level workflow explains how to safely test and deploy configuration changes with CloudFront continuous deployment.

  1. Choose the distribution that you want to use as the primary distribution. The primary distribution is one that currently serves production traffic.

  2. From the primary distribution, create a staging distribution. A staging distribution starts as a copy of the primary distribution.

  3. Create a traffic configuration inside a continuous deployment policy, and attach it to the primary distribution. This determines how CloudFront routes traffic to the staging distribution. For more information about routing requests to a staging distribution, see Routing requests to the staging distribution.

  4. Update the configuration of the staging distribution. For more information about the settings that you can update, see Updating primary and staging distributions.

  5. Monitor the staging distribution to determine whether the configuration changes perform as expected. For more information about monitoring a staging distribution, see Monitoring a staging distribution.

    As you monitor the staging distribution, you can:

    • Update the configuration of the staging distribution again, to continue testing configuration changes.

    • Update the continuous deployment policy (traffic configuration) to send more or less traffic to the staging distribution.

  6. When you're satisfied with the performance of the staging distribution, promote the staging distribution's configuration to the primary distribution, which copies the staging distribution's configuration to the primary distribution. This also disables the continuous deployment policy which means that CloudFront routes all traffic to the primary distribution.

You can build automation that monitors the performance of the staging distribution (step 5) and promotes the configuration automatically (step 6) when certain criteria are met.

After you promote a configuration, you can reuse the same staging distribution the next time you want to test a configuration change.

For more information about working with staging distributions and continuous deployment policies in the CloudFront console, the AWS CLI, or the CloudFront API, see the following section.

Working with a staging distribution and continuous deployment policy

You can create, update, and modify staging distributions and continuous deployment policies in the CloudFront console, with the AWS Command Line Interface (AWS CLI), or with the CloudFront API.

Console

To work with a staging distribution and a continuous deployment policy with the AWS Management Console, use the following procedures.

To create a staging distribution and continuous deployment policy (console)
  1. Sign in to the AWS Management Console and open the CloudFront console at https://console.aws.amazon.com/cloudfront/v4/home.

  2. In the navigation pane, choose Distributions.

  3. Choose the distribution that you want to use as the primary distribution. The primary distribution is one that currently serves production traffic, the one from which you will create the staging distribution.

  4. In the Continuous deployment section, choose Create staging distribution. This opens the Create staging distribution wizard.

  5. In the Create staging distribution wizard, do the following:

    1. (Optional) Type a description for the staging distribution.

    2. Choose Next.

    3. Modify the configuration of the staging distribution. For more information about the settings that you can update, see Updating primary and staging distributions.

      When you are finished modifying the staging distribution's configuration, choose Next.

    4. Use the console to specify the Traffic configuration. This determines how CloudFront routes traffic to the staging distribution. (CloudFront stores the traffic configuration in a continuous deployment policy.)

      For more information about the options in a Traffic configuration, see Routing requests to the staging distribution.

      When you are finished with the Traffic configuration, choose Next.

    5. Review the configuration for the staging distribution, including the traffic configuration, then choose Create staging distribution.

When you finish the Create staging distribution wizard in the CloudFront console, CloudFront does the following:

  • Creates a staging distribution with the settings that you specified (in step 5c)

  • Creates a continuous deployment policy with the traffic configuration that you specified (in step 5d)

  • Attaches the continuous deployment policy to the primary distribution that you created the staging distribution from

When the primary distribution's configuration, with the attached continuous deployment policy, deploys to edge locations, CloudFront begins sending the specified portion of traffic to the staging distribution based on the traffic configuration.

To update a staging distribution (console)
  1. Open the CloudFront console at https://console.aws.amazon.com/cloudfront/v4/home.

  2. In the navigation pane, choose Distributions.

  3. Choose the primary distribution. This is the distribution that currently serves production traffic, the one from which you created the staging distribution.

  4. Choose View staging distribution.

  5. Use the console to modify the configuration of the staging distribution. For more information about the settings that you can update, see Updating primary and staging distributions.

As soon as the staging distribution's configuration deploys to edge locations it takes effect for incoming traffic that's routed to the staging distribution.

To update a continuous deployment policy (console)
  1. Open the CloudFront console at https://console.aws.amazon.com/cloudfront/v4/home.

  2. In the navigation pane, choose Distributions.

  3. Choose the primary distribution. This is the distribution that currently serves production traffic, the one from which you created the staging distribution.

  4. In the Continuous deployment section, choose Edit policy.

  5. Modify the traffic configuration in the continuous deployment policy. When you are finished, choose Save changes.

When the primary distribution's configuration with the updated continuous deployment policy deploys to edge locations, CloudFront begins sending traffic to the staging distribution based on the updated traffic configuration.

To promote a staging distribution's configuration (console)
  1. Open the CloudFront console at https://console.aws.amazon.com/cloudfront/v4/home.

  2. In the navigation pane, choose Distributions.

  3. Choose the primary distribution. This is the distribution that currently serves production traffic, the one from which you created the staging distribution.

  4. In the Continuous deployment section, choose Promote.

  5. Type confirm and then choose Promote.

When you promote a staging distribution, CloudFront copies the configuration from the staging distribution to the primary distribution. CloudFront also disables the continuous deployment policy and routes all traffic to the primary distribution.

After you promote a configuration, you can reuse the same staging distribution the next time you want to test a configuration change.

CLI

To work with a staging distribution and a continuous deployment policy with the AWS CLI, use the following procedures.

To create a staging distribution (CLI)
  1. Use the aws cloudfront get-distribution and grep commands together to get the ETag value of the distribution that you want to use as the primary distribution. The primary distribution is one that currently serves production traffic, from which you will create the staging distribution.

    The following command shows an example. In the following example, replace primary_distribution_ID with the ID of the primary distribution.

    aws cloudfront get-distribution --id primary_distribution_ID | grep 'ETag'

    Copy the ETag value because you need it for the following step.

  2. Use the aws cloudfront copy-distribution command to create a staging distribution. The following example command uses escape characters (\) and line breaks for readability, but you should omit these from the command. In the following example command:

    • Replace primary_distribution_ID with the ID of the primary distribution.

    • Replace primary_distribution_ETag with the ETag value of the primary distribution (that you got in the previous step).

    • (Optional) Replace CLI_example with the desired caller reference ID.

    aws cloudfront copy-distribution --primary-distribution-id primary_distribution_ID \ --if-match primary_distribution_ETag \ --staging \ --caller-reference 'CLI_example'

    The command's output shows information about the staging distribution and its configuration. Copy the staging distribution's CloudFront domain name because you need it for a following step.

To create a continuous deployment policy (CLI with input file)
  1. Use the following command to create file named continuous-deployment-policy.yaml that contains all of the input parameters for the create-continuous-deployment-policy command. The following command uses escape characters (\) and line breaks for readability, but you should omit these from the command.

    aws cloudfront create-continuous-deployment-policy --generate-cli-skeleton yaml-input \ > continuous-deployment-policy.yaml
  2. Open the file named continuous-deployment-policy.yaml that you just created. Edit the file to specify the continuous deployment policy settings that you want, then save the file. When you edit the file:

    • In the StagingDistributionDnsNames section:

      • Change the value of Quantity to 1.

      • For Items, paste the CloudFront domain name of the staging distribution (that you saved from a previous step).

    • In the TrafficConfig section:

      • Choose a Type, either SingleWeight or SingleHeader.

      • Remove the settings for the other type. For example, if you want a weight-based traffic configuration, set Type to SingleWeight and then remove the SingleHeaderConfig settings.

      • To use a weight-based traffic configuration, set the value of Weight to a decimal number between .01 (one percent) and .15 (fifteen percent).

      For more information about the options in TrafficConfig, see Routing requests to the staging distribution and Session stickiness for weight-based configurations.

  3. Use the following command to create the continuous deployment policy using input parameters from the continuous-deployment-policy.yaml file.

    aws cloudfront create-continuous-deployment-policy --cli-input-yaml file://continuous-deployment-policy.yaml

    Copy the Id value in the command's output. This is the continuous deployment policy ID, and you need it in a following step.

To attach a continuous deployment policy to a primary distribution (CLI with input file)
  1. Use the following command to save the primary distribution's configuration to a file named primary-distribution.yaml. Replace primary_distribution_ID with the primary distribution's ID.

    aws cloudfront get-distribution-config --id primary_distribution_ID --output yaml > primary-distribution.yaml
  2. Open the file named primary-distribution.yaml that you just created. Edit the file, making the following changes:

    • Paste the continuous deployment policy ID (that you copied from a previous step) into the ContinuousDeploymentPolicyId field.

    • Rename the ETag field to IfMatch, but don't change the field's value.

    Save the file when finished.

  3. Use the following command to update the primary distribution to use the continuous deployment policy. Replace primary_distribution_ID with the primary distribution's ID.

    aws cloudfront update-distribution --id primary_distribution_ID --cli-input-yaml file://primary-distribution.yaml

When the primary distribution's configuration, with the attached continuous deployment policy, deploys to edge locations, CloudFront begins sending the specified portion of traffic to the staging distribution based on the traffic configuration.

To update a staging distribution (CLI with input file)
  1. Use the following command to save the staging distribution's configuration to a file named staging-distribution.yaml. Replace staging_distribution_ID with the staging distribution's ID.

    aws cloudfront get-distribution-config --id staging_distribution_ID --output yaml > staging-distribution.yaml
  2. Open the file named staging-distribution.yaml that you just created. Edit the file, making the following changes:

    • Modify the configuration of the staging distribution. For more information about the settings that you can update, see Updating primary and staging distributions.

    • Rename the ETag field to IfMatch, but don't change the field's value.

    Save the file when finished.

  3. Use the following command to update the staging distribution's configuration. Replace staging_distribution_ID with the staging distribution's ID.

    aws cloudfront update-distribution --id staging_distribution_ID --cli-input-yaml file://staging-distribution.yaml

As soon as the staging distribution's configuration deploys to edge locations it takes effect for incoming traffic that's routed to the staging distribution.

To update a continuous deployment policy (CLI with input file)
  1. Use the following command to save the continuous deployment policy's configuration to a file named continuous-deployment-policy.yaml. Replace continuous_deployment_policy_ID with the continuous deployment policy's ID. The following command uses escape characters (\) and line breaks for readability, but you should omit these from the command.

    aws cloudfront get-continuous-deployment-policy-config --id continuous_deployment_policy_ID \ --output yaml > continuous-deployment-policy.yaml
  2. Open the file named continuous-deployment-policy.yaml that you just created. Edit the file, making the following changes:

    Save the file when finished.

  3. Use the following command to update the continuous deployment policy. Replace continuous_deployment_policy_ID with the continuous deployment policy's ID. The following command uses escape characters (\) and line breaks for readability, but you should omit these from the command.

    aws cloudfront update-continuous-deployment-policy --id continuous_deployment_policy_ID \ --cli-input-yaml file://continuous-deployment-policy.yaml

When the primary distribution's configuration with the updated continuous deployment policy deploys to edge locations, CloudFront begins sending traffic to the staging distribution based on the updated traffic configuration.

To promote a staging distribution's configuration (CLI)
  • Use the aws cloudfront update-distribution-with-staging-config command to promote the staging distribution's configuration to the primary distribution. The following example command uses escape characters (\) and line breaks for readability, but you should omit these from the command. In the following example command:

    • Replace primary_distribution_ID with the ID of the primary distribution.

    • Replace staging_distribution_ID with the ID of the staging distribution.

    • Replace primary_distribution_ETag and staging_distribution_ETag with the ETag values of the primary and staging distributions. Make sure the primary distribution's value is first, as shown in the example.

    aws cloudfront update-distribution-with-staging-config --id primary_distribution_ID \ --staging-distribution-id staging_distribution_ID \ --if-match 'primary_distribution_ETag,staging_distribution_ETag'

When you promote a staging distribution, CloudFront copies the configuration from the staging distribution to the primary distribution. CloudFront also disables the continuous deployment policy and routes all traffic to the primary distribution.

After you promote a configuration, you can reuse the same staging distribution the next time you want to test a configuration change.

API

To create a staging distribution and continuous deployment policy with the CloudFront API, use the following API operations:

For more information about the fields that you specify in these API calls, see the following:

After you create a staging distribution and a continuous deployment policy, use UpdateDistribution (on the primary distribution) to attach the continuous deployment policy to the primary distribution.

To update the configuration of a staging distribution, use UpdateDistribution (on the staging distribution) to modify the configuration of the staging distribution. For more information about the settings that you can update, see Updating primary and staging distributions.

To promote a staging distribution's configuration to the primary distribution, use UpdateDistributionWithStagingConfig.

For more information about the fields that you specify in these API calls, see the API reference documentation for your AWS SDK or other API client.

Monitoring a staging distribution

To monitor the performance of a staging distribution, you can use the same metrics, logs, and reports that CloudFront provides for all distributions. For example:

  • You can view the default CloudFront distribution metrics (such as total requests and error rate) in the CloudFront console, and you can turn on additional metrics (such as cache hit rate and error rate by status code) for an additional cost. You can also create alarms based on these metrics.

  • You can view standard logs and real-time logs to get detailed information about the requests that are received by the staging distribution. Standard logs contain the following two fields that help you identify the primary distribution that the request was originally sent to before CloudFront routed it to the staging distribution: primary-distribution-id and primary-distribution-dns-name.

  • You can view and download reports in the CloudFront console, for example the cache statistics report.

Understanding how continuous deployment works

The following topics explain how CloudFront continuous deployment works.

Routing requests to the staging distribution

When you use CloudFront continuous deployment, you don't need to change anything about the viewer requests. Viewers cannot send requests directly to a staging distribution using a DNS name, IP address, or CNAME. Instead, viewers send requests to the primary (production) distribution, and CloudFront routes some of those requests to the staging distribution based on the traffic configuration settings in the continuous deployment policy. There are two types of traffic configurations:

Weight-based

A weight-based configuration routes the specified percentage of viewer requests to the staging distribution. When you use a weight-based configuration, you can also enable session stickiness, which helps make sure that CloudFront treats requests from the same viewer as part of a single session. For more information, see Session stickiness for weight-based configurations.

Header-based

A header-based configuration routes requests to the staging distribution when the viewer request contains a specific HTTP header (you specify the header and the value). Requests that don't contain the specified header and value are routed to the primary distribution. This configuration is useful for local testing, or when you have control over the viewer requests.

Note

Headers routed to your staging distribution must contain the prefix aws-cf-cd-.

Session stickiness for weight-based configurations

When you use a weight-based configuration to route traffic to a staging distribution, you can also enable session stickiness, which helps make sure that CloudFront treats requests from the same viewer as a single session. When you enable session stickiness, CloudFront sets a cookie so that all requests from the same viewer in a single session are served by one distribution, either the primary or staging.

When you enable session stickiness, you can also specify the idle duration. If the viewer is idle (sends no requests) for this amount of time, the session expires and CloudFront treats future requests from this viewer as a new session. You specify the idle duration as a number of seconds, from 300 (five minutes) to 3600 (one hour).

In the following cases, CloudFront resets all sessions (even active ones) and considers all requests to be a new session:

  • You disable or enable the continuous deployment policy

  • You disable or enable the session stickiness setting

Updating primary and staging distributions

When a primary distribution has an attached continuous deployment policy, the following configuration changes are available for both primary and staging distributions:

  • All cache behavior settings, including the default cache behavior

  • All origin settings (origins and origin groups)

  • Custom error responses (error pages)

  • Geographic restrictions

  • Default root object

  • Logging settings

  • Description (comment)

You can also update external resources that are referenced in a distribution's configuration—such as a cache policy, a response headers policy, a CloudFront function, or a Lambda@Edge function.

Primary and staging distributions don't share a cache

The primary and staging distributions don't share a cache. When CloudFront sends the first request to a staging distribution, its cache is empty. As requests arrive at the staging distribution, it begins caching responses (if configured to do so).

Quotas and other considerations for continuous deployment

CloudFront continuous deployment is subject to the following quotas and other considerations.

Quotas

  • Maximum number of staging distributions per AWS account: 20

  • Maximum number of continuous deployment policies per AWS account: 20

  • Maximum percentage of traffic you can send to a staging distribution in a weight-based configuration: 15%

  • Minimum and maximum values for session stickiness idle duration: 300–3600 seconds

For more information, see Quotas.

Note

When using continuous deployment and your primary distribution is set with OAC for S3 bucket access, update your S3 bucket policy to allow access for the staging distribution. For example S3 bucket policies, see Giving the origin access control permission to access the S3 bucket.

HTTP/3

You cannot use continuous deployment with a distribution that supports HTTP/3.

Cases when CloudFront sends all requests to the primary distribution

In certain cases, such as periods of high resource utilization, CloudFront might send all requests to the primary distribution regardless of what's specified in the continuous deployment policy.

CloudFront sends all requests to the primary distribution during peak traffic hours, regardless of what's specified in the continuous deployment policy. Peak traffic refers to the traffic on the CloudFront service, and not the traffic on your distribution.