Note
-
To navigate to the segmentation builder experience in the Amazon Connect admin website, you need security profiles permissions for this feature. For more information, see Assign security profile permissions to manage customer segments.
-
Before building segments, we recommend your Customer Profiles domain setup data integrations to populate profiles in your Customer Profiles Domain. For more information on how to configure data integrations with Customer Profiles, see Integrate external applications with Amazon Connect Customer Profiles.
-
Segments can include events you captured using Calculated Attributes. For more information on how to configure custom Calculated Attributes and review the default Calculated Attributes Customer Profiles offers, see Amazon Connect Customer Profiles calculated attributes.
When you create a customer segment, you choose starting audiences and refine that audiences by choosing the filters that define the segment. For example, you could create an audience group, then choose a filter of all customers who live in a specific country and who are frequent callers. Segments are recalculated on demand, such as during campaign execution, contact flow execution, and segment estimate or export. As a result, the size and membership of each segment changes over time.
Additionally, you can create a second audience group, and then create a relationship (AND, OR, or EXCLUDE) between the two audience groups to further narrow down, concatenate, or exclude customers from the first audience group.

Audience groups
When you create a customer segment, you create one or more audience groups. An audience group consists of these components:

-
Starting audiences: The customer segments that define the initial user population. You can specify up to 5 starting audiences, or all of the profiles in your Customer Profiles domain.
-
Filter groups: Categories of audience information that you apply on top of the starting audiences. You can add multiple groups of filters which are connected by OR relationships.
-
Filters: Filters reduce the audience number that belong to the segment. You can add as many filters as you want in order to tailor the segment to your needs.
A customer segment has to have at least one audience group, but you can optionally create a second audience group, and then create a relationship (AND/OR/EXCLUDE) between the two audience groups. See Step 5: Add the second audience group (optional) for more details about the relationship.
Creating a customer
segment
The following steps describe creating and configuring a customer segment:
-
Step 1: Build a new segment
-
Step 2: Configure name and description
-
Step 3: Choose the starting audiences to include in audience group 1
-
Step 4: Choose and configure the filter groups (optional)
-
Step 5: Add audience group 2 (optional)
Step 1: Build a new segment
-
To create a segment, ensure that you have created security profiles permissions as a prerequisite. For more information, see Assign security profile permissions to manage customer segments. In addition, to best visualize the membership of your segment, we recommend data ingestion prior to segment creation. To ingest profiles through S3 or external applications, see Create and ingest customer data into Customer Profiles or Integrate external applications with Amazon Connect Customer Profiles.
-
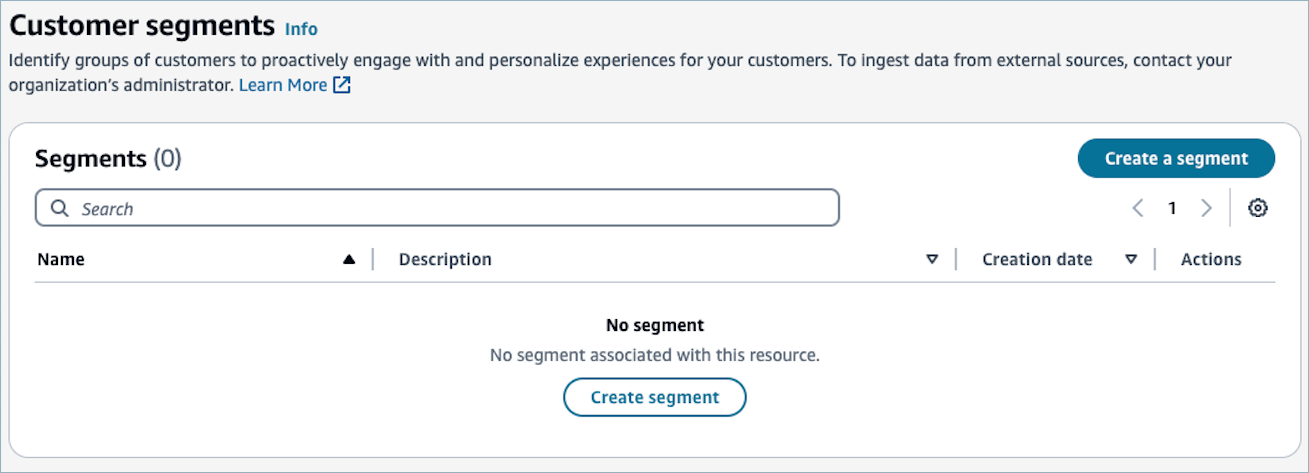
Choose Create a segment in the Customer segment table view.
Step 2: Specify
a name and description
-
For Name, enter a name for the customer segment to make it easy to recognize later.
Note
The Amazon Connect admin website uses the entered name as the
DisplayNameof the segment, and generates an identifier based on it. The generated identifier is used as theSegmentDefinitionNamewhen you access the segment by using Customer Profiles APIs. -
For Description, optionally enter a description for the customer segment.

Step 3: Choose the starting audiences to include in audience group
1
You'll first choose how you want to define the starting audience for the audience group.
-
Under Audience group 1, for the Starting audience dropdown list, select one or more segments to include in the audience group, or choose All profiles from Customer Profiles.
Note
When you choose multiple segments as the starting audience, the segments are connected by
ORrelationships. For example, if you choose Premium membership customers and Basic membership customers segments as the starting audiences, all profiles who are in either of the segments will be the included.
-
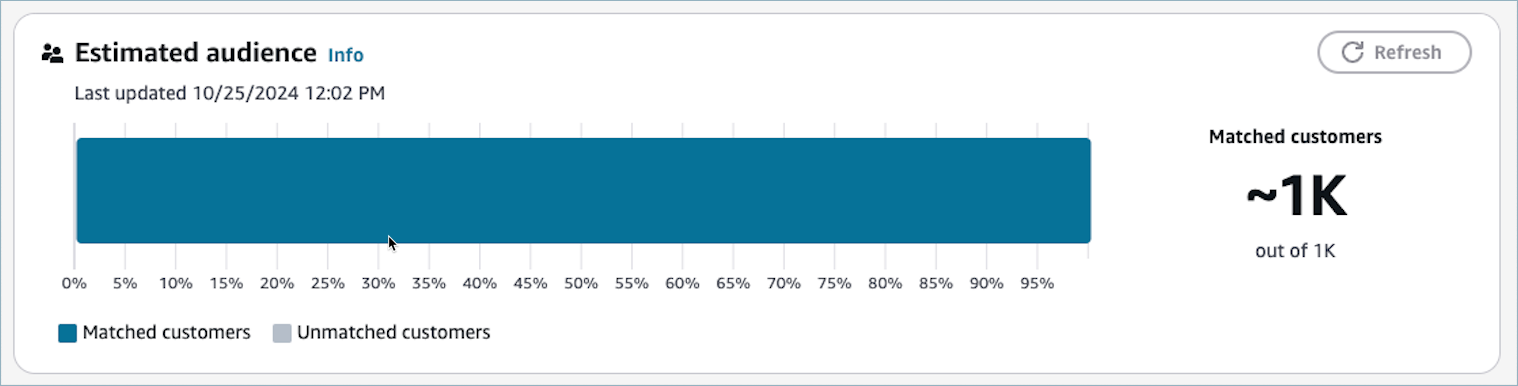
Once you choose a starting audience, the Estimated audience section updates to display the eligible profiles. Once you edit the audience groups, you can click Refresh button in the Estimated audience section to re-fetch the estimate.
Step 4:
Choose and apply audience filters (optional)
After you’ve chosen your starting audiences, you can further refine the audiences by applying conditional logic to attributes. Segments supports standard profile attributes, custom profile attributes, and calculated attributes.

To choose and configure the audience filters
-
For Attribute, you can choose an attribute of the following types
-
Calculated attributes - Filter the audience based on one of calculated attributes.
See Amazon Connect Customer Profiles calculated attributes to learn about the default Calculated Attributes and how to configure custom Calculated Attributes.
-
Standard attributes - Filter the audience based on one of standard profile attributes.
See Standard profile definition in the Amazon Connect Customer Profiles for the list of standard profile attributes.
-
Custom attributes - Filter the audience based on one of custom profile attributes.
Note
We store up to 1000 most recent profile attributes within the domain. If your domain contains a large amount of attributes the oldest attributes may not be displayed in this list.
-
-
Choose the Operator. Operators determines the relationship of the attribute to a value you enter. The following describes the available operators. Available operators change based on the type of value of the attribute you selected.
| Supported type of attribute value | Operator | Description |
|---|---|---|
| Number | Greater than | Used for numeric attributes only. This operator filters results that are greater than the number passed. For example, Customer’s average hold time is greater than 10 seconds. |
| Greater than or equal | Used for numeric attributes only. This operator filters results that are greater than or equal to the number passed. For example, Customer’s average hold time is greater than or equal to 10 seconds. | |
| Equals | Used for numeric attributes only. This operator filters the audience by numeric value equality. For example, Customer’s average hold time equals 10 seconds. | |
| Less than | Used for numeric attributes only. This operator filters results that are less than the number passed. For example, Customer’s average hold time is less than 10 seconds. | |
| Less than or equal | Used for numeric attributes only. This operator filters results that are less than or equal to the number passed. For example, Customer’s average hold time is less than or equal to 10 seconds. | |
| String | Is | Filters the audience the matches to the given string. For example, customer’s Address.Country is USA. |
| Is not | Filters the audience that does not match a given string. For example, customer’s Address.Country is not USA. | |
| Contains | Use this to filter the audience based on a substring within a string. For example, if you have a filter for Address.Country attribute, you could pass the US to return US or USA. | |
| Begind with | Filters the audience whose attribute begins with the given string. For example, customer’s Address.Country begins with US. | |
| Ends with | Filters the audience whose attribute ends with the given string. For example, customer’s EmailAddress ends with @amazon.com. | |
| Date | Before | Filters the audience whose attribute has a date value that is before a specific date. For example, customer’s whose Attributes.NextReservation is before 2024/10/01. |
| On | Filters the audience whose attribute value matches with a specific date. For example, customer’s whose Attributes.NextReservation is on 2024/10/01. | |
| After | Filters the audience whose attribute has a date value that is after a specific date. For example, customer’s whose Attributes.NextReservation is after 2024/10/01. | |
| Time range is | Filters the audience whose attribute has a date value that is between a specific time range. You can either specify the time range in absolute time mode or relative time mode. | |
| Absolute time mode: allows you to specify an absolute time range. For example, between 2024/10/01 12:00 AM and 2024/10/07 12:00 AM. | ||
| Relative time mode: allows you to specify the relative time range of furture or past X hours, days, weeks, months, or years. - Future time direction: will filter audience whose attribute has a date value that is between now and a speficied future time. For example, within the next 2 days. - Past time direction: will filter audience whose attribute has a date value that is between a speficied past time and now. For example, within the last 2 days. | ||
| Time range is not | Filters the audience whose attribute has a date value that is not between a specific time range. You can either specify the time range in absolute time mode or relative time mode. See "Time range is" operator in this table for more details. |
Note
Customer segments in the Amazon Connect admin website uses UTC timezone and a default time of 00:00:00 UTC for all time-based filters. You can filter on dates but times are recorded as the same value. If you enter a date of 2024-01-01, the console passes the time as 2024-01-01T00:00:00Z.
Note
When you specify a filter for a calculated attribute, you can override the
time period of the calculated attribute definition. For example, the filter
Frequent caller is true for the event time period of 60
                            days
will override the Frequent caller
Default calculated
attributes in Amazon Connect Customer Profiles to
evaluate the value within the past 60 days instead of the time period
configured in the calculated attribute definition. This override
is specific to the segment, and does not affect the calculated attribute
definition itself.

-
Specify the Value. You can specify multiple values connected by
ORrelationships. For example,Address.CountryisUSAorMexico. The value input shows suggestions in the dropdown for string operators based on the customer profiles stored in the domain.Note
Values are case-sensitive. For example, Address.Country is US returns different results than Address.Country is us.
-
(Optional) To apply additional attributes to this filter group, choose + Filter. To create another group of filters, choose + Group.
Note
When you have multiple filters in a filter group, the filters are connected by AND relationships. For example, a filter group containing 2 filters, “Address.Country is USA” and “Customer’s average hold time is more than 10 seconds”, the profiles whose Address.Country is USA and average hold time is more than 10 seconds will belong to the segment.
When you have multiple filter groups in an audience group, Customer segments in the Amazon Connect admin website use OR relationships to connect between the filter groups.

-
When you’re finished setting up the audience group, choose Create segment.
Step 5: Add the
second audience group (optional)
Optionally add the second audience group and define a relationship with audience group 1. When you create a customer segment by using the Amazon Connect admin website, you can have a maximum of two audience groups per segment. If you add a second audience group to your segment, you can choose one of two ways to specify how the two audience groups are connected:
-
AND relationship — If you use AND relationship to connect two audiences, your segment contains all profiles who meet the filters of both Audience group 1 and Audience group 2.
-
OR relationship — If you use OR relationship to connect two audiences, your segment contains all profiles who meet the filters of either Audience group 1 or Audience group 2.
-
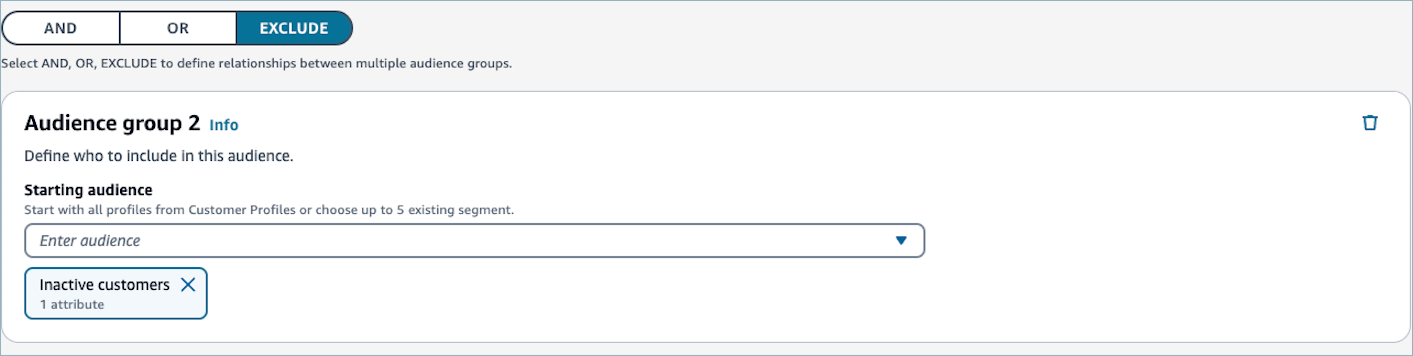
EXCLUDE relationship — If you use EXCLUDE relationship to connect two audiences, the segment will contain profiles in Audience group 1 excluding the profiles in Audience group 2.
To configure second audience group
-
Choose AND, OR, or EXCLUDE relationship after configuring Audience group 1.
-
Choose the starting audience in Audience group 2. For reference, see Step 3: Choose the starting audiences to include in audience group 1.
-
(Optional) Choose the filters by which you want to narrow down your segments. For reference, see Step 4: Choose and apply audience filters (optional)
-
When you finish setting up the segment, choose Create segment. Segment is created and you can now use the segment in outbound campaigns or flows.

