Joining an Amazon EC2 Windows instance to your AWS Managed Microsoft AD Active Directory
You can launch and join an Amazon EC2 Windows instance to an AWS Managed Microsoft AD. Alternatively, you can manually join an existing EC2 Windows instance to an AWS Managed Microsoft AD.
- Seamlessly join EC2 Windows instance
-
This procedure seamlessly joins an Amazon EC2 Windows instance to your AWS Managed Microsoft AD. If you need to perform seamless domain join across multiple AWS accounts, see Tutorial: Sharing your AWS Managed Microsoft AD directory for seamless EC2 domain-join. For more information about Amazon EC2, see What is Amazon EC2?.
Prerequisites
To seamlessly domain join an EC2 instance, you will need to complete the following:
-
Have an AWS Managed Microsoft AD. To learn more, see Creating your AWS Managed Microsoft AD.
-
You'll need the following IAM permissions to seamlessly join an EC2 Windows instance:
-
IAM Instance Profile with the following IAM permissions:
-
AmazonSSMManagedInstanceCore -
AmazonSSMDirectoryServiceAccess
-
-
The user seamlessly domain joining the EC2 to the AWS Managed Microsoft AD needs the following IAM permissions:
-
AWS Directory Service Permissions:
-
"ds:DescribeDirectories" -
"ds:CreateComputer"
-
-
Amazon VPC Permissions:
-
"ec2:DescribeVpcs" -
"ec2:DescribeSubnets" -
"ec2:DescribeNetworkInterfaces" -
"ec2:CreateNetworkInterface" -
"ec2:AttachNetworkInterface"
-
-
EC2 Permissions:
-
"ec2:DescribeInstances" -
"ec2:DescribeImages" -
"ec2:DescribeInstanceTypes" -
"ec2:RunInstances" -
"ec2:CreateTags"
-
-
AWS Systems Manager Permissions:
-
"ssm:DescribeInstanceInformation" -
"ssm:SendCommand" -
"ssm:GetCommandInvocation" -
"ssm:CreateBatchAssociation"
-
-
-
When your AWS Managed Microsoft AD is created, a security group is created with inbound and outbound rules. To learn more about these rules and ports, see What gets created with your AWS Managed Microsoft AD. To seamlessly domain join an EC2 Windows instance, your VPC where you're launching your instance should allow the same ports allowed in your AWS Managed Microsoft AD security group's inbound and outbound rules.
-
Depending on your network security and firewall settings, you could be required to allow additional outbound traffic. This traffic would be for HTTPS (port 443) to the following endpoints:
Endpoint Role ec2messages.region.amazonaws.comCreates and deletes session channels with Session Manager service. For more information, see AWS Systems Manager endpoints and quotas.
ssm.region.amazonaws.comEndpoint for AWS Systems Manager Session Manager. For more information, see AWS Systems Manager endpoints and quotas.
ssmmessages.region.amazonaws.comCreates and deletes session channels with Session Manager service. For more information, see AWS Systems Manager endpoints and quotas.
ds.region.amazonaws.comEndpoint for AWS Directory Service. For more information, see Region availability for AWS Directory Service.
-
We recommend to use a DNS server that will resolve your AWS Managed Microsoft AD domain name. To do so, you can create a DHCP option set. See Creating or changing a DHCP options set for AWS Managed Microsoft AD for more information.
-
If you choose not to create a DHCP option set, then your DNS servers will be static and configured to by your AWS Managed Microsoft AD.
-
To seamlessly join an Amazon EC2 Windows instance
-
Sign in to the AWS Management Console and open the Amazon EC2 console at https://console.aws.amazon.com/ec2/
. -
In the navigation bar, choose the same AWS Region as the existing directory.
-
On the EC2 Dashboard, in the Launch instance section, choose Launch instance.
-
On the Launch an instance page, under the Name and Tags section, enter the name you would like to use for your Windows EC2 instance.
(Optional) Choose Add additional tags to add one or more tag key-value pairs to organize, track, or control access for this EC2 instance.
-
In the Application and OS Image (Amazon Machine Image) section, choose Windows in the Quick Start pane. You can change the Windows Amazon Machine Image (AMI) from the Amazon Machine Image (AMI) dropdown list.
-
In the Instance type section, choose the instance type you would like to use from Instance type dropdown list.
-
In the Key pair (login) section, you can either choose to create a new key pair or choose from an existing key pair.
To create a new key pair, choose Create new key pair.
Enter a name for the key pair and select an option for the Key pair type and Private key file format.
To save the private key in a format that can be used with OpenSSH, choose .pem. To save the private key in a format that can be used with PuTTY, choose .ppk.
Choose create key pair.
The private key file is automatically downloaded by your browser. Save the private key file in a safe place.
Important
This is the only chance for you to save the private key file.
-
On the Launch an instance page, under Network settings section, choose Edit. Choose the VPC that your directory was created in from the VPC - required dropdown list.
-
Choose one of the public subnets in your VPC from the Subnet dropdown list. The subnet you choose must have all external traffic routed to an internet gateway. If this is not the case, you won't be able to connect to the instance remotely.
For more information on how to connect to a internet gateway, see Connect to the internet using an internet gateway in the Amazon VPC User Guide.
-
Under Auto-assign public IP, choose Enable.
For more information about public and private IP addressing, see Amazon EC2 instance IP addressing in the Amazon EC2 User Guide.
-
For Firewall (security groups) settings, you can use the default settings or make changes to meet your needs.
-
For Configure storage settings, you can use the default settings or make changes to meet your needs.
-
Select Advanced details section, choose your domain from the Domain join directory dropdown list.
Note
After choosing the Domain join directory, you may see:

This error occurs if the EC2 launch wizard identifies an existing SSM document with unexpected properties. You can do one of the following:
If you previously edited the SSM document and the properties are expected, choose close and proceed to launch the EC2 instance with no changes.
Select the delete the existing SSM document here link to delete the SSM document. This will allow for the creation of an SSM document with the correct properties. The SSM document will automatically be created when you launch the EC2 instance.
-
For IAM instance profile, you can select an existing IAM instance profile or create a new one. Select an IAM instance profile that has the AWS managed policies AmazonSSMManagedInstanceCore and AmazonSSMDirectoryServiceAccess attached to it from the IAM instance profile dropdown list. To create a new one, choose Create new IAM profile link, and then do the following:
-
Choose Create role.
-
Under Select trusted entity, choose AWS service.
-
Under Use case, choose EC2.
-
Under Add permissions, in the list of policies, select the AmazonSSMManagedInstanceCore and AmazonSSMDirectoryServiceAccess policies. To filter the list, type
SSMin the search box. Choose Next.Note
AmazonSSMDirectoryServiceAccess provides the permissions to join instances to an Active Directory managed by AWS Directory Service. AmazonSSMManagedInstanceCore provides the minimum permissions necessary to use the AWS Systems Manager service. For more information about creating a role with these permissions, and for information about other permissions and policies you can assign to your IAM role, see Create an IAM instance profile for Systems Manager in the AWS Systems Manager User Guide.
-
On the Name, review, and create page, enter a Role name. You will need this role name to attach to the EC2 instance.
-
(Optional) You can provide a description of the IAM instance profile in the Description field.
-
Choose Create role.
-
Return to Launch an instance page and choose the refresh icon next to the IAM instance profile. Your new IAM instance profile should be visible in the IAM instance profile dropdown list. Choose the new profile and leave the rest of the settings with their default values.
-
-
Choose Launch instance.
-
- Manually join EC2 Windows instance
To manually join an existing Amazon EC2 Windows instance to an AWS Managed Microsoft AD Active Directory, the instance must be launched using the parameters as specified in Joining an Amazon EC2 Windows instance to your AWS Managed Microsoft AD Active Directory.
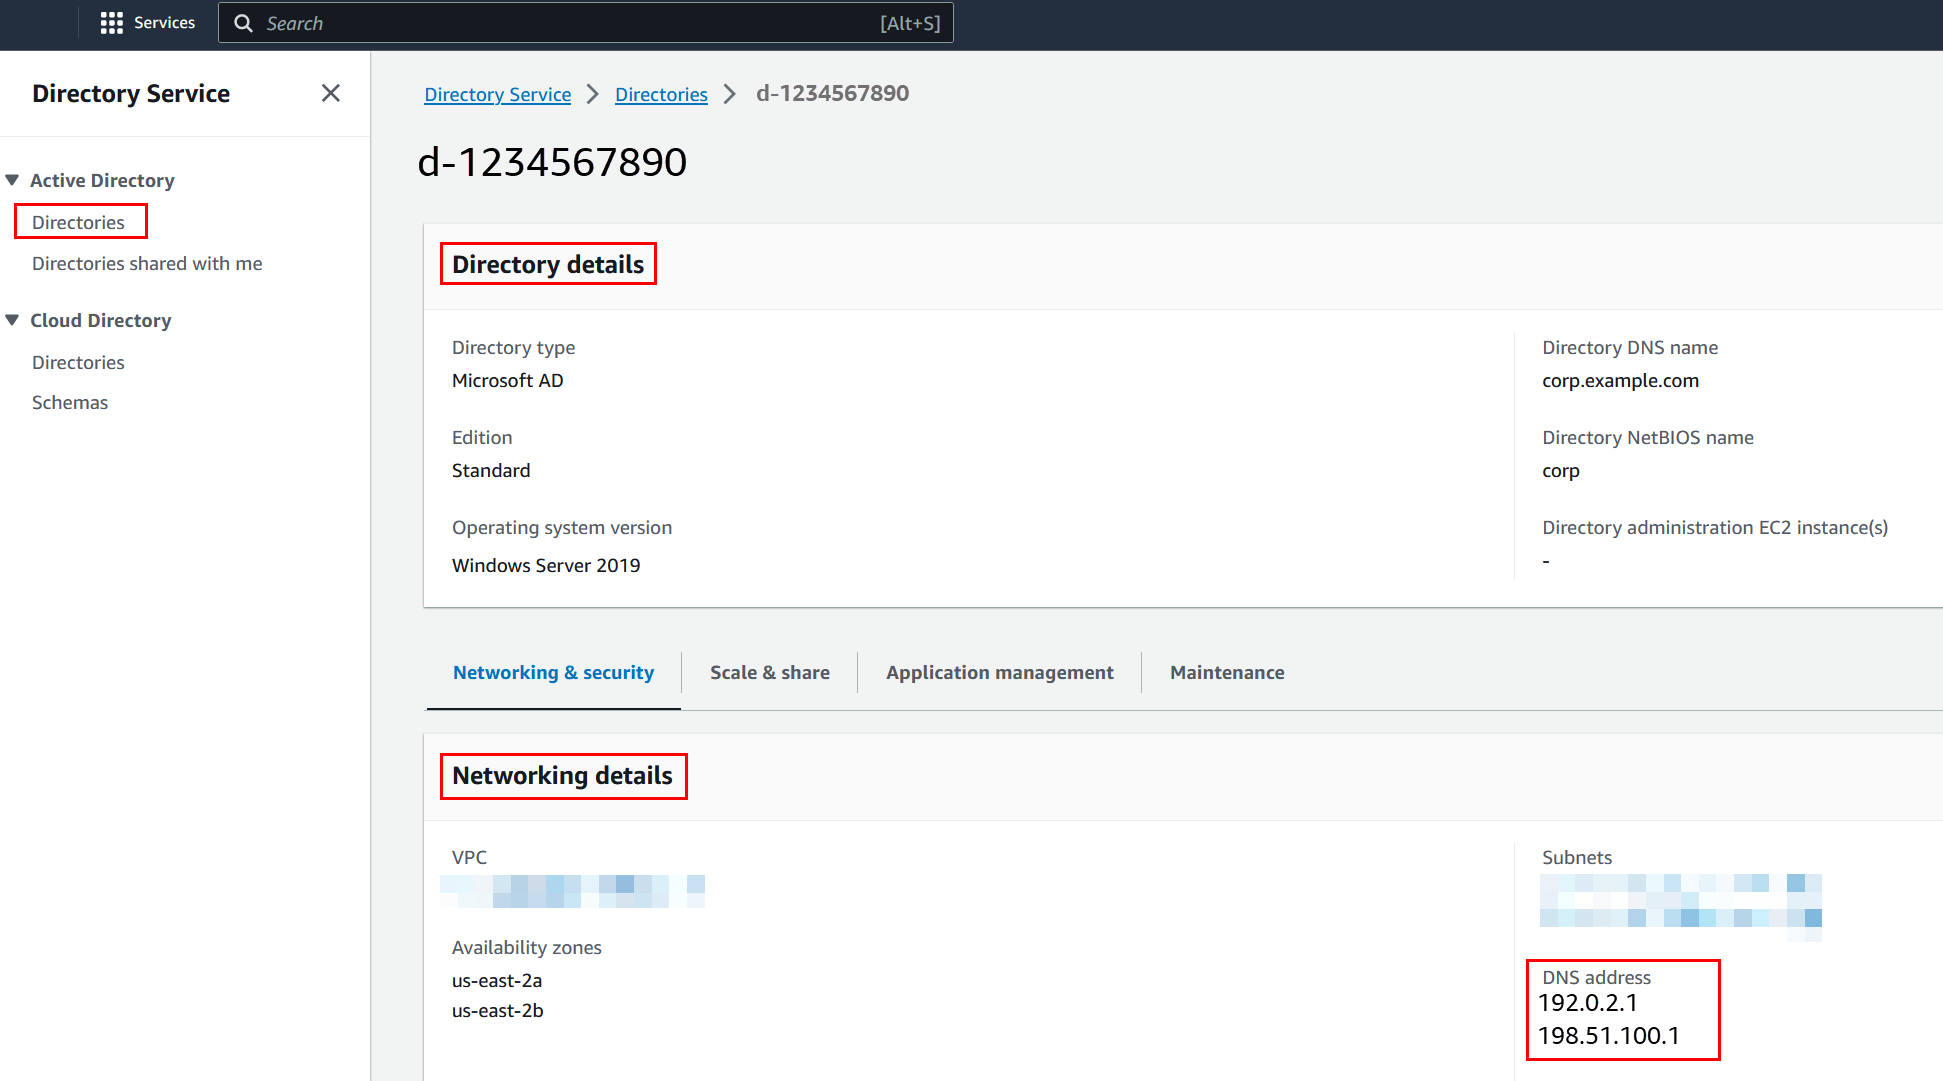
You will need the IP addresses of the AWS Managed Microsoft AD DNS servers. This information can be found under Directory Services > Directories > the Directory ID link for your directory > Directory details and Networking & Security sections.
To join a Windows instance to an AWS Managed Microsoft AD Active Directory
-
Connect to the instance using any Remote Desktop Protocol client.
-
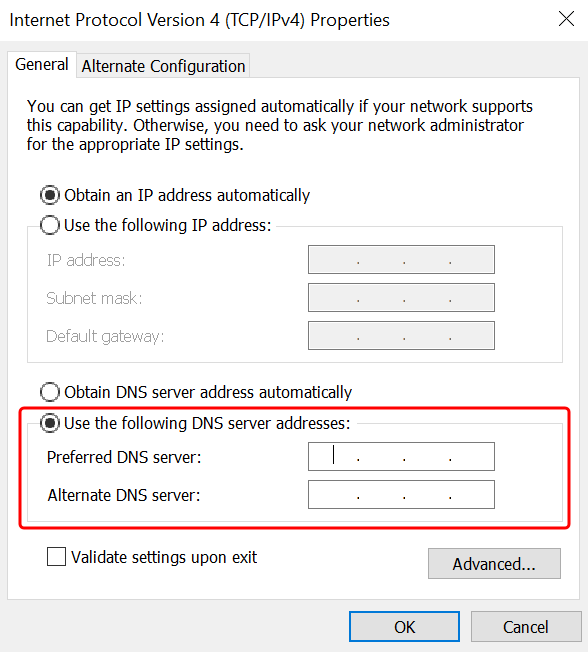
Open the TCP/IPv4 properties dialog box on the instance.
-
Open Network Connections.
Tip
You can open Network Connections directly by running the following from a command prompt on the instance.
%SystemRoot%\system32\control.exe ncpa.cpl -
Open the context menu (right-click) for any enabled network connection and then choose Properties.
-
In the connection properties dialog box, open (double-click) Internet Protocol Version 4.
-
-
Select Use the following DNS server addresses, change the Preferred DNS server and Alternate DNS server addresses to the IP addresses of your AWS Managed Microsoft AD-provided DNS servers, and choose OK.
-
Open the System Properties dialog box for the instance, select the Computer Name tab, and choose Change.
Tip
You can open the System Properties dialog box directly by running the following from a command prompt on the instance.
%SystemRoot%\system32\control.exe sysdm.cpl -
In the Member of field, select Domain, enter the fully qualified name of your AWS Managed Microsoft AD Active Directory, and choose OK.
-
When prompted for the name and password for the domain administrator, enter the username and password of an account that has domain join privileges. For more information about delegating these privileges, see Delegating directory join privileges for AWS Managed Microsoft AD.
Note
You can enter either the fully qualified name of your domain or the NetBIOS name, followed by a backslash (\), and then the username. The username would be Admin. For example,
corp.example.com\adminorcorp\admin. -
After you receive the message welcoming you to the domain, restart the instance to have the changes take effect.
Now that your instance has been joined to the AWS Managed Microsoft AD Active Directory domain, you can log into that instance remotely and install utilities to manage the directory, such as adding users and groups. The Active Directory Administration Tools can be used to create users and groups. For more information, see Installing Active Directory Administration Tools for AWS Managed Microsoft AD.
Note
You can also use Amazon Route 53 to process DNS queries instead of manually changing the DNS addresses on your Amazon EC2 instances. For more information, see Integrating your Directory Service's DNS resolution with Amazon Route 53 Resolver
and Forwarding outbound DNS queries to your network. -
