Step 1: Create an example application
In this step, you create a new application starting from a preexisting example application. Elastic Beanstalk supports platforms for different programming languages, application servers, and Docker containers. You choose a platform when you create the application.
Create an application and an environment
To create your example application, you'll use the Create application console wizard. It creates an Elastic Beanstalk application and launches an environment within it. An environment is the collection of AWS resources required to run your application code.
To create an example application
-
Open the Elastic Beanstalk console
. -
Choose Create application.
-
For Application name enter
getting-started-app. -
Optionally add application tags.
-
For Platform, choose a platform.
-
Choose Next.
-
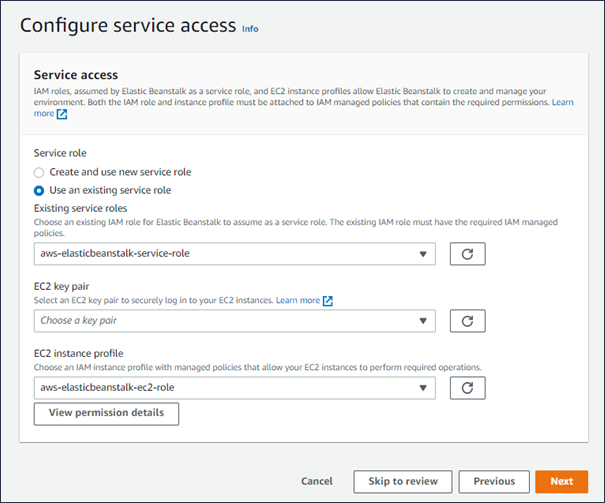
The Configure service access page displays.
-
Choose Use an existing service role for Service Role.
-
Next, we'll focus on the EC2 instance profile dropdown list. The values displayed in this dropdown list may vary, depending on whether you account has previously created a new environment.
Choose one of the following, based on the values displayed in your list.
If
aws-elasticbeanstalk-ec2-roledisplays in the dropdown list, select it from the EC2 instance profile dropdown list.If another value displays in the list, and it’s the default EC2 instance profile intended for your environments, select it from the EC2 instance profile dropdown list.
If the EC2 instance profile dropdown list doesn't list any values to choose from, expand the procedure that follows, Create IAM Role for EC2 instance profile.
Complete the steps in Create IAM Role for EC2 instance profile to create an IAM Role that you can subsequently select for the EC2 instance profile. Then return back to this step.
Now that you've created an IAM Role, and refreshed the list, it displays as a choice in the dropdown list. Select the IAM Role you just created from the EC2 instance profile dropdown list.
-
Choose Skip to Review on the Configure service access page.
This skips the optional steps.
-
The Review page displays a summary of all your choices.
Choose Submit at the bottom of the page.
To create a an IAM Role for EC2 instance profile selection
-
Choose View permission details. This displays under the EC2 instance profile dropdown list.
A modal window titled View instance profile permissions displays. This window lists the managed profiles that you'll need to attach to the new EC2 instance profile that you create. It also provides a link to launch the IAM console.
-
Choose the IAM console link displayed at the top of the window.
-
In the IAM console navigation pane, choose Roles.
-
Choose Create role.
-
Under Trusted entity type, choose AWS service.
-
Under Use case, choose EC2.
-
Choose Next.
-
Attach the appropriate managed policies. Scroll in the View instance profile permissions modal window to see the managed policies. The policies are also listed here:
-
AWSElasticBeanstalkWebTier -
AWSElasticBeanstalkWorkerTier -
AWSElasticBeanstalkMulticontainerDocker
-
-
Choose Next.
-
Enter a name for the role.
-
(Optional) Add tags to the role.
-
Choose Create role.
-
Return to the Elastic Beanstalk console window that is open.
-
Close the modal window View instance profile permissions.
Important
Do not close the browser page that displays the Elastic Beanstalk console.
-
Choose
 (refresh),
next to the EC2 instance profile dropdown list.
(refresh),
next to the EC2 instance profile dropdown list.
This refreshes the dropdown list, so that the Role you just created will display in the dropdown list.
Elastic Beanstalk workflow
To deploy and run the example application on AWS resources, Elastic Beanstalk takes the following actions. They take about five minutes to complete.
-
Creates an Elastic Beanstalk application named getting-started-app.
-
Launches an environment named GettingStartedApp-env with these AWS resources:
-
An Amazon Elastic Compute Cloud (Amazon EC2) instance (virtual machine)
-
An Amazon EC2 security group
-
An Amazon Simple Storage Service (Amazon S3) bucket
-
Amazon CloudWatch alarms
-
An AWS CloudFormation stack
-
A domain name
For details about these AWS resources, see AWS resources created for the example application.
-
-
Creates a new application version named Sample Application. This is the default Elastic Beanstalk example application file.
-
Deploys the code for the example application to the GettingStartedApp-env environment.
During the environment creation process, the console tracks progress and displays events.
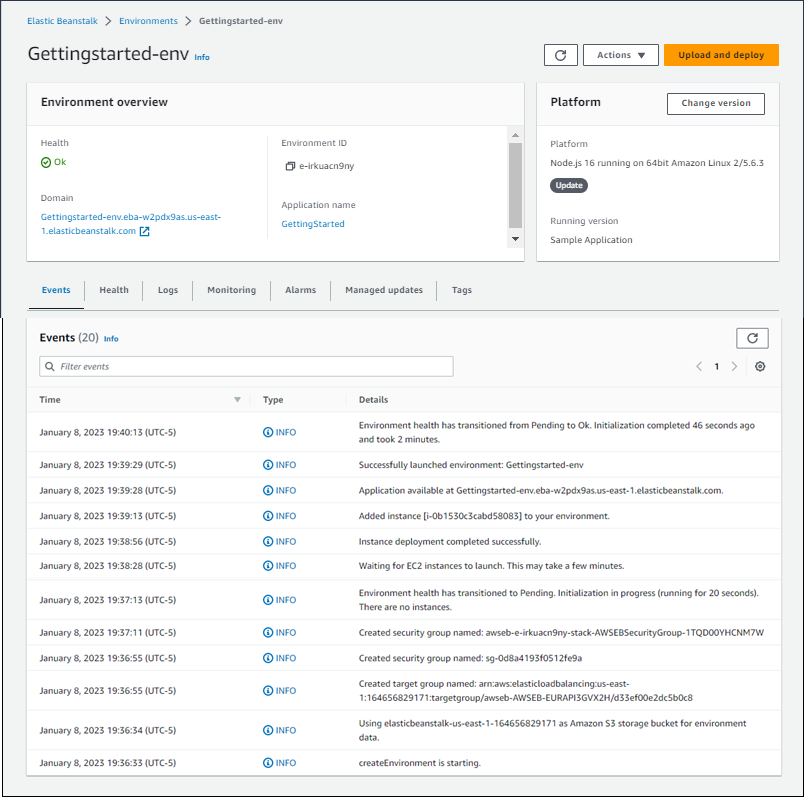
When all of the resources are launched and the EC2 instances running the application pass health checks, the environment's health changes to
Ok. You can now use your web application's website.
AWS resources created for the example application
When you create the example application, Elastic Beanstalk creates the following AWS resources:
-
EC2 instance – An Amazon EC2 virtual machine configured to run web apps on the platform you choose.
Each platform runs a different set of software, configuration files, and scripts to support a specific language version, framework, web container, or combination thereof. Most platforms use either Apache or nginx as a reverse proxy that processes web traffic in front of your web app, forwards requests to it, serves static assets, and generates access and error logs.
-
Instance security group – An Amazon EC2 security group configured to allow incoming traffic on port 80. This resource lets HTTP traffic from the load balancer reach the EC2 instance running your web app. By default, traffic is not allowed on other ports.
-
Amazon S3 bucket – A storage location for your source code, logs, and other artifacts that are created when you use Elastic Beanstalk.
-
Amazon CloudWatch alarms – Two CloudWatch alarms that monitor the load on the instances in your environment and are triggered if the load is too high or too low. When an alarm is triggered, your Auto Scaling group scales up or down in response.
-
AWS CloudFormation stack – Elastic Beanstalk uses AWS CloudFormation to launch the resources in your environment and propagate configuration changes. The resources are defined in a template that you can view in the AWS CloudFormation console
. -
Domain name – A domain name that routes to your web app in the form
subdomain.region.elasticbeanstalk.com.Note
To augment the security of your Elastic Beanstalk applications, the elasticbeanstalk.com domain is registered in the Public Suffix List (PSL)
. For further security, we recommend that you use cookies with a __Host-prefix if you ever need to set sensitive cookies in the default domain name for your Elastic Beanstalk applications. This practice will help to defend your domain against cross-site request forgery attempts (CSRF). For more information see the Set-Cookiepage in the Mozilla Developer Network.
