Secure your Lightsail LAMP instance with Let's Encrypt SSL certificates
Amazon Lightsail makes it easy to secure your websites and applications with SSL/TLS using Lightsail load balancers. However, using a Lightsail load balancer might not generally be the right choice. Perhaps your site doesn't need the scalability or fault tolerance load balancers provide, or maybe you're optimizing for cost.
In the latter case, you might consider using Let's Encrypt to obtain a free SSL certificate. If so, that's no problem. You can integrate those certificates with Lightsail instances. This tutorial shows you how to request a Let’s Encrypt wildcard certificate using Certbot, and integrate it with your LAMP instance.
Important
-
The Linux distribution used by Bitnami instances changed from Ubuntu to Debian in July, 2020. Because of this change, some of the steps in this tutorial will differ depending on the Linux distribution of your instance. All Bitnami blueprint instances created after the change use the Debian Linux distribution. Instances created before the change will continue to use the Ubuntu Linux distribution. To check the distribution of your instance, run the
uname -acommand. The response will show either Ubuntu or Debian as your instance's Linux distribution. -
Bitnami is in the process of modifying the file structure for many of their stacks. The file paths in this tutorial may change depending on whether your Bitnami stack uses native Linux system packages (Approach A), or if it is a self-contained installation (Approach B). To identify your Bitnami installation type and which approach to follow, run the following command:
test ! -f "/opt/bitnami/common/bin/openssl" && echo "Approach
            A: Using system packages." || echo "Approach B: Self-contained
            installation."
Contents
Step 1: Complete the prerequisites
Complete the following prerequisites if you haven’t already done so:
-
Create a LAMP instance in Lightsail. To learn more, see Create an instance.
-
Register a domain name, and get administrative access to edit its DNS records. To learn more, see Amazon Lightsail DNS .
Note
We recommend that you manage your domain’s DNS records using a Lightsail DNS zone. To learn more, see Creating a DNS zone to manage your domain’s DNS records.
-
Use the browser-based SSH terminal in the Lightsail console to perform the steps in this tutorial. However, you can also use your own SSH client, such as PuTTY. To learn more about configuring PuTTY, see Download and set up PuTTY to connect using SSH.
After you've completed the prerequisites, continue to the next section of this tutorial.
Step 2: Install Certbot on your instance
Certbot is a client used to request a certificate from Let’s Encrypt and deploy it to a web server. Let's Encrypt uses the ACME protocol to issue certificates, and Certbot is an ACME-enabled client that interacts with Let's Encrypt.
To install Certbot on your Lightsail instance
-
Sign in to the Lightsail console
. -
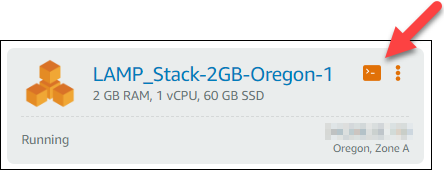
In the left navigation pane, choose the SSH quick connect icon for the instance that you want to connect to.
-
After your Lightsail browser-based SSH session is connected, enter the following command to update the packages on your instance:
sudo apt-get update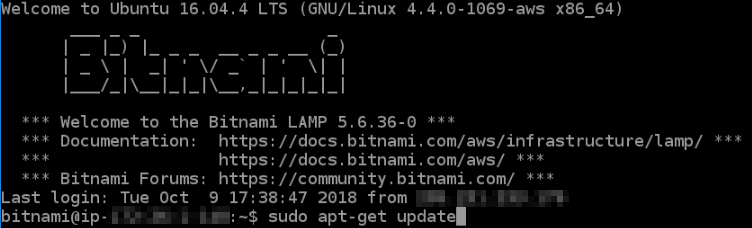
-
Enter the following command to install the software properties package. Certbot’s developers use a Personal Package Archive (PPA) to distribute Certbot. The software properties package makes it more efficient to work with PPAs.
sudo apt-get install software-properties-commonNote
If you encounter a
Could not get lockerror when running thesudo apt-get installcommand, please wait approximately 15 minutes and try again. This error may be caused by a cron job that is using the Apt package management tool to install unattended upgrades. -
Enter the following command to add Certbot to the local apt repository:
Note
Step 5 applies only to instances that use the Ubuntu Linux distribution. Skip this step if your instance uses the Debian Linux distribution.
sudo apt-add-repository ppa:certbot/certbot -y -
Enter the following command to update apt to include the new repository:
sudo apt-get update -y -
Enter the following command to install Certbot:
sudo apt-get install certbot -yCertbot is now installed on your Lightsail instance.
-
Keep the browser-based SSH terminal window open—you return to it later in this tutorial. Continue to the next section of this tutorial.
Step 3: Request a Let’s Encrypt SSL wildcard certificate
Begin the process of requesting a certificate from Let’s Encrypt. Using Certbot, request a
wildcard certificate, which lets you use a single certificate for a domain and its subdomains.
For example, a single wildcard certificate works for the example.com top-level
domain, and the blog.example.com, and stuff.example.com
subdomains.
To request a Let’s Encrypt SSL wildcard certificate
-
In the same browser-based SSH terminal window used in step 2 of this tutorial, enter the following commands to set an environment variable for your domain. You can now more efficiently copy and paste commands to obtain the certificate.
DOMAIN=DomainWILDCARD=*.$DOMAINIn the command, replace
Domainwith your registered domain name.Example:
DOMAIN=example.comWILDCARD=*.$DOMAIN -
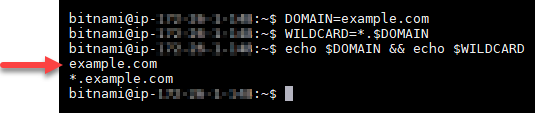
Enter the following command to confirm the variables return the correct values:
echo $DOMAIN && echo $WILDCARDYou should see a result similar to the following:
-
Enter the following command to start Certbot in interactive mode. This command tells Certbot to use a manual authorization method with DNS challenges to verify domain ownership. It requests a wildcard certificate for your top-level domain, as well as its subdomains.
sudo certbot -d $DOMAIN -d $WILDCARD --manual --preferred-challenges dns certonly -
Enter your email address when prompted, because it’s used for renewal and security notices.
-
Read the Let’s Encrypt terms of service. When done, press A if you agree. If you disagree, you cannot obtain a Let’s Encrypt certificate.
-
Respond accordingly to the prompt to share your email address and to the warning about your IP address being logged.
-
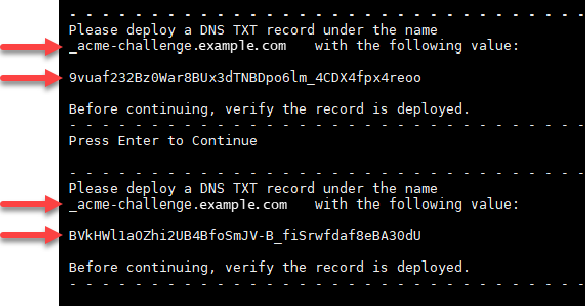
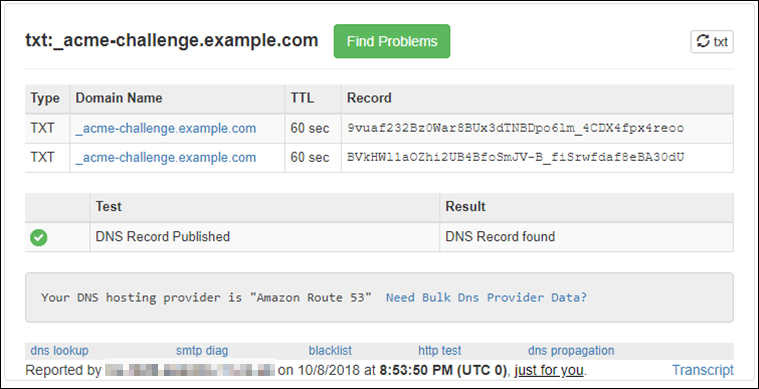
Let’s Encrypt now prompts you to verify that you own the domain specified. You do this by adding TXT records to the DNS records for your domain. A set of TXT record values are provided as shown in the following example:
Note
Let's Encrypt may provide a single or multiple TXT records that you must use for verification. In this example, we were provided with two TXT records to use for verification.
-
Keep the Lightsail browser-based SSH session open—you return to it later in this tutorial. Continue to the next section of this tutorial.
Step 4: Add TXT records to your domain’s DNS zone
Adding a TXT record to your domain’s DNS zone verifies that you own the domain. For demonstration purposes, we use the Lightsail DNS zone. However, the steps might be similar for other DNS zones typically hosted by domain registrars.
Note
To learn more about how to create a Lightsail DNS zone for your domain, see Creating a DNS zone to manage your domain’s DNS records in Lightsail.
To add TXT records to your domain’s DNS zone in Lightsail
-
In the left navigation pane, choose Domains & DNS.
-
Under the DNS zones section of the page, choose the DNS Zone for the domain that you specified in the Certbot certificate request.
-
In the DNS zone editor, choose DNS records.
-
Choose Add record.
-
In the Record type drop-down menu, choose TXT record.
-
Enter the values specified by the Let’s Encrypt certificate request into the Record name and Responds with fields.
Note
The Lightsail console pre-populates the apex portion of your domain. For example, if you want to add the
_acme-challenge.example.com_acme-challenge.example.comportion for you when you save the record. -
Choose Save.
-
Repeat steps 4 through 7 to add the second set of TXT records specified by the Let’s Encrypt certificate request.
-
Keep the Lightsail console browser window open—you return to it later in this tutorial. Continue to the next section of this tutorial.
Step 5: Confirm that the TXT records have propagated
Use the MxToolbox utility to confirm that the TXT records have propagated to the internet’s DNS. DNS record propagation might take a while depending on your DNS hosting provider, and the configured time to live (TTL) for your DNS records. It is important that you complete this step, and confirm that your TXT records have propagated, before continuing your Certbot certificate request. Otherwise, your certificate request fails.
To confirm the TXT records have propagated to the internet’s DNS
-
Open a new browser window and go to https://mxtoolbox.com/TXTLookup.aspx
. -
Enter the following text into the text box.
_acme-challenge.DomainReplace
Domainwith your registered domain name.Example:
_acme-challenge.example.com
-
Choose TXT Lookup to run the check.
-
One of the following responses occurs:
-
If your TXT records have propagated to the internet’s DNS, you see a response similar to the one shown in the following screenshot. Close the browser window and continue to the next section of this tutorial.
-
If your TXT records have not propagated to the internet’s DNS, you see a DNS Record not found response. Confirm that you added the correct DNS records to your domains’ DNS zone. If you added the correct records, wait a while longer to let your domain’s DNS records propagate, and run the TXT lookup again.
-
Step 6: Complete the Let’s Encrypt SSL certificate request
Go back to the Lightsail browser-based SSH session for your LAMP instance and complete the Let’s Encrypt certificate request. Certbot saves your SSL certificate, chain, and key files to a specific directory on your LAMP instance.
To complete the Let’s Encrypt SSL certificate request
-
In the Lightsail browser-based SSH session for your LAMP instance, press Enter to continue your Let’s Encrypt SSL certificate request. If successful, a response similar to the one shown in the following screenshot appears:
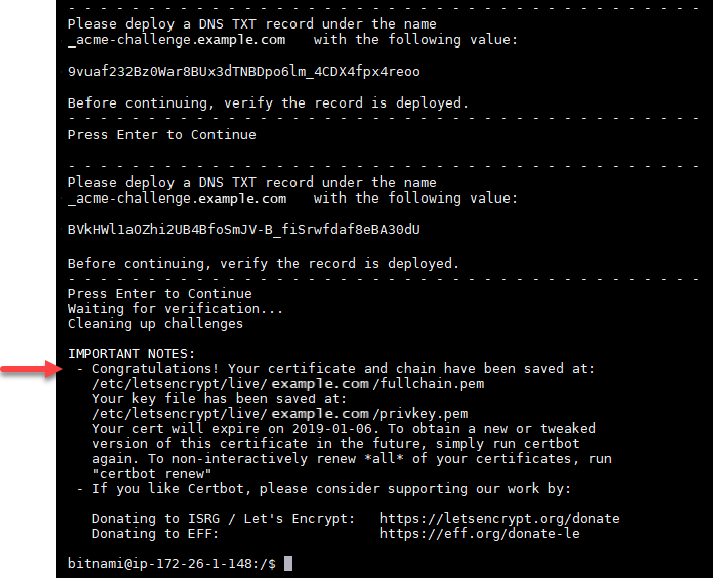
The message confirms that your certificate, chain, and key files are stored in the
/etc/letsencrypt/live/directory.Domain/Domainwill be your registered domain name, such as/etc/letsencrypt/live/.example.com/ -
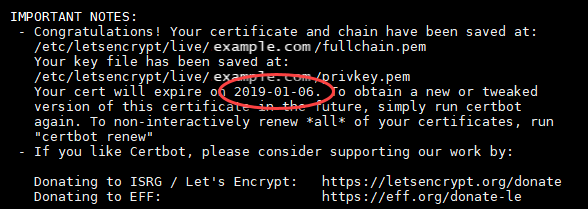
Make note of the expiration date specified in the message. You use it to renew your certificate by that date.
-
Now that you have the Let’s Encrypt SSL certificate, continue to the next section of this tutorial.
Step 7: Create links to the Let’s Encrypt certificate files in the Apache server directory
Create links to the Let’s Encrypt SSL certificate files in the Apache server directory on your LAMP instance. Also, back up your existing certificates, in case you need them later.
To create links to the Let’s Encrypt certificate files in the Apache server directory
-
In the Lightsail browser-based SSH session for your LAMP instance, enter the following command to stop the underlying LAMP stack services:
sudo /opt/bitnami/ctlscript.sh stopYou should see a response similar to the following:

-
Enter the following command to set an environment variable for your domain.
DOMAIN=DomainIn the command, replace
Domainwith your registered domain name.Example:
DOMAIN=example.com -
Enter the following command to confirm the variables return the correct values:
echo $DOMAINYou should see a result similar to the following:

-
Enter the following commands individually to rename your existing certificate files as backups. Refer to the Important block at the beginning of this tutorial for information about the different distributions and file structures.
-
For Debian Linux distributions
Approach A (Bitnami installations using system packages):
sudo mv /opt/bitnami/apache2/conf/bitnami/certs/server.crt /opt/bitnami/apache2/conf/bitnami/certs/server.crt.oldsudo mv /opt/bitnami/apache2/conf/bitnami/certs/server.key /opt/bitnami/apache2/conf/bitnami/certs/server.key.oldApproach B (Self-contained Bitnami installations):
sudo mv /opt/bitnami/apache2/conf/server.crt /opt/bitnami/apache2/conf/server.crt.oldsudo mv /opt/bitnami/apache2/conf/server.key /opt/bitnami/apache2/conf/server.key.old -
For older instances that use the Ubuntu Linux distribution:
sudo mv /opt/bitnami/apache/conf/bitnami/certs/server.crt /opt/bitnami/apache/conf/bitnami/certs/server.crt.oldsudo mv /opt/bitnami/apache/conf/bitnami/certs/server.key /opt/bitnami/apache/conf/bitnami/certs/server.key.old
-
-
Enter the following commands individually to create links to your Let’s Encrypt certificate files in the apache2 server directory. Refer to the Important block at the beginning of this tutorial for information about the different distributions and file structures.
-
For Debian Linux distributions
Approach A (Bitnami installations using system packages):
sudo ln -sf /etc/letsencrypt/live/$DOMAIN/privkey.pem /opt/bitnami/apache2/conf/bitnami/certs/server.keysudo ln -sf /etc/letsencrypt/live/$DOMAIN/fullchain.pem /opt/bitnami/apache2/conf/bitnami/certs/server.crtApproach B (Self-contained Bitnami installations):
sudo ln -sf /etc/letsencrypt/live/$DOMAIN/privkey.pem /opt/bitnami/apache2/conf/server.keysudo ln -sf /etc/letsencrypt/live/$DOMAIN/fullchain.pem /opt/bitnami/apache2/conf/server.crt -
For older instances that use the Ubuntu Linux distribution:
sudo ln -s /etc/letsencrypt/live/$DOMAIN/privkey.pem /opt/bitnami/apache/conf/bitnami/certs/server.keysudo ln -s /etc/letsencrypt/live/$DOMAIN/fullchain.pem /opt/bitnami/apache/conf/bitnami/certs/server.crt
-
-
Enter the following command to start the underlying LAMP stack services that you had stopped earlier:
sudo /opt/bitnami/ctlscript.sh startYou should see a result similar to the following:
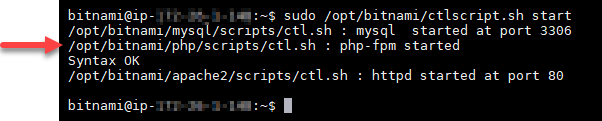
Your LAMP instance is now configured to use SSL encryption. However, traffic is not automatically redirected from HTTP to HTTPS.
-
Continue to the next section of this tutorial.
Step 8: Configure HTTP to HTTPS redirection for your web application
You can configure an HTTP to HTTPS redirect for your LAMP instance. Automatically redirecting from HTTP to HTTPS makes your site accessible only by your customers using SSL, even when they connect using HTTP.
To configure HTTP to HTTPS redirection for your web application
-
In the Lightsail browser-based SSH session for your LAMP instance, enter the following command to edit the Apache web server configuration file using the Vim text editor:
sudo vim /opt/bitnami/apache2/conf/bitnami/bitnami.confNote
This tutorial uses Vim for demonstration purposes; however, you can use any text editor of your choice for this step.
-
Press
ito enter insert mode in the Vim editor. -
In the file, enter the following text between
DocumentRoot "/opt/bitnami/apache2/htdocs"and<Directory "/opt/bitnami/apache2/htdocs">:RewriteEngine On RewriteCond %{HTTPS} !=on RewriteRule ^/(.*) https://%{SERVER_NAME}/$1 [R,L]The result should look like the following:

-
Press the ESC key, and then enter
:wqto write (save) your edits, and quit Vim. -
Enter the following command to restart the underlying LAMP stack services and make your edits effective:
sudo /opt/bitnami/ctlscript.sh restartYour LAMP instance is now configured to automatically redirect connections from HTTP to HTTPS. When a visitor goes to
http://www.example.com, they are automatically redirected to the encryptedhttps://www.example.comaddress.
Step 9: Renew the Let's Encrypt certificates every 90 days
Let’s Encrypt certificates are valid for 90 days. Certificates can be renewed 30 days before they expire. To renew the Let's Encrypt certificates, run the original command used to obtain them. Repeat the steps in the Request a Let’s Encrypt SSL wildcard certificate section of this tutorial.
