Create an AMI using Windows Sysprep with EC2Launch
When you create an image from an instance with the EC2Launch agent installed, EC2Launch performs specific tasks as the image is prepared. This includes working with Windows Sysprep. For more information, see Windows Sysprep phases.
EC2Launch offers a default answer file and batch files for Windows Sysprep that automate and
secure the image-preparation process on your AMI. Modifying these files is optional.
These files are located in the following directory by default:
C:\ProgramData\Amazon\EC2-Windows\Launch\Sysprep.
Important
Do not use Windows Sysprep to create an instance backup. Windows Sysprep removes system-specific information. If you remove this information there might be unintended consequences for an instance backup.
Contents
EC2Launch answer and batch files for Windows Sysprep
The EC2Launch answer file and batch files for Windows Sysprep include the following:
Unattend.xml-
This is the default answer file. If you run
SysprepInstance.ps1or choose ShutdownWithSysprep in the user interface, the system reads the setting from this file. BeforeSysprep.cmd-
Customize this batch file to run commands before EC2Launch runs Windows Sysprep.
SysprepSpecialize.cmd-
Customize this batch file to run commands during the Windows Sysprep specialize phase.
Run Windows Sysprep with EC2Launch
On the full installation of Windows Server 2016 and later (with a desktop experience), you can run Windows Sysprep with EC2Launch manually or by using the EC2 Launch Settings application.
To run Windows Sysprep using the EC2Launch Settings application
-
In the Amazon EC2 console, locate or create a Windows Server 2016 or later AMI.
-
Launch a Windows instance from the AMI.
-
Connect to your Windows instance and customize it.
-
Search for and run the EC2LaunchSettings application. It is located in the following directory by default:
C:\ProgramData\Amazon\EC2-Windows\Launch\Settings.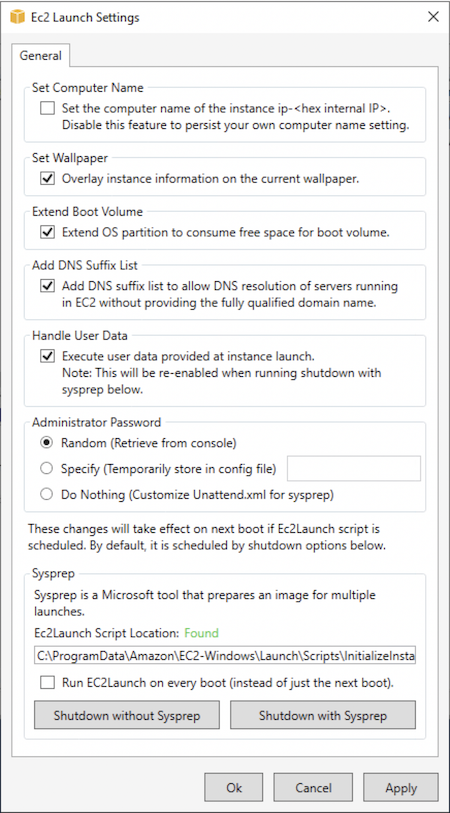
-
Select or clear options as needed. These settings are stored in the
LaunchConfig.jsonfile. -
For Administrator Password, do one of the following:
-
Choose Random. EC2Launch generates a password and encrypts it using the user's key. The system disables this setting after the instance is launched so that this password persists if the instance is rebooted or stopped and started.
-
Choose Specify and type a password that meets the system requirements. The password is stored in
LaunchConfig.jsonas clear text and is deleted after Windows Sysprep sets the administrator password. If you shut down now, the password is set immediately. EC2Launch encrypts the password using the user's key. -
Choose DoNothing and specify a password in the
unattend.xmlfile. If you don't specify a password inunattend.xml, the administrator account is disabled.
-
-
Choose Shutdown with Sysprep.
To manually run Windows Sysprep using EC2Launch
-
In the Amazon EC2 console locate or create a Windows Server 2016 or later Datacenter edition AMI that you want to duplicate.
-
Launch and connect to your Windows instance.
-
Customize the instance.
-
Specify settings in the
LaunchConfig.jsonfile. This file is located in theC:\ProgramData\Amazon\EC2-Windows\Launch\Configdirectory by default.For
adminPasswordType, specify one of the following values:Random-
EC2Launch generates a password and encrypts it using the user's key. The system disables this setting after the instance is launched so that this password persists if the instance is rebooted or stopped and started.
Specify-
EC2Launch uses the password you specify in
adminPassword. If the password does not meet the system requirements, EC2Lauch generates a random password instead. The password is stored inLaunchConfig.jsonas clear text and is deleted after Windows Sysprep sets the administrator password. EC2Launch encrypts the password using the user's key. DoNothing-
EC2Launch uses the password you specify in the
unattend.xmlfile. If you don't specify a password inunattend.xml, the administrator account is disabled.
-
(Optional) Specify settings in
unattend.xmland other configuration files. If plan to attend to the installation, then you don't need to make changes in these files. The files are located in the following directory by default:C:\ProgramData\Amazon\EC2-Windows\Launch\Sysprep. -
In Windows PowerShell, run
./InitializeInstance.ps1
							-Schedule
. The script is located in the following directory, by default:C:\ProgramData\Amazon\EC2-Windows\Launch\Scripts. This script schedules the instance to initialize during the next boot. You must run this script before you run theSysprepInstance.ps1script in the next step. -
In Windows PowerShell, run
./SysprepInstance.ps1. The script is located in the following directory by default:C:\ProgramData\Amazon\EC2-Windows\Launch\Scripts.
You are logged off the instance and the instance shuts down. If you check the
Instances page in the Amazon EC2 console, the instance state
changes from Running to Stopping, and then to
Stopped. At this point, it is safe to create an AMI from this
instance.
Update metadata/KMS routes for Server 2016 and later when launching a custom AMI
To update metadata/KMS routes for Server 2016 and later when launching a custom AMI, do one of the following:
-
Run the EC2LaunchSettings GUI (C:\ProgramData\Amazon\EC2-Windows\Launch\Settings\Ec2LaunchSettings.exe) and select the option to shut down with Windows Sysprep.
-
Run EC2LaunchSettings and shut down without Windows Sysprep before creating the AMI. This sets the EC2 Launch Initialize tasks to run at the next boot, which will set routes based on the subnet for the instance.
-
Manually reschedule EC2 Launch initialize tasks before creating an AMI from PowerShell.
Important
Take note of the default password reset behavior before rescheduling tasks.
-
To update the routes on a running instance that is experiencing Windows activation or communication with instance metadata failures, see "Unable to activate Windows".
