Publicación y suscripción con el SDK de transmisión para Android de IVS
En esta sección se explican los pasos necesarios para publicar y suscribirse a una fase mediante una aplicación Android.
Creación de vistas
Empezamos por crear un diseño simple para nuestra aplicación con el archivo activity_main.xml creado automáticamente. El diseño contiene EditText para agregar un token, un Button de unión, TextView para mostrar el estado del escenario y CheckBox para cambiar la publicación.
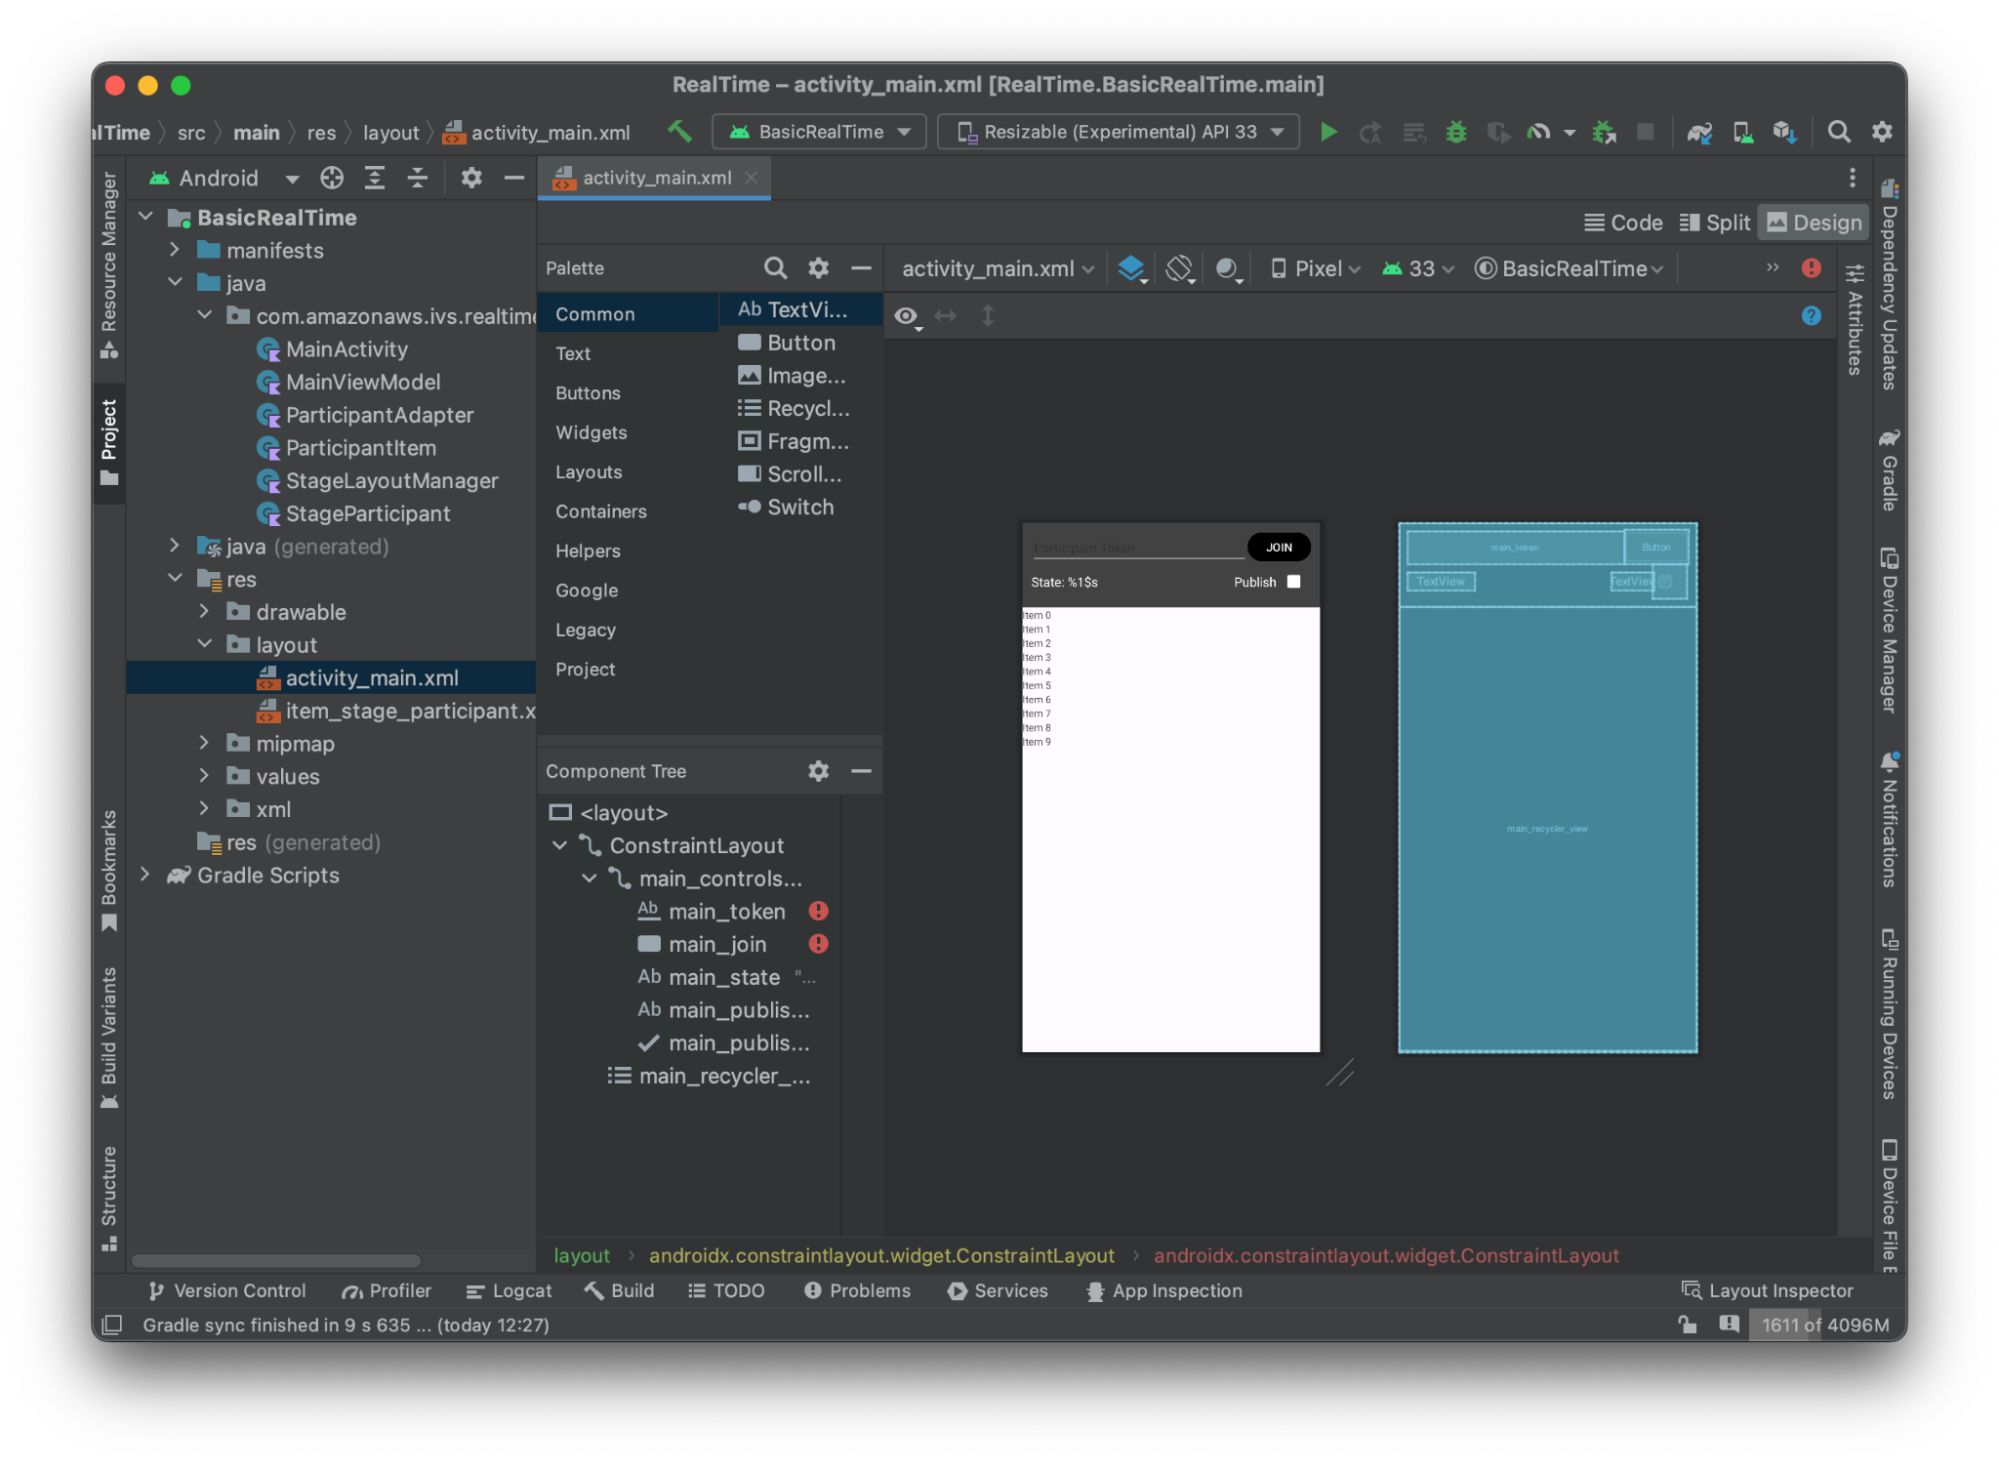
Este es el XML que hay detrás de la vista:
<?xml version="1.0" encoding="utf-8"?>
<layout xmlns:android="http://schemas.android.com/apk/res/android"
    xmlns:app="http://schemas.android.com/apk/res-auto"
    xmlns:tools="http://schemas.android.com/tools">

    <androidx.constraintlayout.widget.ConstraintLayout
        android:keepScreenOn="true"
        android:layout_width="match_parent"
        android:layout_height="match_parent"
        tools:context=".BasicActivity">

        <androidx.constraintlayout.widget.ConstraintLayout
            android:id="@+id/main_controls_container"
            android:layout_width="match_parent"
            android:layout_height="wrap_content"
            android:background="@color/cardview_dark_background"
            android:padding="12dp"
            app:layout_constraintTop_toTopOf="parent">

            <EditText
                android:id="@+id/main_token"
                android:layout_width="0dp"
                android:layout_height="wrap_content"
                android:autofillHints="@null"
                android:backgroundTint="@color/white"
                android:hint="@string/token"
                android:imeOptions="actionDone"
                android:inputType="text"
                android:textColor="@color/white"
                app:layout_constraintEnd_toStartOf="@id/main_join"
                app:layout_constraintStart_toStartOf="parent"
                app:layout_constraintTop_toTopOf="parent" />

            <Button
                android:id="@+id/main_join"
                android:layout_width="wrap_content"
                android:layout_height="wrap_content"
                android:backgroundTint="@color/black"
                android:text="@string/join"
                android:textAllCaps="true"
                android:textColor="@color/white"
                android:textSize="16sp"
                app:layout_constraintBottom_toBottomOf="@+id/main_token"
                app:layout_constraintEnd_toEndOf="parent"
                app:layout_constraintStart_toEndOf="@id/main_token" />

            <TextView
                android:id="@+id/main_state"
                android:layout_width="wrap_content"
                android:layout_height="wrap_content"
                android:text="@string/state"
                android:textColor="@color/white"
                android:textSize="18sp"
                app:layout_constraintBottom_toBottomOf="parent"
                app:layout_constraintStart_toStartOf="parent"
                app:layout_constraintTop_toBottomOf="@id/main_token" />

            <TextView
                android:id="@+id/main_publish_text"
                android:layout_width="wrap_content"
                android:layout_height="wrap_content"
                android:text="@string/publish"
                android:textColor="@color/white"
                android:textSize="18sp"
                app:layout_constraintBottom_toBottomOf="parent"
                app:layout_constraintEnd_toStartOf="@id/main_publish_checkbox"
                app:layout_constraintTop_toBottomOf="@id/main_token" />

            <CheckBox
                android:id="@+id/main_publish_checkbox"
                android:layout_width="wrap_content"
                android:layout_height="wrap_content"
                android:buttonTint="@color/white"
                android:checked="true"
                app:layout_constraintBottom_toBottomOf="@id/main_publish_text"
                app:layout_constraintEnd_toEndOf="parent"
                app:layout_constraintTop_toTopOf="@id/main_publish_text" />

        </androidx.constraintlayout.widget.ConstraintLayout>

        <androidx.recyclerview.widget.RecyclerView
            android:id="@+id/main_recycler_view"
            android:layout_width="match_parent"
            android:layout_height="0dp"
            app:layout_constraintTop_toBottomOf="@+id/main_controls_container"
            app:layout_constraintBottom_toBottomOf="parent" />

    </androidx.constraintlayout.widget.ConstraintLayout>
<layout>
Aquí hacemos referencia a los ID de un par de cadenas, así que es el momento de crear todo el archivo strings.xml:
<resources>
    <string name="app_name">BasicRealTime</string>
    <string name="join">Join</string>
    <string name="leave">Leave</string>
    <string name="token">Participant Token</string>
    <string name="publish">Publish</string>
    <string name="state">State: %1$s</string>
</resources>
Vamos a vincular esas vistas del XML a nuestro MainActivity.kt:
import android.widget.Button
import android.widget.CheckBox
import android.widget.EditText
import android.widget.TextView
import androidx.recyclerview.widget.RecyclerView

private lateinit var checkboxPublish: CheckBox
private lateinit var recyclerView: RecyclerView
private lateinit var buttonJoin: Button
private lateinit var textViewState: TextView
private lateinit var editTextToken: EditText

override fun onCreate(savedInstanceState: Bundle?) {
    super.onCreate(savedInstanceState)
    setContentView(R.layout.activity_main)

    checkboxPublish = findViewById(R.id.main_publish_checkbox)
    recyclerView = findViewById(R.id.main_recycler_view)
    buttonJoin = findViewById(R.id.main_join)
    textViewState = findViewById(R.id.main_state)
    editTextToken = findViewById(R.id.main_token)
}
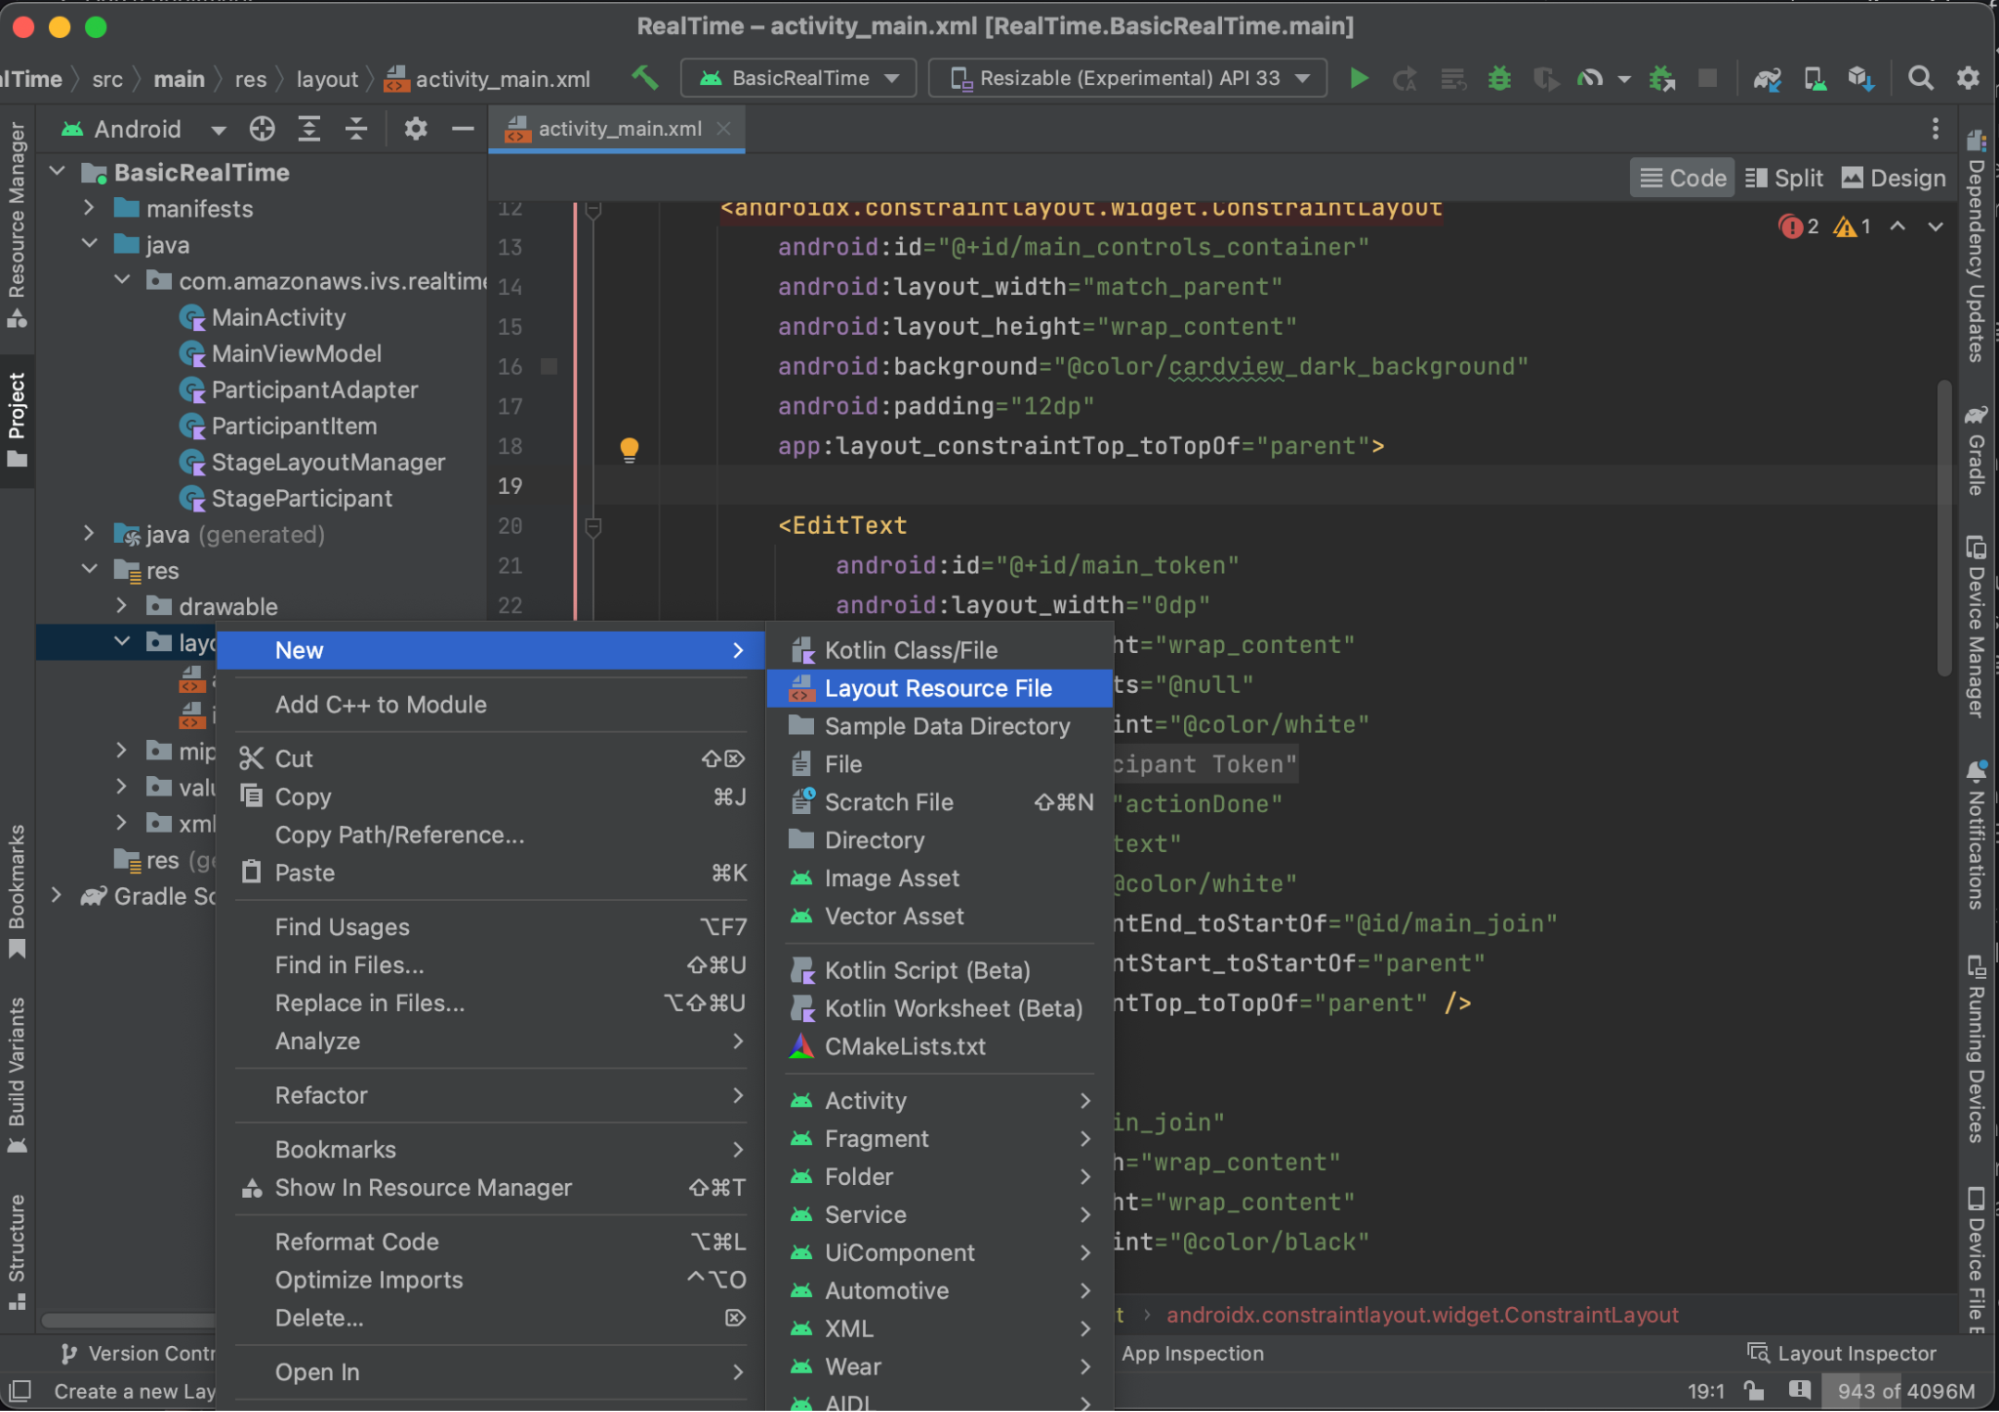
Ahora crearemos una vista de elementos para RecyclerView. Para ello, haga clic con el botón derecho en el directorio res/layout y seleccione Nuevo > Archivo de recursos de diseño. Asigne a este archivo el nombre item_stage_participant.xml.
El diseño de este elemento es sencillo: contiene una vista para renderizar la transmisión de video de un participante y una lista de etiquetas para mostrar información sobre el participante:
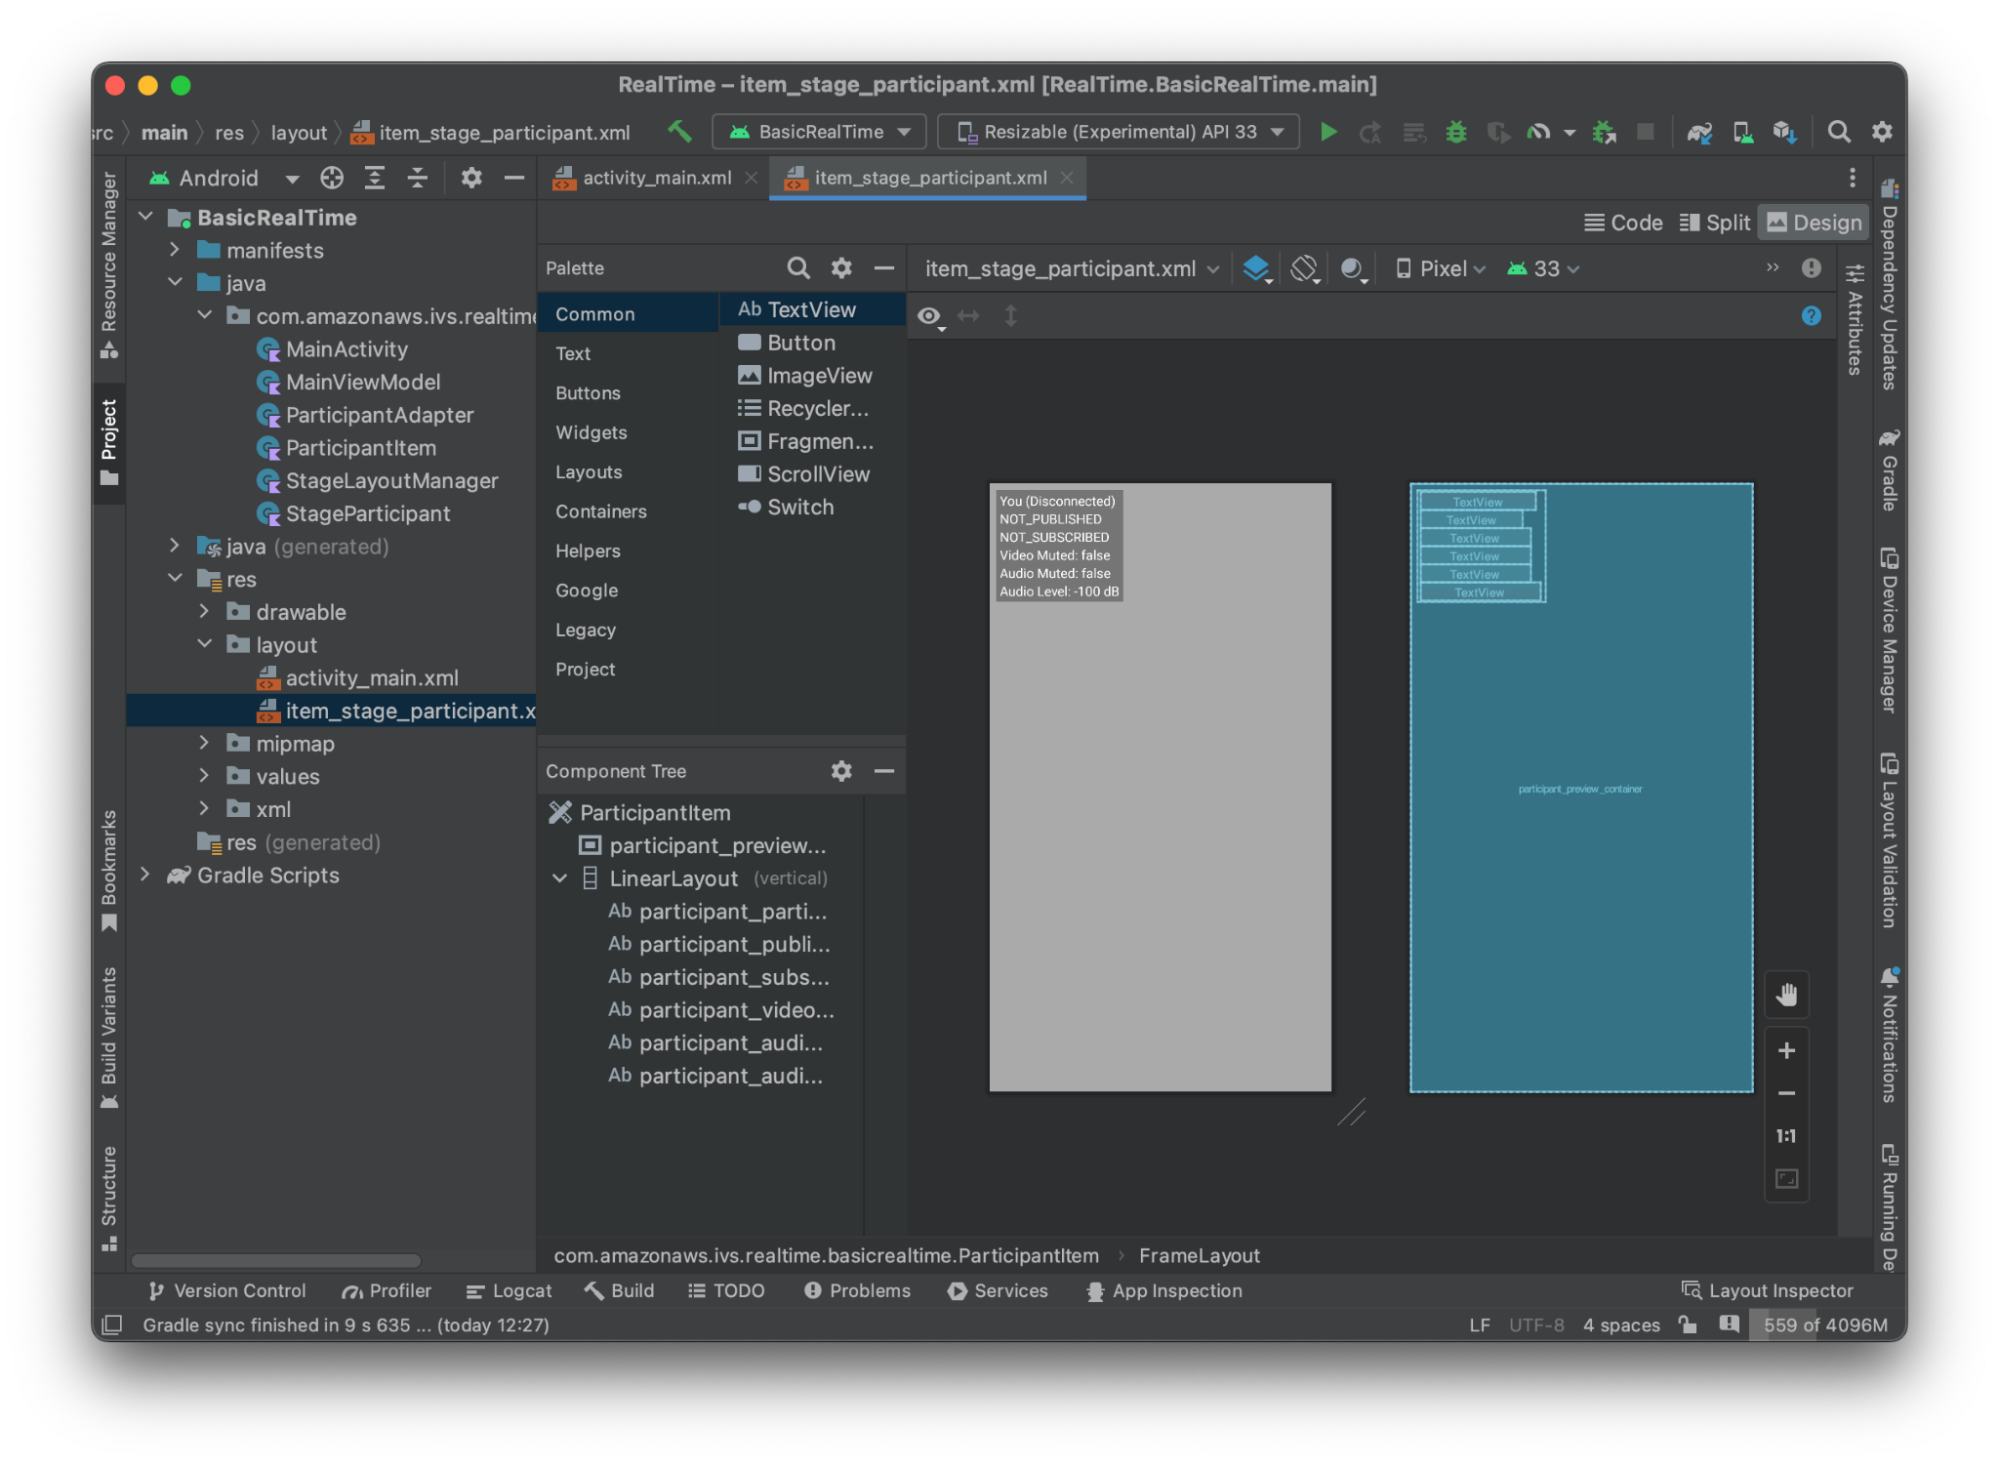
Este es el XML:
<?xml version="1.0" encoding="utf-8"?>
<com.amazonaws.ivs.realtime.basicrealtime.ParticipantItem xmlns:android="http://schemas.android.com/apk/res/android"
    xmlns:app="http://schemas.android.com/apk/res-auto"
    xmlns:tools="http://schemas.android.com/tools"
    android:layout_width="match_parent"
    android:layout_height="match_parent">

    <FrameLayout
        android:id="@+id/participant_preview_container"
        android:layout_width="match_parent"
        android:layout_height="match_parent"
        tools:background="@android:color/darker_gray" />

    <LinearLayout
        android:layout_width="wrap_content"
        android:layout_height="wrap_content"
        android:layout_marginStart="8dp"
        android:layout_marginTop="8dp"
        android:background="#50000000"
        android:orientation="vertical"
        android:paddingLeft="4dp"
        android:paddingTop="2dp"
        android:paddingRight="4dp"
        android:paddingBottom="2dp"
        app:layout_constraintStart_toStartOf="parent"
        app:layout_constraintTop_toTopOf="parent">

        <TextView
            android:id="@+id/participant_participant_id"
            android:layout_width="wrap_content"
            android:layout_height="wrap_content"
            android:textColor="@android:color/white"
            android:textSize="16sp"
            tools:text="You (Disconnected)" />

        <TextView
            android:id="@+id/participant_publishing"
            android:layout_width="wrap_content"
            android:layout_height="wrap_content"
            android:textColor="@android:color/white"
            android:textSize="16sp"
            tools:text="NOT_PUBLISHED" />

        <TextView
            android:id="@+id/participant_subscribed"
            android:layout_width="wrap_content"
            android:layout_height="wrap_content"
            android:textColor="@android:color/white"
            android:textSize="16sp"
            tools:text="NOT_SUBSCRIBED" />

        <TextView
            android:id="@+id/participant_video_muted"
            android:layout_width="wrap_content"
            android:layout_height="wrap_content"
            android:textColor="@android:color/white"
            android:textSize="16sp"
            tools:text="Video Muted: false" />

        <TextView
            android:id="@+id/participant_audio_muted"
            android:layout_width="wrap_content"
            android:layout_height="wrap_content"
            android:textColor="@android:color/white"
            android:textSize="16sp"
            tools:text="Audio Muted: false" />

        <TextView
            android:id="@+id/participant_audio_level"
            android:layout_width="wrap_content"
            android:layout_height="wrap_content"
            android:textColor="@android:color/white"
            android:textSize="16sp"
            tools:text="Audio Level: -100 dB" />

    </LinearLayout>

</com.amazonaws.ivs.realtime.basicrealtime.ParticipantItem>
Este archivo XML infla una clase que aún no hemos creado, ParticipantItem. Como el XML incluye el espacio de nombres completo, asegúrese de actualizar este archivo XML en su espacio de nombres. Vamos a crear esta clase y configurar las vistas, aunque lo vamos a dejar en blanco por ahora.
Cree una nueva clase de Kotlin, ParticipantItem:
package com.amazonaws.ivs.realtime.basicrealtime

import android.content.Context
import android.util.AttributeSet
import android.widget.FrameLayout
import android.widget.TextView
import kotlin.math.roundToInt

class ParticipantItem @JvmOverloads constructor(
    context: Context,
    attrs: AttributeSet? = null,
    defStyleAttr: Int = 0,
    defStyleRes: Int = 0,
) : FrameLayout(context, attrs, defStyleAttr, defStyleRes) {

    private lateinit var previewContainer: FrameLayout
    private lateinit var textViewParticipantId: TextView
    private lateinit var textViewPublish: TextView
    private lateinit var textViewSubscribe: TextView
    private lateinit var textViewVideoMuted: TextView
    private lateinit var textViewAudioMuted: TextView
    private lateinit var textViewAudioLevel: TextView

    override fun onFinishInflate() {
        super.onFinishInflate()
        previewContainer = findViewById(R.id.participant_preview_container)
        textViewParticipantId = findViewById(R.id.participant_participant_id)
        textViewPublish = findViewById(R.id.participant_publishing)
        textViewSubscribe = findViewById(R.id.participant_subscribed)
        textViewVideoMuted = findViewById(R.id.participant_video_muted)
        textViewAudioMuted = findViewById(R.id.participant_audio_muted)
        textViewAudioLevel = findViewById(R.id.participant_audio_level)
    }
}
Permisos
Para utilizar la cámara y el micrófono, debe solicitar permisos al usuario. Para ello, seguimos un flujo de permisos estándar:
override fun onStart() {
    super.onStart()
    requestPermission()
}

private val requestPermissionLauncher =
    registerForActivityResult(ActivityResultContracts.RequestMultiplePermissions()) { permissions ->
        if (permissions[Manifest.permission.CAMERA] == true && permissions[Manifest.permission.RECORD_AUDIO] == true) {
            viewModel.permissionGranted() // we will add this later
        }
    }

private val permissions = listOf(
    Manifest.permission.CAMERA,
    Manifest.permission.RECORD_AUDIO,
)

private fun requestPermission() {
    when {
        this.hasPermissions(permissions) -> viewModel.permissionGranted() // we will add this later
        else -> requestPermissionLauncher.launch(permissions.toTypedArray())
    }
}

private fun Context.hasPermissions(permissions: List<String>): Boolean {
    return permissions.all {
        ContextCompat.checkSelfPermission(this, it) == PackageManager.PERMISSION_GRANTED
    }
}
Estado de la aplicación
Nuestra aplicación hace un seguimiento de los participantes en el entorno local en un archivo MainViewModel.kt. El estado se comunicará de nuevo a MainActivity mediante StateFlow
Cree una nueva clase de Kotlin (MainViewModel):
package com.amazonaws.ivs.realtime.basicrealtime

import android.app.Application
import androidx.lifecycle.AndroidViewModel

class MainViewModel(application: Application) : AndroidViewModel(application), Stage.Strategy, StageRenderer {

}
En MainActivity.kt, administramos el modelo de la vista:
import androidx.activity.viewModels

private val viewModel: MainViewModel by viewModels()
Para usar AndroidViewModel y las extensiones ViewModel de Kotlin, tendrá que agregar lo siguiente al archivo build.gradle del módulo:
implementation 'androidx.core:core-ktx:1.10.1'
implementation "androidx.activity:activity-ktx:1.7.2"
implementation 'androidx.appcompat:appcompat:1.6.1'
implementation 'com.google.android.material:material:1.10.0'
implementation "androidx.lifecycle:lifecycle-extensions:2.2.0"

def lifecycle_version = "2.6.1"
implementation "androidx.lifecycle:lifecycle-livedata-ktx:$lifecycle_version"
implementation "androidx.lifecycle:lifecycle-viewmodel-ktx:$lifecycle_version"
implementation 'androidx.constraintlayout:constraintlayout:2.1.4'
Adaptador RecyclerView
Crearemos una subclase RecyclerView.Adapter sencilla para hacer un seguimiento de nuestros participantes y actualizar RecyclerView en los eventos del escenario. Pero antes, necesitamos una clase que represente a un participante. Cree una nueva clase de Kotlin (StageParticipant):
package com.amazonaws.ivs.realtime.basicrealtime

import com.amazonaws.ivs.broadcast.Stage
import com.amazonaws.ivs.broadcast.StageStream

class StageParticipant(val isLocal: Boolean, var participantId: String?) {
    var publishState = Stage.PublishState.NOT_PUBLISHED
    var subscribeState = Stage.SubscribeState.NOT_SUBSCRIBED
    var streams = mutableListOf<StageStream>()

    val stableID: String
        get() {
            return if (isLocal) {
                "LocalUser"
            } else {
                requireNotNull(participantId)
            }
        }
}
Usaremos esta clase en la clase ParticipantAdapter que crearemos a continuación. Empezamos por definir la clase y crear una variable para hacer un seguimiento de los participantes:
package com.amazonaws.ivs.realtime.basicrealtime

import android.view.LayoutInflater
import android.view.ViewGroup
import androidx.recyclerview.widget.RecyclerView

class ParticipantAdapter : RecyclerView.Adapter<ParticipantAdapter.ViewHolder>() {

    private val participants = mutableListOf<StageParticipant>()
También tenemos que definir RecyclerView.ViewHolder antes de implementar el resto de las anulaciones:
class ViewHolder(val participantItem: ParticipantItem) : RecyclerView.ViewHolder(participantItem)
Con esto, podemos implementar las anulaciones de RecyclerView.Adapter estándar:
override fun onCreateViewHolder(parent: ViewGroup, viewType: Int): ViewHolder {
    val item = LayoutInflater.from(parent.context)
        .inflate(R.layout.item_stage_participant, parent, false) as ParticipantItem
    return ViewHolder(item)
}

override fun getItemCount(): Int {
    return participants.size
}

override fun getItemId(position: Int): Long =
    participants[position]
        .stableID
        .hashCode()
        .toLong()

override fun onBindViewHolder(holder: ViewHolder, position: Int) {
    return holder.participantItem.bind(participants[position])
}

override fun onBindViewHolder(holder: ViewHolder, position: Int, payloads: MutableList<Any>) {
    val updates = payloads.filterIsInstance<StageParticipant>()
    if (updates.isNotEmpty()) {
        updates.forEach { holder.participantItem.bind(it) // implemented later }
    } else {
        super.onBindViewHolder(holder, position, payloads)
    }
}
Por último, agregamos nuevos métodos a los que llamaremos desde MainViewModel cuando se hagan cambios en los participantes. Estos métodos son operaciones CRUD estándar en el adaptador.
fun participantJoined(participant: StageParticipant) {
    participants.add(participant)
    notifyItemInserted(participants.size - 1)
}

fun participantLeft(participantId: String) {
    val index = participants.indexOfFirst { it.participantId == participantId }
    if (index != -1) {
        participants.removeAt(index)
        notifyItemRemoved(index)
    }
}

fun participantUpdated(participantId: String?, update: (participant: StageParticipant) -> Unit) {
    val index = participants.indexOfFirst { it.participantId == participantId }
    if (index != -1) {
        update(participants[index])
        notifyItemChanged(index, participants[index])
    }
}
En MainViewModel, tenemos que crear y mantener una referencia a este adaptador:
internal val participantAdapter = ParticipantAdapter()
Estado de la etapa
También tenemos que hacer un seguimiento del estado de algunos escenarios en MainViewModel. Definamos esas propiedades ahora:
private val _connectionState = MutableStateFlow(Stage.ConnectionState.DISCONNECTED)
val connectionState = _connectionState.asStateFlow()

private var publishEnabled: Boolean = false
    set(value) {
        field = value
        // Because the strategy returns the value of `checkboxPublish.isChecked`, just call `refreshStrategy`.
        stage?.refreshStrategy()
    }

private var deviceDiscovery: DeviceDiscovery? = null
private var stage: Stage? = null
private var streams = mutableListOf<LocalStageStream>()
Para ver su propia vista previa antes de unirse a un escenario, creamos inmediatamente un participante local:
init {
    deviceDiscovery = DeviceDiscovery(application)

    // Create a local participant immediately to render our camera preview and microphone stats
    val localParticipant = StageParticipant(true, null)
    participantAdapter.participantJoined(localParticipant)
}
Queremos asegurarnos de borrar estos recursos cuando se elimine ViewModel. Anulamos onCleared() directamente para así no olvidarnos de eliminar estos recursos.
override fun onCleared() {
    stage?.release()
    deviceDiscovery?.release()
    deviceDiscovery = null
    super.onCleared()
}
A continuación, completamos la propiedad streams local nada más recibir los permisos e implementamos el método permissionsGranted al que llamamos anteriormente:
internal fun permissionGranted() {
    val deviceDiscovery = deviceDiscovery ?: return
    streams.clear()
    val devices = deviceDiscovery.listLocalDevices()
    // Camera
    devices
        .filter { it.descriptor.type == Device.Descriptor.DeviceType.CAMERA }
        .maxByOrNull { it.descriptor.position == Device.Descriptor.Position.FRONT }
        ?.let { streams.add(ImageLocalStageStream(it)) }
    // Microphone
    devices
        .filter { it.descriptor.type == Device.Descriptor.DeviceType.MICROPHONE }
        .maxByOrNull { it.descriptor.isDefault }
        ?.let { streams.add(AudioLocalStageStream(it)) }

    stage?.refreshStrategy()

    // Update our local participant with these new streams
    participantAdapter.participantUpdated(null) {
        it.streams.clear()
        it.streams.addAll(streams)
    }
}
Implementación del SDK de escenarios
Los siguientes tres conceptos básicos subyacen a la funcionalidad de transmisión en tiempo real: escenario, estrategia y renderizador. El objetivo del diseño es minimizar la cantidad de lógica necesaria por parte del cliente para crear un producto que funcione.
Stage.Strategy
La implementación de Stage.Strategy es sencilla:
override fun stageStreamsToPublishForParticipant(
    stage: Stage,
    participantInfo: ParticipantInfo
): MutableList<LocalStageStream> {
    // Return the camera and microphone to be published.
    // This is only called if `shouldPublishFromParticipant` returns true.
    return streams
}

override fun shouldPublishFromParticipant(stage: Stage, participantInfo: ParticipantInfo): Boolean {
    return publishEnabled
}

override fun shouldSubscribeToParticipant(stage: Stage, participantInfo: ParticipantInfo): Stage.SubscribeType {
    // Subscribe to both audio and video for all publishing participants.
    return Stage.SubscribeType.AUDIO_VIDEO
}
En resumen, la publicación depende del estado de la variable publishEnabled interna y, si publicamos, publicaremos las transmisiones que recopilamos anteriormente. Por último, en este ejemplo, siempre nos suscribimos a otros participantes y recibimos tanto su contenido de audio como de video.
StageRenderer
La implementación de StageRenderer también es bastante simple, aunque, dada la cantidad de funciones, contiene bastante más código. El enfoque general de este renderizador es actualizar ParticipantAdapter cuando el SDK nos notifique un cambio en un participante. Hay ciertos casos en los que tratamos a los participantes locales de forma diferente, porque hemos decidido administrarlos por nuestra cuenta para que puedan ver la vista previa de la cámara antes de unirse.
override fun onError(exception: BroadcastException) {
    Toast.makeText(getApplication(), "onError ${exception.localizedMessage}", Toast.LENGTH_LONG).show()
    Log.e("BasicRealTime", "onError $exception")
}

override fun onConnectionStateChanged(
    stage: Stage,
    connectionState: Stage.ConnectionState,
    exception: BroadcastException?
) {
    _connectionState.value = connectionState
}

override fun onParticipantJoined(stage: Stage, participantInfo: ParticipantInfo) {
    if (participantInfo.isLocal) {
        // If this is the local participant joining the stage, update the participant with a null ID because we
        // manually added that participant when setting up our preview
        participantAdapter.participantUpdated(null) {
            it.participantId = participantInfo.participantId
        }
    } else {
        // If they are not local, add them normally
        participantAdapter.participantJoined(
            StageParticipant(
                participantInfo.isLocal,
                participantInfo.participantId
            )
        )
    }
}

override fun onParticipantLeft(stage: Stage, participantInfo: ParticipantInfo) {
    if (participantInfo.isLocal) {
        // If this is the local participant leaving the stage, update the ID but keep it around because
        // we want to keep the camera preview active
        participantAdapter.participantUpdated(participantInfo.participantId) {
            it.participantId = null
        }
    } else {
        // If they are not local, have them leave normally
        participantAdapter.participantLeft(participantInfo.participantId)
    }
}

override fun onParticipantPublishStateChanged(
    stage: Stage,
    participantInfo: ParticipantInfo,
    publishState: Stage.PublishState
) {
    // Update the publishing state of this participant
    participantAdapter.participantUpdated(participantInfo.participantId) {
        it.publishState = publishState
    }
}

override fun onParticipantSubscribeStateChanged(
    stage: Stage,
    participantInfo: ParticipantInfo,
    subscribeState: Stage.SubscribeState
) {
    // Update the subscribe state of this participant
    participantAdapter.participantUpdated(participantInfo.participantId) {
        it.subscribeState = subscribeState
    }
}

override fun onStreamsAdded(stage: Stage, participantInfo: ParticipantInfo, streams: MutableList<StageStream>) {
    // We don't want to take any action for the local participant because we track those streams locally
    if (participantInfo.isLocal) {
        return
    }
    // For remote participants, add these new streams to that participant's streams array.
    participantAdapter.participantUpdated(participantInfo.participantId) {
        it.streams.addAll(streams)
    }
}

override fun onStreamsRemoved(stage: Stage, participantInfo: ParticipantInfo, streams: MutableList<StageStream>) {
    // We don't want to take any action for the local participant because we track those streams locally
    if (participantInfo.isLocal) {
        return
    }
    // For remote participants, remove these streams from that participant's streams array.
    participantAdapter.participantUpdated(participantInfo.participantId) {
        it.streams.removeAll(streams)
    }
}

override fun onStreamsMutedChanged(
    stage: Stage,
    participantInfo: ParticipantInfo,
    streams: MutableList<StageStream>
) {
    // We don't want to take any action for the local participant because we track those streams locally
    if (participantInfo.isLocal) {
        return
    }
    // For remote participants, notify the adapter that the participant has been updated. There is no need to modify
    // the `streams` property on the `StageParticipant` because it is the same `StageStream` instance. Just
    // query the `isMuted` property again.
    participantAdapter.participantUpdated(participantInfo.participantId) {}
}
Implementación de LayoutManager de RecyclerView personalizado
Establecer diferentes números de participantes puede resultar complejo. Lo ideal es que ocupen todo el marco de la vista principal, pero gestionar la configuración de cada participante de forma independiente no es la mejor forma de lograrlo. Para facilitarlo, veremos cómo implementar RecyclerView.LayoutManager.
Cree otra clase, StageLayoutManager, que debería ampliar GridLayoutManager. Esta clase está pensada para calcular cómo se mostrará cada participante en función del número de participantes en un diseño de filas o columnas basado en flujos. Cada fila tiene la misma altura que las demás, pero las columnas pueden tener diferentes anchuras por fila. Consulte el comentario del código que aparece sobre la variable layouts para ver cómo personalizar este comportamiento.
package com.amazonaws.ivs.realtime.basicrealtime

import android.content.Context
import androidx.recyclerview.widget.GridLayoutManager
import androidx.recyclerview.widget.RecyclerView

class StageLayoutManager(context: Context?) : GridLayoutManager(context, 6) {

    companion object {
        /**
         * This 2D array contains the description of how the grid of participants should be rendered
         * The index of the 1st dimension is the number of participants needed to active that configuration
         * Meaning if there is 1 participant, index 0 will be used. If there are 5 participants, index 4 will be used.
         *
         * The 2nd dimension is a description of the layout. The length of the array is the number of rows that
         * will exist, and then each number within that array is the number of columns in each row.
         *
         * See the code comments next to each index for concrete examples.
         *
         * This can be customized to fit any layout configuration needed.
         */
        val layouts: List<List<Int>> = listOf(
            // 1 participant
            listOf(1), // 1 row, full width
            // 2 participants
            listOf(1, 1), // 2 rows, all columns are full width
            // 3 participants
            listOf(1, 2), // 2 rows, first row's column is full width then 2nd row's columns are 1/2 width
            // 4 participants
            listOf(2, 2), // 2 rows, all columns are 1/2 width
            // 5 participants
            listOf(1, 2, 2), // 3 rows, first row's column is full width, 2nd and 3rd row's columns are 1/2 width
            // 6 participants
            listOf(2, 2, 2), // 3 rows, all column are 1/2 width
            // 7 participants
            listOf(2, 2, 3), // 3 rows, 1st and 2nd row's columns are 1/2 width, 3rd row's columns are 1/3rd width
            // 8 participants
            listOf(2, 3, 3),
            // 9 participants
            listOf(3, 3, 3),
            // 10 participants
            listOf(2, 3, 2, 3),
            // 11 participants
            listOf(2, 3, 3, 3),
            // 12 participants
            listOf(3, 3, 3, 3),
        )
    }

    init {
        spanSizeLookup = object : SpanSizeLookup() {
            override fun getSpanSize(position: Int): Int {
                if (itemCount <= 0) {
                    return 1
                }
                // Calculate the row we're in
                val config = layouts[itemCount - 1]
                var row = 0
                var curPosition = position
                while (curPosition - config[row] >= 0) {
                    curPosition -= config[row]
                    row++
                }
                // spanCount == max spans, config[row] = number of columns we want
                // So spanCount / config[row] would be something like 6 / 3 if we want 3 columns.
                // So this will take up 2 spans, with a max of 6 is 1/3rd of the view.
                return spanCount / config[row]
            }
        }
    }

    override fun onLayoutChildren(recycler: RecyclerView.Recycler?, state: RecyclerView.State?) {
        if (itemCount <= 0 || state?.isPreLayout == true) return

        val parentHeight = height
        val itemHeight = parentHeight / layouts[itemCount - 1].size // height divided by number of rows.

        // Set the height of each view based on how many rows exist for the current participant count.
        for (i in 0 until childCount) {
            val child = getChildAt(i) ?: continue
            val layoutParams = child.layoutParams as RecyclerView.LayoutParams
            if (layoutParams.height != itemHeight) {
                layoutParams.height = itemHeight
                child.layoutParams = layoutParams
            }
        }
        // After we set the height for all our views, call super.
        // This works because our RecyclerView can not scroll and all views are always visible with stable IDs.
        super.onLayoutChildren(recycler, state)
    }

    override fun canScrollVertically(): Boolean = false
    override fun canScrollHorizontally(): Boolean = false
}
En MainActivity.kt, tenemos que configurar el adaptador y el administrador de diseño de RecyclerView:
// In onCreate after setting recyclerView.
recyclerView.layoutManager = StageLayoutManager(this)
recyclerView.adapter = viewModel.participantAdapter
Enlace de acciones de la interfaz de usuario
Ya casi está, solo tenemos que enlazar algunas acciones de la interfaz de usuario.
Primero, tenemos que hacer que MainActivity supervise los cambios en StateFlow desde MainViewModel:
// At the end of your onCreate method
lifecycleScope.launch {
    repeatOnLifecycle(Lifecycle.State.CREATED) {
        viewModel.connectionState.collect { state ->
            buttonJoin.setText(if (state == ConnectionState.DISCONNECTED) R.string.join else R.string.leave)
            textViewState.text = getString(R.string.state, state.name)
        }
    }
}
A continuación, agregamos los oyentes a nuestro botón de unión y a la casilla de publicación:
buttonJoin.setOnClickListener {
    viewModel.joinStage(editTextToken.text.toString())
}
checkboxPublish.setOnCheckedChangeListener { _, isChecked ->
    viewModel.setPublishEnabled(isChecked)
}
Ambos elementos llaman a funciones en MainViewModel, lo cual implementaremos ahora:
internal fun joinStage(token: String) {
    if (_connectionState.value != Stage.ConnectionState.DISCONNECTED) {
        // If we're already connected to a stage, leave it.
        stage?.leave()
    } else {
        if (token.isEmpty()) {
            Toast.makeText(getApplication(), "Empty Token", Toast.LENGTH_SHORT).show()
            return
        }
        try {
            // Destroy the old stage first before creating a new one.
            stage?.release()
            val stage = Stage(getApplication(), token, this)
            stage.addRenderer(this)
            stage.join()
            this.stage = stage
        } catch (e: BroadcastException) {
            Toast.makeText(getApplication(), "Failed to join stage ${e.localizedMessage}", Toast.LENGTH_LONG).show()
            e.printStackTrace()
        }
    }
}

internal fun setPublishEnabled(enabled: Boolean) {
    publishEnabled = enabled
}
Renderización de los participantes
Por último, tenemos que renderizar los datos que recibimos del SDK en el elemento de participante que creamos anteriormente. Ya hemos completado la lógica de RecyclerView, por lo que solo tenemos que implementar la API bind en ParticipantItem.
Empezamos por agregar la función vacía y, luego, la analizaremos paso a paso:
fun bind(participant: StageParticipant) {

}
Primero, analizaremos el estado sencillo, el ID del participante, el estado de la publicación y el estado de la suscripción. Para hacerlo, tan solo actualizamos TextViews directamente:
val participantId = if (participant.isLocal) {
    "You (${participant.participantId ?: "Disconnected"})"
} else {
    participant.participantId
}
textViewParticipantId.text = participantId
textViewPublish.text = participant.publishState.name
textViewSubscribe.text = participant.subscribeState.name
A continuación, actualizaremos los estados silenciados de audio y video. Para obtener el estado silenciado, tenemos que encontrar el ImageDevice y el AudioDevice de la matriz de transmisiones. Para optimizar el rendimiento, recordamos los últimos ID de los dispositivos conectados.
// This belongs outside the `bind` API.
private var imageDeviceUrn: String? = null
private var audioDeviceUrn: String? = null

// This belongs inside the `bind` API.
val newImageStream = participant
    .streams
    .firstOrNull { it.device is ImageDevice }
textViewVideoMuted.text = if (newImageStream != null) {
    if (newImageStream.muted) "Video muted" else "Video not muted"
} else {
    "No video stream"
}

val newAudioStream = participant
    .streams
    .firstOrNull { it.device is AudioDevice }
textViewAudioMuted.text = if (newAudioStream != null) {
    if (newAudioStream.muted) "Audio muted" else "Audio not muted"
} else {
    "No audio stream"
}
Por último, queremos renderizar una vista previa de imageDevice:
if (newImageStream?.device?.descriptor?.urn != imageDeviceUrn) {
    // If the device has changed, remove all subviews from the preview container
    previewContainer.removeAllViews()
    (newImageStream?.device as? ImageDevice)?.let {
        val preview = it.getPreviewView(BroadcastConfiguration.AspectMode.FIT)
        previewContainer.addView(preview)
        preview.layoutParams = FrameLayout.LayoutParams(
            FrameLayout.LayoutParams.MATCH_PARENT,
            FrameLayout.LayoutParams.MATCH_PARENT
        )
    }
}
imageDeviceUrn = newImageStream?.device?.descriptor?.urn
Y mostramos las estadísticas de audio de audioDevice:
if (newAudioStream?.device?.descriptor?.urn != audioDeviceUrn) {
    (newAudioStream?.device as? AudioDevice)?.let {
        it.setStatsCallback { _, rms ->
            textViewAudioLevel.text = "Audio Level: ${rms.roundToInt()} dB"
        }
    }
}
audioDeviceUrn = newAudioStream?.device?.descriptor?.urn
