Monitor Infrastructure Performance using the AWS Network Manager console
View the network performance between two Regions, between two Availability Zones, or in the two connections within an Availability Zone. After you choose a starting and ending date, and a period by which to aggregate performance, the network performance metrics display in the Health status timeline and Network latency timeline for that time period. You can also subscribe or unsubscribe performance metrics from Amazon CloudWatch. When you subscribe, you're able to view performance metrics in CloudWatch.
Note
Enabling subscriptions with CloudWatch might incur a charge. For more information about CloudWatch pricing
guidelines, see Amazon CloudWatch
pricing
Choose between two Regions, two Availability Zones, or connections within an Availability Zone. You can choose multiple Region, Availability Zones or intra-Availability Zones, but you can't have a combination of all three. Combinations of Regions, Inter-Availability Zones, or Intra-Availability Zones are not supported.
To choose a Region or Availability Zone
Access the Network Manager console at https://console.aws.amazon.com/networkmanager/home/
. -
Under Monitoring and troubleshooting, choose Infrastructure Performance.
-
From the Regions drop-down list, choose whether you want to see Inter-Region, Inter-Availability Zone, or Intra-Availability Zone performance data.
By default the table populates all possible Source and Destination pairs of Regions or Availability Zones, or all possible pairs within an intra-Availability Zone. This section displays whether that pair is subscribed to Amazon CloudWatch. Sort on Source, Destination, or Subscription to more easily select which Regions or Availability Zones you want to check network performance for.
-
Scroll through the pages and choose one or more pairs.
-
(Optional). To choose specific Regions or Availability Zone, choose Find metrics.
-
In the Find metrics field, choose one of the following Properties:
-
Source — The Region or Inter/Intra Availability Zone that's the source of the network traffic.
-
Destination — The Region or Inter/Intra Availability Zone that's the destination for the network source.
-
Subscription — Indicates whether the Region or Availability Zone is Subscribed or Unsubscribed for CloudWatch notifications. For more information about managing subscriptions with CloudWatch, see Amazon CloudWatch subscriptions for Infrastructure Performance.
-
-
For the property operator, choose one of the following operators:
-
Source = — Returns network performance results only for the chosen Region, Availability Zone, or an unsubscribed subscription status.
-
Source != — Does not equal. Excludes the chosen Region, Availability Zone, or unsubscribed subscription status from the network performance results.
-
-
From the Source Values drop-down list, choose the value to apply to the operator.
-
Repeat the previous step if you want to include multiple metrics in the results.
-
By default, each metric that you add is separated by and connecting logic, restricting results to the criteria that meet all of the requirements. To return results that match any of your chosen metrics, choose or from the drop-down list.
All metrics use the same connecting logic. Combinations of and/or logic are not supported. If you change the connecting logic between two metrics, all other metrics will use the same connecting logic.
-
The following example shows a filter for a single Source Region,
us-east-1and a single Destination Region,eu-central-1. The results return one combination: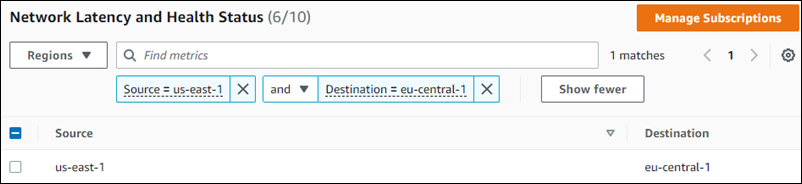
-
-
Choose a time range, and then choose Apply. You can choose a Relative range or an Absolute range.
Relative range options use a date range based on your current date and time:
-
Last 30 minutes
-
Last 1 hour
-
Last 6 hour
-
Last 1 day
-
Last 1 week
-
Custom range — Set a custom date range. Enter a Duration, and then choose one of the following Units of time:
-
seconds
-
minutes (default)
-
hours
-
days
-
weeks
-
years
-
Absolute range allows you to set a specific start date and time and end date and time. The date range cannot exceed 30 days.
Note
Performance metrics are not available prior to Oct 26, 2022 00:00:00 GMT+000.
-
On the calendar control, choose the start and end dates. Or,
-
Enter a Start date and End date using a
YYYY/MM/DDformat. -
Enter a Start time and End time using an
hh:mmformat.
-
If you choose dates using the calendar control, the default start and end times are set to
00:00. You can change those times by entering your preferred times in the fields.When using an absolute range, both start and end dates are required.
-
-
Choose the time period by which you want the performance aggregated. Options are:
-
5M — Five minutes (default)
-
15M — Fifteen minutes
-
1H — One hour
-
1D — One day
-
1W — One week
-
-
The Health status timeline and Network latency sections update.
Health status timeline
The Health status timeline shows a single consolidated view of network performance for the chosen Region, Inter-Availability Zone, or Intra-Availability Zone pairs over the starting and end times, consolidated by the aggregation period. The timeline displays the following network latency statuses:
-
Healthy (green) — Network performance fell within the expected range.
-
Degraded (yellow) — Network latency fell below the expected range.
Hover over the status bar at a particular date and time to display the health status at that time for the pairs you've chosen.
In the following example, network performance is checked for two pairs of
Regions: eu-north-1 and me-south-1, as well as
eu-north-1 and ap-south-1. The time period uses a Relative
time of Last 1 hour on November 11, and the aggregation period
is 5M (five minutes). From 11:55 AM to 12:05 PM during
this hour there was Degraded performance. Hovering over the status bar shows
that degraded performance occurred only between the eu-north-1 and
me-south-1 Regions, while network performance for the other
Region pair was healthy.
Note
This example is provided for illustrative purposes only and does not represent the actual network health status between these Regions during this time.

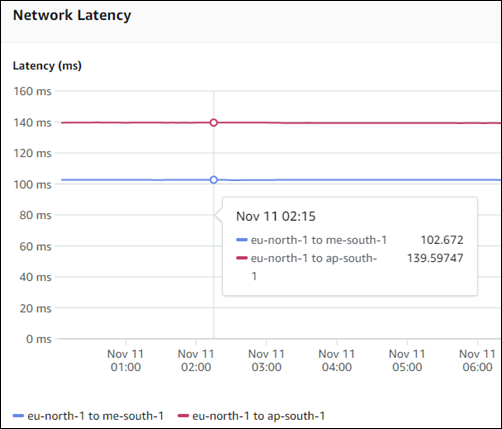
Network latency
The Network latency section shows the actual network performance speed between the chosen
Region, Availability Zone, or within an Availability Zone pairs over the starting and end times,
consolidated by the aggregation period. Latency can run from a minimum of 0
ms to a maximum of 160 ms. Each chosen pair is represented by
individual lines in the section, with a legend at the bottom of the page mapping a line to a
pair. Hover anywhere over the graph at a particular time to view a comprehensive list of all
chosen pairs and the actual latency at that time. Or, if you want to see the latency for a
specific pair, choose that line. The following example shows the latency of two
Region pairs : eu-north-1 and me-south-1, as well as
eu-north-1 and ap-south-1 at 02:15 on
Nov 11.
Note
This example is provided for illustrative purposes only and does not represent the actual network latency between these Regions during this time.