Getting started with AWS Private 5G
To begin using AWS Private 5G, you must create a network and then order capacity. After the order arrives, you must acknowledge that the equipment has arrived and CPI certify the position of the radio unit. When you finish, you have a private mobile network at your on-premises location.
Tasks
Prerequisites
-
You must have an AWS Business support plan.
-
Ensure that the AWS Identity and Access Management (IAM) service-linked role for Private 5G is created. For more information, see AWS Private 5G service-linked role.
-
Your site must be in the United States and must meet the site requirements for a private mobile network. For more information, see Network site requirements for AWS Private 5G.
-
You must create your network in one of the following AWS Regions:
-
us-east-1– US East (N. Virginia) -
us-east-2– US East (Ohio) -
us-west-2– US West (Oregon)
-
-
You must have CBRS certified professional installer (CPI) credentials to certify the geographic location of the radio units. For more information, see CBRS certified professional installer (CPI).
Grant access to a certified public installer (CPI)
To verify the location of the radio unit, installation requires credentials in the AWS account that contains the Private 5G network. Consider the following information about providing access to a CPI:
-
If you use a third party to install the radio units and certify the geographic location of the radio units, you must provide them with temporary access to your AWS account. You should grant only the minimum permissions required to register the radio units.
-
If you use temporary credentials, you must define how long the credentials last. Ensure that you give the installer enough time to perform all steps for installing the radio units.
How permissions work
By default, users don't have permissions for Private 5G resources and operations. To allow users to interact with resources during installation, you must create an identity-based policy that explicitly grants them permissions. For more information, see Identity and access management for AWS Private 5G.
The following is an example of the minimal policy required to register a radio unit. Specify the Amazon Resource Name (ARN) of the radio unit as the resource.
{
    "Version": "2012-10-17",
    "Statement": [
        {
            "Effect": "Allow",
            "Action": "private-networks:ConfigureAccessPoint",
            "Resource": [
                "arn:aws:private-networks:region:account-id:network-resource/network-name/resource-id"
            ]
        }
    ]
}
How temporary permissions work
If you prefer to issue temporary credentials to access Private 5G resources, you can use AWS Security Token Service (AWS STS) to create and provide trusted users with temporary credentials. For example, you might do this if the individual who is installing the radio unit only needs access to resources during installation. AWS STS operations create temporary security credentials that include an access key pair and a session token. Users can use these credentials to access your resources, and you can configure credentials that last up to 36 hours. You are responsible for configuring and distributing AWS STS credentials to any installers.
For more information, see Requesting temporary security credentials in the IAM User Guide.
Create a network
Use the following procedure to create a network.
Prerequisites
-
Verify that your site meets the requirements for a private mobile network. For more information, see Network site requirements for AWS Private 5G.
-
Verify that the service-linked role for Private 5G is created. For more information, see AWS Private 5G service-linked role.
To create a network
Open the Private 5G console at https://console.aws.amazon.com/private-networks/
. -
To change the AWS Region, use the Region selector in the upper-right corner of the page.
-
Choose Create network.
-
Enter a network name. You can't change the network name after your network has been created.
-
(Optional) Enter a description for the network.
-
Enter a site name. You can't change the site name after your network has been created.
-
(Optional) Enter a description of the site.
-
Choose Create network.
Create an order
Use the following procedure to order the hardware. After your order ships, you can get your tracking number from the console.
To create an order
Open the Private 5G console at https://console.aws.amazon.com/private-networks/
. -
In the navigation pane, choose Networks.
-
Choose the network.
-
Choose Create order.
-
For Plan configuration, enter the number of radio units and SIM cards. You must order at least one radio unit and 10 SIM cards.
Alternatively, to get an estimate of the number of resources needed, choose Launch estimator, complete the form, and choose Copy estimates to order form.
-
Enter the address you want your radio unit and SIM cards shipped to.
-
Optionally, enter an email address and phone number that we can send order updates to.
-
Choose a commitment period for the radio units in this order. You can choose a 60-day, 1-year, or 3-year commitment period. For pricing information, see AWS Private 5G Pricing
. Important
Before you choose a commitment period, understand each option. See Understand commitment periods and automatic renewal
-
If you choose a 1-year or 3-year commitment period, you can enable Automatic renewal to automatically extend the current period for one more year at your current hourly rate.
-
Read the Acknowledge commitment statement, and check the box to acknowledge the order, commitment period, and cost.
-
Choose Create order.
To get the tracking number for your order
Open the Private 5G console at https://console.aws.amazon.com/private-networks/
. -
In the navigation pane, choose Networks.
-
Choose the network.
-
Choose the Orders tab and find the Tracking number column for your order.
Understand commitment periods and automatic renewal
Learn more about the 60-day, 1-year, and 3-year commitment periods. Also understand how the automatic-renewal option affects your commitment period and rates.
-
This is the minimum commitment period that you can start with.
-
During this commitment period, you can:
-
Switch to a 1-year or 3-year commitment. The change is immediate and you start benefiting from the lowered rate.
-
Start the return process. Your billing will stop after the commitment ends.
-
-
When your current period ends, your hourly rate will continue at the same rate.
-
During this commitment period, you can:
-
Enable Automatic renewal to renew your 1-year commitment on a yearly basis. Your rate stays the same until you disable Automatic renewal.
-
Switch to a 3-year commitment. The change is immediate and you can start benefiting from the lowered rate.
-
Start the return process. Your billing will stop after the commitment ends.
-
-
A month before the commitment ends, we will send you an email to remind you of your options.
-
When this commitment ends, if you have not enabled Automatic renewal or switched to the 3-year commitment, your hourly rate will increase to the pay-as-you-go rate.
-
During the commitment period, you can:
-
Enable Automatic renewal. After the 3-year commitment ends, you will automatically switch to a 1-year commitment that renews on a yearly basis. Your rate stays the same until you disable Automatic renewal.
-
Start the return process. Your billing will stop after the commitment ends.
-
-
A month before the commitment ends, we will send you an email to remind you of your options.
-
When this commitment ends, if you have not enabled Automatic renewal, your hourly rate will increase to the pay-as-you-go rate.
You can set your 1-year and 3-year commitments to automatically renew yearly at the initial commitment rate. For example:
-
You have a 3-year commitment and you enable Automatic renewal. At the end of the 3 years, we will switch you to a 1-year commitment that will renew every year until you disable Automatic renewal. However, your hourly rate will continue at the same low 3-year commitment rate.
-
You have a 1-year commitment and you enable Automatic renewal. At the end of the year, your commitment will renew for a year, every year until you disable Automatic renewal. Your hourly rate will continue at the same 1-year commitment rate.
You cannot automatically renew a 60-day commitment.
Acknowledge the order
After your order arrives, do the following:
-
Check that the tamper-resistant seal is intact. If you believe your order has been tampered with, contact AWS Support for a replacement order.
-
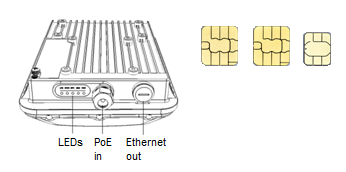
Open your package and remove the radio unit and SIM cards from the case. The following graphic represents the components that are included in your package.
Prerequisites
-
You must have your order.
-
You must know the serial number on the radio unit and the number of SIM cards that you received.
To acknowledge receipt of an order
Open the Private 5G console at https://console.aws.amazon.com/private-networks/
. -
In the navigation pane, choose Networks.
-
Choose the network.
-
Choose Acknowledge order.
Make sure that the information about your order in the prompt matches the serial number on the radio unit and the number of SIM cards that you received. If you find a discrepancy, contact AWS Support.
-
After you have confirmed that the order contains the equipment listed, choose Acknowledge.
Activate the radio unit
After you acknowledge your order, place the radio unit in a safe area and activate it. If the network site has multiple active radio units, it can take around 30 minutes to activate each radio unit.
If a radio unit is defective, you can request a replacement. For more information, see Return a radio unit.
Prerequisites
-
You must supply a Power over Ethernet (PoE) injector to power the radio unit. For more information, see Network site requirements for AWS Private 5G.
-
If the network site has multiple radio units, the first radio unit that you activate must be in a location with a GPS signal.
-
Turn off all PoE power and control settings, such as Link Layer Discovery Protocol (LLPD), on the port that connects to the radio unit.
To activate the radio unit
-
Remove the cap from PoE
inport (A). Plug one end of an Ethernet cable into the PoEinport and the other end into theoutport on the injector (B). Use another Ethernet cable and plug theinport on the injector (C) to a network switch that has internet access.
-
Plug an AC power cord into the injector and into a 110v output. If you are mounting the unit outside, see the mounting guide that's included in the package. If your switch provides PoE+ (30 watts), you can omit the injector.
-
Wait until the PWR and EMS lights are solid green on the radio unit.
-
If the network site has multiple active radio units, you can't continue to the CTI certification step until every radio unit has a SYNC light that is solid green.
Install additional radio units (optional)
You can optionally install additional radio units to increase coverage. If at least one of
the units has a GPS signal, and you have a proper RF plan, you can have seamless handover between
radio units with overlapping coverage areas. For help with RF planning, see RF Planning and Certified Professional
Installation (CPI)
Prerequisites
-
The first radio unit that you activate must be in a location with a GPS signal.
-
Ensure that the PTP protocol is not blocked on the switch (UDP ports 319 and 320).
Install and activate each radio unit, as described in the previous section.
CPI certify the positions of the radio units as described in the next section.
CPI certify the radio position
After the radio unit has solid green lights for PWR and EMS, CPI certify the position of your radio unit.
Prerequisites
-
CBRS certified professional installer (CPI) credentials to certify the geographic location of the radio units. For more information, see CBRS certified professional installer (CPI) and Certified Professional Installer (CPI) certification.
-
The radio unit is powered on and the PWR and EMS lights are solid green.
To enter the location
Open the Private 5G console at https://console.aws.amazon.com/private-networks/
. -
In the navigation pane, choose Networks.
-
Choose the network.
-
Choose Enter coordinates.
-
Enter information about the position of your radio unit and the Certified Professional Installer (CPI) that certifies this position.
-
In Latitude, enter the latitude coordinate, with up to six digits after the decimal point.
-
In Longitude, enter the longitude coordinate, with up to six digits after the decimal point.
-
In Elevation, enter the elevation in feet.
-
In Elevation reference, choose a reference.
-
Above ground level
-
Above mean sea level
-
-
In CPI name, enter the name of the CPI. The CPI name is case sensitive and must be an exact match.
-
In CPI username, enter the Spectrum Access System (SAS) username of the CPI. Depending on which service you used for CPI certification, the format is either
NAME-######ora1b2c3d4-5678-90ab-cdef-EXAMPLE12345. -
In Certificate password, enter the name of the password for the CPI certificate assigned to the .p12 file.
-
Use Certificate (.p12) to add the certificate associated with the CPI credentials.
-
-
Choose Enter coordinates to certify the position of the radio unit.
To start using the network
-
If your network site has a single radio unit, wait until the PWR, EMS, and EPC lights in the unit are green, which can take up to 15 minutes. For more information, see Understanding radio unit lights.
-
If your network site has multiple radio units, wait until the PWR, EMS, SYNC, and EPC lights in the unit are green, which can take up to 30 minutes. For more information, see Understanding radio unit lights.
-
Place the SIM cards in your CBRS/LTE band 48 enabled end-devices.
Firmware updates
A properly functioning radio unit might shut down and reset while updating its firmware. This behavior is expected. Do not contact support unless it is happening frequently.
Configure end-user equipment
AWS provides SIM cards that you insert into end-user equipment to access the Private 5G network. After you insert the SIM card, you might need to configure an Access Point Name (APN) to access the radio unit.
Consider the following information about configuring end-user equipment that supports CBRS with an APN:
-
Apple iOS equipment typically does not require an APN configuration. You only need to insert the SIM card to connect.
-
Android equipment typically does require an APN configuration. For Android equipment:
-
Create a new APN.
-
The APN should use the following lowercase connection name:
aws. -
If the end-user equipment is dedicated for Private 5G network, turn off Automatically select network and select AWS to connect the SIM card to the radio unit.
Note
You might find that you have to turn off Automatically select network and select AWS even if the end-user equipment is not dedicated for the Private 5G network.
-
-
Your device must support LTE band 48.
For more information about how to configure an APN, consult the operating system documentation for your end-user equipment that supports CBRS.
Important
AWS recommends that you physically destroy the SIM cards when you're finished using them.
