You are currently viewing content for use with Unity game engine software. See all AWS GameKit documentation
 Set up a Unity project with AWS GameKit
As a first step to building cloud-based features, set up an AWS GameKit cloud project for your Unity project. The cloud project maintains all the configurations and code that AWS GameKit uses when deploying AWS resources for the project's backend. AWS GameKit maintains the project's configurations and deployment status on an ongoing basis.
To set up a AWS GameKit cloud project
Set up is a one-time task. With a cloud project in place, anyone who works on AWS GameKit features in the project is automatically using the cloud project. Users who are new to the project are required to enter their security credentials, and all users should check on the active environment before making changes.
-
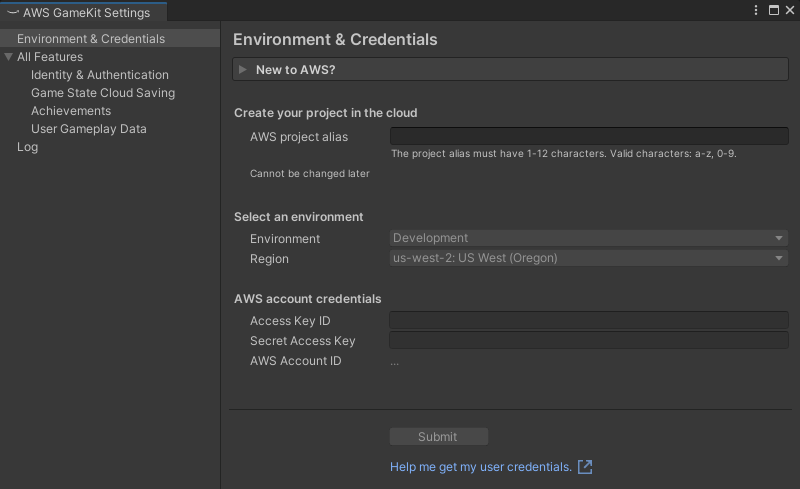
In the Unity Editor toolbar, open the AWS GameKit menu and choose Settings. Choose the Environment & Credentials section.
-
Enter a new AWS project alias. The alias string must be all lowercase alphanumeric characters and can't contain spaces or special characters.
AWS GameKit uses the project alias in several ways, including naming the folder containing project configuration settings (stored locally with your Unity project files). In addition, every AWS resource that's deployed for this project references the alias in its reference name.
-
Choose a staging Environment to work in. You can select a default environment (Development, Testing, or Production) or create a custom environment.
With environments, developers can maintain multiple replicas of the project's backend in parallel. When working with AWS GameKit, users choose which environment to work in, and all configuration and deployment activity occurs in the active environment. Users can switch environments at any time.
-
Choose an AWS Region for the selected environment. All resources for the environment will be deployed to hardware in this region. Each environment can deploy resources to one region only.
Choose a region that makes sense for the environment. For example, you might place development resources geographically near the development team, and place production resources close to your players. See AWS GameKit supported AWS Regions to verify region support for the game features you want.
-
Under AWS account credentials, enter your security credentials. The credentials are a two-part user access key that includes an Access key ID and a Secret access key. On entering valid credentials, the AWS account ID field is automatically filled in.
These credentials do two things: they specify an AWS account for the project, and they identify a unique user on that account. For help getting your credentials, see Get your AWS security credentials.
Your credentials are automatically stored on the local device for reuse in future sessions. In addition, if you switch environments, your stored credentials are used unless you manually reenter them. AWS GameKit stores the credentials in a text file in your home directory
C:\Users\.<user ID>\.aws\credentialsImportant
Your user account must have access permissions to work with the AWS resources for your game backend. Your access isn't validated when you submit credentials, but you won't be able to create, redeploy, or delete AWS resources for the game features.
-
Choose Submit to create a new AWS GameKit cloud project and set the active environment.
In the future, when you open this game project in the Unreal Editor, the AWS GameKit plugin automatically selects the last used project alias, environment, region, and credentials. You can switch environments or change region settings and credentials at any time Environment and Credentials section.
