Deploying a high-availability Drupal website with an external Amazon RDS database to Elastic Beanstalk
This tutorial walks you through the process of launching an RDS DB instance external to AWS Elastic Beanstalk. Then it describes configuring a high-availability environment running a Drupal website to connect to it. The website uses Amazon Elastic File System (Amazon EFS) as shared storage for uploaded files. Running a DB instance external to Elastic Beanstalk decouples the database from the lifecycle of your environment, and lets you connect to the same database from multiple environments, swap out one database for another, or perform a blue/green deployment without affecting your database.
Sections
Prerequisites
This tutorial assumes you have knowledge of the basic Elastic Beanstalk operations and the Elastic Beanstalk console. If you haven't already, follow the instructions in Getting started using Elastic Beanstalk to launch your first Elastic Beanstalk environment.
To follow the procedures in this guide, you will need a command line terminal or shell to run commands. Commands are shown in listings preceded by a prompt symbol ($) and the name of the current directory, when appropriate.
~/eb-project$ this is a command
this is output
On Linux and macOS, you can use your preferred shell and package manager. On Windows 10, you can install the Windows Subsystem for Linux
The procedures in this tutorial for Amazon Relational Database Service (Amazon RDS) tasks assume that you are launching resources in a default Amazon Virtual Private Cloud (Amazon VPC). All new accounts include a default VPC in each region. If you don't have a default VPC, the procedures will vary. See Using Elastic Beanstalk with Amazon RDS for instructions for EC2-Classic and custom VPC platforms.
The sample application uses Amazon EFS. It only works in AWS Regions that support Amazon EFS. To learn about supporting AWS Regions, see Amazon Elastic File System Endpoints and Quotas in the AWS General Reference.
If the platform of your Elastic Beanstalk environment uses PHP 7.4 or earlier, we recommend that you use Drupal version 8.9.13 for this tutorial. For platforms installed with PHP 8.0 or later, we recommend that you use Drupal 9.1.5.
For more information about Drupal releases and the PHP versions that they support, see PHP requirements
Launch a DB instance in Amazon RDS
To use an external database with an application running in Elastic Beanstalk, first launch a DB instance with Amazon RDS. When you launch an instance with Amazon RDS, it is completely independent of Elastic Beanstalk and your Elastic Beanstalk environments, and will not be terminated or monitored by Elastic Beanstalk.
Use the Amazon RDS console to launch a Multi-AZ MySQL DB instance. Choosing a Multi-AZ deployment ensures that your database will failover and continue to be available if the source DB instance goes out of service.
To launch an RDS DB instance in a default VPC
-
Open the RDS console
. -
In the navigation pane, choose Databases.
-
Choose Create database.
-
Choose Standard Create.
Important
Do not choose Easy Create. If you choose it, you can't configure the necessary settings to launch this RDS DB.
-
Under Additional configuration, for Initial database name, type
ebdb. -
Review the default settings and adjust these settings according to your specific requirements. Pay attention to the following options:
-
DB instance class – Choose an instance size that has an appropriate amount of memory and CPU power for your workload.
-
Multi-AZ deployment – For high availability, set this to Create an Aurora Replica/Reader node in a different AZ.
-
Master username and Master password – The database username and password. Make a note of these settings because you will use them later.
-
-
Verify the default settings for the remaining options, and then choose Create database.
Next, modify the security group attached to your DB instance to allow inbound traffic on the appropriate port. This is the same security group that you will attach to your Elastic Beanstalk environment later, so the rule that you add will grant ingress permission to other resources in the same security group.
To modify the inbound rules on the security group that's attached to your RDS instance
-
Open the Amazon RDS console
. -
Choose Databases.
-
Choose the name of your DB instance to view its details.
-
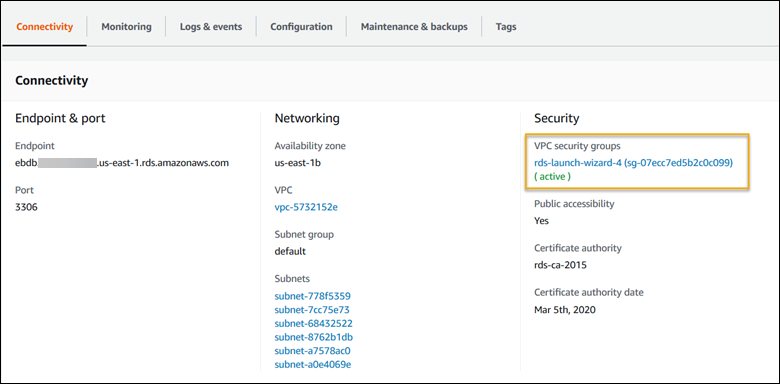
In the Connectivity section, make a note of the Subnets, Security groups, and Endpoint that are displayed on this page. This is so you can use this information later.
-
Under Security, you can see the security group that's associated with the DB instance. Open the link to view the security group in the Amazon EC2 console.
-
In the security group details, choose Inbound.
-
Choose Edit.
-
Choose Add Rule.
-
For Type, choose the DB engine that your application uses.
-
For Source, type
sg-to view a list of available security groups. Choose the security group that's associated with the Auto Scaling group that's used with your Elastic Beanstalk environment. This is so that Amazon EC2 instances in the environment can have access to the database.
-
Choose Save.
Creating a DB instance takes about 10 minutes. In the meantime, launch your Elastic Beanstalk environment.
Launch an Elastic Beanstalk environment
Use the Elastic Beanstalk console to create an Elastic Beanstalk environment. Choose the PHP platform and accept the default settings and sample code. After you launch the environment, you can configure the environment to connect to the database, then deploy the Drupal code to the environment.
To launch an environment (console)
-
Open the Elastic Beanstalk console using this preconfigured link: console.aws.amazon.com/elasticbeanstalk/home#/newApplication?applicationName=tutorials&environmentType=LoadBalanced
-
For Platform, select the platform and platform branch that match the language used by your application.
-
For Application code, choose Sample application.
-
Choose Review and launch.
-
Review the available options. Choose the available option you want to use, and when you're ready, choose Create app.
Environment creation takes about 5 minutes and creates the following resources:
-
EC2 instance – An Amazon Elastic Compute Cloud (Amazon EC2) virtual machine configured to run web apps on the platform that you choose.
Each platform runs a specific set of software, configuration files, and scripts to support a specific language version, framework, web container, or combination of these. Most platforms use either Apache or NGINX as a reverse proxy that sits in front of your web app, forwards requests to it, serves static assets, and generates access and error logs.
-
Instance security group – An Amazon EC2 security group configured to allow inbound traffic on port 80. This resource lets HTTP traffic from the load balancer reach the EC2 instance running your web app. By default, traffic isn't allowed on other ports.
-
Load balancer – An Elastic Load Balancing load balancer configured to distribute requests to the instances running your application. A load balancer also eliminates the need to expose your instances directly to the internet.
-
Load balancer security group – An Amazon EC2 security group configured to allow inbound traffic on port 80. This resource lets HTTP traffic from the internet reach the load balancer. By default, traffic isn't allowed on other ports.
-
Auto Scaling group – An Auto Scaling group configured to replace an instance if it is terminated or becomes unavailable.
-
Amazon S3 bucket – A storage location for your source code, logs, and other artifacts that are created when you use Elastic Beanstalk.
-
Amazon CloudWatch alarms – Two CloudWatch alarms that monitor the load on the instances in your environment and that are triggered if the load is too high or too low. When an alarm is triggered, your Auto Scaling group scales up or down in response.
-
AWS CloudFormation stack – Elastic Beanstalk uses AWS CloudFormation to launch the resources in your environment and propagate configuration changes. The resources are defined in a template that you can view in the AWS CloudFormation console
. -
Domain name – A domain name that routes to your web app in the form
subdomain.region.elasticbeanstalk.com.Note
To augment the security of your Elastic Beanstalk applications, the elasticbeanstalk.com domain is registered in the Public Suffix List (PSL)
. For further security, we recommend that you use cookies with a __Host-prefix if you ever need to set sensitive cookies in the default domain name for your Elastic Beanstalk applications. This practice will help to defend your domain against cross-site request forgery attempts (CSRF). For more information see the Set-Cookiepage in the Mozilla Developer Network.
All of these resources are managed by Elastic Beanstalk. When you terminate your environment, Elastic Beanstalk terminates all the resources that it contains. The RDS DB instance that you launched is outside of your environment, so you are responsible for managing its lifecycle.
Note
The Amazon S3 bucket that Elastic Beanstalk creates is shared between environments and is not deleted during environment termination. For more information, see Using Elastic Beanstalk with Amazon S3.
Configure security settings and environment properties
Add the security group of your DB instance to your running environment. This procedure causes Elastic Beanstalk to reprovision all instances in your environment with the additional security group attached.
To add a security group to your environment
-
Do one of the following:
-
To add a security group using the Elastic Beanstalk console
Open the Elastic Beanstalk console
, and in the Regions list, select your AWS Region. -
In the navigation pane, choose Environments, and then choose the name of your environment from the list.
Note
If you have many environments, use the search bar to filter the environment list.
In the navigation pane, choose Configuration.
-
In the Instances configuration category, choose Edit.
-
Under EC2 security groups, choose the security group to attach to the instances, in addition to the instance security group that Elastic Beanstalk creates.
-
To save the changes choose Apply at the bottom of the page.
-
Read the warning, and then choose Confirm.
-
To add a security group using a configuration file, use the
securitygroup-addexisting.configexample file.
-
Next, use environment properties to pass the connection information to your environment. The sample application uses a default set of properties that match the ones that Elastic Beanstalk configures when you provision a database within your environment.
To configure environment properties for an Amazon RDS DB instance
Open the Elastic Beanstalk console
, and in the Regions list, select your AWS Region. -
In the navigation pane, choose Environments, and then choose the name of your environment from the list.
Note
If you have many environments, use the search bar to filter the environment list.
In the navigation pane, choose Configuration.
-
In the Updates, monitoring, and logging configuration category, choose Edit.
-
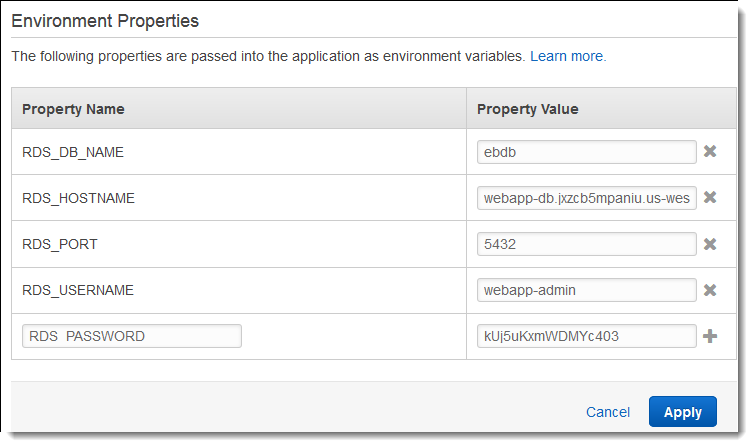
In the Environment properties section, define the variables that your application reads to construct a connection string. For compatibility with environments that have an integrated RDS DB instance, use the following names and values. You can find all values, except for your password, in the RDS console
. Property name Description Property value RDS_HOSTNAMEThe hostname of the DB instance.
On the Connectivity & security tab on the Amazon RDS console: Endpoint.
RDS_PORTThe port where the DB instance accepts connections. The default value varies among DB engines.
On the Connectivity & security tab on the Amazon RDS console: Port.
RDS_DB_NAMEThe database name,
ebdb.On the Configuration tab on the Amazon RDS console: DB Name.
RDS_USERNAMEThe username that you configured for your database.
On the Configuration tab on the Amazon RDS console: Master username.
RDS_PASSWORDThe password that you configured for your database.
Not available for reference in the Amazon RDS console.
-
To save the changes choose Apply at the bottom of the page.
After installing Drupal, you need to connect to the instance with SSH to retrieve some configuration details. Assign an SSH key to your environment's instances.
To configure SSH
-
If you haven't previously created a key pair, open the key pairs page
of the Amazon EC2 console and follow the instructions to create one. Open the Elastic Beanstalk console
, and in the Regions list, select your AWS Region. -
In the navigation pane, choose Environments, and then choose the name of your environment from the list.
Note
If you have many environments, use the search bar to filter the environment list.
In the navigation pane, choose Configuration.
-
Under Security, choose Edit.
-
For EC2 key pair, choose your key pair.
-
To save the changes choose Apply at the bottom of the page.
Configure and deploy your application
To create a Drupal project for Elastic Beanstalk, download the Drupal source code and combine it with the files in the aws-samples/eb-php-drupal
To create a Drupal project
-
Run the follwing command to download Drupal from www.drupal.org/download. To learn more about downloads, see the the Drupal website
. If the platform of your Elastic Beanstalk environment uses PHP 7.4 or earlier, we recommend that you download Drupal version 8.9.13 for this tutorial. You can run the following command to download it.
~$curl https://ftp.drupal.org/files/projects/drupal-8.9.13.tar.gz -o drupal.tar.gzIf your platform uses PHP 8.0 or later, we recommend that you download Drupal 9.1.5. You can use this command to download it.
~$curl https://ftp.drupal.org/files/projects/drupal-9.1.5.tar.gz -o drupal.tar.gzFor more information about Drupal releases and the PHP versions that they support, see PHP requirements
in the official Drupal documentation. The core versions that Drupal recommends are listed on the Drupal website . -
Use the following command to download the configuration files from the sample repository:
~$wget https://github.com/aws-samples/eb-php-drupal/releases/download/v1.1/eb-php-drupal-v1.zip -
Extract Drupal and change the name of the folder.
If you downloaded Drupal 8.9.13:
~$tar -xvf drupal.tar.gz~$mv drupal-8.9.13 drupal-beanstalk~$cd drupal-beanstalkIf you downloaded Drupal 9.1.5:
~$tar -xvf drupal.tar.gz~$mv drupal-9.1.5 drupal-beanstalk~$cd drupal-beanstalk -
Extract the configuration files over the Drupal installation.
~/drupal-beanstalk$unzip ../eb-php-drupal-v1.zipcreating: .ebextensions/ inflating: .ebextensions/dev.config inflating: .ebextensions/drupal.config inflating: .ebextensions/efs-create.config inflating: .ebextensions/efs-filesystem.template inflating: .ebextensions/efs-mount.config inflating: .ebextensions/loadbalancer-sg.config inflating: LICENSE inflating: README.md inflating: beanstalk-settings.php
Verify that the structure of your drupal-beanstalk folder is correct, as shown.
drupal-beanstalk$ tree -aL 1
.
├── autoload.php
├── beanstalk-settings.php
├── composer.json
├── composer.lock
├── core
├── .csslintrc
├── .ebextensions
├── .ebextensions
├── .editorconfig
├── .eslintignore
├── .eslintrc.json
├── example.gitignore
├── .gitattributes
├── .htaccess
├── .ht.router.php
├── index.php
├── LICENSE
├── LICENSE.txt
├── modules
├── profiles
├── README.md
├── README.txt
├── robots.txt
├── sites
├── themes
├── update.php
├── vendor
└── web.config
The beanstalk-settings.php file from the project repo uses the environment variables that you defined in the previous step to
configure the database connection. The .ebextensions folder contains configuration files that create additional resources within your
Elastic Beanstalk environment.
The configuration files require modification to work with your account. Replace the placeholder values in the files with the appropriate IDs and create a source bundle.
To update configuration files and create a source bundle.
-
Modify the configuration files as follows.
-
.ebextensions/dev.config– restricts access to your environment to your IP address to protect it during the Drupal installation process. Replace the placeholder IP address near the top of the file with your public IP address. -
.ebextensions/efs-create.config– creates an EFS file system and mount points in each Availability Zone / subnet in your VPC. Identify your default VPC and subnet IDs in the Amazon VPC console.
-
-
Create a source bundle containing the files in your project folder. The following command creates a source bundle named
drupal-beanstalk.zip. It excludes files in thevendorfolder, which take up a lot of space and are not necessary for deploying your application to Elastic Beanstalk.~/eb-drupal$zip ../drupal-beanstalk.zip -r * .[^.]* -x "vendor/*"
Upload the source bundle to Elastic Beanstalk to deploy Drupal to your environment.
To deploy a source bundle
Open the Elastic Beanstalk console
, and in the Regions list, select your AWS Region. -
In the navigation pane, choose Environments, and then choose the name of your environment from the list.
Note
If you have many environments, use the search bar to filter the environment list.
-
On the environment overview page, choose Upload and deploy.
-
Use the on-screen dialog box to upload the source bundle.
-
Choose Deploy.
-
When the deployment completes, you can choose the site URL to open your website in a new tab.
Install Drupal
To complete your Drupal installation
Open the Elastic Beanstalk console
, and in the Regions list, select your AWS Region. -
In the navigation pane, choose Environments, and then choose the name of your environment from the list.
Note
If you have many environments, use the search bar to filter the environment list.
-
Choose the environment URL to open your site in a browser. You are redirected to a Drupal installation wizard because the site has not been configured yet.
-
Perform a standard installation with the following settings for the database:
-
Database name – The DB Name shown in the Amazon RDS console.
-
Database username and password – The Master Username and Master Password values you entered when creating your database.
-
Advanced Options > Host – The Endpoint of the DB instance shown in the Amazon RDS console.
-
Installation takes about a minute to complete.
Update Drupal configuration and remove access restrictions
The Drupal installation process created a file named settings.php in the sites/default folder on the
instance. You need this file in your source code to avoid resetting your site on subsequent deployments, but the file currently contains secrets that you
don't want to commit to source. Connect to the application instance to retrieve information from the settings file.
To connect to your application instance with SSH
-
Open the instances page
of the Amazon EC2 console. -
Choose the application instance. It is the one named after your Elastic Beanstalk environment.
-
Choose Connect.
-
Follow the instructions to connect the instance with SSH. The command looks similar to the following.
$ssh -i ~/.ssh/mykey ec2-user@ec2-00-55-33-222.us-west-2.compute.amazonaws.com
Get the sync directory id from the last line of the settings file.
[ec2-user ~]$ tail -n 1 /var/app/current/sites/default/settings.php
$config_directories['sync'] = 'sites/default/files/config_4ccfX2sPQm79p1mk5IbUq9S_FokcENO4mxyC-L18-4g_xKj_7j9ydn31kDOYOgnzMu071Tvc4Q/sync';
The file also contains the sites current hash key, but you can ignore the current value and use your own.
Assign the sync directory path and hash key to environment properties. The customized settings file from the project repo reads these properties to configure the site during deployment, in addition to the database connection properties that you set earlier.
Drupal configuration properties
-
SYNC_DIR– The path to the sync directory. -
HASH_SALT– Any string value that meets environment property requirements.
To configure environment properties in the Elastic Beanstalk console
Open the Elastic Beanstalk console
, and in the Regions list, select your AWS Region. -
In the navigation pane, choose Environments, and then choose the name of your environment from the list.
Note
If you have many environments, use the search bar to filter the environment list.
In the navigation pane, choose Configuration.
-
In the Updates, monitoring, and logging configuration category, choose Edit.
-
Scroll down to Environment properties.
-
Select Add environment property.
-
Enter the property Name and Value pairs.
-
If you need to add more variables repeat Step 6 and Step 7.
-
To save the changes choose Apply at the bottom of the page.
Finally, the sample project includes a configuration file (loadbalancer-sg.config) that creates a security group and assigns it
to the environment's load balancer, using the IP address that you configured in dev.config to restrict HTTP access on port 80 to
connections from your network. Otherwise, an outside party could potentially connect to your site before you have installed Drupal and configured your
admin account.
To update Drupal's configuration and remove access restrictions
-
Delete the
.ebextensions/loadbalancer-sg.configfile from your project directory.~/drupal-beanstalk$rm .ebextensions/loadbalancer-sg.config -
Copy the customized
settings.phpfile into the sites folder.~/drupal-beanstalk$cp beanstalk-settings.php sites/default/settings.php -
Create a source bundle.
~/eb-drupal$zip ../drupal-beanstalk-v2.zip -r * .[^.]* -x "vendor/*"
Upload the source bundle to Elastic Beanstalk to deploy Drupal to your environment.
To deploy a source bundle
Open the Elastic Beanstalk console
, and in the Regions list, select your AWS Region. -
In the navigation pane, choose Environments, and then choose the name of your environment from the list.
Note
If you have many environments, use the search bar to filter the environment list.
-
On the environment overview page, choose Upload and deploy.
-
Use the on-screen dialog box to upload the source bundle.
-
Choose Deploy.
-
When the deployment completes, you can choose the site URL to open your website in a new tab.
Configure your Auto Scaling group
Finally, configure your environment's Auto Scaling group with a higher minimum instance count. Run at least two instances at all times to prevent the web servers in your environment from being a single point of failure, and to allow you to deploy changes without taking your site out of service.
To configure your environment's Auto Scaling group for high availability
Open the Elastic Beanstalk console
, and in the Regions list, select your AWS Region. -
In the navigation pane, choose Environments, and then choose the name of your environment from the list.
Note
If you have many environments, use the search bar to filter the environment list.
In the navigation pane, choose Configuration.
-
In the Capacity configuration category, choose Edit.
-
In the Auto Scaling group section, set Min instances to
2. -
To save the changes choose Apply at the bottom of the page.
To support content uploads across multiple instances, the sample project uses Amazon Elastic File System to create a shared file system. Create a post on the site and upload content to store it on the shared file system. View the post and refresh the page multiple times to hit both instances and verify that the shared file system is working.
Cleanup
When you finish working with Elastic Beanstalk, you can terminate your environment. Elastic Beanstalk terminates all AWS resources associated with your environment, such as Amazon EC2 instances, database instances, load balancers, security groups, and alarms.
To terminate your Elastic Beanstalk environment
Open the Elastic Beanstalk console
, and in the Regions list, select your AWS Region. -
In the navigation pane, choose Environments, and then choose the name of your environment from the list.
Note
If you have many environments, use the search bar to filter the environment list.
-
Choose Actions, and then choose Terminate environment.
-
Use the on-screen dialog box to confirm environment termination.
With Elastic Beanstalk, you can easily create a new environment for your application at any time.
In addition, you can terminate database resources that you created outside of your Elastic Beanstalk environment. When you terminate an Amazon RDS DB instance, you can take a snapshot and restore the data to another instance later.
To terminate your RDS DB instance
-
Open the Amazon RDS console
. -
Choose Databases.
-
Choose your DB instance.
-
Choose Actions, and then choose Delete.
-
Choose whether to create a snapshot, and then choose Delete.
Next steps
As you continue to develop your application, you'll probably want a way to manage environments and deploy your application without manually creating a .zip file and uploading it to the Elastic Beanstalk console. The Elastic Beanstalk Command Line Interface (EB CLI) provides easy-to-use commands for creating, configuring, and deploying applications to Elastic Beanstalk environments from the command line.
The sample application uses configuration files to configure PHP settings and create a table in the database if it doesn't already exist. You can also use a configuration file to configure your instances' security group settings during environment creation to avoid time-consuming configuration updates. See Advanced environment customization with configuration files (.ebextensions) for more information.
For development and testing, you might want to use the Elastic Beanstalk functionality for adding a managed DB instance directly to your environment. For instructions on setting up a database inside your environment, see Adding a database to your Elastic Beanstalk environment.
If you need a high-performance database, consider using Amazon Aurora
Finally, if you plan on using your application in a production environment, you will want to configure a custom domain name for your environment and enable HTTPS for secure connections.
