Developing and testing AWS Glue job scripts locally
When you develop and test your AWS Glue for Spark job scripts, there are multiple available options:
AWS Glue Studio console
Visual editor
Script editor
AWS Glue Studio notebook
Interactive sessions
Jupyter notebook
Docker image
Local development
Remote development
AWS Glue Studio ETL library
Local development
You can choose any of the above options based on your requirements.
If you prefer no code or less code experience, the AWS Glue Studio visual editor is a good choice.
If you prefer an interactive notebook experience, AWS Glue Studio notebook is a good choice. For more information, see Using Notebooks with AWS Glue Studio and AWS Glue. If you want to use your own local environment, interactive sessions is a good choice. For more information, see Using interactive sessions with AWS Glue.
If you prefer local/remote development experience, the Docker image is a good choice. This helps you to develop and test AWS Glue for Spark job scripts anywhere you prefer without incurring AWS Glue cost.
If you prefer local development without Docker, installing the AWS Glue ETL library directory locally is a good choice.
Developing using AWS Glue Studio
The AWS Glue Studio visual editor is a graphical interface that makes it easy to create, run, and monitor extract, transform, and load (ETL) jobs in AWS Glue. You can visually compose data transformation workflows and seamlessly run them on AWS Glue's Apache Spark-based serverless ETL engine. You can inspect the schema and data results in each step of the job. For more information, see the AWS Glue Studio User Guide.
Developing using interactive sessions
Interactive sessions allow you to build and test applications from the environment of your choice. For more information, see Using interactive sessions with AWS Glue.
Developing using a Docker image
Note
The instructions in this section have not been tested on Microsoft Windows operating systems.
For local development and testing on Windows platforms, see the blog Building an AWS Glue ETL pipeline locally without an AWS account
For a production-ready data platform, the development process and CI/CD pipeline for AWS Glue jobs is a key topic. You can flexibly develop and test AWS Glue jobs in a Docker container. AWS Glue hosts Docker images on Docker Hub to set up your development environment with additional utilities. You can use your preferred IDE, notebook, or REPL using AWS Glue ETL library. This topic describes how to develop and test AWS Glue version 4.0 jobs in a Docker container using a Docker image.
The following Docker images are available for AWS Glue on Docker Hub.
For AWS Glue version 4.0:
amazon/aws-glue-libs:glue_libs_4.0.0_image_01For AWS Glue version 3.0:
amazon/aws-glue-libs:glue_libs_3.0.0_image_01For AWS Glue version 2.0:
amazon/aws-glue-libs:glue_libs_2.0.0_image_01
These images are for x86_64. It is recommended that you test on this architecture. However, it may be possible to rework a local development solution on unsupported base images.
This example describes using amazon/aws-glue-libs:glue_libs_4.0.0_image_01 and
running the container on a local machine. This container image has been tested for an
AWS Glue version 3.3 Spark jobs. This image contains the following:
Amazon Linux
AWS Glue ETL library (aws-glue-libs
) Apache Spark 3.3.0
Spark history server
Jupyter Lab
Livy
Other library dependencies (the same set as the ones of AWS Glue job system)
Complete one of the following sections according to your requirements:
Set up the container to use spark-submit
Set up the container to use REPL shell (PySpark)
Set up the container to use Pytest
Set up the container to use Jupyter Lab
Set up the container to use Visual Studio Code
Prerequisites
Before you start, make sure that Docker is installed and the Docker daemon is running. For
installation instructions, see the Docker documentation for Mac
For more information about restrictions when developing AWS Glue code locally, see Local development restrictions.
Configuring AWS
To enable AWS API calls from the container, set up AWS credentials by following steps. In the following sections, we will use this AWS named profile.
-
Set up the AWS CLI, configuring a named profile. For more information about AWS CLI configuration, see Configuration and credential file settings in the AWS CLI documentation.
Run the following command in a terminal:
PROFILE_NAME="<your_profile_name>"
You may also need to set the AWS_REGION environment variable to specify the AWS Region to send requests to.
Setting up and running the container
Setting up the container to run PySpark code through the spark-submit command includes the following high-level steps:
Pull the image from Docker Hub.
Run the container.
Pulling the image from Docker Hub
Run the following command to pull the image from Docker Hub:
docker pull amazon/aws-glue-libs:glue_libs_4.0.0_image_01
Running the container
You can now run a container using this image. You can choose any of following based on your requirements.
spark-submit
You can run an AWS Glue job script by running the spark-submit command on the container.
Write the script and save it as
sample1.pyunder the/local_path_to_workspacedirectory. Sample code is included as the appendix in this topic.$ WORKSPACE_LOCATION=/local_path_to_workspace $ SCRIPT_FILE_NAME=sample.py $ mkdir -p ${WORKSPACE_LOCATION}/src $ vim ${WORKSPACE_LOCATION}/src/${SCRIPT_FILE_NAME}Run the following command to execute the
spark-submitcommand on the container to submit a new Spark application:$ docker run -it -v ~/.aws:/home/glue_user/.aws -v $WORKSPACE_LOCATION:/home/glue_user/workspace/ -e AWS_PROFILE=$PROFILE_NAME -e DISABLE_SSL=true --rm -p 4040:4040 -p 18080:18080 --name glue_spark_submit amazon/aws-glue-libs:glue_libs_4.0.0_image_01 spark-submit /home/glue_user/workspace/src/$SCRIPT_FILE_NAME ...22/01/26 09:08:55 INFO DAGScheduler: Job 0 finished: fromRDD at DynamicFrame.scala:305, took 3.639886 s root |-- family_name: string |-- name: string |-- links: array | |-- element: struct | | |-- note: string | | |-- url: string |-- gender: string |-- image: string |-- identifiers: array | |-- element: struct | | |-- scheme: string | | |-- identifier: string |-- other_names: array | |-- element: struct | | |-- lang: string | | |-- note: string | | |-- name: string |-- sort_name: string |-- images: array | |-- element: struct | | |-- url: string |-- given_name: string |-- birth_date: string |-- id: string |-- contact_details: array | |-- element: struct | | |-- type: string | | |-- value: string |-- death_date: string ...-
(Optionally) Configure
spark-submitto match your environment. For example, you can pass your dependencies with the--jarsconfiguration. For more information, consult Launching Applications with spark-submitin the Spark documentation.
REPL shell (Pyspark)
You can run REPL (read-eval-print loops) shell for interactive development.
Run the following command to execute the PySpark command on the container to start the REPL shell:
$ docker run -it -v ~/.aws:/home/glue_user/.aws -e AWS_PROFILE=$PROFILE_NAME -e DISABLE_SSL=true --rm -p 4040:4040 -p 18080:18080 --name glue_pyspark amazon/aws-glue-libs:glue_libs_4.0.0_image_01 pyspark
...
 ____ __
 / __/__ ___ _____/ /__
 _\ \/ _ \/ _ `/ __/ '_/
 /__ / .__/\_,_/_/ /_/\_\  version 3.1.1-amzn-0
 /_/

Using Python version 3.7.10 (default, Jun 3 2021 00:02:01)
Spark context Web UI available at http://56e99d000c99:4040
Spark context available as 'sc' (master = local[*], app id = local-1643011860812).
SparkSession available as 'spark'.
>>>
Pytest
For unit testing, you can use pytest for AWS Glue Spark job scripts.
Run the following commands for preparation.
$ WORKSPACE_LOCATION=/local_path_to_workspace
$ SCRIPT_FILE_NAME=sample.py
$ UNIT_TEST_FILE_NAME=test_sample.py
$ mkdir -p ${WORKSPACE_LOCATION}/tests
$ vim ${WORKSPACE_LOCATION}/tests/${UNIT_TEST_FILE_NAME}
Run the following command to execute pytest on the test suite:
$ docker run -it -v ~/.aws:/home/glue_user/.aws -v $WORKSPACE_LOCATION:/home/glue_user/workspace/ -e AWS_PROFILE=$PROFILE_NAME -e DISABLE_SSL=true --rm -p 4040:4040 -p 18080:18080 --name glue_pytest amazon/aws-glue-libs:glue_libs_4.0.0_image_01 -c "python3 -m pytest"
starting org.apache.spark.deploy.history.HistoryServer, logging to /home/glue_user/spark/logs/spark-glue_user-org.apache.spark.deploy.history.HistoryServer-1-5168f209bd78.out
*============================================================= test session starts =============================================================
*platform linux -- Python 3.7.10, pytest-6.2.3, py-1.11.0, pluggy-0.13.1
rootdir: /home/glue_user/workspace
plugins: anyio-3.4.0
*collected 1 item  *

tests/test_sample.py . [100%]

============================================================== warnings summary ===============================================================
tests/test_sample.py::test_counts
 /home/glue_user/spark/python/pyspark/sql/context.py:79: DeprecationWarning: Deprecated in 3.0.0. Use SparkSession.builder.getOrCreate() instead.
 DeprecationWarning)

-- Docs: https://docs.pytest.org/en/stable/warnings.html
======================================================== 1 passed, *1 warning* in 21.07s ========================================================
Jupyter Lab
You can start Jupyter for interactive development and ad-hoc queries on notebooks.
Run the following command to start Jupyter Lab:
$ JUPYTER_WORKSPACE_LOCATION=/local_path_to_workspace/jupyter_workspace/
$ docker run -it -v ~/.aws:/home/glue_user/.aws -v $JUPYTER_WORKSPACE_LOCATION:/home/glue_user/workspace/jupyter_workspace/ -e AWS_PROFILE=$PROFILE_NAME -e DISABLE_SSL=true --rm -p 4040:4040 -p 18080:18080 -p 8998:8998 -p 8888:8888 --name glue_jupyter_lab amazon/aws-glue-libs:glue_libs_4.0.0_image_01 /home/glue_user/jupyter/jupyter_start.sh
...
[I 2022-01-24 08:19:21.368 ServerApp] Serving notebooks from local directory: /home/glue_user/workspace/jupyter_workspace
[I 2022-01-24 08:19:21.368 ServerApp] Jupyter Server 1.13.1 is running at:
[I 2022-01-24 08:19:21.368 ServerApp] http://faa541f8f99f:8888/lab
[I 2022-01-24 08:19:21.368 ServerApp] or http://127.0.0.1:8888/lab
[I 2022-01-24 08:19:21.368 ServerApp] Use Control-C to stop this server and shut down all kernels (twice to skip confirmation).
Open http://127.0.0.1:8888/lab in your web browser in your local machine, to see the Jupyter lab UI.
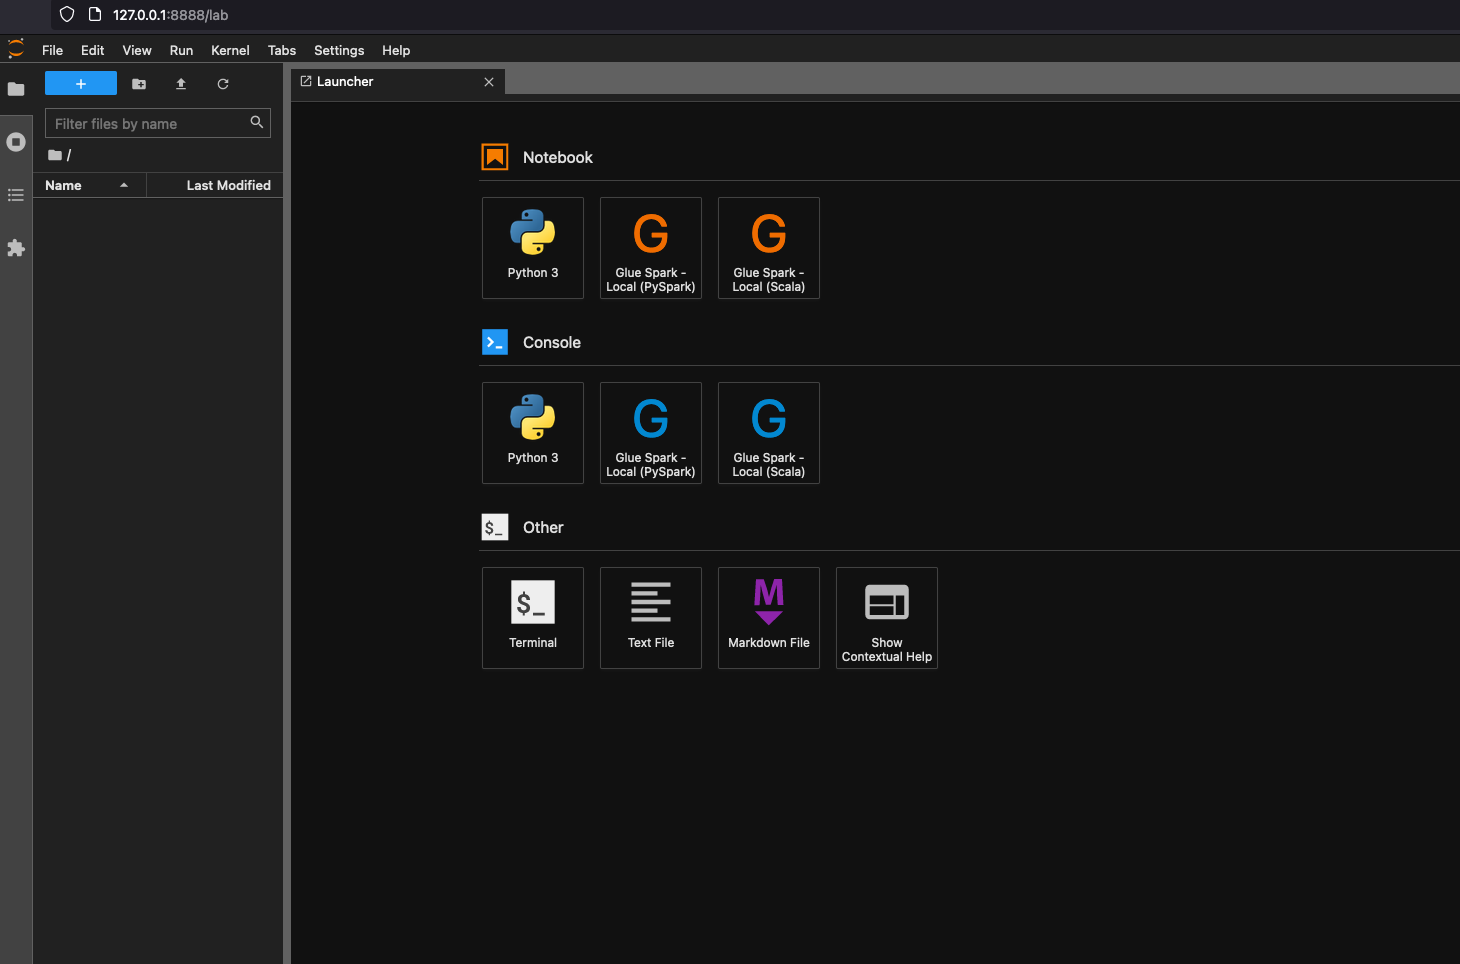
Choose Glue Spark Local (PySpark) under Notebook. You can start developing code in the interactive Jupyter notebook UI.

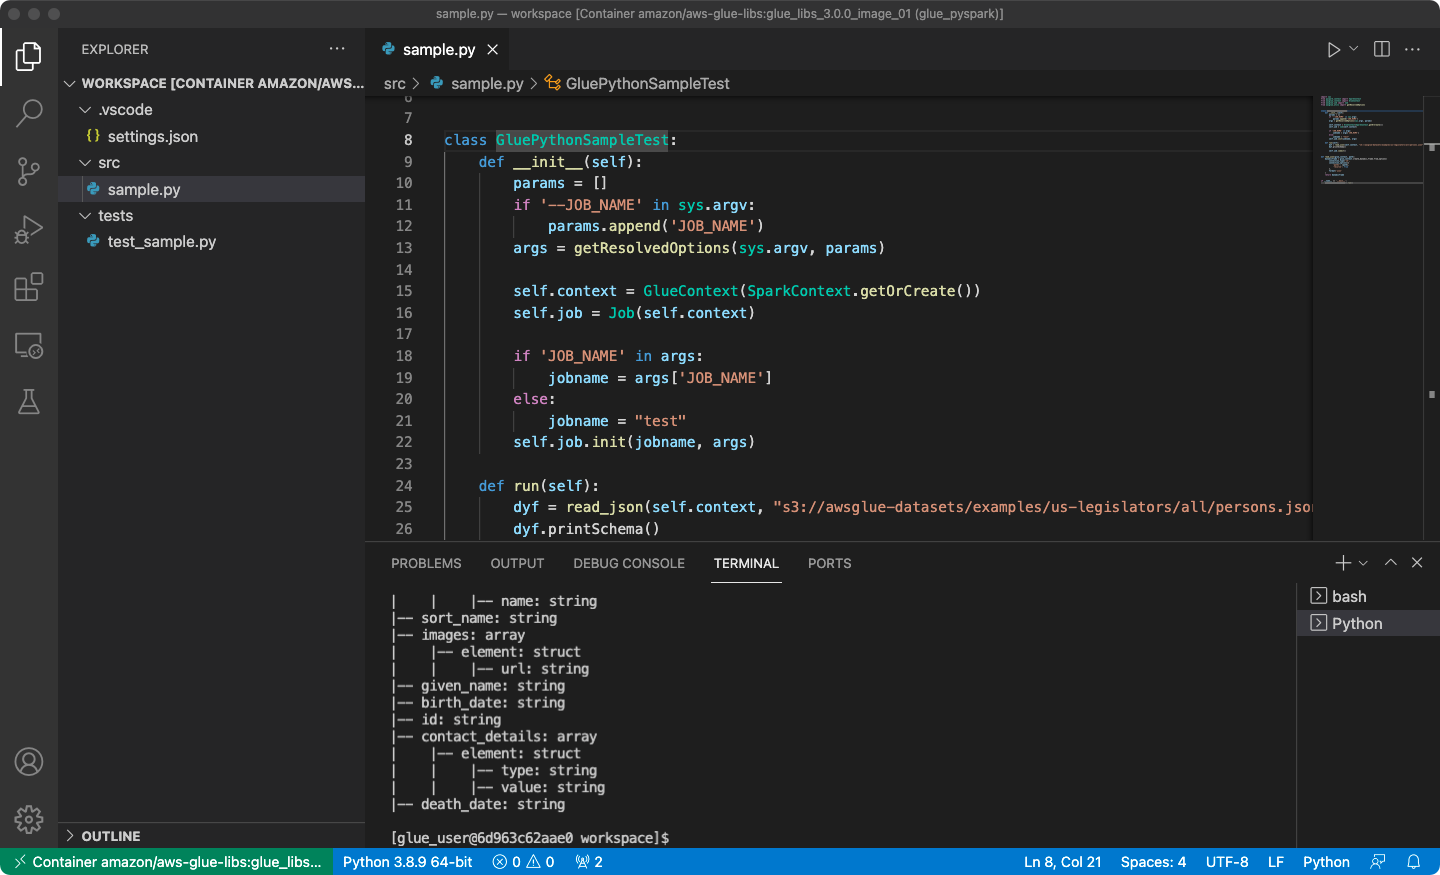
Setting up the container to use Visual Studio Code
Prerequisites:
Install Visual Studio Code.
Install Python
. Open the workspace folder in Visual Studio Code.
Choose Settings.
Choose Workspace.
Choose Open Settings (JSON).
Paste the following JSON and save it.
{
    "python.defaultInterpreterPath": "/usr/bin/python3",
    "python.analysis.extraPaths": [
        "/home/glue_user/aws-glue-libs/PyGlue.zip:/home/glue_user/spark/python/lib/py4j-0.10.9-src.zip:/home/glue_user/spark/python/",
    ]
}
Steps:
Run the Docker container.
$ docker run -it -v ~/.aws:/home/glue_user/.aws -v $WORKSPACE_LOCATION:/home/glue_user/workspace/ -e AWS_PROFILE=$PROFILE_NAME -e DISABLE_SSL=true --rm -p 4040:4040 -p 18080:18080 --name glue_pyspark amazon/aws-glue-libs:glue_libs_4.0.0_image_01 pysparkStart Visual Studio Code.
Choose Remote Explorer on the left menu, and choose
amazon/aws-glue-libs:glue_libs_4.0.0_image_01.
Right click and choose Attach to Container. If a dialog is shown, choose Got it.
Open
/home/glue_user/workspace/.Create a Glue PySpark script and choose Run.
You will see the successful run of the script.
Appendix: AWS Glue job sample code for testing
This appendix provides scripts as AWS Glue job sample code for testing purposes.
sample.py: Sample code to utilize the AWS Glue ETL library with an Amazon S3 API call
import sys
from pyspark.context import SparkContext
from awsglue.context import GlueContext
from awsglue.job import Job
from awsglue.utils import getResolvedOptions


class GluePythonSampleTest:
    def __init__(self):
        params = []
        if '--JOB_NAME' in sys.argv:
            params.append('JOB_NAME')
        args = getResolvedOptions(sys.argv, params)

        self.context = GlueContext(SparkContext.getOrCreate())
        self.job = Job(self.context)

        if 'JOB_NAME' in args:
            jobname = args['JOB_NAME']
        else:
            jobname = "test"
        self.job.init(jobname, args)

    def run(self):
        dyf = read_json(self.context, "s3://awsglue-datasets/examples/us-legislators/all/persons.json")
        dyf.printSchema()

        self.job.commit()


def read_json(glue_context, path):
    dynamicframe = glue_context.create_dynamic_frame.from_options(
        connection_type='s3',
        connection_options={
            'paths': [path],
            'recurse': True
        },
        format='json'
    )
    return dynamicframe


if __name__ == '__main__':
    GluePythonSampleTest().run()
The above code requires Amazon S3 permissions in AWS IAM. You need to grant the IAM managed policy arn:aws:iam::aws:policy/AmazonS3ReadOnlyAccess or an IAM custom policy which allows you to call ListBucket and GetObject for the Amazon S3 path.
test_sample.py: Sample code for unit test of sample.py.
import pytest
from pyspark.context import SparkContext
from awsglue.context import GlueContext
from awsglue.job import Job
from awsglue.utils import getResolvedOptions
import sys
from src import sample


@pytest.fixture(scope="module", autouse=True)
def glue_context():
    sys.argv.append('--JOB_NAME')
    sys.argv.append('test_count')

    args = getResolvedOptions(sys.argv, ['JOB_NAME'])
    context = GlueContext(SparkContext.getOrCreate())
    job = Job(context)
    job.init(args['JOB_NAME'], args)

    yield(context)

    job.commit()


def test_counts(glue_context):
    dyf = sample.read_json(glue_context, "s3://awsglue-datasets/examples/us-legislators/all/persons.json")
    assert dyf.toDF().count() == 1961
Developing using the AWS Glue ETL library
The AWS Glue ETL library is available in a public Amazon S3 bucket, and can be consumed by the Apache Maven build system. This enables you to develop and test your Python and Scala extract, transform, and load (ETL) scripts locally, without the need for a network connection. Local development with the Docker image is recommended, as it provides an environment properly configured for the use of this library.
Local development is available for all AWS Glue versions, including AWS Glue version 0.9, 1.0, 2.0, and later. For information about the versions of Python and Apache Spark that are available with AWS Glue, see the Glue version job property.
The library is released with the Amazon Software license (https://aws.amazon.com/asl
Local development restrictions
Keep the following restrictions in mind when using the AWS Glue Scala library to develop locally.
-
Avoid creating an assembly jar ("fat jar" or "uber jar") with the AWS Glue library because it causes the following features to be disabled:
-
AWS Glue Parquet writer (Using the Parquet format in AWS Glue)
These feature are available only within the AWS Glue job system.
-
The FindMatches transform is not supported with local development.
-
The vectorized SIMD CSV reader is not supported with local development.
-
The property customJdbcDriverS3Path for loading JDBC driver from S3 path is not supported with local development. Alternatively you can download the JDBC driver in your local and load from there.
-
The Glue Data Quality is not supported with local development.
Developing locally with Python
Complete some prerequisite steps and then use AWS Glue utilities to test and submit your Python ETL script.
Prerequisites for local Python development
Complete these steps to prepare for local Python development:
-
Clone the AWS Glue Python repository from GitHub (https://github.com/awslabs/aws-glue-libs
). -
Do one of the following:
For AWS Glue version 0.9, check out branch
glue-0.9.For AWS Glue versions 1.0, check out branch
glue-1.0. All versions above AWS Glue 0.9 support Python 3.For AWS Glue versions 2.0, check out branch
glue-2.0.For AWS Glue versions 3.0, check out branch
glue-3.0.For AWS Glue version 4.0, check out the
masterbranch.
-
Install Apache Maven from the following location: https://aws-glue-etl-artifacts.s3.amazonaws.com/glue-common/apache-maven-3.6.0-bin.tar.gz
. -
Install the Apache Spark distribution from one of the following locations:
For AWS Glue version 0.9: https://aws-glue-etl-artifacts.s3.amazonaws.com/glue-0.9/spark-2.2.1-bin-hadoop2.7.tgz
For AWS Glue version 1.0: https://aws-glue-etl-artifacts.s3.amazonaws.com/glue-1.0/spark-2.4.3-bin-hadoop2.8.tgz
For AWS Glue version 2.0: https://aws-glue-etl-artifacts.s3.amazonaws.com/glue-2.0/spark-2.4.3-bin-hadoop2.8.tgz
For AWS Glue version 3.0: https://aws-glue-etl-artifacts.s3.amazonaws.com/glue-3.0/spark-3.1.1-amzn-0-bin-3.2.1-amzn-3.tgz
For AWS Glue version 4.0: https://aws-glue-etl-artifacts.s3.amazonaws.com/glue-4.0/spark-3.3.0-amzn-1-bin-3.3.3-amzn-0.tgz
-
Export the
SPARK_HOMEenvironment variable, setting it to the root location extracted from the Spark archive. For example:For AWS Glue version 0.9:
export
                SPARK_HOME=/home/$USER/spark-2.2.1-bin-hadoop2.7
For AWS Glue version 1.0 and 2.0:
export
                  SPARK_HOME=/home/$USER/spark-2.4.3-bin-spark-2.4.3-bin-hadoop2.8
For AWS Glue version 3.0:
export
                  SPARK_HOME=/home/$USER/spark-3.1.1-amzn-0-bin-3.2.1-amzn-3
For AWS Glue version 4.0:
export
                  SPARK_HOME=/home/$USER/spark-3.3.0-amzn-1-bin-3.3.3-amzn-0
Running your Python ETL script
With the AWS Glue jar files available for local development, you can run the AWS Glue Python package locally.
Use the following utilities and frameworks to test and run your Python script. The
commands listed in the following table are run from the root directory of the AWS Glue Python package
| Utility | Command | Description |
|---|---|---|
| AWS Glue Shell | ./bin/gluepyspark |
Enter and run Python scripts in a shell that integrates with AWS Glue ETL libraries. |
| AWS Glue Submit | ./bin/gluesparksubmit |
Submit a complete Python script for execution. |
| Pytest | ./bin/gluepytest |
Write and run unit tests of your Python code. The pytest module must be
installed and available in the PATH. For more information, see the
pytest
documentation |
Developing locally with Scala
Complete some prerequisite steps and then issue a Maven command to run your Scala ETL script locally.
Prerequisites for local Scala development
Complete these steps to prepare for local Scala development.
Step 1: Install software
In this step, you install software and set the required environment variable.
-
Install Apache Maven from the following location: https://aws-glue-etl-artifacts.s3.amazonaws.com/glue-common/apache-maven-3.6.0-bin.tar.gz
. -
Install the Apache Spark distribution from one of the following locations:
For AWS Glue version 0.9: https://aws-glue-etl-artifacts.s3.amazonaws.com/glue-0.9/spark-2.2.1-bin-hadoop2.7.tgz
For AWS Glue version 1.0: https://aws-glue-etl-artifacts.s3.amazonaws.com/glue-1.0/spark-2.4.3-bin-hadoop2.8.tgz
For AWS Glue version 2.0: https://aws-glue-etl-artifacts.s3.amazonaws.com/glue-2.0/spark-2.4.3-bin-hadoop2.8.tgz
For AWS Glue version 3.0: https://aws-glue-etl-artifacts.s3.amazonaws.com/glue-3.0/spark-3.1.1-amzn-0-bin-3.2.1-amzn-3.tgz
For AWS Glue version 4.0: https://aws-glue-etl-artifacts.s3.amazonaws.com/glue-4.0/spark-3.3.0-amzn-1-bin-3.3.3-amzn-0.tgz
-
Export the
SPARK_HOMEenvironment variable, setting it to the root location extracted from the Spark archive. For example:For AWS Glue version 0.9:
export
                  SPARK_HOME=/home/$USER/spark-2.2.1-bin-hadoop2.7
For AWS Glue version 1.0 and 2.0:
export
                    SPARK_HOME=/home/$USER/spark-2.4.3-bin-spark-2.4.3-bin-hadoop2.8
For AWS Glue version 3.0:
export
                    SPARK_HOME=/home/$USER/spark-3.1.1-amzn-0-bin-3.2.1-amzn-3
For AWS Glue version 4.0:
export
                    SPARK_HOME=/home/$USER/spark-3.3.0-amzn-1-bin-3.3.3-amzn-0
Step 2: Configure your Maven project
Use the following pom.xml file as a template for your
AWS Glue Scala applications. It contains the required
dependencies, repositories, and plugins elements.
Replace the Glue version string with one of the following:
-
4.0.0for AWS Glue version 4.0 -
3.0.0for AWS Glue version 3.0 -
1.0.0for AWS Glue version 1.0 or 2.0 -
0.9.0for AWS Glue version 0.9
  <project xmlns="http://maven.apache.org/POM/4.0.0" xmlns:xsi="http://www.w3.org/2001/XMLSchema-instance" xsi:schemaLocation="http://maven.apache.org/POM/4.0.0 http://maven.apache.org/maven-v4_0_0.xsd">
    <modelVersion>4.0.0</modelVersion>
    <groupId>com.amazonaws</groupId>
    <artifactId>AWSGlueApp</artifactId>
    <version>1.0-SNAPSHOT</version>
    <name>${project.artifactId}</name>
    <description>AWS ETL application</description>

        <properties>
            <scala.version>2.11.1 for AWS Glue 2.0 or below, 2.12.7 for AWS Glue 3.0 and 4.0</scala.version>
            <glue.version>Glue version with three numbers (as mentioned earlier)</glue.version>
        </properties>
    <dependencies>
        <dependency>
            <groupId>org.scala-lang</groupId>
            <artifactId>scala-library</artifactId>
            <version>${scala.version}</version>
			<!-- A "provided" dependency, this will be ignored when you package your application -->
            <scope>provided</scope>
        </dependency>
        <dependency>
            <groupId>com.amazonaws</groupId>
            <artifactId>AWSGlueETL</artifactId>
			<version>${glue.version}</version>
            <!-- A "provided" dependency, this will be ignored when you package your application -->
            <scope>provided</scope>
        </dependency>
    </dependencies>

    <repositories>
        <repository>
            <id>aws-glue-etl-artifacts</id>
            <url>https://aws-glue-etl-artifacts.s3.amazonaws.com/release/</url>
        </repository>
    </repositories>
    <build>
        <sourceDirectory>src/main/scala</sourceDirectory>
        <plugins>
            <plugin>
                <!-- see http://davidb.github.com/scala-maven-plugin -->
                <groupId>net.alchim31.maven</groupId>
                <artifactId>scala-maven-plugin</artifactId>
                <version>3.4.0</version>
                <executions>
                    <execution>
                        <goals>
                            <goal>compile</goal>
                            <goal>testCompile</goal>
                        </goals>
                    </execution>
                </executions>
            </plugin>
            <plugin>
                <groupId>org.codehaus.mojo</groupId>
                <artifactId>exec-maven-plugin</artifactId>
                <version>1.6.0</version>
                <executions>
                    <execution>
                        <goals>
                        <goal>java</goal>
                        </goals>
                    </execution>
                </executions>
                <configuration>
                <systemProperties>
                    <systemProperty>
                        <key>spark.master</key>
                        <value>local[*]</value>
                    </systemProperty>
                    <systemProperty>
                        <key>spark.app.name</key>
                        <value>localrun</value>
                    </systemProperty>
                    <systemProperty>
                        <key>org.xerial.snappy.lib.name</key>
                        <value>libsnappyjava.jnilib</value>
                    </systemProperty>
                </systemProperties>
                </configuration>
            </plugin>
            <plugin>
                <groupId>org.apache.maven.plugins</groupId>
                <artifactId>maven-enforcer-plugin</artifactId>
                <version>3.0.0-M2</version>
                <executions>
                    <execution>
                        <id>enforce-maven</id>
                        <goals>
                            <goal>enforce</goal>
                        </goals>
                        <configuration>
                            <rules>
                                <requireMavenVersion>
                                    <version>3.5.3</version>
                                </requireMavenVersion>
                            </rules>
                        </configuration>
                    </execution>
                </executions>
            </plugin>
			<!-- The shade plugin will be helpful in building a uberjar or fatjar.
			You can use this jar in the AWS Glue runtime environment. For more information, see https://maven.apache.org/plugins/maven-shade-plugin/ -->
            <plugin>
                <groupId>org.apache.maven.plugins</groupId>
                <artifactId>maven-shade-plugin</artifactId>
                <version>3.2.4</version>
                <configuration>
                    <!-- any other shade configurations -->
                </configuration>
                <executions>
                    <execution>
                        <phase>package</phase>
                        <goals>
                            <goal>shade</goal>
                        </goals>
                    </execution>
                </executions>
            </plugin>
        </plugins>
    </build>
</project>
Running your Scala ETL script
Run the following command from the Maven project root directory to run your Scala ETL script.
mvn exec:java -Dexec.mainClass="mainClass" -Dexec.args="--JOB-NAMEjobName"
Replace mainClass with the fully qualified class name of the
script's main class. Replace jobName with the desired job
name.
Configuring a test environment
For examples of configuring a local test environment, see the following blog articles:
If you want to use development endpoints or notebooks for testing your ETL scripts, see Developing scripts using development endpoints.
Note
Development endpoints are not supported for use with AWS Glue version 2.0 jobs. For more information, see Running Spark ETL Jobs with Reduced Startup Times.
