Creating and building out a workflow manually in AWS Glue
You can use the AWS Glue console to manually create and build out a workflow one node at a time.
A workflow contains jobs, crawlers, and triggers. Before manually creating a workflow, create the jobs and crawlers that the workflow is to include. It's best to specify run-on-demand crawlers for workflows. You can create new triggers while you are building out your workflow, or you can clone existing triggers into the workflow. When you clone a trigger, all the catalog objects associated with the trigger—the jobs or crawlers that fire it and the jobs or crawlers that it starts—are added to the workflow.
Important
Limit the total number of jobs, crawlers, and triggers within a workflow to 100 or less. If you include more than 100, you might get errors when trying to resume or stop workflow runs.
You build out your workflow by adding triggers to the workflow graph, and defining the watched events and actions for each trigger. You begin with a start trigger, which can be either an on-demand or schedule trigger, and complete the graph by adding event (conditional) triggers.
Step 1: Create the workflow
Sign in to the AWS Management Console and open the AWS Glue console at https://console.aws.amazon.com/glue/
. -
In the navigation pane, under ETL, choose Workflows.
-
Choose Add workflow and complete the Add a new ETL workflow form.
Any optional default run properties that you add are made available as arguments to all jobs in the workflow. For more information, see Getting and setting workflow run properties in AWS Glue.
-
Choose Add workflow.
The new workflow appears in the list on the Workflows page.
Step 2: Add a start trigger
-
On the Workflows page, select your new workflow. Then, at the bottom of the page, ensure that the Graph tab is selected.
-
Choose Add trigger, and in the Add trigger dialog box, do one of the following:
-
Choose Clone existing, and choose a trigger to clone. Then choose Add.
The trigger appears on the graph, along with the jobs and crawlers that it watches and the jobs and crawlers that it starts.
If you mistakenly selected the wrong trigger, select the trigger on the graph, and then choose Remove.
-
Choose Add new, and complete the Add trigger form.
-
For Trigger type, select Schedule, On demand, or EventBridge event.
For trigger type Schedule, choose one of the Frequency options. Choose Custom to enter a
cronexpression.For trigger type EventBridge event, enter Number of events (batch size), and optionally enter Time delay (batch window). If you omit Time delay, the batch window defaults to 15 minutes. For more information, see Overview of workflows in AWS Glue.
-
Choose Add.
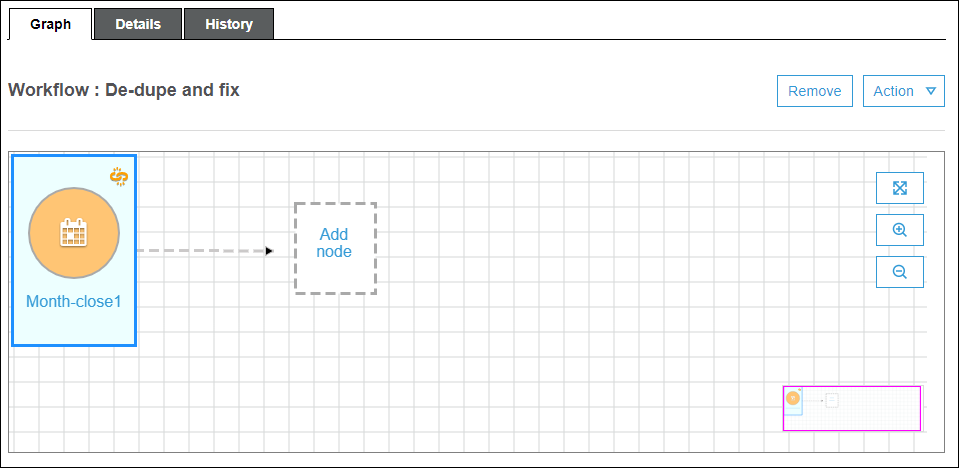
The trigger appears on the graph, along with a placeholder node (labeled Add node). In the example below, the start trigger is a schedule trigger named
Month-close1.At this point, the trigger isn't saved yet.
-
-
-
If you added a new trigger, complete these steps:
-
Do one of the following:
-
Choose the placeholder node (Add node).
-
Ensure that the start trigger is selected, and on the Action menu above the graph, choose Add jobs/crawlers to trigger.
-
-
In the Add jobs(s) and crawler(s) to trigger dialog box, select one or more jobs or crawlers, and then choose Add.
The trigger is saved, and the selected jobs or crawlers appear on the graph with connectors from the trigger.
If you mistakenly added the wrong jobs or crawlers, you can select either the trigger or a connector and choose Remove.
-
Step 3: Add more triggers
Continue to build out your workflow by adding more triggers of type Event. To zoom in or out or to enlarge the graph canvas, use the icons to the right of the graph. For each trigger to add, complete the following steps:
Note
There is no action to save the workflow. After you add your last trigger and assign actions to the trigger, the workflow is complete and saved. You can always come back later and add more nodes.
-
Do one of the following:
-
To clone an existing trigger, ensure that no node on the graph is selected, and on the Action menu, choose Add trigger.
-
To add a new trigger that watches a particular job or crawler on the graph, select the job or crawler node, and then choose the Add trigger placeholder node.
You can add more jobs or crawlers to watch for this trigger in a later step.
-
-
In the Add trigger dialog box, do one of the following:
-
Choose Add new, and complete the Add trigger form. Then choose Add.
The trigger appears on the graph. You will complete the trigger in a later step.
-
Choose Clone existing, and choose a trigger to clone. Then choose Add.
The trigger appears on the graph, along with the jobs and crawlers that it watches and the jobs and crawlers that it starts.
If you mistakenly chose the wrong trigger, select the trigger on the graph, and then choose Remove.
-
-
If you added a new trigger, complete these steps:
-
Select the new trigger.
As the following graph shows, the trigger
De-dupe/fix
                                succeeded
is selected, and placeholder nodes appear for (1) events to watch and (2) actions.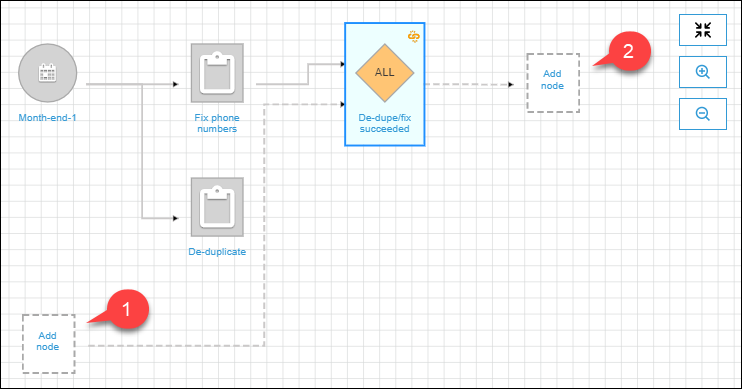
-
(Optional if the trigger already watches an event and you want to add more jobs or crawlers to watch.) Choose the events-to-watch placeholder node, and in the Add job(s) and crawler(s) to watch dialog box, select one or more jobs or crawlers. Choose an event to watch (SUCCEEDED, FAILED, etc.), and choose Add.
-
Ensure that the trigger is selected, and choose the actions placeholder node.
-
In the Add job(s) and crawler(s) to watch dialog box, select one or more jobs or crawlers, and choose Add.
The selected jobs and crawlers appear on the graph, with connectors from the trigger.
-
For more information on workflows and blueprints, see the following topics.
