Detect and process sensitive data
The Detect PII transform identifies Personal Identifiable Information (PII) in your data source. You choose the PII entity to identify, how you want the data to be scanned, and what to do with the PII entity that have been identified by the Detect PII transform.
The Detect PII transform provides the ability to detect, mask, or remove entities that you define, or are pre-defined by AWS. This enables you to increase compliance and reduce liability. For example, you may want to ensure that no personally identifiable information exists in your data that can be read and want to mask social security numbers with a fixed string (such as xxx-xx-xxxx), phone numbers, or addresses.
To work with sensitive data outside of AWS Glue Studio, see Using Sensitive Data Detection outside AWS Glue Studio
Topics
Choosing how you want the data to be scanned
When you scan your dataset for sensitive data like personally identifiable information (PII), you can choose to detect PII in each row or detect the columns that contain PII data.
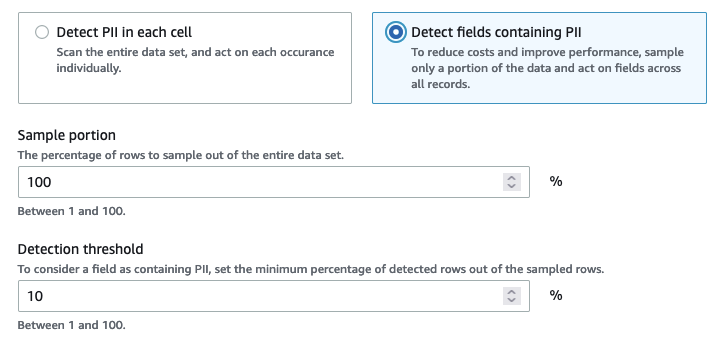
When you choose Detect PII in each cell, you’re choosing to scan all rows in the data source. This is a comprehensive scan to ensure that PII entities are identified.
When you choose Detect fields containing PII, you’re choosing to scan a sample of rows for PII entities. This is a way to keep costs and resources low while also identifying the fields where PII entities are found.
When you choose to detect fields that contain PII, you can reduce costs and improve performance by sampling a portion of rows. Choosing this option will allow you to specify additional options:
-
Sample portion: This allows you to specify the percentage of rows to sample. For example, if you enter ‘50’, you’re specifying that you want 50 percent of scanned rows for the PII entity.
-
Detection threshold: This allows you to specify the percentage of rows that contain the PII entity in order for the entire column to be identified as having the PII entity. For example, if you enter ‘10’, you’re specifying that the number of the PII entity, US Phone, in the rows that are scanned must be 10 percent or greater in order for the field to be identified as having the PII entity, US Phone. If the percentage of rows that contain the PII entity is less than 10 percent, that field will not be labeled as having the PII entity, US Phone, in it.
Choosing the PII entities to detect
If you chose Detect PII in each cell, you can choose from one of three options:
-
All available PII patterns - this includes AWS entities.
-
Select categories - when you select categories, PII patterns will automatically include patterns in the categories that you select.
-
Select specific patterns - Only the patterns that you select will be detected.
For a full list of managed sensitive data types, see Managed data types.
Choose from all available PII patterns
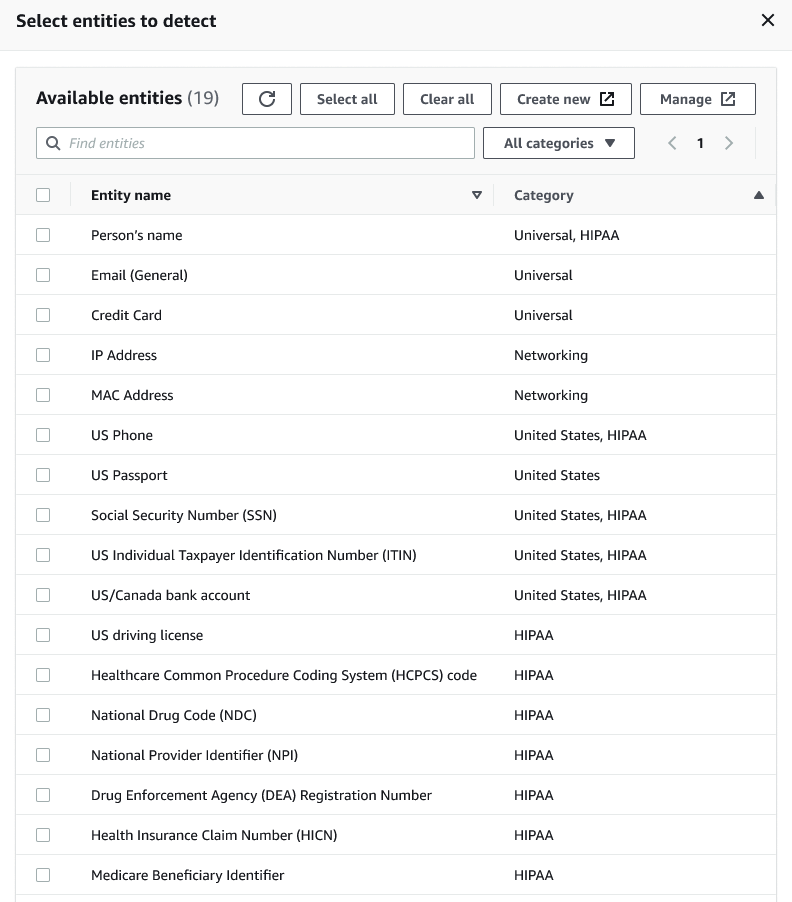
If you choose All available PII patterns, select entities pre-defined by AWS. You can select one, more than one, or all entities.
Select categories
If you chose Select categories as the PII patterns to detect, you can select from the options in the drop-down menu. Note that some entities can belong to more than one category. For example, Person's name is an entity that belongs to the Universal and HIPAA categories.
-
Universal (examples: Email, Credit Card)
-
HIPAA (examples: US Driving License, Healthcare Common Procedure Coding System (HCPCS) code)
-
Networking (examples: IP Address, MAC Address)
Argentina
Australia
Austria
Belgium
Bosnia
Bulgaria
Canada
Chile
Colombia
Croatia
Cyprus
Czechia
Denmark
Estonia
Finland
France
Germany
Greece
Hungary
Ireland
Korea
Japan
Mexico
Netherlands
New Zealand
Norway
Portugal
Romania
Singapore
Slovakia
Slovenia
Spain
Sweden
Switzerland
Turkey
Ukraine
United States
United Kingdom
Venezuela
Select specific patterns
If you choose Select specific patterns as the PII patterns to detect, you can search or browse from a list of patterns you've already created, or create a new detection entity pattern.
The steps below describe how to create a new custom pattern for detecting sensitive data. You will create the custom pattern by entering a name for the custom pattern, add a regular expression, and optionally, define context words.
-
To create a new pattern, click the Create new button.

-
In the Create detection entity page, enter the entity name and a regular expression. The regular expression (Regex) is what AWS Glue will use to match entities.
-
Click Validate. If the validation is successful, you will see a confirmation message stating that the string is a valid regular expression. If the validation is not successful, you will see a message stating that the string does not conform to proper formatting and accepted character literals, operators or constructs.
-
You can choose to add Context words in addition to the regular expression. Context words may increase the likelihood of a match. These can be useful in cases where field names are not descriptive of the entity. For example, social security numbers may be named 'SSN' or 'SS'. Adding these context words can help match the entity.
-
Click Create to create the detection entity. Any created entities are visible in the AWS Glue Studio console. Click on Detection entities in the left-hand navigation menu.
You can edit, delete, or create detection entities from the Detection entities page. You can also search for a pattern using the search field.
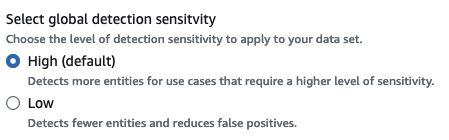
Specifying the level of detection sensitivity
You can set the level of sensitivity when using detecting sensitive data.
-
High – (Default) Detects more entities for use cases that require a higher level of sensitivity. All AWS Glue jobs created after November 2023 are automatically opted-in to this setting.
-
Low – Detects fewer entities and reduces false positives.
Choosing what to do with identified PII data
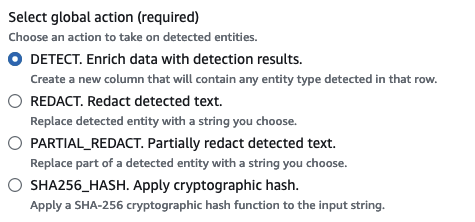
If you chose to detect PII in the entire data source, you can select a global action to apply:
-
Enrich data with detection results: If you chose Detect PII in each cell, you can store the detected entities into a new column.
-
Redact detected text: You can replace the detected PII value with a string that you specify in the optional Replacing text input field. If no string is specified, the detected PII entity is replaced with '*******'.
-
Partially redact detected text: You can replace part of the detected PII value with a string you choose. There are two possible options: to either leave the ends unmasked or to mask by providing an explicit regex pattern. This feature is not available in AWS Glue 2.0.
-
Apply cryptographic hash: You can pass the detected PII value to a SHA-256 cryptographic hash function and replace the value with the function’s output.
Differences between AWS Glue versions 2.0 and 3.0+
AWS Glue 2.0 jobs will return a new DataFrame with the detected PII information for each column in a supplementary column. Any redaction or hash work is visible within the AWS Glue script in the visual tab.
AWS Glue 3.0 and 4.0 jobs will return a new DataFrame with this same supplementary column. A new key
for “actionUsed” is present and can be one of DETECT, REDACT, PARTIAL_REDACT,
or SHA256_HASH.
If a masking action is selected, the DataFrame will return data with sensitive data masked.
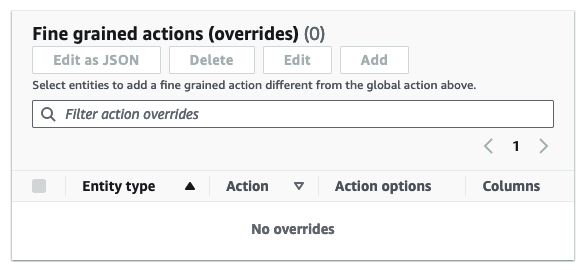
Adding fine-grained action overrides
Additional detection and action settings can be added to the fine-grained actions overrides table. This allows you to:
-
Include or exclude certain columns from detection – An inferred schema on the data source will populate the table with available columns.
-
Specify specific settings that are more fine-grained than using global actions – For example, you can specify different redaction text settings for different entity types.
-
Specify a different action than the global action – If a different action wants to be applied on a different sensitive data type, that can be done here. Note that two different edit-in-place actions (redaction and hashing) cannot be used on the same column, but detect can always be used.