Terjemahan disediakan oleh mesin penerjemah. Jika konten terjemahan yang diberikan bertentangan dengan versi bahasa Inggris aslinya, utamakan versi bahasa Inggris.
Publikasikan & Berlangganan dengan IVS Android Broadcast SDK
Bagian ini akan membawa Anda melalui langkah-langkah yang terlibat dalam menerbitkan dan berlangganan ke panggung menggunakan aplikasi Android Anda.
Buat Tampilan
Kita mulai dengan membuat tata letak sederhana untuk aplikasi kita menggunakan activity_main.xml file yang dibuat secara otomatis. Layout berisi EditText to add a token, JoinButton, a TextView to show the stage state, dan CheckBox to toggle publishing.
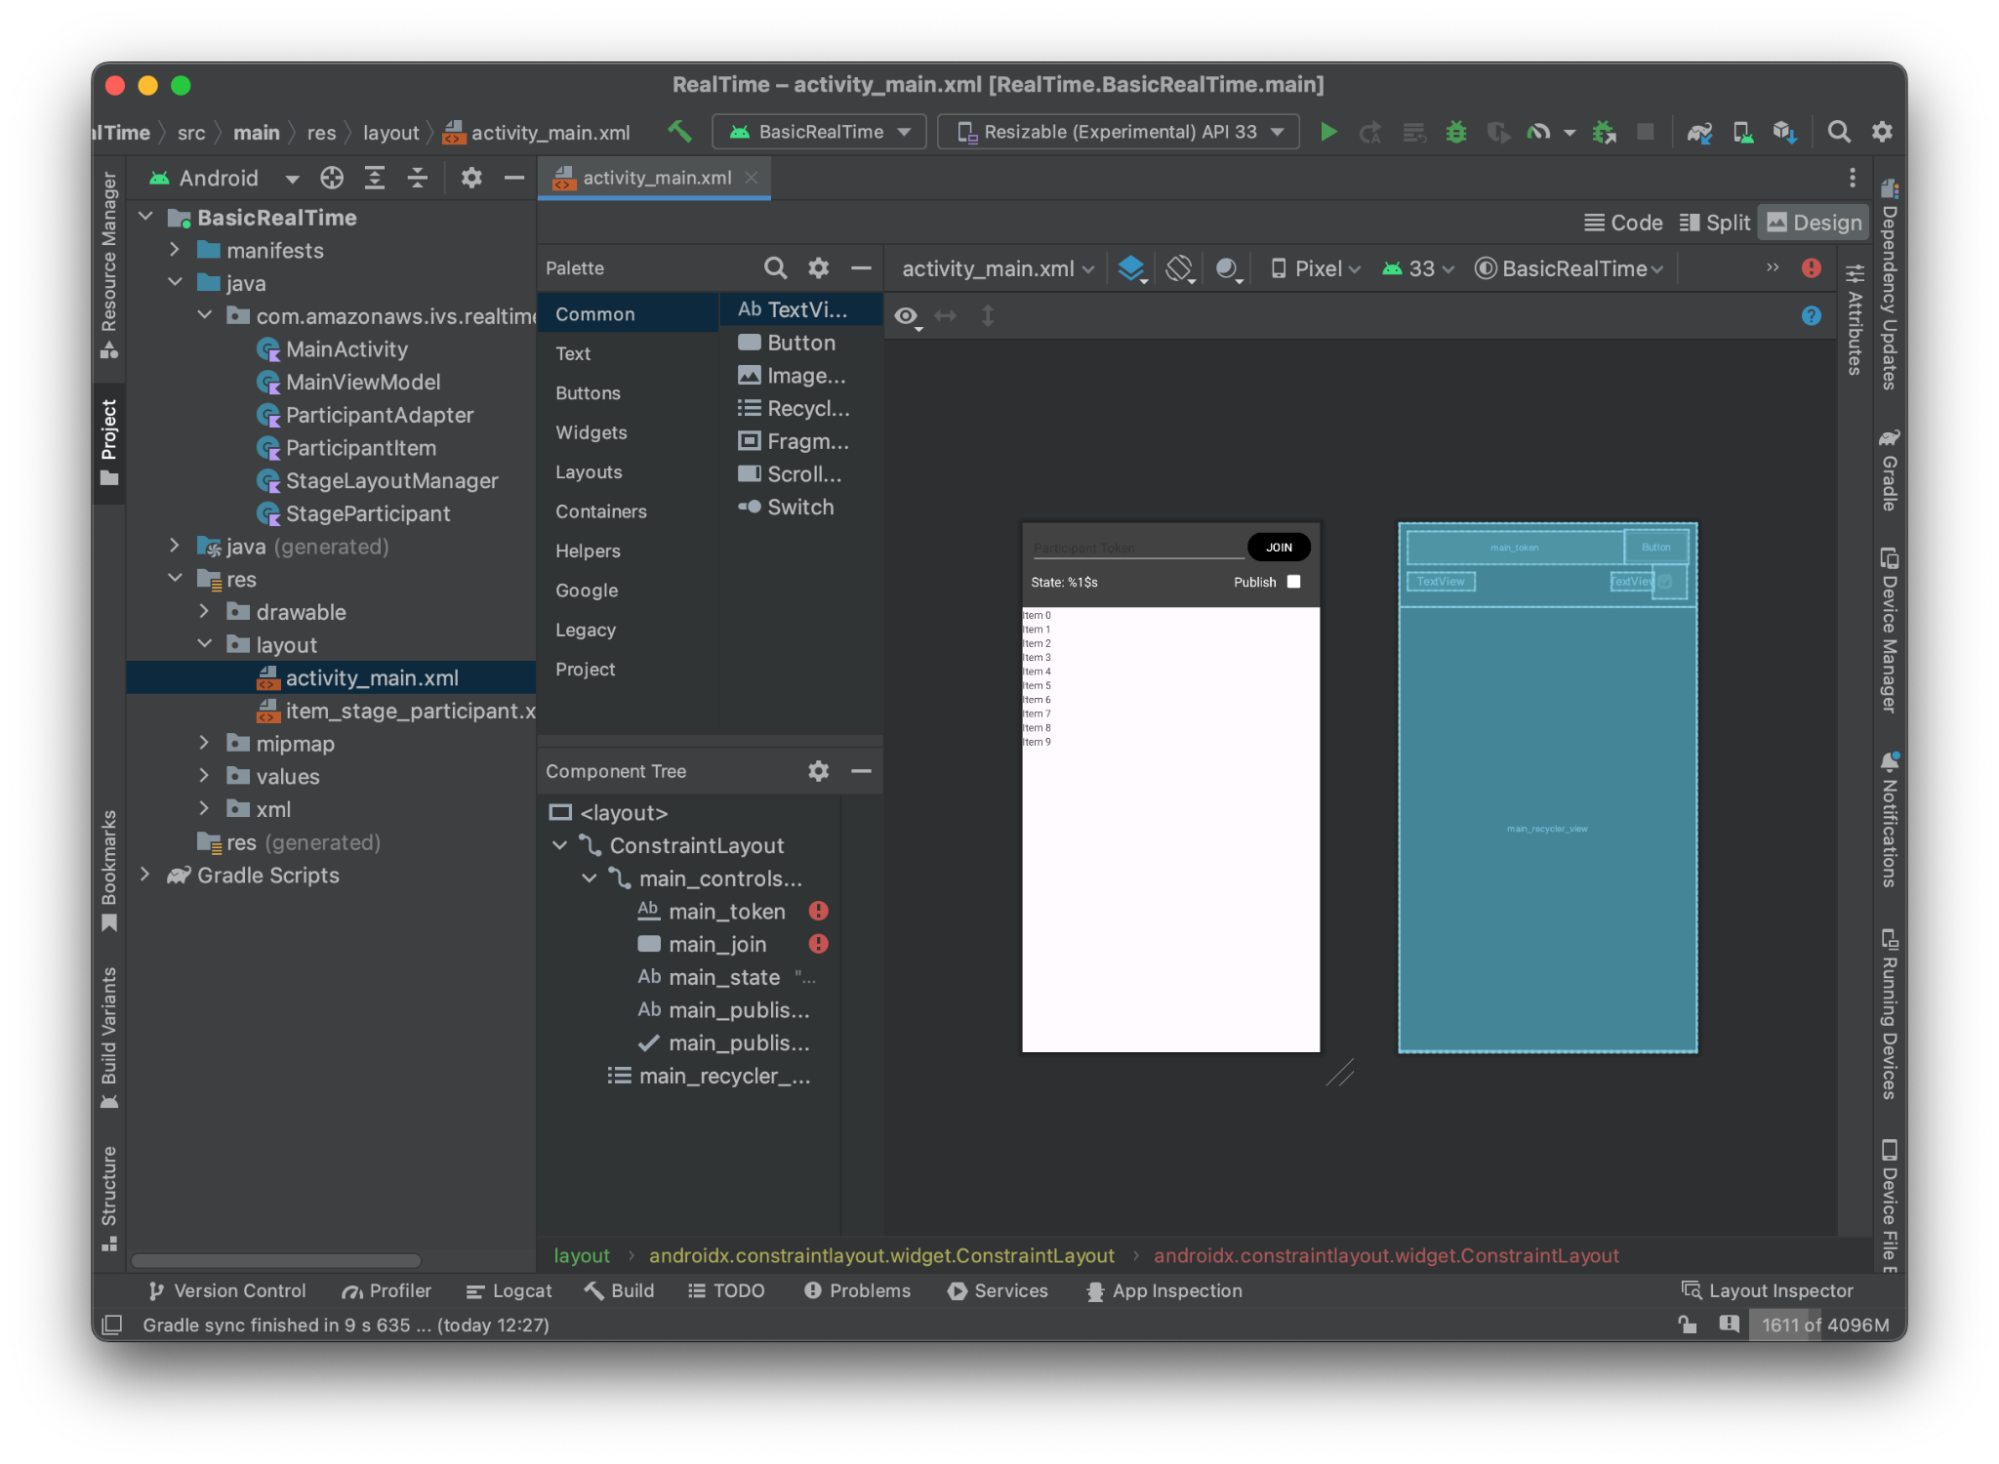
Berikut adalah XHTML di belakang tampilan:
<?xml version="1.0" encoding="utf-8"?>
<layout xmlns:android="http://schemas.android.com/apk/res/android"
    xmlns:app="http://schemas.android.com/apk/res-auto"
    xmlns:tools="http://schemas.android.com/tools">

    <androidx.constraintlayout.widget.ConstraintLayout
        android:keepScreenOn="true"
        android:layout_width="match_parent"
        android:layout_height="match_parent"
        tools:context=".BasicActivity">

        <androidx.constraintlayout.widget.ConstraintLayout
            android:id="@+id/main_controls_container"
            android:layout_width="match_parent"
            android:layout_height="wrap_content"
            android:background="@color/cardview_dark_background"
            android:padding="12dp"
            app:layout_constraintTop_toTopOf="parent">

            <EditText
                android:id="@+id/main_token"
                android:layout_width="0dp"
                android:layout_height="wrap_content"
                android:autofillHints="@null"
                android:backgroundTint="@color/white"
                android:hint="@string/token"
                android:imeOptions="actionDone"
                android:inputType="text"
                android:textColor="@color/white"
                app:layout_constraintEnd_toStartOf="@id/main_join"
                app:layout_constraintStart_toStartOf="parent"
                app:layout_constraintTop_toTopOf="parent" />

            <Button
                android:id="@+id/main_join"
                android:layout_width="wrap_content"
                android:layout_height="wrap_content"
                android:backgroundTint="@color/black"
                android:text="@string/join"
                android:textAllCaps="true"
                android:textColor="@color/white"
                android:textSize="16sp"
                app:layout_constraintBottom_toBottomOf="@+id/main_token"
                app:layout_constraintEnd_toEndOf="parent"
                app:layout_constraintStart_toEndOf="@id/main_token" />

            <TextView
                android:id="@+id/main_state"
                android:layout_width="wrap_content"
                android:layout_height="wrap_content"
                android:text="@string/state"
                android:textColor="@color/white"
                android:textSize="18sp"
                app:layout_constraintBottom_toBottomOf="parent"
                app:layout_constraintStart_toStartOf="parent"
                app:layout_constraintTop_toBottomOf="@id/main_token" />

            <TextView
                android:id="@+id/main_publish_text"
                android:layout_width="wrap_content"
                android:layout_height="wrap_content"
                android:text="@string/publish"
                android:textColor="@color/white"
                android:textSize="18sp"
                app:layout_constraintBottom_toBottomOf="parent"
                app:layout_constraintEnd_toStartOf="@id/main_publish_checkbox"
                app:layout_constraintTop_toBottomOf="@id/main_token" />

            <CheckBox
                android:id="@+id/main_publish_checkbox"
                android:layout_width="wrap_content"
                android:layout_height="wrap_content"
                android:buttonTint="@color/white"
                android:checked="true"
                app:layout_constraintBottom_toBottomOf="@id/main_publish_text"
                app:layout_constraintEnd_toEndOf="parent"
                app:layout_constraintTop_toTopOf="@id/main_publish_text" />

        </androidx.constraintlayout.widget.ConstraintLayout>

        <androidx.recyclerview.widget.RecyclerView
            android:id="@+id/main_recycler_view"
            android:layout_width="match_parent"
            android:layout_height="0dp"
            app:layout_constraintTop_toBottomOf="@+id/main_controls_container"
            app:layout_constraintBottom_toBottomOf="parent" />

    </androidx.constraintlayout.widget.ConstraintLayout>
<layout>
Kami mereferensikan beberapa string IDs di sini, jadi kami akan membuat seluruh strings.xml file kami sekarang:
<resources>
    <string name="app_name">BasicRealTime</string>
    <string name="join">Join</string>
    <string name="leave">Leave</string>
    <string name="token">Participant Token</string>
    <string name="publish">Publish</string>
    <string name="state">State: %1$s</string>
</resources>
Mari kita tautkan pandangan tersebut di XHTML ke: MainActivity.kt
import android.widget.Button
import android.widget.CheckBox
import android.widget.EditText
import android.widget.TextView
import androidx.recyclerview.widget.RecyclerView

private lateinit var checkboxPublish: CheckBox
private lateinit var recyclerView: RecyclerView
private lateinit var buttonJoin: Button
private lateinit var textViewState: TextView
private lateinit var editTextToken: EditText

override fun onCreate(savedInstanceState: Bundle?) {
    super.onCreate(savedInstanceState)
    setContentView(R.layout.activity_main)

    checkboxPublish = findViewById(R.id.main_publish_checkbox)
    recyclerView = findViewById(R.id.main_recycler_view)
    buttonJoin = findViewById(R.id.main_join)
    textViewState = findViewById(R.id.main_state)
    editTextToken = findViewById(R.id.main_token)
}
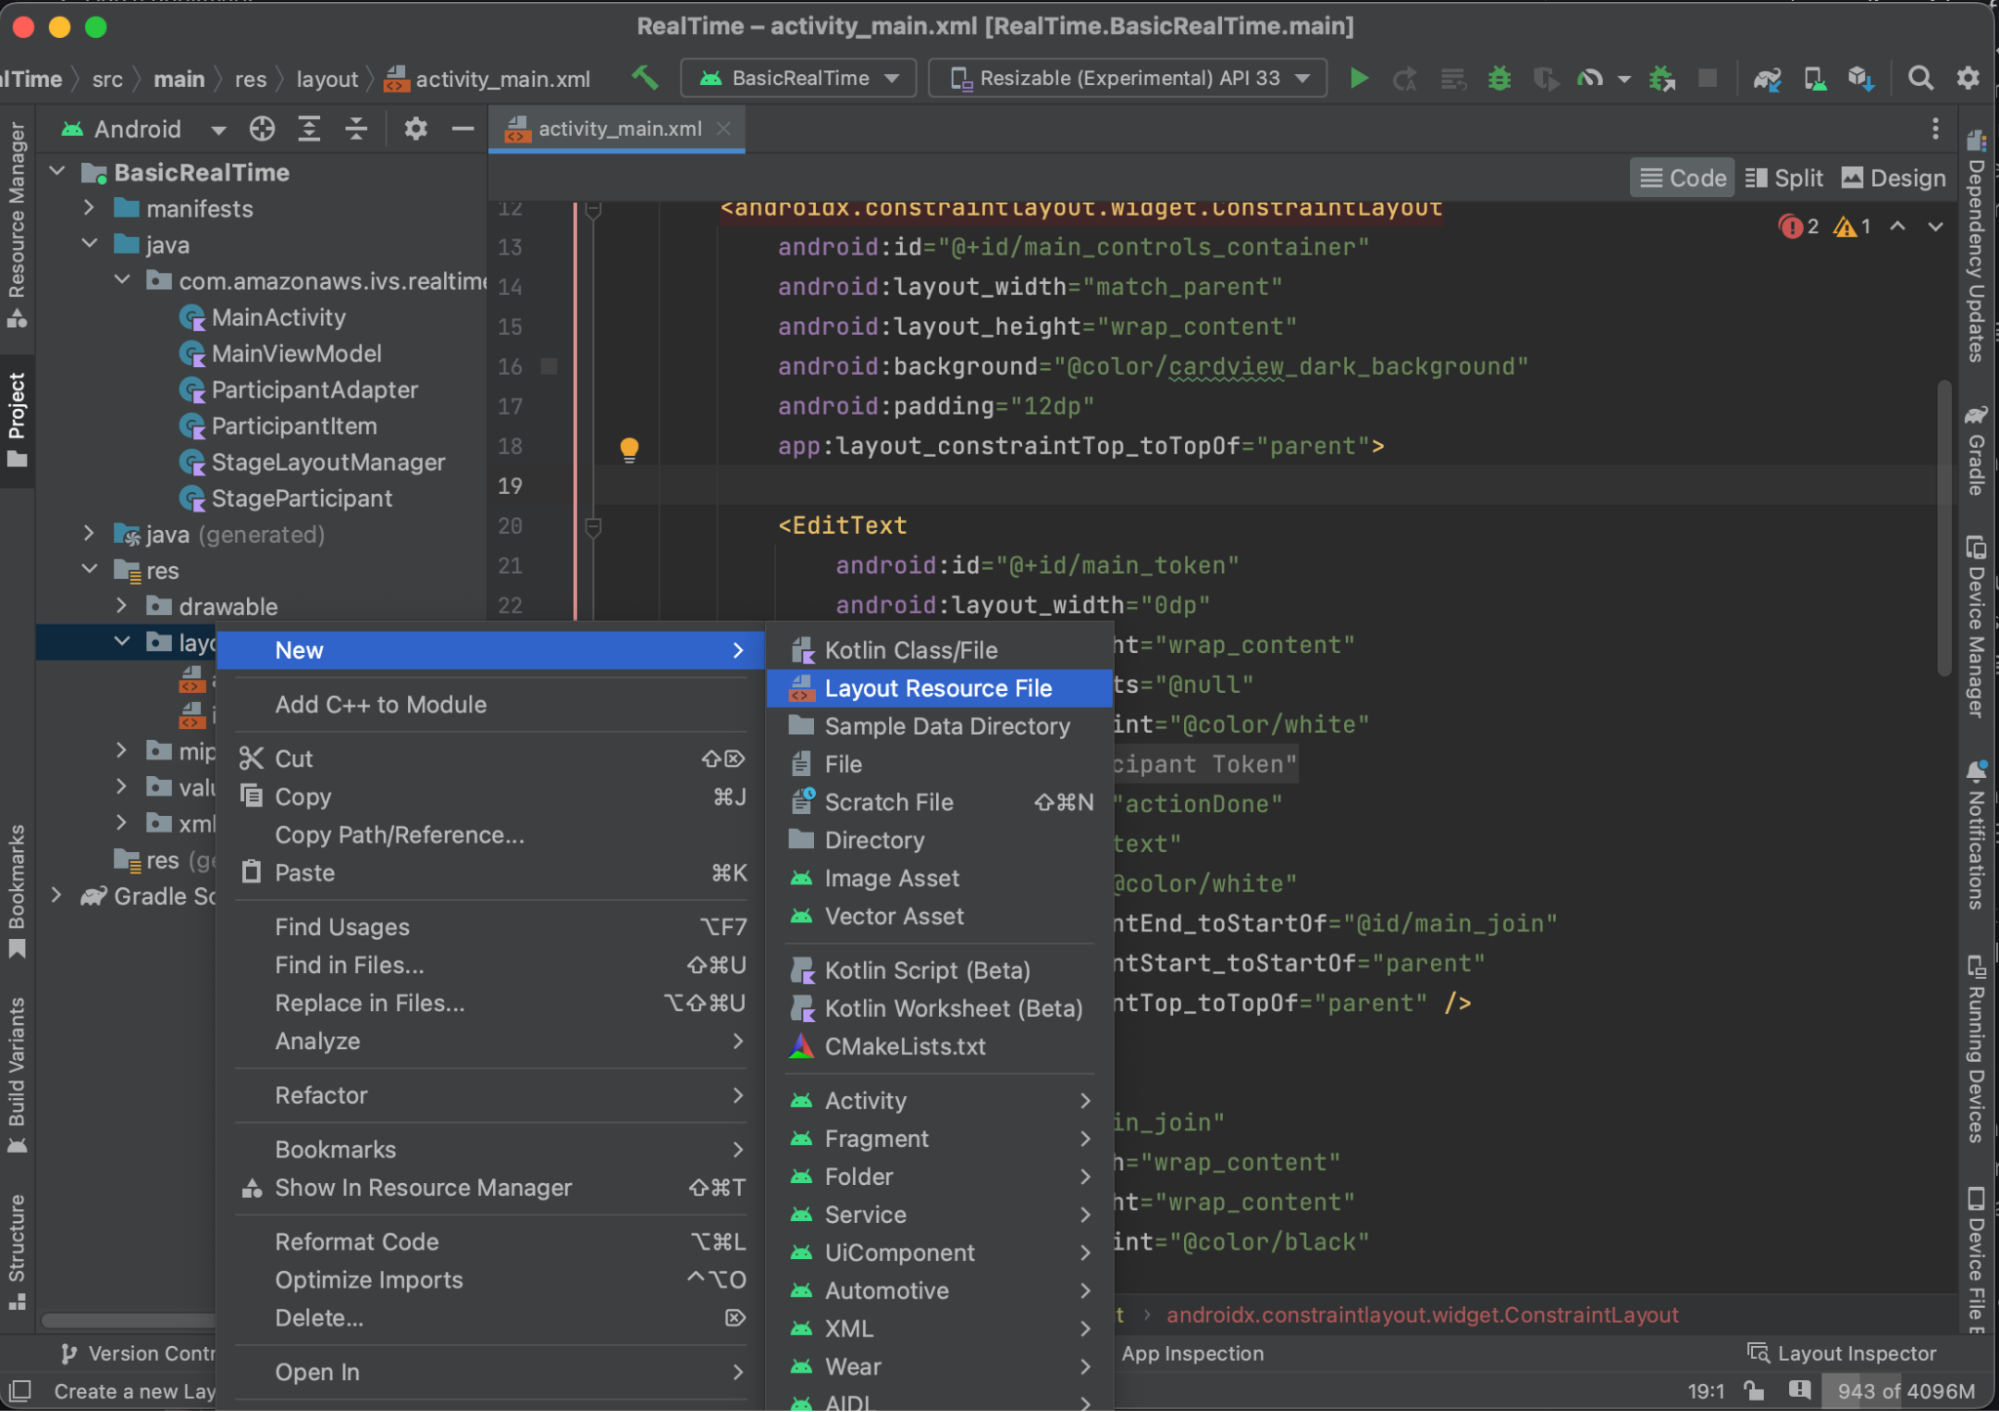
Sekarang kita membuat tampilan item untuk kitaRecyclerView. Untuk melakukan ini, klik kanan res/layout direktori Anda dan pilih New > Layout Resource File. Beri nama file baru iniitem_stage_participant.xml.
Tata letak untuk item ini sederhana: berisi tampilan untuk merender aliran video peserta dan daftar label untuk menampilkan informasi tentang peserta:

Berikut adalah XML-nya:
<?xml version="1.0" encoding="utf-8"?>
<com.amazonaws.ivs.realtime.basicrealtime.ParticipantItem xmlns:android="http://schemas.android.com/apk/res/android"
    xmlns:app="http://schemas.android.com/apk/res-auto"
    xmlns:tools="http://schemas.android.com/tools"
    android:layout_width="match_parent"
    android:layout_height="match_parent">

    <FrameLayout
        android:id="@+id/participant_preview_container"
        android:layout_width="match_parent"
        android:layout_height="match_parent"
        tools:background="@android:color/darker_gray" />

    <LinearLayout
        android:layout_width="wrap_content"
        android:layout_height="wrap_content"
        android:layout_marginStart="8dp"
        android:layout_marginTop="8dp"
        android:background="#50000000"
        android:orientation="vertical"
        android:paddingLeft="4dp"
        android:paddingTop="2dp"
        android:paddingRight="4dp"
        android:paddingBottom="2dp"
        app:layout_constraintStart_toStartOf="parent"
        app:layout_constraintTop_toTopOf="parent">

        <TextView
            android:id="@+id/participant_participant_id"
            android:layout_width="wrap_content"
            android:layout_height="wrap_content"
            android:textColor="@android:color/white"
            android:textSize="16sp"
            tools:text="You (Disconnected)" />

        <TextView
            android:id="@+id/participant_publishing"
            android:layout_width="wrap_content"
            android:layout_height="wrap_content"
            android:textColor="@android:color/white"
            android:textSize="16sp"
            tools:text="NOT_PUBLISHED" />

        <TextView
            android:id="@+id/participant_subscribed"
            android:layout_width="wrap_content"
            android:layout_height="wrap_content"
            android:textColor="@android:color/white"
            android:textSize="16sp"
            tools:text="NOT_SUBSCRIBED" />

        <TextView
            android:id="@+id/participant_video_muted"
            android:layout_width="wrap_content"
            android:layout_height="wrap_content"
            android:textColor="@android:color/white"
            android:textSize="16sp"
            tools:text="Video Muted: false" />

        <TextView
            android:id="@+id/participant_audio_muted"
            android:layout_width="wrap_content"
            android:layout_height="wrap_content"
            android:textColor="@android:color/white"
            android:textSize="16sp"
            tools:text="Audio Muted: false" />

        <TextView
            android:id="@+id/participant_audio_level"
            android:layout_width="wrap_content"
            android:layout_height="wrap_content"
            android:textColor="@android:color/white"
            android:textSize="16sp"
            tools:text="Audio Level: -100 dB" />

    </LinearLayout>

</com.amazonaws.ivs.realtime.basicrealtime.ParticipantItem>
File XHTML ini mengembang kelas yang belum kita buat,. ParticipantItem Karena XHTML menyertakan namespace lengkap, pastikan untuk memperbarui file XHTML ini ke namespace Anda. Mari kita buat kelas ini dan atur tampilan, tetapi biarkan kosong untuk saat ini.
Buat class Kotlin baru,ParticipantItem:
package com.amazonaws.ivs.realtime.basicrealtime

import android.content.Context
import android.util.AttributeSet
import android.widget.FrameLayout
import android.widget.TextView
import kotlin.math.roundToInt

class ParticipantItem @JvmOverloads constructor(
    context: Context,
    attrs: AttributeSet? = null,
    defStyleAttr: Int = 0,
    defStyleRes: Int = 0,
) : FrameLayout(context, attrs, defStyleAttr, defStyleRes) {

    private lateinit var previewContainer: FrameLayout
    private lateinit var textViewParticipantId: TextView
    private lateinit var textViewPublish: TextView
    private lateinit var textViewSubscribe: TextView
    private lateinit var textViewVideoMuted: TextView
    private lateinit var textViewAudioMuted: TextView
    private lateinit var textViewAudioLevel: TextView

    override fun onFinishInflate() {
        super.onFinishInflate()
        previewContainer = findViewById(R.id.participant_preview_container)
        textViewParticipantId = findViewById(R.id.participant_participant_id)
        textViewPublish = findViewById(R.id.participant_publishing)
        textViewSubscribe = findViewById(R.id.participant_subscribed)
        textViewVideoMuted = findViewById(R.id.participant_video_muted)
        textViewAudioMuted = findViewById(R.id.participant_audio_muted)
        textViewAudioLevel = findViewById(R.id.participant_audio_level)
    }
}
Izin
Untuk menggunakan kamera dan mikrofon, Anda perlu meminta izin dari pengguna. Kami mengikuti alur izin standar untuk ini:
override fun onStart() {
    super.onStart()
    requestPermission()
}

private val requestPermissionLauncher =
    registerForActivityResult(ActivityResultContracts.RequestMultiplePermissions()) { permissions ->
        if (permissions[Manifest.permission.CAMERA] == true && permissions[Manifest.permission.RECORD_AUDIO] == true) {
            viewModel.permissionGranted() // we will add this later
        }
    }

private val permissions = listOf(
    Manifest.permission.CAMERA,
    Manifest.permission.RECORD_AUDIO,
)

private fun requestPermission() {
    when {
        this.hasPermissions(permissions) -> viewModel.permissionGranted() // we will add this later
        else -> requestPermissionLauncher.launch(permissions.toTypedArray())
    }
}

private fun Context.hasPermissions(permissions: List<String>): Boolean {
    return permissions.all {
        ContextCompat.checkSelfPermission(this, it) == PackageManager.PERMISSION_GRANTED
    }
}
Status Aplikasi
Aplikasi kami melacak peserta secara lokal di a MainViewModel.kt dan status akan dikomunikasikan kembali ke MainActivity penggunaan Kotlin. StateFlow
Buat class MainViewModel Kotlin baru:
package com.amazonaws.ivs.realtime.basicrealtime

import android.app.Application
import androidx.lifecycle.AndroidViewModel

class MainViewModel(application: Application) : AndroidViewModel(application), Stage.Strategy, StageRenderer {

}
Dalam MainActivity.kt kami mengelola model tampilan kami:
import androidx.activity.viewModels

private val viewModel: MainViewModel by viewModels()
Untuk menggunakan AndroidViewModel dan ViewModel ekstensi Kotlin ini, Anda harus menambahkan yang berikut ini ke build.gradle file modul Anda:
implementation 'androidx.core:core-ktx:1.10.1'
implementation "androidx.activity:activity-ktx:1.7.2"
implementation 'androidx.appcompat:appcompat:1.6.1'
implementation 'com.google.android.material:material:1.10.0'
implementation "androidx.lifecycle:lifecycle-extensions:2.2.0"

def lifecycle_version = "2.6.1"
implementation "androidx.lifecycle:lifecycle-livedata-ktx:$lifecycle_version"
implementation "androidx.lifecycle:lifecycle-viewmodel-ktx:$lifecycle_version"
implementation 'androidx.constraintlayout:constraintlayout:2.1.4'
RecyclerView Adaptor
Kami akan membuat RecyclerView.Adapter subclass sederhana untuk melacak peserta kami dan memperbarui acara RecyclerView di atas panggung kami. Tapi pertama-tama, kita membutuhkan kelas yang mewakili peserta. Buat class StageParticipant Kotlin baru:
package com.amazonaws.ivs.realtime.basicrealtime

import com.amazonaws.ivs.broadcast.Stage
import com.amazonaws.ivs.broadcast.StageStream

class StageParticipant(val isLocal: Boolean, var participantId: String?) {
    var publishState = Stage.PublishState.NOT_PUBLISHED
    var subscribeState = Stage.SubscribeState.NOT_SUBSCRIBED
    var streams = mutableListOf<StageStream>()

    val stableID: String
        get() {
            return if (isLocal) {
                "LocalUser"
            } else {
                requireNotNull(participantId)
            }
        }
}
Kita akan menggunakan kelas ini di ParticipantAdapter kelas yang akan kita buat selanjutnya. Kita mulai dengan mendefinisikan kelas dan membuat variabel untuk melacak peserta:
package com.amazonaws.ivs.realtime.basicrealtime

import android.view.LayoutInflater
import android.view.ViewGroup
import androidx.recyclerview.widget.RecyclerView

class ParticipantAdapter : RecyclerView.Adapter<ParticipantAdapter.ViewHolder>() {

    private val participants = mutableListOf<StageParticipant>()
Kita juga harus mendefinisikan kita RecyclerView.ViewHolder sebelum menerapkan sisa penggantian:
class ViewHolder(val participantItem: ParticipantItem) : RecyclerView.ViewHolder(participantItem)
Dengan menggunakan ini, kita dapat menerapkan RecyclerView.Adapter penggantian standar:
override fun onCreateViewHolder(parent: ViewGroup, viewType: Int): ViewHolder {
    val item = LayoutInflater.from(parent.context)
        .inflate(R.layout.item_stage_participant, parent, false) as ParticipantItem
    return ViewHolder(item)
}

override fun getItemCount(): Int {
    return participants.size
}

override fun getItemId(position: Int): Long =
    participants[position]
        .stableID
        .hashCode()
        .toLong()

override fun onBindViewHolder(holder: ViewHolder, position: Int) {
    return holder.participantItem.bind(participants[position])
}

override fun onBindViewHolder(holder: ViewHolder, position: Int, payloads: MutableList<Any>) {
    val updates = payloads.filterIsInstance<StageParticipant>()
    if (updates.isNotEmpty()) {
        updates.forEach { holder.participantItem.bind(it) // implemented later }
    } else {
        super.onBindViewHolder(holder, position, payloads)
    }
}
Akhirnya, kami menambahkan metode baru yang akan kami panggil dari kami MainViewModel ketika perubahan pada peserta dilakukan. Metode ini adalah operasi CRUD standar pada adaptor.
fun participantJoined(participant: StageParticipant) {
    participants.add(participant)
    notifyItemInserted(participants.size - 1)
}

fun participantLeft(participantId: String) {
    val index = participants.indexOfFirst { it.participantId == participantId }
    if (index != -1) {
        participants.removeAt(index)
        notifyItemRemoved(index)
    }
}

fun participantUpdated(participantId: String?, update: (participant: StageParticipant) -> Unit) {
    val index = participants.indexOfFirst { it.participantId == participantId }
    if (index != -1) {
        update(participants[index])
        notifyItemChanged(index, participants[index])
    }
}
Kembali MainViewModel kita perlu membuat dan menahan referensi ke adaptor ini:
internal val participantAdapter = ParticipantAdapter()
Status Panggung
Kita juga perlu melacak beberapa status tahap di dalamnyaMainViewModel. Mari kita definisikan properti itu sekarang:
private val _connectionState = MutableStateFlow(Stage.ConnectionState.DISCONNECTED)
val connectionState = _connectionState.asStateFlow()

private var publishEnabled: Boolean = false
    set(value) {
        field = value
        // Because the strategy returns the value of `checkboxPublish.isChecked`, just call `refreshStrategy`.
        stage?.refreshStrategy()
    }

private var deviceDiscovery: DeviceDiscovery? = null
private var stage: Stage? = null
private var streams = mutableListOf<LocalStageStream>()
Untuk melihat pratinjau Anda sendiri sebelum bergabung dengan panggung, kami segera membuat peserta lokal:
init {
    deviceDiscovery = DeviceDiscovery(application)

    // Create a local participant immediately to render our camera preview and microphone stats
    val localParticipant = StageParticipant(true, null)
    participantAdapter.participantJoined(localParticipant)
}
Kami ingin memastikan kami membersihkan sumber daya ini ketika kami ViewModel dibersihkan. Kami onCleared() segera mengganti, jadi kami tidak lupa untuk membersihkan sumber daya ini.
override fun onCleared() {
    stage?.release()
    deviceDiscovery?.release()
    deviceDiscovery = null
    super.onCleared()
}
Sekarang kita mengisi streams properti lokal kita segera setelah izin diberikan, menerapkan permissionsGranted metode yang kita sebut sebelumnya:
internal fun permissionGranted() {
    val deviceDiscovery = deviceDiscovery ?: return
    streams.clear()
    val devices = deviceDiscovery.listLocalDevices()
    // Camera
    devices
        .filter { it.descriptor.type == Device.Descriptor.DeviceType.CAMERA }
        .maxByOrNull { it.descriptor.position == Device.Descriptor.Position.FRONT }
        ?.let { streams.add(ImageLocalStageStream(it)) }
    // Microphone
    devices
        .filter { it.descriptor.type == Device.Descriptor.DeviceType.MICROPHONE }
        .maxByOrNull { it.descriptor.isDefault }
        ?.let { streams.add(AudioLocalStageStream(it)) }

    stage?.refreshStrategy()

    // Update our local participant with these new streams
    participantAdapter.participantUpdated(null) {
        it.streams.clear()
        it.streams.addAll(streams)
    }
}
Menerapkan Stage SDK
Tiga konsep inti mendasari fungsionalitas real-time: panggung, strategi, dan penyaji. Tujuan desain adalah meminimalkan jumlah logika sisi klien yang diperlukan untuk membangun produk yang berfungsi.
Tahap.Strategi
Stage.StrategyImplementasi kami sederhana:
override fun stageStreamsToPublishForParticipant(
    stage: Stage,
    participantInfo: ParticipantInfo
): MutableList<LocalStageStream> {
    // Return the camera and microphone to be published.
    // This is only called if `shouldPublishFromParticipant` returns true.
    return streams
}

override fun shouldPublishFromParticipant(stage: Stage, participantInfo: ParticipantInfo): Boolean {
    return publishEnabled
}

override fun shouldSubscribeToParticipant(stage: Stage, participantInfo: ParticipantInfo): Stage.SubscribeType {
    // Subscribe to both audio and video for all publishing participants.
    return Stage.SubscribeType.AUDIO_VIDEO
}
Untuk meringkas, kami menerbitkan berdasarkan publishEnabled keadaan internal kami, dan jika kami mempublikasikan, kami akan mempublikasikan aliran yang kami kumpulkan sebelumnya. Akhirnya untuk sampel ini, kami selalu berlangganan peserta lain, menerima audio dan video mereka.
StageRenderer
StageRendererImplementasinya juga cukup sederhana, meskipun mengingat jumlah fungsi yang berisi lebih banyak kode. Pendekatan umum dalam penyaji ini adalah memperbarui ParticipantAdapter saat SDK memberi tahu kami tentang perubahan pada peserta. Ada skenario tertentu di mana kami menangani peserta lokal secara berbeda, karena kami telah memutuskan untuk mengelolanya sendiri sehingga mereka dapat melihat pratinjau kamera mereka sebelum bergabung.
override fun onError(exception: BroadcastException) {
    Toast.makeText(getApplication(), "onError ${exception.localizedMessage}", Toast.LENGTH_LONG).show()
    Log.e("BasicRealTime", "onError $exception")
}

override fun onConnectionStateChanged(
    stage: Stage,
    connectionState: Stage.ConnectionState,
    exception: BroadcastException?
) {
    _connectionState.value = connectionState
}

override fun onParticipantJoined(stage: Stage, participantInfo: ParticipantInfo) {
    if (participantInfo.isLocal) {
        // If this is the local participant joining the stage, update the participant with a null ID because we
        // manually added that participant when setting up our preview
        participantAdapter.participantUpdated(null) {
            it.participantId = participantInfo.participantId
        }
    } else {
        // If they are not local, add them normally
        participantAdapter.participantJoined(
            StageParticipant(
                participantInfo.isLocal,
                participantInfo.participantId
            )
        )
    }
}

override fun onParticipantLeft(stage: Stage, participantInfo: ParticipantInfo) {
    if (participantInfo.isLocal) {
        // If this is the local participant leaving the stage, update the ID but keep it around because
        // we want to keep the camera preview active
        participantAdapter.participantUpdated(participantInfo.participantId) {
            it.participantId = null
        }
    } else {
        // If they are not local, have them leave normally
        participantAdapter.participantLeft(participantInfo.participantId)
    }
}

override fun onParticipantPublishStateChanged(
    stage: Stage,
    participantInfo: ParticipantInfo,
    publishState: Stage.PublishState
) {
    // Update the publishing state of this participant
    participantAdapter.participantUpdated(participantInfo.participantId) {
        it.publishState = publishState
    }
}

override fun onParticipantSubscribeStateChanged(
    stage: Stage,
    participantInfo: ParticipantInfo,
    subscribeState: Stage.SubscribeState
) {
    // Update the subscribe state of this participant
    participantAdapter.participantUpdated(participantInfo.participantId) {
        it.subscribeState = subscribeState
    }
}

override fun onStreamsAdded(stage: Stage, participantInfo: ParticipantInfo, streams: MutableList<StageStream>) {
    // We don't want to take any action for the local participant because we track those streams locally
    if (participantInfo.isLocal) {
        return
    }
    // For remote participants, add these new streams to that participant's streams array.
    participantAdapter.participantUpdated(participantInfo.participantId) {
        it.streams.addAll(streams)
    }
}

override fun onStreamsRemoved(stage: Stage, participantInfo: ParticipantInfo, streams: MutableList<StageStream>) {
    // We don't want to take any action for the local participant because we track those streams locally
    if (participantInfo.isLocal) {
        return
    }
    // For remote participants, remove these streams from that participant's streams array.
    participantAdapter.participantUpdated(participantInfo.participantId) {
        it.streams.removeAll(streams)
    }
}

override fun onStreamsMutedChanged(
    stage: Stage,
    participantInfo: ParticipantInfo,
    streams: MutableList<StageStream>
) {
    // We don't want to take any action for the local participant because we track those streams locally
    if (participantInfo.isLocal) {
        return
    }
    // For remote participants, notify the adapter that the participant has been updated. There is no need to modify
    // the `streams` property on the `StageParticipant` because it is the same `StageStream` instance. Just
    // query the `isMuted` property again.
    participantAdapter.participantUpdated(participantInfo.participantId) {}
}
Menerapkan Kustom RecyclerView LayoutManager
Menempatkan jumlah peserta yang berbeda bisa menjadi rumit. Anda ingin mereka mengambil seluruh bingkai tampilan induk tetapi Anda tidak ingin menangani setiap konfigurasi peserta secara independen. Untuk membuatnya mudah, kita akan berjalan melalui penerapan aRecyclerView.LayoutManager.
Buat kelas baru lainnya,StageLayoutManager, yang harus diperluasGridLayoutManager. Kelas ini dirancang untuk menghitung tata letak untuk setiap peserta berdasarkan jumlah peserta dalam row/column tata letak berbasis aliran. Setiap baris memiliki tinggi yang sama dengan yang lain, tetapi kolom dapat memiliki lebar yang berbeda per baris. Lihat komentar kode di atas layouts variabel untuk deskripsi tentang cara menyesuaikan perilaku ini.
package com.amazonaws.ivs.realtime.basicrealtime

import android.content.Context
import androidx.recyclerview.widget.GridLayoutManager
import androidx.recyclerview.widget.RecyclerView

class StageLayoutManager(context: Context?) : GridLayoutManager(context, 6) {

    companion object {
        /**
         * This 2D array contains the description of how the grid of participants should be rendered
         * The index of the 1st dimension is the number of participants needed to active that configuration
         * Meaning if there is 1 participant, index 0 will be used. If there are 5 participants, index 4 will be used.
         *
         * The 2nd dimension is a description of the layout. The length of the array is the number of rows that
         * will exist, and then each number within that array is the number of columns in each row.
         *
         * See the code comments next to each index for concrete examples.
         *
         * This can be customized to fit any layout configuration needed.
         */
        val layouts: List<List<Int>> = listOf(
            // 1 participant
            listOf(1), // 1 row, full width
            // 2 participants
            listOf(1, 1), // 2 rows, all columns are full width
            // 3 participants
            listOf(1, 2), // 2 rows, first row's column is full width then 2nd row's columns are 1/2 width
            // 4 participants
            listOf(2, 2), // 2 rows, all columns are 1/2 width
            // 5 participants
            listOf(1, 2, 2), // 3 rows, first row's column is full width, 2nd and 3rd row's columns are 1/2 width
            // 6 participants
            listOf(2, 2, 2), // 3 rows, all column are 1/2 width
            // 7 participants
            listOf(2, 2, 3), // 3 rows, 1st and 2nd row's columns are 1/2 width, 3rd row's columns are 1/3rd width
            // 8 participants
            listOf(2, 3, 3),
            // 9 participants
            listOf(3, 3, 3),
            // 10 participants
            listOf(2, 3, 2, 3),
            // 11 participants
            listOf(2, 3, 3, 3),
            // 12 participants
            listOf(3, 3, 3, 3),
        )
    }

    init {
        spanSizeLookup = object : SpanSizeLookup() {
            override fun getSpanSize(position: Int): Int {
                if (itemCount <= 0) {
                    return 1
                }
                // Calculate the row we're in
                val config = layouts[itemCount - 1]
                var row = 0
                var curPosition = position
                while (curPosition - config[row] >= 0) {
                    curPosition -= config[row]
                    row++
                }
                // spanCount == max spans, config[row] = number of columns we want
                // So spanCount / config[row] would be something like 6 / 3 if we want 3 columns.
                // So this will take up 2 spans, with a max of 6 is 1/3rd of the view.
                return spanCount / config[row]
            }
        }
    }

    override fun onLayoutChildren(recycler: RecyclerView.Recycler?, state: RecyclerView.State?) {
        if (itemCount <= 0 || state?.isPreLayout == true) return

        val parentHeight = height
        val itemHeight = parentHeight / layouts[itemCount - 1].size // height divided by number of rows.

        // Set the height of each view based on how many rows exist for the current participant count.
        for (i in 0 until childCount) {
            val child = getChildAt(i) ?: continue
            val layoutParams = child.layoutParams as RecyclerView.LayoutParams
            if (layoutParams.height != itemHeight) {
                layoutParams.height = itemHeight
                child.layoutParams = layoutParams
            }
        }
        // After we set the height for all our views, call super.
        // This works because our RecyclerView can not scroll and all views are always visible with stable IDs.
        super.onLayoutChildren(recycler, state)
    }

    override fun canScrollVertically(): Boolean = false
    override fun canScrollHorizontally(): Boolean = false
}
Kembali MainActivity.kt kita perlu mengatur adaptor dan pengelola tata letak untukRecyclerView:
// In onCreate after setting recyclerView.
recyclerView.layoutManager = StageLayoutManager(this)
recyclerView.adapter = viewModel.participantAdapter
Menghubungkan Tindakan UI
Kami semakin dekat; hanya ada beberapa tindakan UI yang perlu kita hubungkan.
Pertama kita akan MainActivity mengamati StateFlow perubahan dariMainViewModel:
// At the end of your onCreate method
lifecycleScope.launch {
    repeatOnLifecycle(Lifecycle.State.CREATED) {
        viewModel.connectionState.collect { state ->
            buttonJoin.setText(if (state == ConnectionState.DISCONNECTED) R.string.join else R.string.leave)
            textViewState.text = getString(R.string.state, state.name)
        }
    }
}
Selanjutnya kita menambahkan pendengar ke tombol Join dan kotak centang Publish kami:
buttonJoin.setOnClickListener {
    viewModel.joinStage(editTextToken.text.toString())
}
checkboxPublish.setOnCheckedChangeListener { _, isChecked ->
    viewModel.setPublishEnabled(isChecked)
}
Kedua fungsi panggilan di atas di kamiMainViewModel, yang kami terapkan sekarang:
internal fun joinStage(token: String) {
    if (_connectionState.value != Stage.ConnectionState.DISCONNECTED) {
        // If we're already connected to a stage, leave it.
        stage?.leave()
    } else {
        if (token.isEmpty()) {
            Toast.makeText(getApplication(), "Empty Token", Toast.LENGTH_SHORT).show()
            return
        }
        try {
            // Destroy the old stage first before creating a new one.
            stage?.release()
            val stage = Stage(getApplication(), token, this)
            stage.addRenderer(this)
            stage.join()
            this.stage = stage
        } catch (e: BroadcastException) {
            Toast.makeText(getApplication(), "Failed to join stage ${e.localizedMessage}", Toast.LENGTH_LONG).show()
            e.printStackTrace()
        }
    }
}

internal fun setPublishEnabled(enabled: Boolean) {
    publishEnabled = enabled
}
Rendering Peserta
Akhirnya, kita perlu merender data yang kita terima dari SDK ke item peserta yang kita buat sebelumnya. Kami sudah menyelesaikan RecyclerView logika, jadi kami hanya perlu mengimplementasikan bind API diParticipantItem.
Kita akan mulai dengan menambahkan fungsi kosong dan kemudian berjalan melalui langkah demi langkah:
fun bind(participant: StageParticipant) {

}
Pertama kita akan menangani status mudah, ID peserta, status publikasi, dan status berlangganan. Untuk ini, kami hanya memperbarui kami TextViews secara langsung:
val participantId = if (participant.isLocal) {
    "You (${participant.participantId ?: "Disconnected"})"
} else {
    participant.participantId
}
textViewParticipantId.text = participantId
textViewPublish.text = participant.publishState.name
textViewSubscribe.text = participant.subscribeState.name
Selanjutnya kita akan memperbarui status audio dan video yang diredam. Untuk mendapatkan status diredam, kita perlu menemukan ImageDevice dan AudioDevice dari array stream. Untuk mengoptimalkan kinerja, kami mengingat perangkat terakhir yang terpasang IDs.
// This belongs outside the `bind` API.
private var imageDeviceUrn: String? = null
private var audioDeviceUrn: String? = null

// This belongs inside the `bind` API.
val newImageStream = participant
    .streams
    .firstOrNull { it.device is ImageDevice }
textViewVideoMuted.text = if (newImageStream != null) {
    if (newImageStream.muted) "Video muted" else "Video not muted"
} else {
    "No video stream"
}

val newAudioStream = participant
    .streams
    .firstOrNull { it.device is AudioDevice }
textViewAudioMuted.text = if (newAudioStream != null) {
    if (newAudioStream.muted) "Audio muted" else "Audio not muted"
} else {
    "No audio stream"
}
Akhirnya kami ingin membuat pratinjau untukimageDevice:
if (newImageStream?.device?.descriptor?.urn != imageDeviceUrn) {
    // If the device has changed, remove all subviews from the preview container
    previewContainer.removeAllViews()
    (newImageStream?.device as? ImageDevice)?.let {
        val preview = it.getPreviewView(BroadcastConfiguration.AspectMode.FIT)
        previewContainer.addView(preview)
        preview.layoutParams = FrameLayout.LayoutParams(
            FrameLayout.LayoutParams.MATCH_PARENT,
            FrameLayout.LayoutParams.MATCH_PARENT
        )
    }
}
imageDeviceUrn = newImageStream?.device?.descriptor?.urn
Dan kami menampilkan statistik audio dari: audioDevice
if (newAudioStream?.device?.descriptor?.urn != audioDeviceUrn) {
    (newAudioStream?.device as? AudioDevice)?.let {
        it.setStatsCallback { _, rms ->
            textViewAudioLevel.text = "Audio Level: ${rms.roundToInt()} dB"
        }
    }
}
audioDeviceUrn = newAudioStream?.device?.descriptor?.urn
