Use VPN to connect LoRa gateways to your AWS account
To connect your gateways on premises to your AWS account, you can use either a Site-to-Site VPN connection or a Client VPN endpoint.
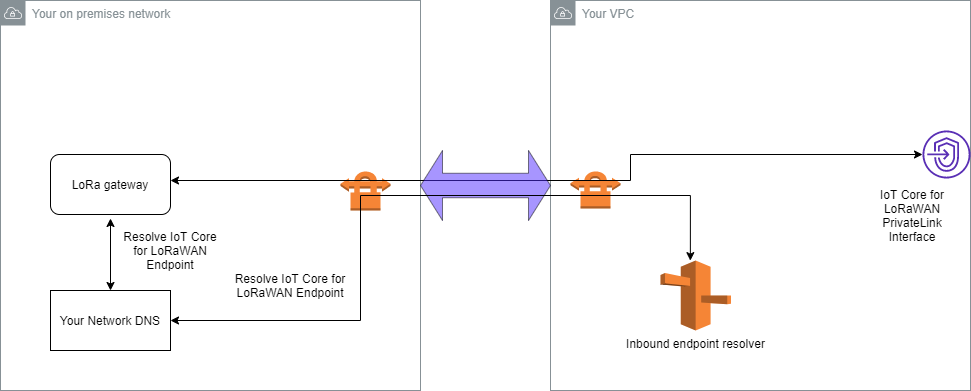
Before you can connect your on premises gateways, you must have created the VPC endpoint, and configured a private hosted zone and inbound resolver so that traffic from the gateways don't go over the public internet. For more information, see Create VPC interface endpoint and private hosted zone.
Site-to-Site VPN endpoint
If you don't have the gateway hardware or want to test the VPN connection using a different AWS account, you can use a Site-to-Site VPN connection. You can use Site-to-Site VPN to connect to the VPC endpoints from the same AWS account or another AWS account that you might be using in a different AWS Region.
Note
If you've the gateway hardware with you and want to set up a VPN connection, we recommend that you use Client VPN instead. For instructions, see Client VPN endpoint.
To set up a Site-to-Site VPN:
-
Create another VPC in the site from which you want to set up the connection. For
VPC-A, you can reuse the VPC that you created previously. To create another VPC (for example,VPC-B), use a CIDR block that doesn't overlap with the CIDR block of the VPC you created previously.For information about setting up the VPCs, follow the instructions described in AWS setup Site-to-Site VPN connection.
Note
The Site-to-Site VPN VPN method described in the document uses OpenSWAN for the VPN connection, which supports only one VPN tunnel. If you use a different commercial software for the VPN, you might be able to set up two tunnels bettween the sites.
-
After you set up the VPN connection, update the
/etc/resolv.conffile by adding the inbound resolver's IP address from your AWS account. You use this IP address for the nameserver. For information about how to obtain this IP address, see Configure Route 53 inbound resolver. For this example, we can use the IP address10.100.0.145that was assigned when you created the Route 53 Resolver.options timeout:2 attempts:5 ; generated by /usr/sbin/dhclient-script searchregion.compute.internal nameserver 10.100.0.145 -
We can now test whether the VPN connection uses the AWS PrivateLink endpoint instead of going over the public internet by using an
nslookupcommand. The following shows an example of running the command.nslookupaccount-specific-prefix.lns.lorawan.region.amazonaws.comThe following shows an example output of running the command, which shows a private IP address indicating that the connection has been established to the AWS PrivateLink LNS endpoint.
Server: 10.100.0.145
Address: 10.100.0.145

Non-authoritative answer:
Name: https://xxxxx.lns.lorawan.region.amazonaws.com
Address: 10.100.0.204
For information about using a Site-to-Site VPN connection, see How Site-to-Site VPN works.
Client VPN endpoint
AWS Client VPN is a managed client-based VPN service that enables you to securely access AWS resources and resources in your on-premises network. The following shows the architecture for the client VPN service.
To establish a VPN connection to a Client VPN endpoint:
-
Create a Client VPN endpoint by following the instructions described in Getting started with AWS Client VPN.
-
Log in to your on-premises network (for example, a Wi-Fi router) by using the access URL for that router (for example,
192.168.1.1), and find the root name and password. -
Set up your LoRaWAN gateway by following the instructions in the gateway's documentation and then add your gateway to AWS IoT Core for LoRaWAN. For information about how to add your gateway, see Onboard your gateways to AWS IoT Core for LoRaWAN.
-
Check whether your gateway's firmware is up to date. If the firmware is out of date, you can follow the instructions provided in the on-premises network to update your gateway's firmware. For more information, see Update gateway firmware using CUPS service with AWS IoT Core for LoRaWAN.
-
Check whether OpenVPN has been enabled. If it has been enabled, skip to the next step to configure the OpenVPN client inside the on-premises network. If it hasn't been enabled, follow the instructions in Guide to install OpenVPN for OpenWrt
. Note
For this example, we use OpenVPN. You can use other VPN clients such as AWS VPN or AWS Direct Connect to set up your Client VPN connection.
-
Configure the OpenVPN client based on information from the client configuration and how you can use OpenVPN client using LuCi
. -
SSH to your on-premises network and update the
/etc/resolv.conffile by adding the IP address of the inbound resolver in your AWS account (10.100.0.145). -
For the gateway traffic to use AWS PrivateLink to connect to the endpoint, replace the first DNS entry for your gateway to the inbound resolver's IP address.
For information about using a Site-to-Site VPN connection, see Getting started with Client VPN.
Connect to LNS and CUPS VPC endpoints
The following shows how you can test your connection to the LNS and CUPS VPC endpoints.
Test CUPS endpoint
To test your AWS PrivateLink connection to the CUPS endpoint from your LoRa gateway, run the following command:
curl -k -v -X POST https://xxxx.cups.region.iotwireless.iot:443/update-info
     --cacert cups.trust --cert cups.crt --key cups.key --header "Content-Type: application/json"
     --data '{
              "router": "xxxxxxxxxxxxx",
              "cupsUri": "https://xxxx.cups.lorawan.region.amazonaws.com:443",
              "cupsCredCrc":1234, "tcCredCrc":552384314
             }'
      —output cups.out
Test LNS endpoint
To test your LNS endpoint, first provision a LoRaWAN device that will work with your wireless gateway. You can then add your device and perform the join procedure after which you can start sending uplink messages.
