FUOTA process overview
The following diagram shows how AWS IoT Core for LoRaWAN performs the FUOTA process for your end devices. If you're adding individual devices to your FUOTA session, you can skip the steps for creating and configuring your multicast group. You can add your devices directly to a FUOTA session, and AWS IoT Core for LoRaWAN will then start the firmware update process.
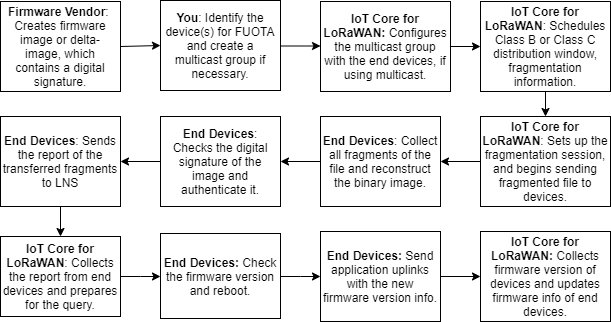
To perform FUOTA for your devices, first create your digitally signed firmware image and configure the devices and multicast groups that you want to add to your FUOTA task. After you start a FUOTA session, your end devices collect all fragments, reconstruct the image from the fragments, report the status to AWS IoT Core for LoRaWAN, and then apply the new firmware image.
The following illustrates the different steps in the FUOTA process:
-
Create a firmware image or delta image with a digital signature
For AWS IoT Core for LoRaWAN to perform FUOTA for your LoRaWAN devices, we recommend that you digitally sign the firmware image or the delta image when sending firmware updates over the air. The devices that receive the images can then verify that it's coming from the right source.
Your firmware image must not be larger than 1 megabyte in size. The larger your firmware size, the longer it can take for your update process to complete. For faster data transfer or if your new image is larger than 1 Megabyte, use a delta image, which is the part of your new image that's the delta between your new firmware image and the previous image.
Note
AWS IoT Core for LoRaWAN doesn't provide the digital signature generation tool and the firmware version management system. You can use any third-party tool to generate the digital signature for your firmware image. We recommend that you use a digital signature tool such as the one embedded in the ARM Mbed GitHub repository
, which also includes tools for generating the delta image and for devices to use that image. -
Identify and configure the devices for FUOTA
After you identify the devices for FUOTA, send firmware updates to individual or multiple devices.
-
To send your firmware updates to multiple devices, create a multicast group, and configure the multicast group with end devices. For more information, see Create multicast groups to send a downlink payload to multiple devices.
-
To send firmware updates to individual devices, add those devices to your FUOTA session and then perform the firmware update.
-
-
Schedule a distribution window and set up fragmentation session
If you created a multicast group, you can specify the class B or class C distribution window to determine when the devices can receive the fragments from AWS IoT Core for LoRaWAN. Your devices might be operating in class A before they switch to class B or class C mode. You must also specify the start time of the session.
Class B or class C devices wake up at the specified distribution window and start receiving the downlink packets. Devices operating in class C mode can consume more power than class B devices. For more information, see Device classes.
-
End devices report status to AWS IoT Core for LoRaWAN and update firmware image
After you set up a fragmentation session, your end devices and AWS IoT Core for LoRaWAN perform the following steps to update the firmware of your devices.
-
Because LoRaWAN devices have a low data rate, to start the FUOTA process, AWS IoT Core for LoRaWAN sets up a fragmentation session to fragment the firmware image. Then it sends these fragments to the end devices.
-
After AWS IoT Core for LoRaWAN sends the image fragments, your LoRaWAN end devices perform the following tasks.
-
Collect the fragments and then reconstruct the binary image from these fragments.
-
Check the digital signature of the reconstructed image to authenticate the image and verify that it's coming from the right source.
-
Compare the firmware version from AWS IoT Core for LoRaWAN to the current version.
-
Report the status of the fragmented images that were transferred to AWS IoT Core for LoRaWAN, and then apply the new firmware image.
Note
In some cases, the end devices report the status of the fragmented images that were transferred to AWS IoT Core for LoRaWAN before checking the digital signature of the firmware image.
-
-
Now that you've learned the FUOTA process, you can create your FUOTA task and add devices to the task for updating their firmware. For more information, see Create FUOTA task and provide firmware image.
