Tutorial: Create a flow that processes mortgage applications
To get familiar with Amazon Bedrock resources and their capabilities, we'll use an AWS CloudFormation template to set up a flow that automates a mortgage application process processes by combining various Amazon Bedrock and other AWS resources.
Note
For this tutorial, we will use the us-east-1 Region. You can use any Region that supports Agents, Flows, Guardrails, Knowledge bases, and Prompt management. For a table of feature support by Region, see Feature support by AWS Region in Amazon Bedrock. Make sure that you have permissions to create Amazon S3, Amazon Bedrock, Lambda, and DynamoDB resources in the Region that you use.
This flow isn't meant for deployment purposes, but rather to use as a tutorial to understand Amazon Bedrock resources. The following image is the visual representation of the flow in the AWS Management Console:
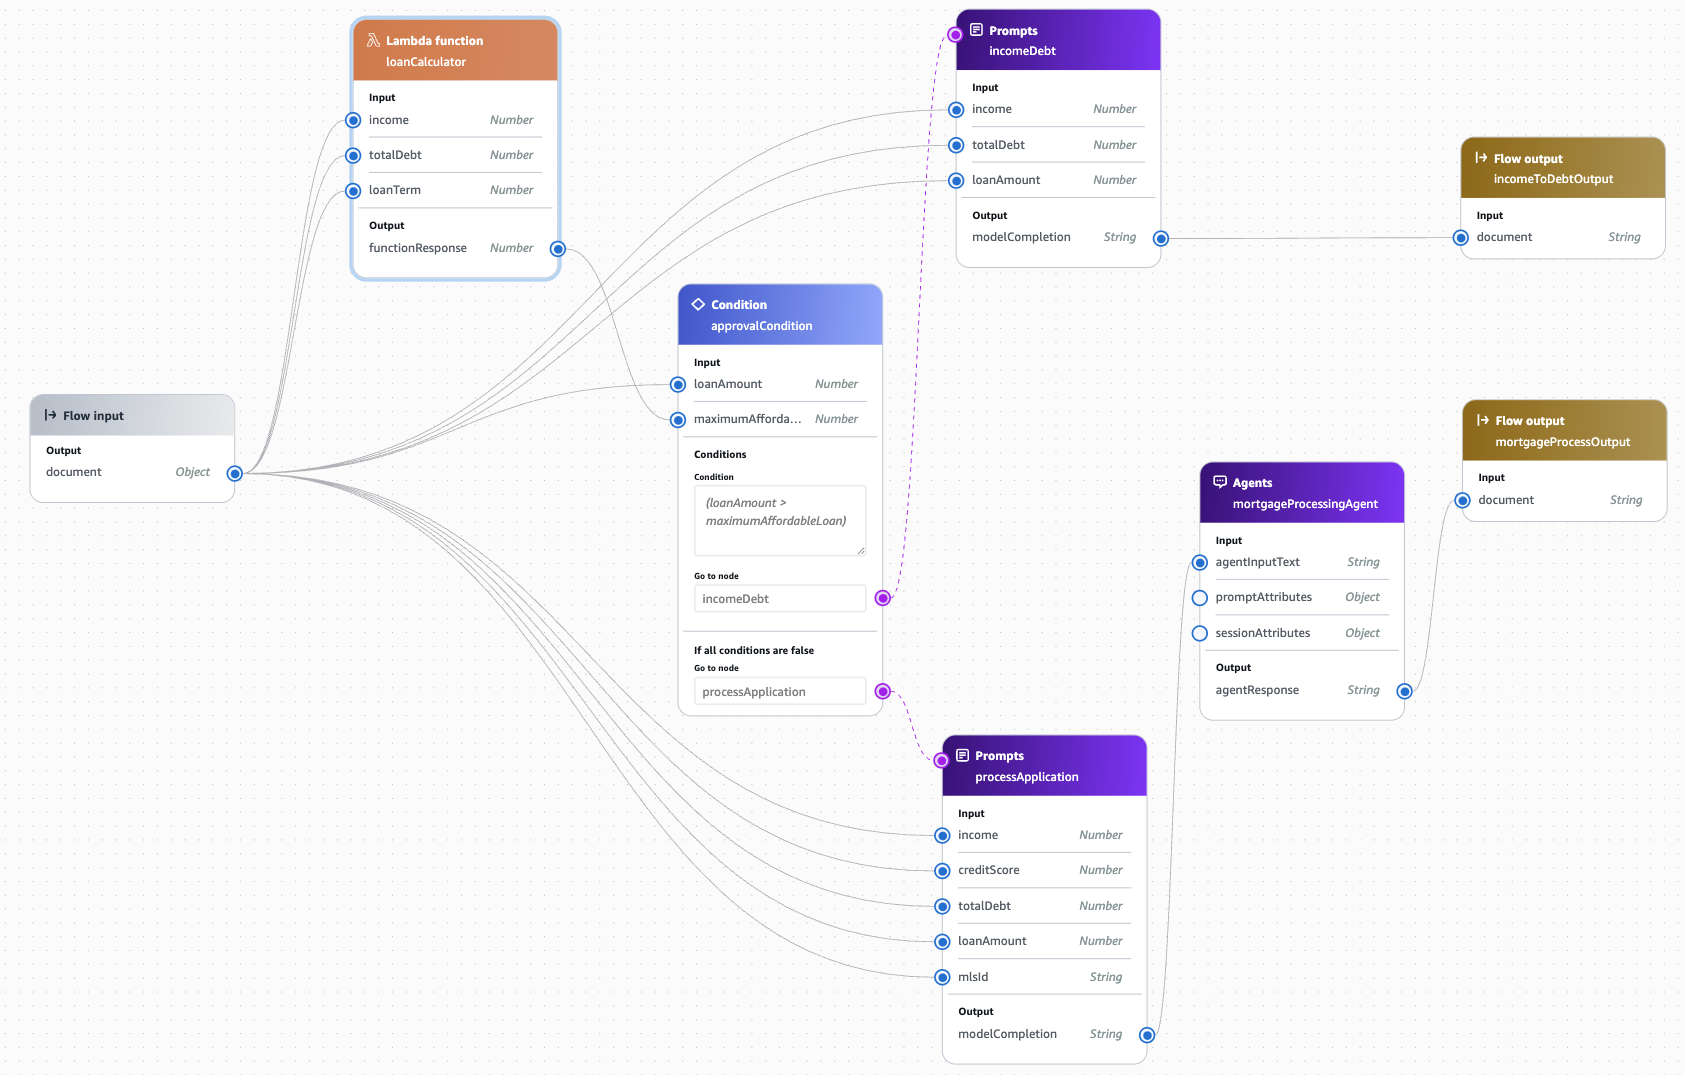
The flow combines an Amazon Bedrock agent, prompts, and a Lambda function to create a mortgage processing flow that intakes customer financial information and processes whether the customer qualifies for a loan. An Amazon Bedrock knowledge base and guardrail are also attached to the flow's agent to augment responses and to provide safeguards. For more detailed information about the components of the flow, see Details about the mortgage processing flow.
Topics
Prerequisites
To create this flow, you'll download a .zip file and follow instructions to run a script that will set up your resources and template for you.
Important
You'll be billed for the Amazon resources that you create until you delete them.
Then, complete the following prerequisites:
-
Download the cloudformation-mortgage-flow-setup.zip file.
-
Unzip the file. You can learn more about the contents at CloudFormation templates.
-
Request access to Amazon Bedrock foundation models by doing the following:
-
Sign in to the AWS Management Console with an IAM identity that has permissions to use the Amazon Bedrock console. Then, open the Amazon Bedrock console at https://console.aws.amazon.com/bedrock
. -
Make sure that you're in the US East (N. Virginia) Region by checking your Region in the upper-right corner. If you're not, switch Regions.
-
Select Model access at the bottom of the left navigation pane.
-
Choose Modify model access.
-
Do one of the following:
-
To request access to all models, choose Enable all models. On the page you're taken to, the checkboxes next to all the models will be filled.
-
To request access to specific models, choose Enable specific models. On the page you're taken to, you have the following options:
-
To request access to all models by a provider, select the checkbox next to the provider name.
-
To request access to one model, select the checkbox next to the model name.
-
-
-
For the purposes of the following tutorial, you should minimally request access to the Titan Embeddings G1 - Text and Claude 3 Haiku models. Then choose Next.
-
Review the models that you're requesting access to and the Terms. When you're ready, choose Submit to request access.
-
Create the mortgage processing flow using AWS CloudFormation
To create the mortgage processing flow and its associated resources, we'll create a CloudFormation template and use it to create a stack containing Amazon Bedrock resources.
Important
You'll be billed for the Amazon resources that you create until you delete them.
Create the resources and AWS CloudFormation template file
First, use the script from the .zip file to upload the resources to an S3 bucket and to create the CloudFormation templates.
-
In a terminal, run the following command to copy the resources into an Amazon S3 bucket and populate the
main-stack.yamlandmain-stack.jsonfiles with the S3 bucket name as the default value for the bucket name parameter.bash deploy.shNote
The usage of the script is
bash deploy.sh, where<region><bucket-name><region>and<bucket-name>are optional arguments. If you don't provide them, the following default values will be used:-
<region>– The default AWS Region specified in your AWS credentials setup. -
<bucket-name>– The bucket will be namedmortgage-flow-deployment-<AccountId>-<Region>, where<AccountId>is your AWS account ID and<Region>matches the value you provide or the default AWS Region specified in your AWS credentials setup.
-
-
Confirm the prompts. After the deployment is complete, you should have a complete
main-stack.yamlandmain-stack.jsontemplate for the next step.
Note
If the script fails, you can manually prepare the resources by doing the following:
-
Upload the contents (don't include the folder itself) of the unzipped
cloudformation-mortgage-flow-setupfolder to an S3 bucket in US East (N. Virginia) in the Amazon S3 console at https://console.aws.amazon.com/s3/. -
Find the
templates/json/main-stack-tmp.yamlortemplates/json/main-stack-tmp.jsonfile and do the following:-
Change the
Defaultvalue of theQ01pS3BucketNameparameter fromMortgageFlowBucketto your S3 bucket name. -
Remove
-tmpfrom the file name, such that it becomestemplates/json/main-stack.yamlortemplates/json/main-stack.json.
-
Create the stack by using the AWS CloudFormation console
Next, use the template you've saved to provision a CloudFormation stack.
-
Open the AWS CloudFormation console at https://console.aws.amazon.com/cloudformation
. Make sure that you're in the US East (N. Virginia) Region by checking your Region in the upper-right corner. If you're not, switch Regions. -
On the Stacks page, from the Create stack menu, choose With new resources (standard).
-
Specify the template:
-
Under Prerequisite, choose Choose an existing template.
-
Under Specify template, choose Upload a template file.
-
Choose Choose file, navigate to the
main-stack.yamlor themain-stack.jsontemplate, and select it. -
Choose Next.
-
Specify the stack details:
-
In the Stack name field, enter a name for the stack.
-
In the Parameters field, leave the default values.
Note
The
Q01pS3BucketNamevalue should match the name of the S3 bucket to which you uploaded the resources for this template. The remaining arguments are related to the configurations of the knowledge base--if you modify any of them, make sure that the configurations are compatible with each other. For more information, see Prerequisites for using a vector store you created for a knowledge base. -
Choose Next.
-
Configure the stack options:
-
Under Stack failure options, choose Delete all newly created resources.
Note
Choosing this option prevents you from possibly being billed for resources whose deletion policy specifies they be retained even if the stack creation fails. For more information, see
DeletionPolicyattribute in the AWS CloudFormation User Guide. -
Under Capabilities, check the box to acknowledge that CloudFormation might create IAM resources in your account.
-
Choose Next.
-
-
Review the stack details and choose Submit. AWS CloudFormation creates the stack. The creation will take several minutes. After the stack creation is complete, you can use the Resources tab on the stack detail page to view the resources that where provisioned in your account.
-
After the stack creation completes, do the following to sync the data source for the knowledge base so that the knowledge base can be queried:
-
Sign in to the AWS Management Console with an IAM identity that has permissions to use the Amazon Bedrock console. Then, open the Amazon Bedrock console at https://console.aws.amazon.com/bedrock
. -
From the left navigation pane, choose Knowledge Bases and then select the knowledge base that was created, named
AWSDocsTutorial-MortgageKB. -
In the Data source section, select the checkbox next to the data source that was created, named
AWSDocsTutorial-MortgageKB-DS. -
Choose Sync. After syncing completes, you can test the flow.
-
Test the mortgage processing flow
Once the mortgage processing flow has been created, you can use the Amazon Bedrock console to examine, test, and modify the flow. You can also examine, test, and modify the individual resources in the flow.
To test the flow
-
Sign in to the AWS Management Console with an IAM identity that has permissions to use the Amazon Bedrock console. Then, open the Amazon Bedrock console at https://console.aws.amazon.com/bedrock
. -
From the left navigation pane, choose Flows. Make sure that you're in the US East (N. Virginia) Region by checking your Region in the upper-right corner. If you're not, switch Regions.
-
In the Flows section, select the flow that was created from the CloudFormation template. It should be
AWSDocsTutorial-MortgageFlow. -
Choose Edit in flow builder. You can drag individual nodes in the flow to modify the visual representation of the flow.
-
In the Test flow pane, enter the following in the text field and then select Run.
{
    "income": 80000,
    "totalDebt": 5000,
    "loanTerm": 30,
    "loanAmount": 600000,
    "creditScore": 750,
    "mlsId": "MLS-5678"
}
Because the loan amount is greater than the calculated maximum affordable loan, the incomeDebt prompt is triggered and the flow generates a rejection letter. You can choose Show trace to see the nodes that were run in the flow.
-
Again, in the Test flow pane, enter the following in the text field and then select Run.
{
    "income": 120000,
    "totalDebt": 5000,
    "loanTerm": 30,
    "loanAmount": 200000,
    "creditScore": 650,
    "mlsId": "MLS-3456"
}
Because the loan amount is less than the calculated maximum affordable loan, the processApplication prompt is triggered and sent to the mortgageProcessingAgent, which looks up the attached knowledge base and generates a response that assesses, based on the input values, whether the customer qualifies for a loan.
-
(Optional) Try running the flow by using different values for the fields in the JSON object. The
mlsIdvalues correspond to properties listed on the Multiple Listing Service. You can find validmlsIdvalues by doing the following:-
Sign in to the AWS Management Console and open the DynamoDB console at https://console.aws.amazon.com/dynamodb/
. -
In the left navigation pane, select Tables.
-
Select the table that says AWSDocsTutorial-PropertyListing.
-
Choose Explore table items.
-
You can use any of the values in the mls_id column in the flow input.
-
You can also navigate to the Agents, Knowledge Bases, Guardrails, and Prompt management pages in the AWS Management Console to examine each Amazon Bedrock resource used in the flow, independently. To learn more about the flow and understand the components in more detail, see Details about the mortgage processing flow.
Clean up: deleting resources
After you explore the resources and have a better understanding of the capabilities of different Amazon Bedrock resources, we'll delete the stack and the resources it contains.
Important
You'll be billed for the Amazon resources that you create until you delete them.
-
From the left navigation pain, choose Stacks.
-
Choose the stack that you created from the template. Then choose Delete, then confirm Delete.
CloudFormation initiates deletion of the main stack, all its nested stacks, and all resources included in the stacks.
