Net Amortized cost
Last Updated
October 2024
Author
-
Deepthi Nune, Sr. Technical Account Manager, AWS
Introduction
By Default CUDOS dashboard shows Amortized and Unblended cost. For customers who would like to see cost after discounts, this guide provides steps to implement possibility to switch between Amortized and Net Amortized cost.
Step 1 of 3. Modify Views/Queries in Athena
You will need to modify several views in Athena to include net amortized cost. Views that you need to modify are:
-
summary_view
-
hourly_view
-
resource_view
Navigate in the AWS Console to the Athena service
-
Select the AwsDataCatalog in the DataSource drop down
-
In the Database drop down select the database where your CUR table is located.
-
Under Views, scroll down until you locate the summary_view.
-
Select the three dots to the right of the view and select Show/edit query from the context menu.

-
Find the line which ends with "amortized_cost" and add the below snippet
    , SUM(CASE
WHEN "line_item_line_item_type" = 'SavingsPlanRecurringFee' THEN ("savings_plan_total_commitment_to_date" - "savings_plan_used_commitment") * COALESCE(( COALESCE("line_item_net_unblended_cost", "line_item_unblended_cost") / NULLIF("line_item_unblended_cost", 0)), 1)
WHEN "line_item_line_item_type" = 'RIFee' THEN COALESCE("reservation_net_unused_amortized_upfront_fee_for_billing_period" + "reservation_net_unused_recurring_fee", "reservation_unused_amortized_upfront_fee_for_billing_period" + "reservation_unused_recurring_fee")
WHEN "line_item_line_item_type" = 'SavingsPlanCoveredUsage' THEN COALESCE("savings_plan_net_savings_plan_effective_cost", "savings_plan_savings_plan_effective_cost")
WHEN "line_item_line_item_type" = 'DiscountedUsage' THEN COALESCE("reservation_net_effective_cost", "reservation_effective_cost")
WHEN "line_item_line_item_type" = 'Fee' AND COALESCE("reservation_reservation_a_r_n", '') = '' THEN COALESCE("line_item_net_unblended_cost", "line_item_unblended_cost")
WHEN "line_item_line_item_type" IN ('Usage', 'Tax', 'Credit', 'Refund') THEN COALESCE("line_item_net_unblended_cost", "line_item_unblended_cost")
ELSE 0 END) "net_amortized_cost"
-
click the Run again button and confirm that the query view updates successfully.

-
Under Views, locate resource_view, Select the three dots to the right of the view and select Show/edit query from the context menu.
-
Find the line which ends with "unblended_cost" , add the below snippet
, "sum"("line_item_net_unblended_cost") "net_amortized_cost"
, "sum"("reservation_net_effective_cost") "reservation_net_effective_cost"
, "sum"("savings_plan_net_savings_plan_effective_cost") "savings_plan_net_effective_cost"
-
click the Run again button and confirm that the query view updates successfully.
-
Under Views, locate hourly_view, Select the three dots to the right of the view and select Show/edit query from the context menu.
-
Find the line which ends with "unblended_cost" , add the below snippet
, "sum"("line_item_net_unblended_cost") "net_amortized_cost"
, "sum"("reservation_net_effective_cost") "reservation_net_effective_cost"
, "sum"("savings_plan_net_savings_plan_effective_cost") "savings_plan_net_effective_cost"
-
click the Run again button and confirm that the query view updates successfully.
Step 2 of 3. Modify/Refresh DataSet in Amazon QuickSight
Next the data set in Amazon QuickSight needs to be refreshed in order to see the added fields and use them in your analysis and dashboard.
-
Navigate to Amazon QuickSight in the console.
-
Select Datasets on the left side of the page.

-
Locate summary_view in the list of datasets and click on the dataset.
-
Click on Edit Dataset under the summary tab in the top right of the page.

-
Allow the dataset preview windows to load.
-
Click on Save & Publish button in the top right of the page. this will trigger a refresh of the dataset and import net_amortized field

-
Repeat the steps to refresh resource_view and hourly_view dataset as well.
Step 3 of 3. Create/Modify CUDOS Dashboard Analysis
After the dataset has been updated you can now add the net_amortized cost to different visualizations. Here we will demonstrate how you can update the CUDOS dashboard to use the net_amortized cost along with amortized_cost
Note
If you deploy an update to the CUDOS/CID dashboards with the
--recursive option it will overwrite your Athena query view changes
and published dashboard changes
-
First, we’ll need to save the dashboard as an analysis so we can make changes.
-
Open the CUDOS dashboard and select the save icon, selecting "save as" in the drop-down selection to save the dashboard as an analysis.

-
open the saved analysis.
Step 3a. Create a parameter and control
We will create a new parameter and control/filter so we can switch between unblended cost and net_amortized cost for all the visuals
-
Click on Insert → Add Parameter from the top left menu bar

-
Enter a name: CostType for the parameter and enter the static default value : net amortized cost
-
Click create

-
In the parameter added window, select Control to create a new control and connect to the parameter.

-
Enter in a display name : Cost Type, and ensure "Dropdown" is the style.
-
Define specific values as displayed below

-
Finally click the add button.
-
The control will be added to the sheet in your analysis.

Note
The control has to be re-added to each sheet in the analysis
Step 3b. Bind this control to calculated fields in datasets
Now that we’ve created the parameter and control we need to associate it with few calculated fields in order to have an effect in our analysis visualizations.
-
Click on Dataset from the left navigation and select the dataset hourly_view

-
Find the calculated column amortized cost and edit the calculated field as shown below and click on save
ifelse(
({charge_type} = 'SavingsPlanCoveredUsage' and ${CostType} = 'amortized cost'), {savings_plan_effective_cost},
({charge_type} = 'SavingsPlanCoveredUsage' and ${CostType} = 'net amortized cost' ), {savings_plan_net_effective_cost},
({charge_type} = 'DiscountedUsage' and ${CostType} = 'amortized cost'), {reservation_effective_cost},
({charge_type} = 'DiscountedUsage' and ${CostType} = 'net amortized cost'), {reservation_net_effective_cost},
({charge_type} = 'Usage' and ${CostType} = 'amortized cost'), {unblended_cost},
({charge_type} = 'Usage' and ${CostType} = 'net amortized cost'), {net_amortized_cost},
0
)
-
Now select the dataset resource_view and find the calculated field amortized cost. Make changes as shown below and save
ifelse(
({charge_type} = 'SavingsPlanCoveredUsage' and ${CostType} = 'amortized cost'), {savings_plan_effective_cost},
({charge_type} = 'SavingsPlanCoveredUsage' and ${CostType} = 'net amortized cost' ), {savings_plan_net_effective_cost},
({charge_type} = 'DiscountedUsage' and ${CostType} = 'amortized cost'), {reservation_effective_cost},
({charge_type} = 'DiscountedUsage' and ${CostType} = 'net amortized cost'), {reservation_net_effective_cost},
({charge_type} = 'Usage' and ${CostType} = 'amortized cost'), {unblended_cost},
({charge_type} = 'Usage' and ${CostType} = 'net amortized cost'), {net_amortized_cost},
0
)
-
Find the calculated field Workspace Total Resource Cost, edit as shown below and click on Save
sumOver(sum(Cost), [{Workspace ID}])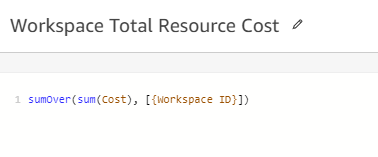
-
Find the calculated field Workspace Average Cost, edit as shown below and click on Save
sum(Cost)/distinct_count({Workspace ID})
-
Now Select the dataset summary_view and find the calculated filed Cost_Amortized . edit the calculated field as shown below and click on save
ifelse(
${CostType}= 'amortized cost',{amortized_cost},
${CostType}= 'net amortized cost', {net_amortized_cost},
NULL)
-
Publish the modified analysis as a new dashboard which now has option to switch between both unblended and net_amortized cost.
