Add Account Names ( Optional )
Account Map
The Cost & Usage Report data doesn’t currently contain account names and other business or organization specific mapping so you can create a view that enhances your CUR data. There are a few options you can leverage to create your account_map view to provide opportunities to leverage your existing mapping tables, organization information, or other business mappings allowing for deeper insights. This view will be used to create the Account Map for your dashboards.
The steps below are necessary ONLY if you have deployed your dashboards using legacy CUR. Dashboards created using CUR 2.0 have account names integrated as part of deployment process.
Option 1: Leverage your existing AWS Organizations account mapping (Recommended)
This option allows you to bring in your AWS Organizations data including OU groupings
You will need to go through an additional Lab for this. This can collect multiple types of data across accounts and AWS Organization, including Trusted Advisor and Compute Optimizer Data. For Account Names you will need only one module AWS Organization Module, but we recommend to explore other modules of this lab as well.
Click to navigate to Optimization Data Collection Lab
After successful deployment create or update your account_map view by running the following query in Athena Query Editor.
CREATE OR REPLACE VIEW account_map AS
SELECT DISTINCT
    "id" "account_id",
    "name" "account_name",
    ’ ’ "parent_account_id",
    ’ ’ "account_email_id"
FROM
    "optimization_data".”organization_data”
Also you must update the role that QuickSight uses to update datasets. This can be a standard QuickSight role that you can manage in QuickSight Admin space (Security and Permissions section). Or this can be a role named CidQuickSightDataSourceRole. This role can be managed by Cloud-Intelligence-Dashboards stack in CloudFormation. Please make sure that you configure there the same bucket name as in Data Collection Lab.
Option 2: Leverage AWS Cost Categories to add account names
This option allows you to bring in account names using AWS Cost Categories. If you have multiple payer accounts, please ensure you use the same name for your cost category in each of the payer accounts, so that consolidated cost and usage report in the data collection account will be consistent. Recommended cost category name: accountname
Navigate to cost categories by either searching for cost categories in the AWS console search bar

OR by going to the Billing console and choosing Cost Categories from the navigation menu

In the Cost Categories console Select Create cost category

Name your cost category as accountname or any other name you’d like. Be consistent with the name across multiple payer accounts if you are consolidating data from other payer accounts
For lookback period select the second option Apply cost category rules starting any specified month from the previous 12 months and then choose a month which is atleast 3 months prior to the current month. Select Next

In the category rules under Rule Builder choose Rule Type as Inherited value and Dimension as Account
Specify a default value as unnamed. You can use anything you’d like to define accounts which do not have an account name but be consistent across multiple payer accounts. Select Next

Select create cost category

The CUR will now have a column called CostCategory/accountname with the account names populated in them. Please note, it might take 24-48 hours for the CUR to be updated. In Athena the column name in the CUR table will be something similar to cost_category_accountname
Once the cost category is available in your CUR Athena table, update your account_map view with the below query with the following modifications
On line 4 and line 9, replace cost_category_accountname with the name of the cost category you chose for account name. If you chose just accountname as shown in the example above then no change is needed.
On line 8, replace (database).(tablename) with your CUR database and table name (e.g. cid_cur.cur)
Run the query after the modification. Your account_map view will now have account names from the cost category created.
CREATE OR REPLACE VIEW "account_map" AS
SELECT DISTINCT
line_item_usage_account_id "account_id"
, max_by(cost_category_accountname,line_item_usage_start_date) "account_name"
, ’ ’ parent_account_id
, ’ ’ account_email_id
FROM
(database).(tablename)
WHERE ((cost_category_accountname <> ’') AND (("bill_billing_period_start_date" >= ("date_trunc"(’month', current_timestamp) - INTERVAL '2' MONTH)) AND (CAST("concat"("year", '-', "month", '-01') AS date) >= ("date_trunc"('month', current_date) - INTERVAL '2' MONTH))))
group by line_item_usage_account_id
Option 3: Account Map CSV file using your existing AWS Account mapping data
Many organizations already maintain their account mapping outside of AWS. You can leverage your existing mapping data by creating a csv file with your account mapping data including any additional organization attributes.
Create your account_map csv file
This example will show you how to create using a sample account_map csv file
-
Create an account_map csv file locally, you can use the sample here and requirements below as a starting point: account_map.csv
-
Update your account_map csv with your account mapping data
Upload your account_map csv file to Amazon S3
-
Navigate to Amazon S3
-
Select Create Bucket

-
Name your bucket, we recommend cost-account-map- to easily locate
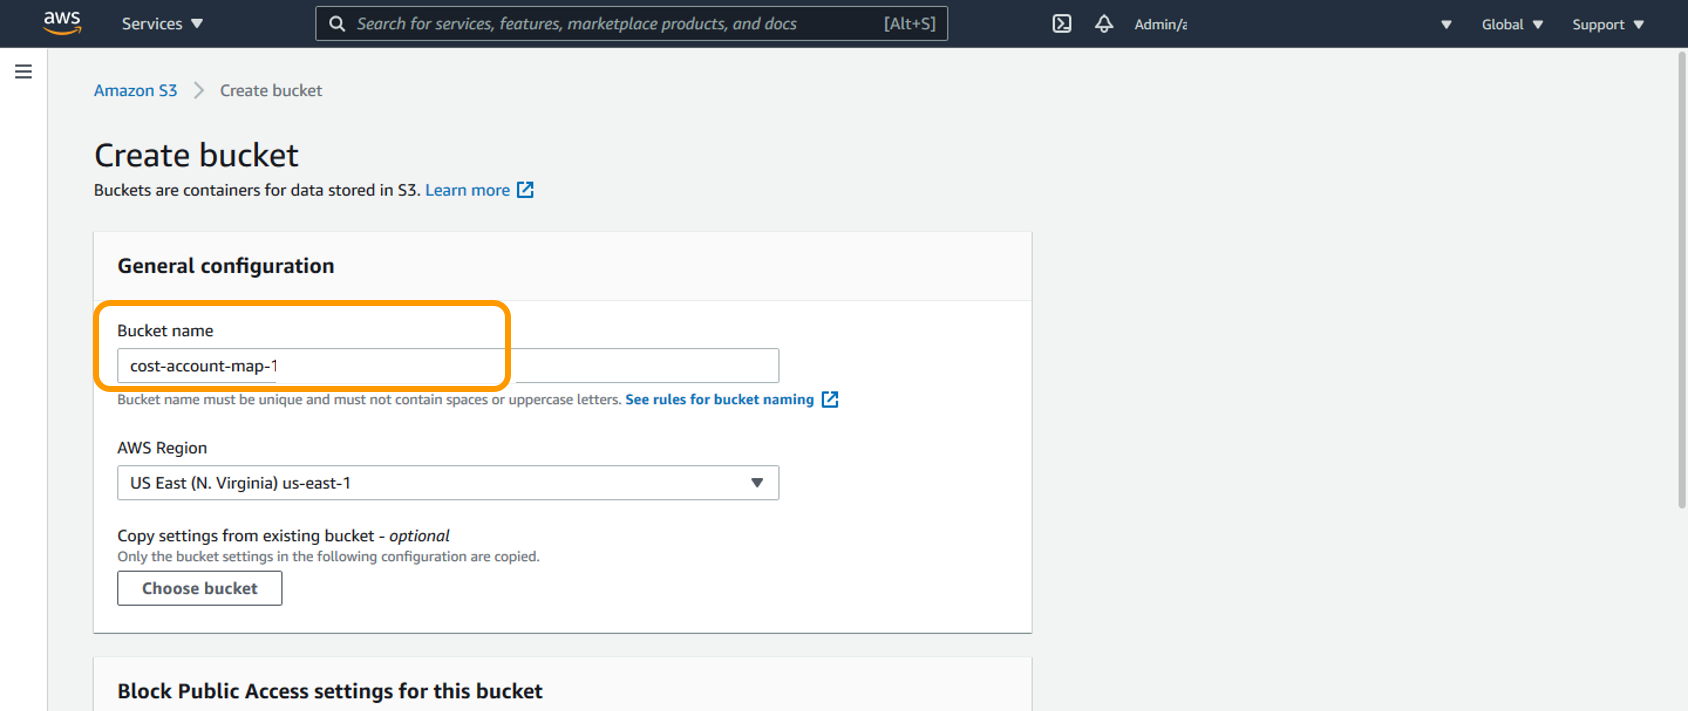
-
Scroll to the bottom and select Create Bucket

-
Navigate to your newly created s3 bucket

-
Select Create folder

-
Name your folder account-map and select Create folder

-
Click on your newly created account-map folder

-
Select Upload

-
In your newly created folder, drag and drop your account_map.csv file then select Upload

-
Copy down the S3 Destination of the account-map.csv. You will need this to create your Athena table

Create your account_mapping Athena table
-
Navigate to Amazon Athena
-
Modify the below query with your account_map.csv information. Replace the (S3.Destination) value in row 15 with your account_map folder S3 destination from step 8 of the last section (e.g. cost-account-map-123456789012/account-map)
Note
Validate rows 2-5 match your csv columns. If you removed one of the fields in the csv you will need to remove it in the query. If you added any additional fields you will need to add the attribute to the query.*
CREATE EXTERNAL TABLE +account_mapping+(
    +account_id+ string,
    +account_name+ string,
    +business_unit+ string,
    +team+ string,
    +cost_center+ string
    )
ROW FORMAT DELIMITED
    FIELDS TERMINATED BY ','
STORED AS INPUTFORMAT
    'org.apache.hadoop.mapred.TextInputFormat'
OUTPUTFORMAT
    'org.apache.hadoop.hive.ql.io.HiveIgnoreKeyTextOutputFormat'
LOCATION
    '(S3.Destination)'
TBLPROPERTIES (
    'has_encrypted_data'='false',
    'skip.header.line.count'='1')
Create your account_map Athena view
The account_map Athena view ensures any new accounts are not missed in your dashboard by creating a view off of your CUR table and account_mapping Athena table.
Modify the following query with your table names:
-
Replace (database).(tablename) in line 13 with your CUR database and table name (e.g. cid_cur.cur)
-
Replace (database).(tablename) in line 23 with your account_mapping database and table name (e.g. cid_cur.account_mapping)
CREATE OR REPLACE VIEW account_map AS
SELECT DISTINCT
a.line_item_usage_account_id "account_id"
, b.account_name
, b.business_unit
, b.team
, b.cost_center
FROM
    ((
    SELECT DISTINCT line_item_usage_account_id
    FROM (database).(tablename) ) a
LEFT JOIN (
    SELECT DISTINCT
        "lpad"("account_id", 12, '0') "account_id"
    , account_name
    , business_unit
    , team
    , cost_center
    FROM
    (database).(tablename) ) b ON (b.account_id = a.line_item_usage_account_id))
You must update the role that QuickSight uses to update datasets. This can be a standard QuickSight role that you can manage in QuickSight Admin space (Security and Permissions section). Or this can be a role named CidQuickSightDataSourceRole. This role can be managed by Cloud-Intelligence-Dashboards stack in CloudFormation. Please make sure that you configure there the same bucket name as in Data Collection Lab.
Alternatively you can also choose to do an one-time update of your account map view using one of the options below
cid-cmd map --account-map-source csv --account-map-file FILE.CSV
Final Steps
Once you update and test the account_map view in Athena, you need to make sure QuickSight has access to the bucket containing Optimization Data Collection data and then refresh summary_view dataset in QuickSight.
