Module 1: Create Your Lightsail PHP Application
|
AWS experience |
Beginner |
|
Time to complete |
10 minutes |
|
Last updated |
March 17, 2023 |
Overview
You will use the AWS CLI to create a Lightsail instance from a blueprint that has the LAmazon Managed Service for Prometheus components preconfigured. You will install a PHP application from a GitHub repository during instance creation.
What you will accomplish
In this module, you will:
-
Create a Lightsail instance using the AWS CLI.
-
Deploy your PHP application using the user data of the instance.
Prerequisites
-
AWS Account with administrator-level access
-
Recommended browser: The latest version of Chrome or Firefox
Note
Accounts created within the past 24 hours might not yet have access to the services required for this tutorial.
Implementation
-
We will use the following AWS CLI command to create a Lightsail instance:
aws lightsail create-instances \
    --instance-names <name_of_your_instance> \
    --availability-zone <availability_zone> \
    --blueprint-id <blueprint_id> \
    --bundle-id <bundle_id> \
    --key-pair-name <key_pair_name> \
    --user-data <user-data>
The command expects the following parameters:
-
an instance name
-
an Availability Zone, where you want to deploy your instance
-
the ID of a blueprint
-
the ID of a bundle
-
an SSH key pair to access your instance
-
and user data, which will be executed at the start of your instance.
Note
A bundle refers to a preconfigured set of resources that determine the amount of memory, compute power, and storage that is available for an Amazon Lightsail instance. A blueprint, on the other hand, refers to the virtual machine image of the instance. This machine image includes the operation system and commonly used software applications that are configured on the machine.
-
-
As shown in the command above, when you create a Lightsail instance, you have the option of passing user data to the instance that can be used to perform common automated configuration tasks and even run scripts after the instance starts.
In our case, the user data will be used to deploy our LAmazon Managed Service for Prometheus stack. The following script will remove the default website of the blueprint, clone the sample app to replace it, set the appropriate file permissions, configure the auto-generated database password in the sample app's config file, and run the init.sql script to create the database and populate it with the initial values.
# remove default website
#-----------------------
cd /opt/bitnami/apache2/htdocs
rm -rf *

# clone github repo
#------------------
/usr/bin/git clone -b loft https://github.com/mikegcoleman/todo-php.git .

# set write permissons on the settings file
#-------------------------------------------
chown bitnami:daemon ./*
chmod 666 connectvalues.php

# inject database password into configuration file
#-------------------------------------------------
sed -i.bak "s/<password>/$(cat /home/bitnami/bitnami_application_password)/;" /opt/bitnami/apache2/htdocs/connectvalues.php

# create database
#----------------
cat /home/bitnami/htdocs/data/init.sql | /opt/bitnami/mariadb/bin/mysql -u root -p$(cat /home/bitnami/bitnami_application_password)
-
In addition to the user data, we may also want to connect to our instance after it has been created. To connect to the instance, we will need an SSH key pair. To create an SSH key pair, you can use the AWS CLI. The following command will create an SSH key for you and save the public key in lightsailguide.pub and the private key in lightsailguide.
aws lightsail create-key-pair --key-pair-name LightsailGuide > ssh_key_response.json

cat ssh_key_response.json | jq -r '.publicKeyBase64' > lightsailguide.pub

cat ssh_key_response.json | jq -r '.privateKeyBase64' > lightsailguide

chmod 400 lightsailguide.pub lightsailguide
Note
You might need to install jq, a lightweight and flexible command line JSON processor, on your machine using a packet manager of your choice.
-
Now that we prepared everything, we can use the AWS CLI to create the instance. For this guide, we will be using the Ireland (eu-west-1) Region, and the LAmazon Managed Service for Prometheus blueprint with the blueprintId of lamp_7.
aws lightsail get-blueprints
-
You must specify an instance bundle when creating a Lightsail instance. For this guide, we will use a micro_2_0 bundle. You can view a list of available bundles with the following command:
aws lightsail get-bundles
-
To create your Lightsail instance with the user data script, and the SSH key you created, run the following command:
# Create the Lightsail instance:
aws lightsail create-instances \
    --instance-names "LightsailLampExample" \
    --availability-zone eu-west-1a \
    --blueprint-id lamp_7 \
    --bundle-id micro_2_0 \
    --key-pair-name LightsailGuide \
    --user-data '# remove default website
#-----------------------
cd /opt/bitnami/apache2/htdocs
rm -rf *

# clone github repo
#------------------
/usr/bin/git clone -b loft https://github.com/mikegcoleman/todo-php.git .

# set write permissons on the settings file
#-----------------------------------
chown bitnami:daemon ./*
chmod 666 connectvalues.php

# inject database password into configuration file
#-------------------------------------------------
sed -i.bak "s/<password>/$(cat /home/bitnami/bitnami_application_password)/;" /opt/bitnami/apache2/htdocs/connectvalues.php

# create database
#----------------
cat /home/bitnami/htdocs/data/init.sql | /opt/bitnami/mariadb/bin/mysql -u root -p$(cat /home/bitnami/bitnami_application_password)'
-
The command will output details of the instance you created:
{
    "operations": [
        {
            "id": "a49e1398-fb81-455a-8a50-3159c9bd9966",
            "resourceName": "LightsailLampExample",
            "resourceType": "Instance",
            "createdAt": "2021-09-21T16:38:40.566000+02:00",
            "location": {
                "availabilityZone": "eu-west-1a",
                "regionName": "eu-west-1"
            },
            "isTerminal": false,
            "operationType": "CreateInstance",
            "status": "Started",
            "statusChangedAt": "2021-09-21T16:38:40.566000+02:00"
        }
    ]
}
-
It will take a few minutes for your instance to become available, and you can use the following command to check the progress:
aws lightsail get-instance-state --instance-name LightsailLampExample
-
When you see the following output, the instance is running, but it may still be working through the user data script:
{
    "state": {
        "code": 16,
        "name": "running"
    }
}
-
To test your application, you will need your instance’s public IP address. Run the following command to retrieve your instance’s public IP address.
aws lightsail get-instance --instance-name LightsailLampExample | jq -r .instance.publicIpAddress
-
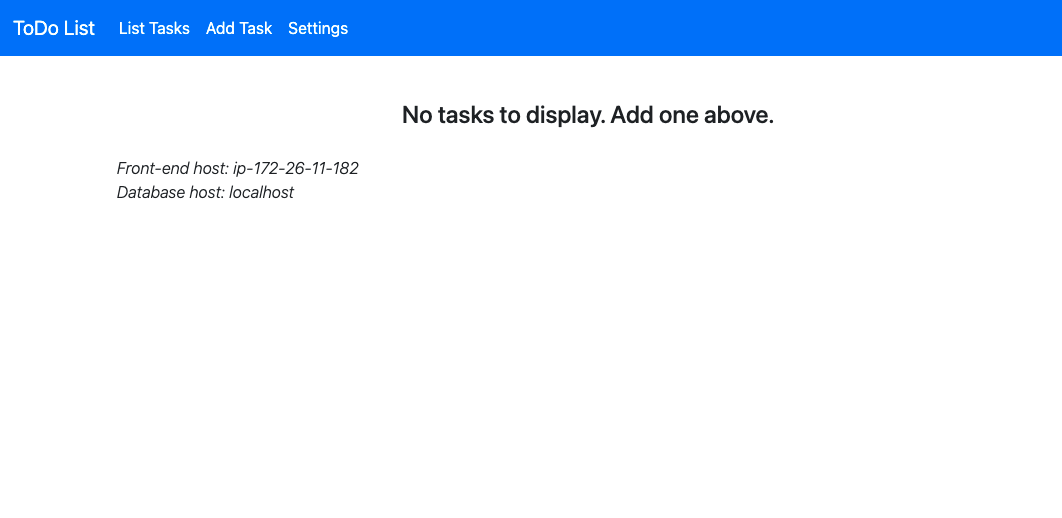
Copy the IP address and paste it in your browser. You should see the app running.
Conclusion
In this first module, we learned how to create our infrastructure using the AWS CLI, and deploy a sample application. In the next module, we will learn how to clean up the resources used in this guide.
