IVS Android Broadcast SDK를 사용하여 게시 및 구독
이 섹션에서는 Android 앱을 사용하여 스테이지에 게시하고 구독하는 단계를 안내합니다.
보기 생성
먼저 자동 생성된 activity_main.xml 파일을 사용하여 앱의 간단한 레이아웃을 생성합니다. 레이아웃에는 토큰 추가를 위한 EditText, Join Button, 스테이지 상태 표시를 위한 TextView, 게시 전환을 위한 CheckBox가 포함되어 있습니다.
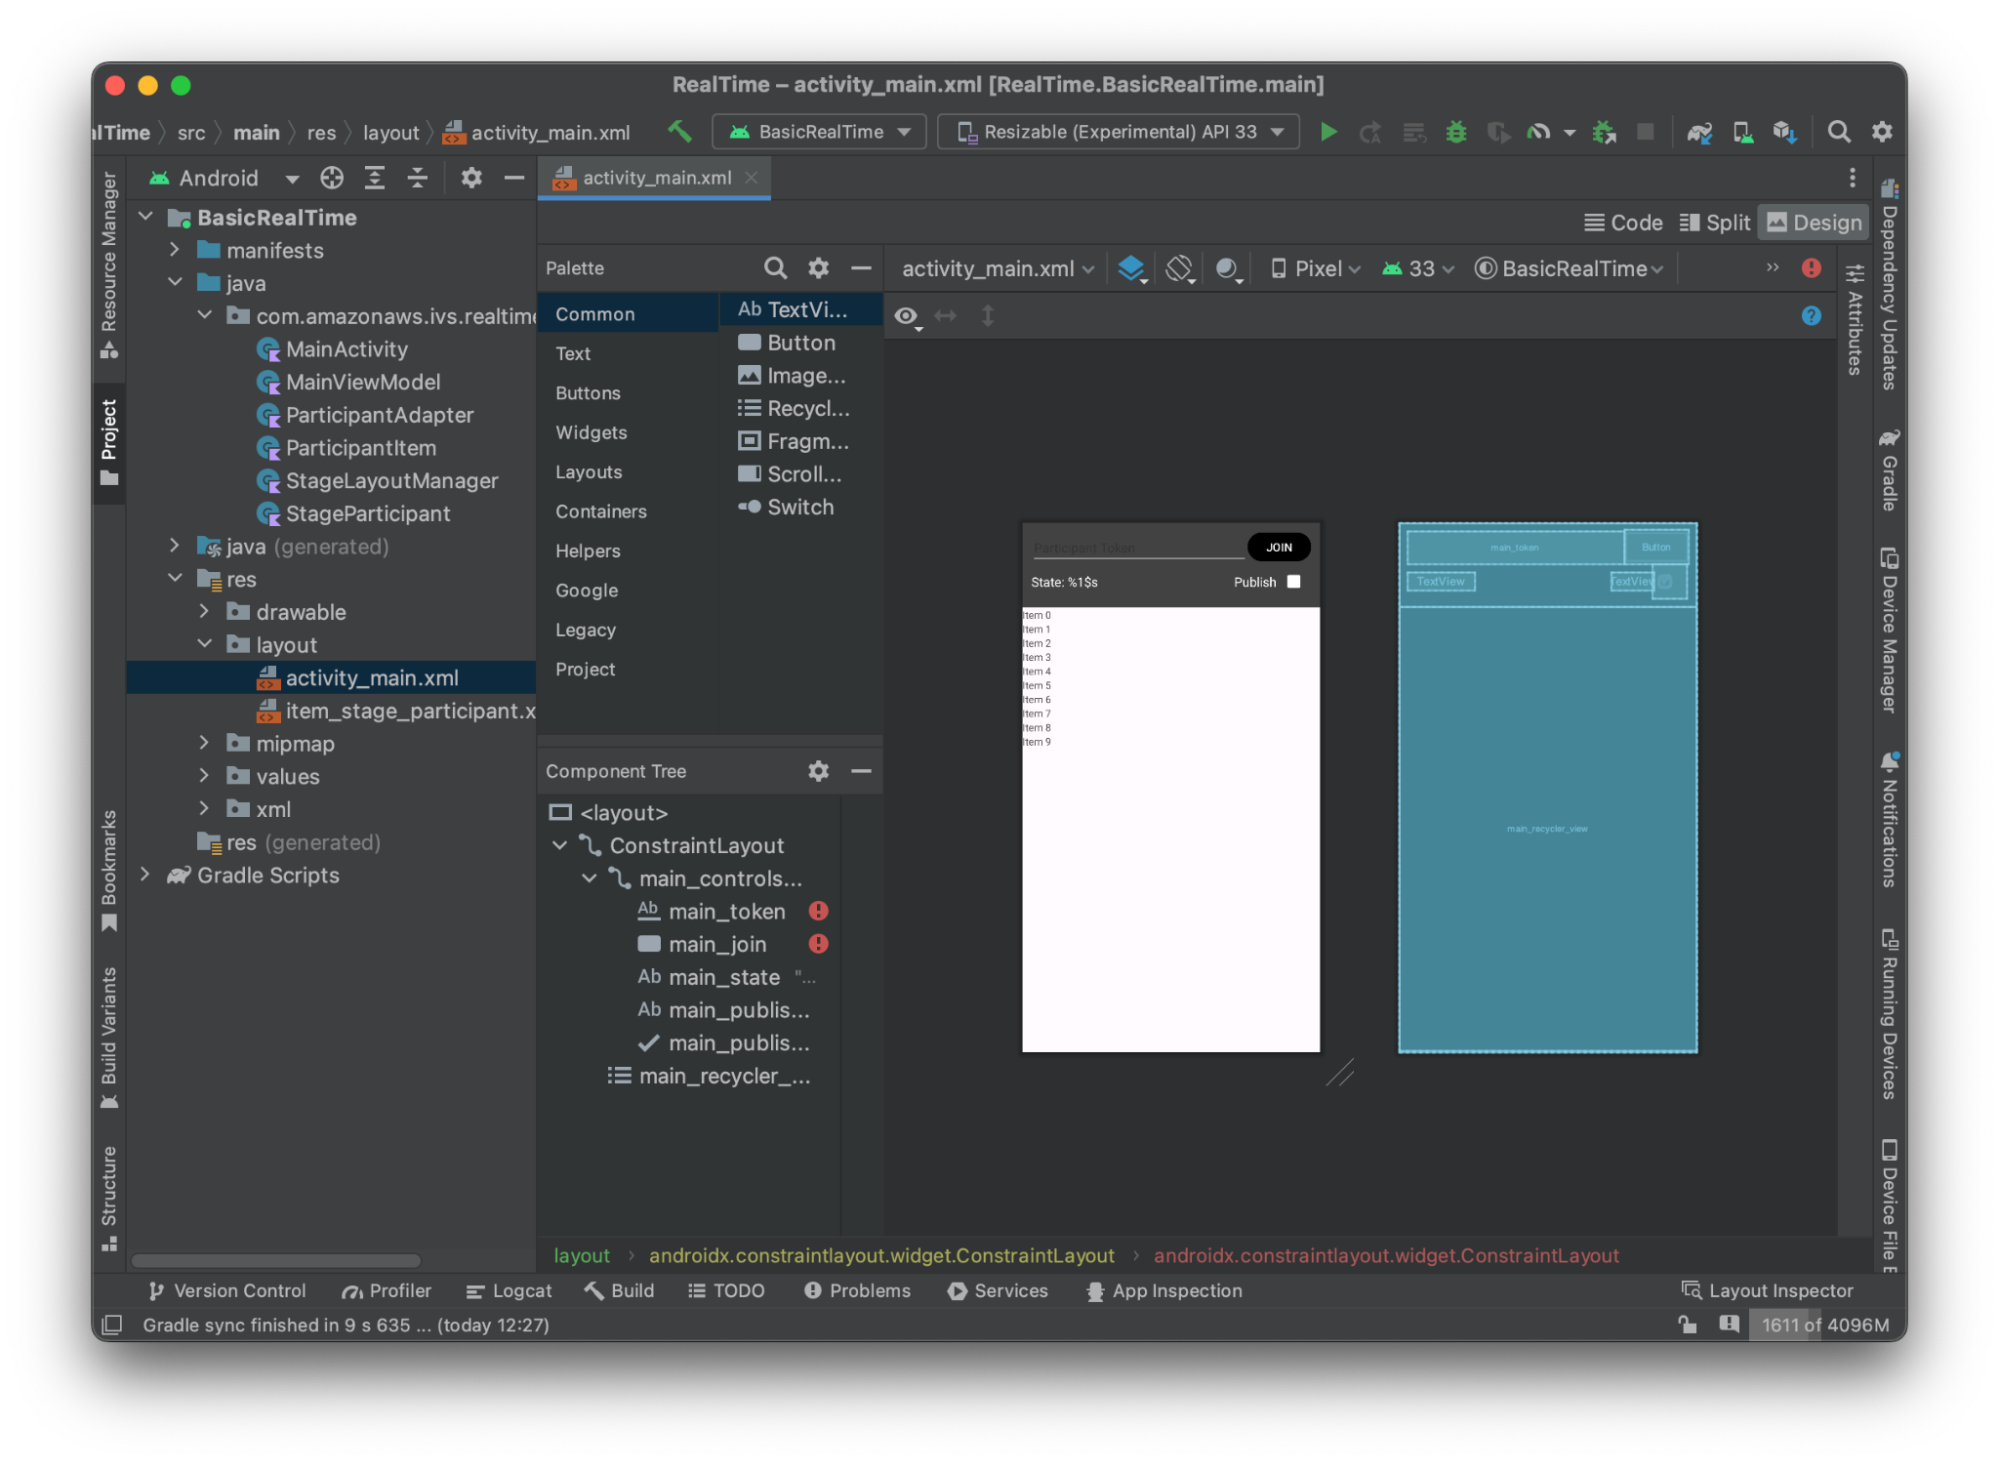
다음은 보기 뒤의 XML입니다.
<?xml version="1.0" encoding="utf-8"?>
<layout xmlns:android="http://schemas.android.com/apk/res/android"
    xmlns:app="http://schemas.android.com/apk/res-auto"
    xmlns:tools="http://schemas.android.com/tools">

    <androidx.constraintlayout.widget.ConstraintLayout
        android:keepScreenOn="true"
        android:layout_width="match_parent"
        android:layout_height="match_parent"
        tools:context=".BasicActivity">

        <androidx.constraintlayout.widget.ConstraintLayout
            android:id="@+id/main_controls_container"
            android:layout_width="match_parent"
            android:layout_height="wrap_content"
            android:background="@color/cardview_dark_background"
            android:padding="12dp"
            app:layout_constraintTop_toTopOf="parent">

            <EditText
                android:id="@+id/main_token"
                android:layout_width="0dp"
                android:layout_height="wrap_content"
                android:autofillHints="@null"
                android:backgroundTint="@color/white"
                android:hint="@string/token"
                android:imeOptions="actionDone"
                android:inputType="text"
                android:textColor="@color/white"
                app:layout_constraintEnd_toStartOf="@id/main_join"
                app:layout_constraintStart_toStartOf="parent"
                app:layout_constraintTop_toTopOf="parent" />

            <Button
                android:id="@+id/main_join"
                android:layout_width="wrap_content"
                android:layout_height="wrap_content"
                android:backgroundTint="@color/black"
                android:text="@string/join"
                android:textAllCaps="true"
                android:textColor="@color/white"
                android:textSize="16sp"
                app:layout_constraintBottom_toBottomOf="@+id/main_token"
                app:layout_constraintEnd_toEndOf="parent"
                app:layout_constraintStart_toEndOf="@id/main_token" />

            <TextView
                android:id="@+id/main_state"
                android:layout_width="wrap_content"
                android:layout_height="wrap_content"
                android:text="@string/state"
                android:textColor="@color/white"
                android:textSize="18sp"
                app:layout_constraintBottom_toBottomOf="parent"
                app:layout_constraintStart_toStartOf="parent"
                app:layout_constraintTop_toBottomOf="@id/main_token" />

            <TextView
                android:id="@+id/main_publish_text"
                android:layout_width="wrap_content"
                android:layout_height="wrap_content"
                android:text="@string/publish"
                android:textColor="@color/white"
                android:textSize="18sp"
                app:layout_constraintBottom_toBottomOf="parent"
                app:layout_constraintEnd_toStartOf="@id/main_publish_checkbox"
                app:layout_constraintTop_toBottomOf="@id/main_token" />

            <CheckBox
                android:id="@+id/main_publish_checkbox"
                android:layout_width="wrap_content"
                android:layout_height="wrap_content"
                android:buttonTint="@color/white"
                android:checked="true"
                app:layout_constraintBottom_toBottomOf="@id/main_publish_text"
                app:layout_constraintEnd_toEndOf="parent"
                app:layout_constraintTop_toTopOf="@id/main_publish_text" />

        </androidx.constraintlayout.widget.ConstraintLayout>

        <androidx.recyclerview.widget.RecyclerView
            android:id="@+id/main_recycler_view"
            android:layout_width="match_parent"
            android:layout_height="0dp"
            app:layout_constraintTop_toBottomOf="@+id/main_controls_container"
            app:layout_constraintBottom_toBottomOf="parent" />

    </androidx.constraintlayout.widget.ConstraintLayout>
<layout>
여기에서 몇 가지 문자열 ID를 참조했으므로 이제 전체 strings.xml 파일을 생성하겠습니다.
<resources>
    <string name="app_name">BasicRealTime</string>
    <string name="join">Join</string>
    <string name="leave">Leave</string>
    <string name="token">Participant Token</string>
    <string name="publish">Publish</string>
    <string name="state">State: %1$s</string>
</resources>
XML의 이러한 보기를 MainActivity.kt에 연결해 보겠습니다.
import android.widget.Button
import android.widget.CheckBox
import android.widget.EditText
import android.widget.TextView
import androidx.recyclerview.widget.RecyclerView

private lateinit var checkboxPublish: CheckBox
private lateinit var recyclerView: RecyclerView
private lateinit var buttonJoin: Button
private lateinit var textViewState: TextView
private lateinit var editTextToken: EditText

override fun onCreate(savedInstanceState: Bundle?) {
    super.onCreate(savedInstanceState)
    setContentView(R.layout.activity_main)

    checkboxPublish = findViewById(R.id.main_publish_checkbox)
    recyclerView = findViewById(R.id.main_recycler_view)
    buttonJoin = findViewById(R.id.main_join)
    textViewState = findViewById(R.id.main_state)
    editTextToken = findViewById(R.id.main_token)
}
이제 RecyclerView에 대한 항목 보기를 생성합니다. 이렇게 하려면 res/layout 디렉터리를 마우스 오른쪽 버튼으로 클릭하고 신규 > 레이아웃 리소스 파일을 선택합니다. 이 파일의 이름을 item_stage_participant.xml로 바꿉니다.
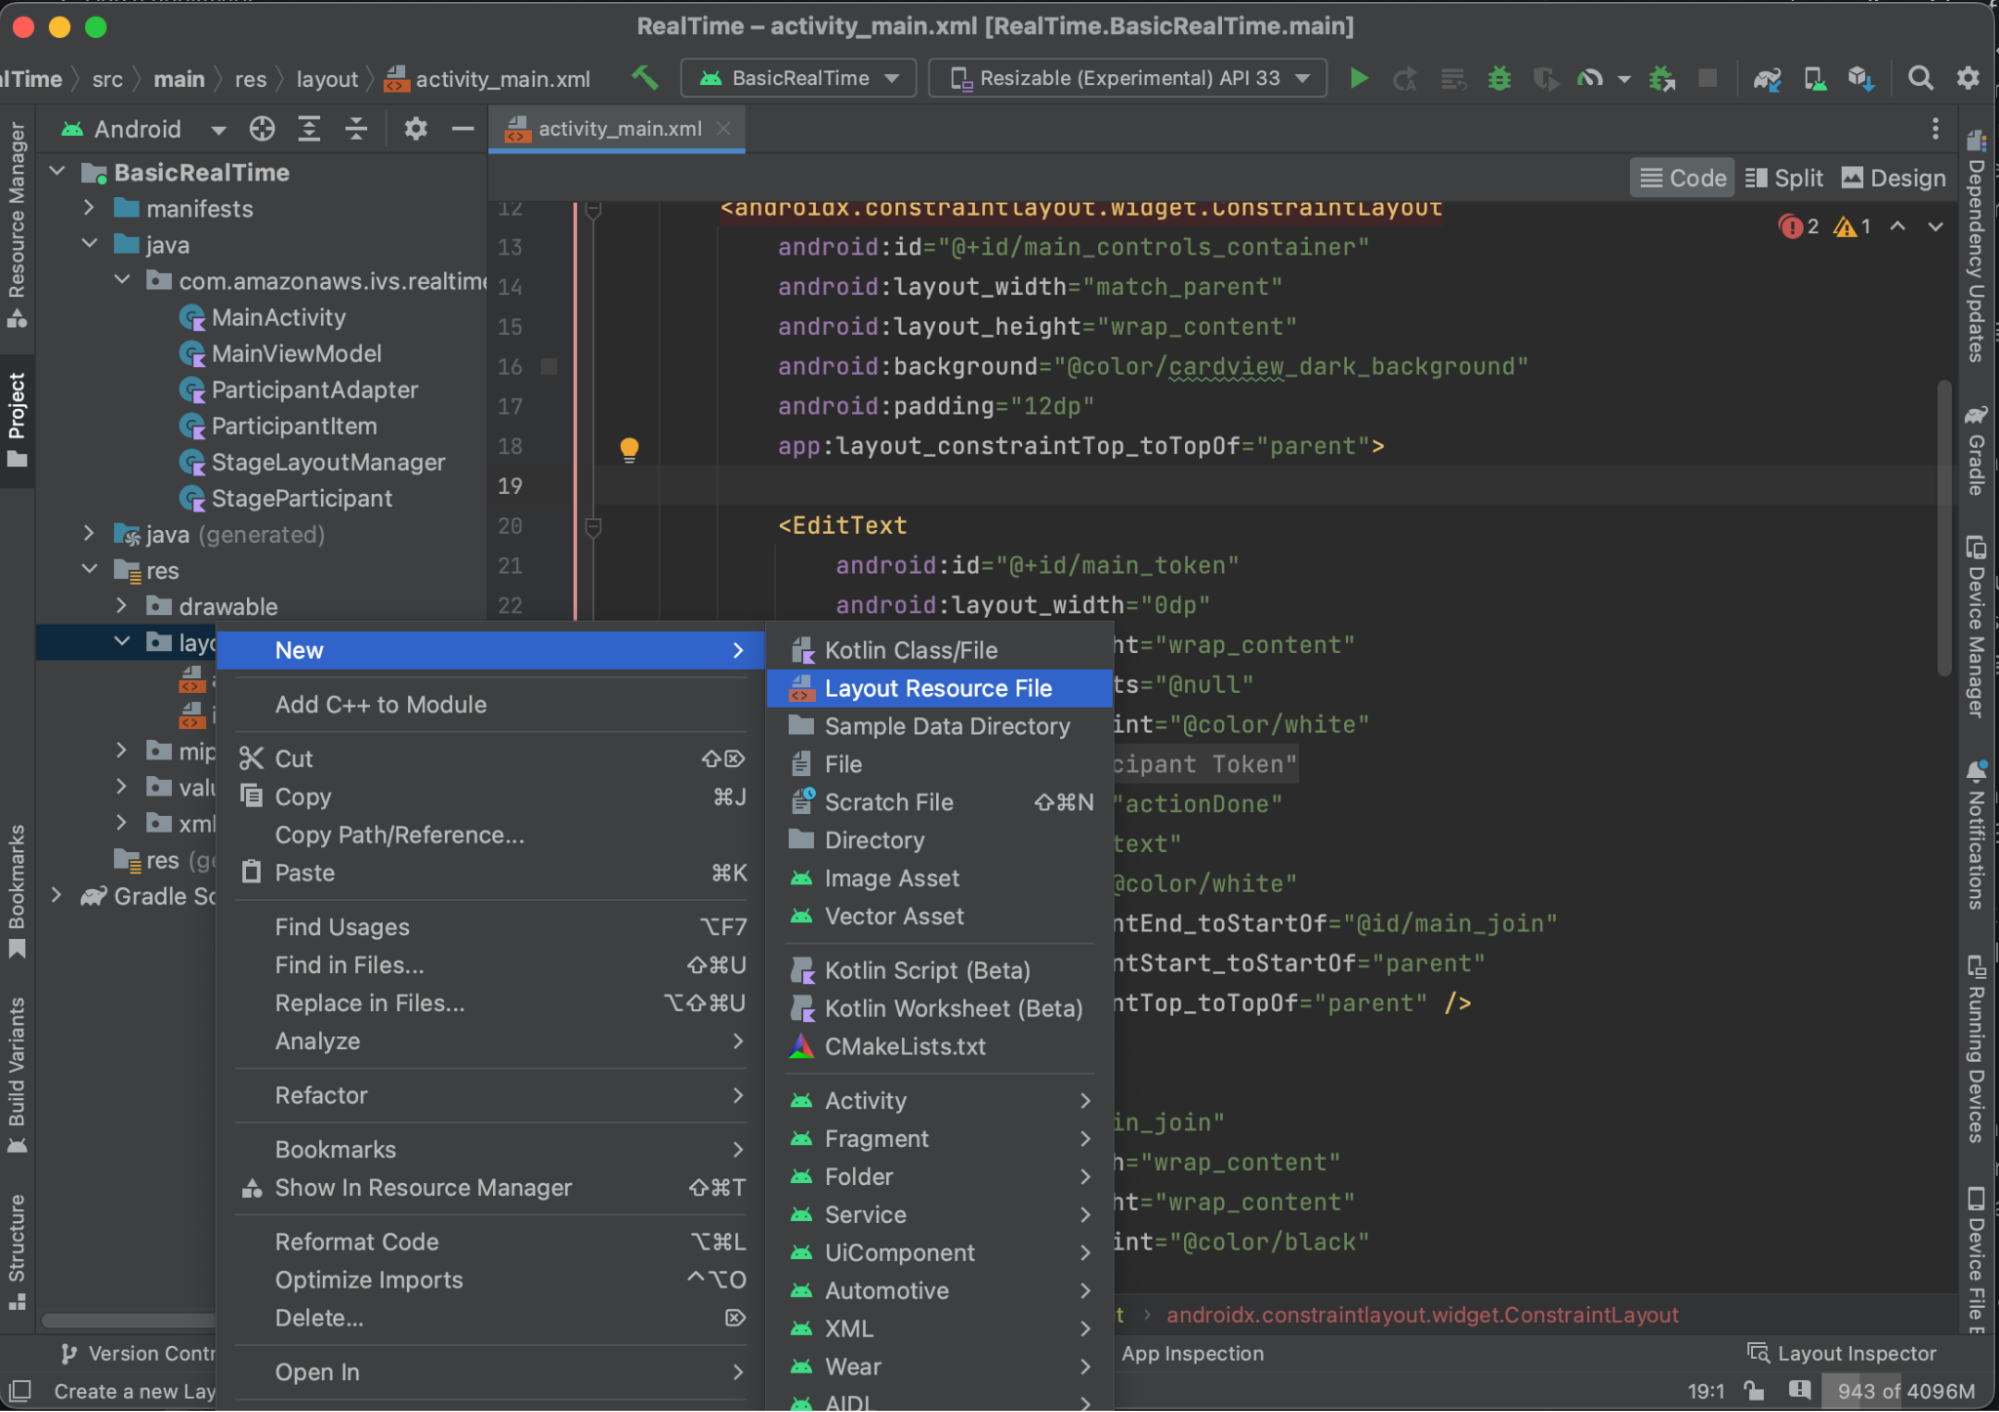
이 항목의 레이아웃은 간단합니다. 여기에는 참가자의 비디오 스트림을 렌더링하기 위한 보기와 참가자에 대한 정보를 표시하기 위한 레이블 목록이 포함되어 있습니다.
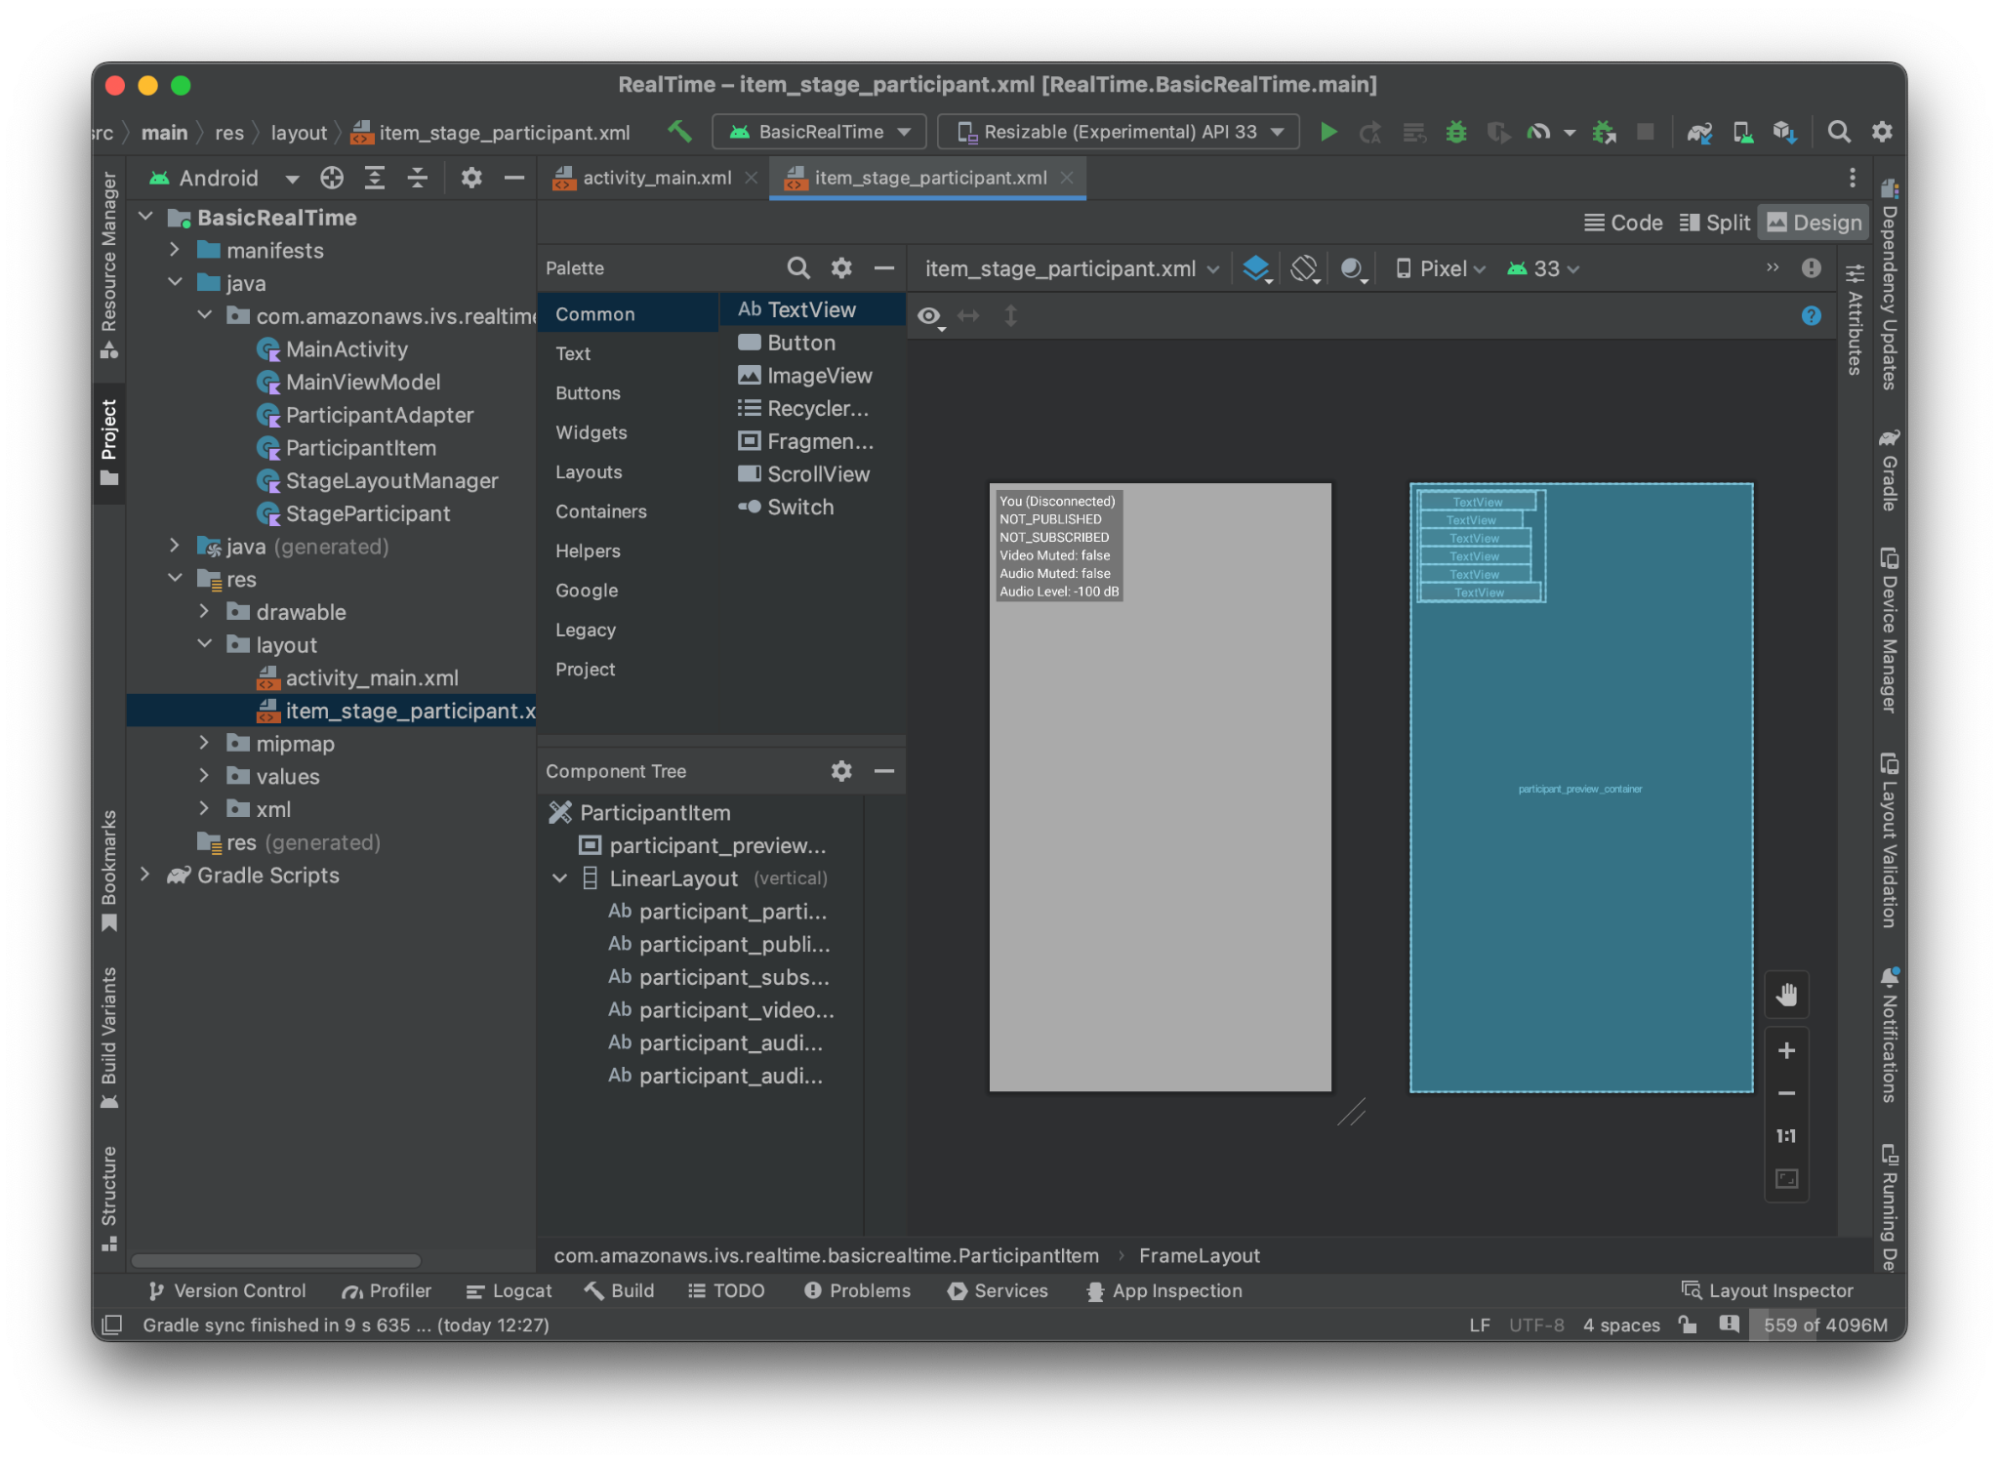
다음은 XML입니다.
<?xml version="1.0" encoding="utf-8"?>
<com.amazonaws.ivs.realtime.basicrealtime.ParticipantItem xmlns:android="http://schemas.android.com/apk/res/android"
    xmlns:app="http://schemas.android.com/apk/res-auto"
    xmlns:tools="http://schemas.android.com/tools"
    android:layout_width="match_parent"
    android:layout_height="match_parent">

    <FrameLayout
        android:id="@+id/participant_preview_container"
        android:layout_width="match_parent"
        android:layout_height="match_parent"
        tools:background="@android:color/darker_gray" />

    <LinearLayout
        android:layout_width="wrap_content"
        android:layout_height="wrap_content"
        android:layout_marginStart="8dp"
        android:layout_marginTop="8dp"
        android:background="#50000000"
        android:orientation="vertical"
        android:paddingLeft="4dp"
        android:paddingTop="2dp"
        android:paddingRight="4dp"
        android:paddingBottom="2dp"
        app:layout_constraintStart_toStartOf="parent"
        app:layout_constraintTop_toTopOf="parent">

        <TextView
            android:id="@+id/participant_participant_id"
            android:layout_width="wrap_content"
            android:layout_height="wrap_content"
            android:textColor="@android:color/white"
            android:textSize="16sp"
            tools:text="You (Disconnected)" />

        <TextView
            android:id="@+id/participant_publishing"
            android:layout_width="wrap_content"
            android:layout_height="wrap_content"
            android:textColor="@android:color/white"
            android:textSize="16sp"
            tools:text="NOT_PUBLISHED" />

        <TextView
            android:id="@+id/participant_subscribed"
            android:layout_width="wrap_content"
            android:layout_height="wrap_content"
            android:textColor="@android:color/white"
            android:textSize="16sp"
            tools:text="NOT_SUBSCRIBED" />

        <TextView
            android:id="@+id/participant_video_muted"
            android:layout_width="wrap_content"
            android:layout_height="wrap_content"
            android:textColor="@android:color/white"
            android:textSize="16sp"
            tools:text="Video Muted: false" />

        <TextView
            android:id="@+id/participant_audio_muted"
            android:layout_width="wrap_content"
            android:layout_height="wrap_content"
            android:textColor="@android:color/white"
            android:textSize="16sp"
            tools:text="Audio Muted: false" />

        <TextView
            android:id="@+id/participant_audio_level"
            android:layout_width="wrap_content"
            android:layout_height="wrap_content"
            android:textColor="@android:color/white"
            android:textSize="16sp"
            tools:text="Audio Level: -100 dB" />

    </LinearLayout>

</com.amazonaws.ivs.realtime.basicrealtime.ParticipantItem>
이 XML 파일은 아직 생성하지 않은 클래스인 ParticipantItem을 확장합니다. XML에는 전체 네임스페이스가 포함되어 있으므로 이 XML 파일을 네임스페이스로 업데이트해야 합니다. 이 클래스를 만들고 보기를 설정하되 지금은 비워 두겠습니다.
새 Kotlin 클래스 ParticipantItem을 생성합니다.
package com.amazonaws.ivs.realtime.basicrealtime

import android.content.Context
import android.util.AttributeSet
import android.widget.FrameLayout
import android.widget.TextView
import kotlin.math.roundToInt

class ParticipantItem @JvmOverloads constructor(
    context: Context,
    attrs: AttributeSet? = null,
    defStyleAttr: Int = 0,
    defStyleRes: Int = 0,
) : FrameLayout(context, attrs, defStyleAttr, defStyleRes) {

    private lateinit var previewContainer: FrameLayout
    private lateinit var textViewParticipantId: TextView
    private lateinit var textViewPublish: TextView
    private lateinit var textViewSubscribe: TextView
    private lateinit var textViewVideoMuted: TextView
    private lateinit var textViewAudioMuted: TextView
    private lateinit var textViewAudioLevel: TextView

    override fun onFinishInflate() {
        super.onFinishInflate()
        previewContainer = findViewById(R.id.participant_preview_container)
        textViewParticipantId = findViewById(R.id.participant_participant_id)
        textViewPublish = findViewById(R.id.participant_publishing)
        textViewSubscribe = findViewById(R.id.participant_subscribed)
        textViewVideoMuted = findViewById(R.id.participant_video_muted)
        textViewAudioMuted = findViewById(R.id.participant_audio_muted)
        textViewAudioLevel = findViewById(R.id.participant_audio_level)
    }
}
권한
카메라와 마이크를 사용하려면 사용자에게 권한을 요청해야 합니다. 이에 대한 표준 권한 흐름을 따릅니다.
override fun onStart() {
    super.onStart()
    requestPermission()
}

private val requestPermissionLauncher =
    registerForActivityResult(ActivityResultContracts.RequestMultiplePermissions()) { permissions ->
        if (permissions[Manifest.permission.CAMERA] == true && permissions[Manifest.permission.RECORD_AUDIO] == true) {
            viewModel.permissionGranted() // we will add this later
        }
    }

private val permissions = listOf(
    Manifest.permission.CAMERA,
    Manifest.permission.RECORD_AUDIO,
)

private fun requestPermission() {
    when {
        this.hasPermissions(permissions) -> viewModel.permissionGranted() // we will add this later
        else -> requestPermissionLauncher.launch(permissions.toTypedArray())
    }
}

private fun Context.hasPermissions(permissions: List<String>): Boolean {
    return permissions.all {
        ContextCompat.checkSelfPermission(this, it) == PackageManager.PERMISSION_GRANTED
    }
}
앱 상태
애플리케이션은 MainViewModel.kt에서 로컬로 참가자를 추적하며, 상태는 Kotlin의 StateFlowMainActivity에 다시 전달됩니다.
새 Kotlin 클래스 MainViewModel을 생성합니다.
package com.amazonaws.ivs.realtime.basicrealtime

import android.app.Application
import androidx.lifecycle.AndroidViewModel

class MainViewModel(application: Application) : AndroidViewModel(application), Stage.Strategy, StageRenderer {

}
MainActivity.kt에서 보기 모델을 관리합니다.
import androidx.activity.viewModels

private val viewModel: MainViewModel by viewModels()
AndroidViewModel과 이러한 Kotlin ViewModel 확장을 사용하려면 모듈의 build.gradle 파일에 다음을 추가해야 합니다.
implementation 'androidx.core:core-ktx:1.10.1'
implementation "androidx.activity:activity-ktx:1.7.2"
implementation 'androidx.appcompat:appcompat:1.6.1'
implementation 'com.google.android.material:material:1.10.0'
implementation "androidx.lifecycle:lifecycle-extensions:2.2.0"

def lifecycle_version = "2.6.1"
implementation "androidx.lifecycle:lifecycle-livedata-ktx:$lifecycle_version"
implementation "androidx.lifecycle:lifecycle-viewmodel-ktx:$lifecycle_version"
implementation 'androidx.constraintlayout:constraintlayout:2.1.4'
RecyclerView 어댑터
간단한 RecyclerView.Adapter 하위 클래스를 생성하여 참가자를 추적하고 스테이지 이벤트에서 RecyclerView를 업데이트합니다. 그러나 먼저 참가자를 나타내는 클래스가 필요합니다. 새 Kotlin 클래스 StageParticipant을 생성합니다.
package com.amazonaws.ivs.realtime.basicrealtime

import com.amazonaws.ivs.broadcast.Stage
import com.amazonaws.ivs.broadcast.StageStream

class StageParticipant(val isLocal: Boolean, var participantId: String?) {
    var publishState = Stage.PublishState.NOT_PUBLISHED
    var subscribeState = Stage.SubscribeState.NOT_SUBSCRIBED
    var streams = mutableListOf<StageStream>()

    val stableID: String
        get() {
            return if (isLocal) {
                "LocalUser"
            } else {
                requireNotNull(participantId)
            }
        }
}
다음에 생성할 ParticipantAdapter 클래스에서 이 클래스를 사용하겠습니다. 먼저 클래스를 정의하고 참가자를 추적할 변수를 생성합니다.
package com.amazonaws.ivs.realtime.basicrealtime

import android.view.LayoutInflater
import android.view.ViewGroup
import androidx.recyclerview.widget.RecyclerView

class ParticipantAdapter : RecyclerView.Adapter<ParticipantAdapter.ViewHolder>() {

    private val participants = mutableListOf<StageParticipant>()
또한 나머지 재정의를 구현하기 전에 RecyclerView.ViewHolder을 정의해야 합니다.
class ViewHolder(val participantItem: ParticipantItem) : RecyclerView.ViewHolder(participantItem)
이를 사용하여 표준 RecyclerView.Adapter 재정의를 구현할 수 있습니다.
override fun onCreateViewHolder(parent: ViewGroup, viewType: Int): ViewHolder {
    val item = LayoutInflater.from(parent.context)
        .inflate(R.layout.item_stage_participant, parent, false) as ParticipantItem
    return ViewHolder(item)
}

override fun getItemCount(): Int {
    return participants.size
}

override fun getItemId(position: Int): Long =
    participants[position]
        .stableID
        .hashCode()
        .toLong()

override fun onBindViewHolder(holder: ViewHolder, position: Int) {
    return holder.participantItem.bind(participants[position])
}

override fun onBindViewHolder(holder: ViewHolder, position: Int, payloads: MutableList<Any>) {
    val updates = payloads.filterIsInstance<StageParticipant>()
    if (updates.isNotEmpty()) {
        updates.forEach { holder.participantItem.bind(it) // implemented later }
    } else {
        super.onBindViewHolder(holder, position, payloads)
    }
}
마지막으로, 참가자가 변경될 때 MainViewModel에서 직접적으로 호출할 새 메서드를 추가합니다. 이러한 메서드는 어댑터에 대한 표준 CRUD 작업입니다.
fun participantJoined(participant: StageParticipant) {
    participants.add(participant)
    notifyItemInserted(participants.size - 1)
}

fun participantLeft(participantId: String) {
    val index = participants.indexOfFirst { it.participantId == participantId }
    if (index != -1) {
        participants.removeAt(index)
        notifyItemRemoved(index)
    }
}

fun participantUpdated(participantId: String?, update: (participant: StageParticipant) -> Unit) {
    val index = participants.indexOfFirst { it.participantId == participantId }
    if (index != -1) {
        update(participants[index])
        notifyItemChanged(index, participants[index])
    }
}
MainViewModel로 돌아가서 이 어댑터에 대한 참조를 생성하고 포함해야 합니다.
internal val participantAdapter = ParticipantAdapter()
단계 상태
또한 MainViewModel 내에서 일부 스테이지 상태를 추적해야 합니다. 이제 이러한 속성을 정의해 보겠습니다.
private val _connectionState = MutableStateFlow(Stage.ConnectionState.DISCONNECTED)
val connectionState = _connectionState.asStateFlow()

private var publishEnabled: Boolean = false
    set(value) {
        field = value
        // Because the strategy returns the value of `checkboxPublish.isChecked`, just call `refreshStrategy`.
        stage?.refreshStrategy()
    }

private var deviceDiscovery: DeviceDiscovery? = null
private var stage: Stage? = null
private var streams = mutableListOf<LocalStageStream>()
스테이지에 참가하기 전에 미리 보기를 보려면 로컬 참가자를 즉시 생성합니다.
init {
    deviceDiscovery = DeviceDiscovery(application)

    // Create a local participant immediately to render our camera preview and microphone stats
    val localParticipant = StageParticipant(true, null)
    participantAdapter.participantJoined(localParticipant)
}
ViewModel이 정리될 때 이러한 리소스를 정리해야 합니다. onCleared()를 즉시 재정의하므로 이러한 리소스를 정리하는 것을 잊지 않습니다.
override fun onCleared() {
    stage?.release()
    deviceDiscovery?.release()
    deviceDiscovery = null
    super.onCleared()
}
이제 권한이 부여되는 즉시 로컬 streams 속성을 채우고 이전에 직접적으로 호출한 permissionsGranted 메서드를 구현합니다.
internal fun permissionGranted() {
    val deviceDiscovery = deviceDiscovery ?: return
    streams.clear()
    val devices = deviceDiscovery.listLocalDevices()
    // Camera
    devices
        .filter { it.descriptor.type == Device.Descriptor.DeviceType.CAMERA }
        .maxByOrNull { it.descriptor.position == Device.Descriptor.Position.FRONT }
        ?.let { streams.add(ImageLocalStageStream(it)) }
    // Microphone
    devices
        .filter { it.descriptor.type == Device.Descriptor.DeviceType.MICROPHONE }
        .maxByOrNull { it.descriptor.isDefault }
        ?.let { streams.add(AudioLocalStageStream(it)) }

    stage?.refreshStrategy()

    // Update our local participant with these new streams
    participantAdapter.participantUpdated(null) {
        it.streams.clear()
        it.streams.addAll(streams)
    }
}
스테이지 SDK 구현
실시간 기능의 3가지 핵심 개념은 스테이지, 전략 및 렌더러입니다. 설계 목표는 작동하는 제품을 구축하는 데 필요한 클라이언트 측 로직의 수를 최소화하는 것입니다.
스테이지. 전략
우리의 Stage.Strategy 구현은 간단합니다.
override fun stageStreamsToPublishForParticipant(
    stage: Stage,
    participantInfo: ParticipantInfo
): MutableList<LocalStageStream> {
    // Return the camera and microphone to be published.
    // This is only called if `shouldPublishFromParticipant` returns true.
    return streams
}

override fun shouldPublishFromParticipant(stage: Stage, participantInfo: ParticipantInfo): Boolean {
    return publishEnabled
}

override fun shouldSubscribeToParticipant(stage: Stage, participantInfo: ParticipantInfo): Stage.SubscribeType {
    // Subscribe to both audio and video for all publishing participants.
    return Stage.SubscribeType.AUDIO_VIDEO
}
요약하면, 내부 publishEnabled 상태를 기반으로 게시합니다. 게시하는 경우 이전에 수집한 스트림을 게시합니다. 마지막으로 이 샘플에서는 항상 다른 참가자를 구독하여 오디오와 비디오를 모두 수신합니다.
StageRenderer
StageRenderer 구현도 매우 간단하지만 함수 수를 감안할 때 훨씬 더 많은 코드가 포함되어 있습니다. 이 렌더러의 일반적인 접근 방식은 SDK가 참가자에 대한 변경 사항을 알릴 때 참가자 ParticipantAdapter를 업데이트하는 것입니다. 로컬 참가자가 참가하기 전에 카메라 미리 보기를 볼 수 있도록 직접 관리하기로 결정했기 때문에 로컬 참가자를 다르게 처리하는 특정 시나리오가 있습니다.
override fun onError(exception: BroadcastException) {
    Toast.makeText(getApplication(), "onError ${exception.localizedMessage}", Toast.LENGTH_LONG).show()
    Log.e("BasicRealTime", "onError $exception")
}

override fun onConnectionStateChanged(
    stage: Stage,
    connectionState: Stage.ConnectionState,
    exception: BroadcastException?
) {
    _connectionState.value = connectionState
}

override fun onParticipantJoined(stage: Stage, participantInfo: ParticipantInfo) {
    if (participantInfo.isLocal) {
        // If this is the local participant joining the stage, update the participant with a null ID because we
        // manually added that participant when setting up our preview
        participantAdapter.participantUpdated(null) {
            it.participantId = participantInfo.participantId
        }
    } else {
        // If they are not local, add them normally
        participantAdapter.participantJoined(
            StageParticipant(
                participantInfo.isLocal,
                participantInfo.participantId
            )
        )
    }
}

override fun onParticipantLeft(stage: Stage, participantInfo: ParticipantInfo) {
    if (participantInfo.isLocal) {
        // If this is the local participant leaving the stage, update the ID but keep it around because
        // we want to keep the camera preview active
        participantAdapter.participantUpdated(participantInfo.participantId) {
            it.participantId = null
        }
    } else {
        // If they are not local, have them leave normally
        participantAdapter.participantLeft(participantInfo.participantId)
    }
}

override fun onParticipantPublishStateChanged(
    stage: Stage,
    participantInfo: ParticipantInfo,
    publishState: Stage.PublishState
) {
    // Update the publishing state of this participant
    participantAdapter.participantUpdated(participantInfo.participantId) {
        it.publishState = publishState
    }
}

override fun onParticipantSubscribeStateChanged(
    stage: Stage,
    participantInfo: ParticipantInfo,
    subscribeState: Stage.SubscribeState
) {
    // Update the subscribe state of this participant
    participantAdapter.participantUpdated(participantInfo.participantId) {
        it.subscribeState = subscribeState
    }
}

override fun onStreamsAdded(stage: Stage, participantInfo: ParticipantInfo, streams: MutableList<StageStream>) {
    // We don't want to take any action for the local participant because we track those streams locally
    if (participantInfo.isLocal) {
        return
    }
    // For remote participants, add these new streams to that participant's streams array.
    participantAdapter.participantUpdated(participantInfo.participantId) {
        it.streams.addAll(streams)
    }
}

override fun onStreamsRemoved(stage: Stage, participantInfo: ParticipantInfo, streams: MutableList<StageStream>) {
    // We don't want to take any action for the local participant because we track those streams locally
    if (participantInfo.isLocal) {
        return
    }
    // For remote participants, remove these streams from that participant's streams array.
    participantAdapter.participantUpdated(participantInfo.participantId) {
        it.streams.removeAll(streams)
    }
}

override fun onStreamsMutedChanged(
    stage: Stage,
    participantInfo: ParticipantInfo,
    streams: MutableList<StageStream>
) {
    // We don't want to take any action for the local participant because we track those streams locally
    if (participantInfo.isLocal) {
        return
    }
    // For remote participants, notify the adapter that the participant has been updated. There is no need to modify
    // the `streams` property on the `StageParticipant` because it is the same `StageStream` instance. Just
    // query the `isMuted` property again.
    participantAdapter.participantUpdated(participantInfo.participantId) {}
}
사용자 지정 RecyclerView LayoutManager 구현
다른 수의 참가자를 배치하는 것은 복잡할 수 있습니다. 참가자가 전체 상위 보기의 프레임을 차지하도록 하되 각 참가자 구성을 독립적으로 처리하지 않으려고 합니다. 이를 쉽게 수행할 수 있도록 RecyclerView.LayoutManager을 구현하는 과정을 살펴보겠습니다.
GridLayoutManager를 확장해야 하는 또 다른 새 클래스인 StageLayoutManager를 생성합니다. 이 클래스는 흐름 기반 행/열 레이아웃의 참가자 수를 기준으로 각 참가자의 레이아웃을 계산하도록 설계되었습니다. 각 행은 다른 행과 높이가 같지만 열은 행마다 너비가 다를 수 있습니다. 이 동작을 사용자 정의하는 방법에 대한 설명은 layouts 변수 위의 코드 주석을 참조하세요.
package com.amazonaws.ivs.realtime.basicrealtime

import android.content.Context
import androidx.recyclerview.widget.GridLayoutManager
import androidx.recyclerview.widget.RecyclerView

class StageLayoutManager(context: Context?) : GridLayoutManager(context, 6) {

    companion object {
        /**
         * This 2D array contains the description of how the grid of participants should be rendered
         * The index of the 1st dimension is the number of participants needed to active that configuration
         * Meaning if there is 1 participant, index 0 will be used. If there are 5 participants, index 4 will be used.
         *
         * The 2nd dimension is a description of the layout. The length of the array is the number of rows that
         * will exist, and then each number within that array is the number of columns in each row.
         *
         * See the code comments next to each index for concrete examples.
         *
         * This can be customized to fit any layout configuration needed.
         */
        val layouts: List<List<Int>> = listOf(
            // 1 participant
            listOf(1), // 1 row, full width
            // 2 participants
            listOf(1, 1), // 2 rows, all columns are full width
            // 3 participants
            listOf(1, 2), // 2 rows, first row's column is full width then 2nd row's columns are 1/2 width
            // 4 participants
            listOf(2, 2), // 2 rows, all columns are 1/2 width
            // 5 participants
            listOf(1, 2, 2), // 3 rows, first row's column is full width, 2nd and 3rd row's columns are 1/2 width
            // 6 participants
            listOf(2, 2, 2), // 3 rows, all column are 1/2 width
            // 7 participants
            listOf(2, 2, 3), // 3 rows, 1st and 2nd row's columns are 1/2 width, 3rd row's columns are 1/3rd width
            // 8 participants
            listOf(2, 3, 3),
            // 9 participants
            listOf(3, 3, 3),
            // 10 participants
            listOf(2, 3, 2, 3),
            // 11 participants
            listOf(2, 3, 3, 3),
            // 12 participants
            listOf(3, 3, 3, 3),
        )
    }

    init {
        spanSizeLookup = object : SpanSizeLookup() {
            override fun getSpanSize(position: Int): Int {
                if (itemCount <= 0) {
                    return 1
                }
                // Calculate the row we're in
                val config = layouts[itemCount - 1]
                var row = 0
                var curPosition = position
                while (curPosition - config[row] >= 0) {
                    curPosition -= config[row]
                    row++
                }
                // spanCount == max spans, config[row] = number of columns we want
                // So spanCount / config[row] would be something like 6 / 3 if we want 3 columns.
                // So this will take up 2 spans, with a max of 6 is 1/3rd of the view.
                return spanCount / config[row]
            }
        }
    }

    override fun onLayoutChildren(recycler: RecyclerView.Recycler?, state: RecyclerView.State?) {
        if (itemCount <= 0 || state?.isPreLayout == true) return

        val parentHeight = height
        val itemHeight = parentHeight / layouts[itemCount - 1].size // height divided by number of rows.

        // Set the height of each view based on how many rows exist for the current participant count.
        for (i in 0 until childCount) {
            val child = getChildAt(i) ?: continue
            val layoutParams = child.layoutParams as RecyclerView.LayoutParams
            if (layoutParams.height != itemHeight) {
                layoutParams.height = itemHeight
                child.layoutParams = layoutParams
            }
        }
        // After we set the height for all our views, call super.
        // This works because our RecyclerView can not scroll and all views are always visible with stable IDs.
        super.onLayoutChildren(recycler, state)
    }

    override fun canScrollVertically(): Boolean = false
    override fun canScrollHorizontally(): Boolean = false
}
MainActivity.kt로 돌아가서 RecyclerView에 대한 어댑터 및 레이아웃 관리자를 설정해야 합니다.
// In onCreate after setting recyclerView.
recyclerView.layoutManager = StageLayoutManager(this)
recyclerView.adapter = viewModel.participantAdapter
UI 작업 연결
거의 다 되었습니다. 몇 가지 UI 작업만 연결하면 됩니다.
먼저 MainActivity가 MainViewModel의 StateFlow 변경 사항을 관찰하도록 합니다.
// At the end of your onCreate method
lifecycleScope.launch {
    repeatOnLifecycle(Lifecycle.State.CREATED) {
        viewModel.connectionState.collect { state ->
            buttonJoin.setText(if (state == ConnectionState.DISCONNECTED) R.string.join else R.string.leave)
            textViewState.text = getString(R.string.state, state.name)
        }
    }
}
다음으로 Join 버튼과 Publish 확인란에 리스너를 추가합니다.
buttonJoin.setOnClickListener {
    viewModel.joinStage(editTextToken.text.toString())
}
checkboxPublish.setOnCheckedChangeListener { _, isChecked ->
    viewModel.setPublishEnabled(isChecked)
}
지금 구현하는 MainViewModel의 위 직접 호출 기능은 모두 다음과 같습니다.
internal fun joinStage(token: String) {
    if (_connectionState.value != Stage.ConnectionState.DISCONNECTED) {
        // If we're already connected to a stage, leave it.
        stage?.leave()
    } else {
        if (token.isEmpty()) {
            Toast.makeText(getApplication(), "Empty Token", Toast.LENGTH_SHORT).show()
            return
        }
        try {
            // Destroy the old stage first before creating a new one.
            stage?.release()
            val stage = Stage(getApplication(), token, this)
            stage.addRenderer(this)
            stage.join()
            this.stage = stage
        } catch (e: BroadcastException) {
            Toast.makeText(getApplication(), "Failed to join stage ${e.localizedMessage}", Toast.LENGTH_LONG).show()
            e.printStackTrace()
        }
    }
}

internal fun setPublishEnabled(enabled: Boolean) {
    publishEnabled = enabled
}
참가자 렌더링
마지막으로 SDK에서 수신하는 데이터를 이전에 생성한 참가자 항목에 렌더링해야 합니다. RecyclerView 로직이 이미 완성되었으므로 ParticipantItem에서 bind API를 구현하기만 하면 됩니다.
먼저 empty 함수를 추가한 다음 단계별로 살펴보겠습니다.
fun bind(participant: StageParticipant) {

}
먼저 쉬움 상태, 참가자 ID, 게시 상태 및 구독 상태를 처리하겠습니다. 이를 위해 TextViews를 직접 업데이트합니다.
val participantId = if (participant.isLocal) {
    "You (${participant.participantId ?: "Disconnected"})"
} else {
    participant.participantId
}
textViewParticipantId.text = participantId
textViewPublish.text = participant.publishState.name
textViewSubscribe.text = participant.subscribeState.name
다음으로 오디오 및 비디오 음소거 상태를 업데이트하겠습니다. 음소거 상태를 얻으려면 streams 배열에서 ImageDevice와 AudioDevice를 찾아야 합니다. 성능을 최적화하기 위해 마지막으로 연결된 디바이스 ID를 기억합니다.
// This belongs outside the `bind` API.
private var imageDeviceUrn: String? = null
private var audioDeviceUrn: String? = null

// This belongs inside the `bind` API.
val newImageStream = participant
    .streams
    .firstOrNull { it.device is ImageDevice }
textViewVideoMuted.text = if (newImageStream != null) {
    if (newImageStream.muted) "Video muted" else "Video not muted"
} else {
    "No video stream"
}

val newAudioStream = participant
    .streams
    .firstOrNull { it.device is AudioDevice }
textViewAudioMuted.text = if (newAudioStream != null) {
    if (newAudioStream.muted) "Audio muted" else "Audio not muted"
} else {
    "No audio stream"
}
마지막으로 imageDevice에 대한 미리 보기를 렌더링하려고 합니다.
if (newImageStream?.device?.descriptor?.urn != imageDeviceUrn) {
    // If the device has changed, remove all subviews from the preview container
    previewContainer.removeAllViews()
    (newImageStream?.device as? ImageDevice)?.let {
        val preview = it.getPreviewView(BroadcastConfiguration.AspectMode.FIT)
        previewContainer.addView(preview)
        preview.layoutParams = FrameLayout.LayoutParams(
            FrameLayout.LayoutParams.MATCH_PARENT,
            FrameLayout.LayoutParams.MATCH_PARENT
        )
    }
}
imageDeviceUrn = newImageStream?.device?.descriptor?.urn
그리고 audioDevice의 오디오 통계를 표시합니다.
if (newAudioStream?.device?.descriptor?.urn != audioDeviceUrn) {
    (newAudioStream?.device as? AudioDevice)?.let {
        it.setStatsCallback { _, rms ->
            textViewAudioLevel.text = "Audio Level: ${rms.roundToInt()} dB"
        }
    }
}
audioDeviceUrn = newAudioStream?.device?.descriptor?.urn
