Tutorial: Using Lambda with API Gateway
In this tutorial, you create a REST API through which you invoke a Lambda function using an HTTP request. Your Lambda function will perform create, read, update, and delete (CRUD) operations on a DynamoDB table. This function is provided here for demonstration, but you will learn to configure an API Gateway REST API that can invoke any Lambda function.
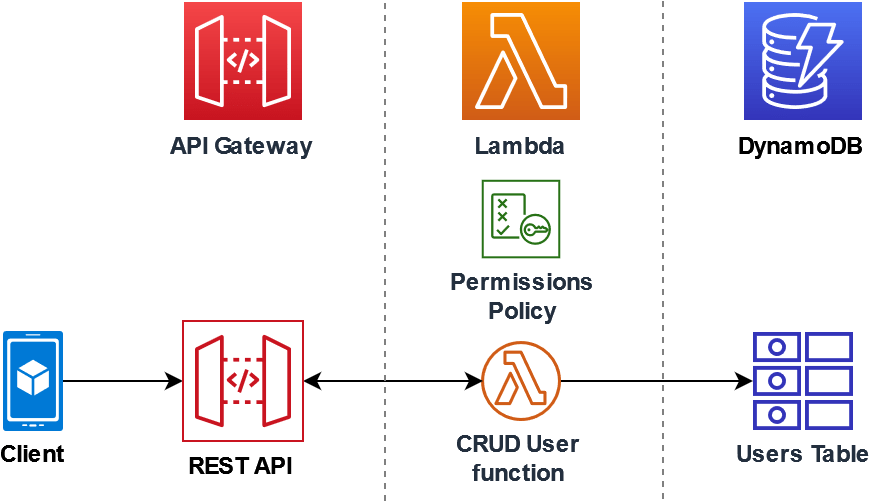
Using API Gateway provides users with a secure HTTP endpoint to invoke your Lambda function and can help manage large volumes of calls to your function by throttling traffic and automatically validating and authorizing API calls. API Gateway also provides flexible security controls using AWS Identity and Access Management (IAM) and Amazon Cognito. This is useful for use cases where advance authorization is required for calls to your application.
Tip
Lambda offers two ways to invoke your function through an HTTP endpoint: API Gateway and Lambda function URLs. If you're not sure which is the best method for your use case, see Select a method to invoke your Lambda function using an HTTP request.
To complete this tutorial, you will go through the following stages:
-
Create and configure a Lambda function in Python or Node.js to perform operations on a DynamoDB table.
-
Create a REST API in API Gateway to connect to your Lambda function.
-
Create a DynamoDB table and test it with your Lambda function in the console.
-
Deploy your API and test the full setup using curl in a terminal.
By completing these stages, you will learn how to use API Gateway to create an HTTP endpoint that can securely invoke a Lambda function at any scale. You will also learn how to deploy your API, and how to test it in the console and by sending an HTTP request using a terminal.
Create a permissions policy
Before you can create an execution role for your Lambda function, you first need to create a permissions policy to give your function permission to access the required AWS resources. For this tutorial, the policy allows Lambda to perform CRUD operations on a DynamoDB table and write to Amazon CloudWatch Logs.
To create the policy
-
Open the Policies page
of the IAM console. -
Choose Create Policy.
-
Choose the JSON tab, and then paste the following custom policy into the JSON editor.
-
Choose Next: Tags.
-
Choose Next: Review.
-
Under Review policy, for the policy Name, enter
lambda-apigateway-policy. -
Choose Create policy.
Create an execution role
An execution role is an AWS Identity and Access Management (IAM) role that grants a Lambda function permission to access AWS services and resources. To enable your function to perform operations on a DynamoDB table, you attach the permissions policy you created in the previous step.
To create an execution role and attach your custom permissions policy
-
Open the Roles page
of the IAM console. -
Choose Create role.
-
For the type of trusted entity, choose AWS service, then for the use case, choose Lambda.
-
Choose Next.
-
In the policy search box, enter
lambda-apigateway-policy. -
In the search results, select the policy that you created (
lambda-apigateway-policy), and then choose Next. -
Under Role details, for the Role name, enter
lambda-apigateway-role, then choose Create role.
Create the Lambda function
-
Open the Functions page
of the Lambda console and choose Create Function. -
Choose Author from scratch.
-
For Function name, enter
LambdaFunctionOverHttps. -
For Runtime, choose the latest Node.js or Python runtime.
-
Under Permissions, expand Change default execution role.
-
Choose Use an existing role, and then select the
lambda-apigateway-rolerole that you created earlier. -
Choose Create function.
-
In the Code source pane, replace the default code with the following Node.js or Python code.
Note
In this example, the name of the DynamoDB table is defined as a variable in your function code. In a real application, best practice is to pass this parameter as an environment variable and to avoid hardcoding the table name. For more information see Using AWS Lambda environment variables.
-
In the DEPLOY section, choose Deploy to update your function's code:

Test the function
Before integrating your function with API Gateway, confirm that you have deployed the function successfully. Use the Lambda console to send a test event to your function.
-
On the Lambda console page for your function, choose the Test tab.
-
Scroll down to the Event JSON section and replace the default event with the following. This event matches the structure expected by the Lambda function.
{ "operation": "echo", "payload": { "somekey1": "somevalue1", "somekey2": "somevalue2" } } -
Choose Test.
-
Under Executing function: succeeded, expand Details. You should see the following response:
{
  "somekey1": "somevalue1",
  "somekey2": "somevalue2"
}
Create a REST API using API Gateway
In this step, you create the API Gateway REST API you will use to invoke your Lambda function.
To create the API
-
Open the API Gateway console
. -
Choose Create API.
-
In the REST API box, choose Build.
-
Under API details, leave New API selected, and for API Name, enter
DynamoDBOperations. -
Choose Create API.
Create a resource on your REST API
To add an HTTP method to your API, you first need to create a resource for that method to operate on. Here you create the resource to manage your DynamoDB table.
To create the resource
-
In the API Gateway console
, on the Resources page for your API, choose Create resource. -
In Resource details, for Resource name enter
DynamoDBManager. -
Choose Create Resource.
Create an HTTP POST method
In this step, you create a method (POST) for your DynamoDBManager resource. You link
this POST method to your Lambda function so that when the method receives an HTTP request, API Gateway invokes
your Lambda function.
Note
For the purpose of this tutorial, one HTTP method (POST) is used to invoke a single Lambda function which
carries out all of the operations on your DynamoDB table. In a real application, best practice is to use a different Lambda
function and HTTP method for each operation. For more information, see
The Lambda monolith
To create the POST method
-
On the Resources page for your API, ensure that the
/DynamoDBManagerresource is highlighted. Then, in the Methods pane, choose Create method. -
For Method type, choose POST.
-
For Integration type, leave Lambda function selected.
-
For Lambda function, choose the Amazon Resource Name (ARN) for your function (
LambdaFunctionOverHttps). -
Choose Create method.
Create a DynamoDB table
Create an empty DynamoDB table that your Lambda function will perform CRUD operations on.
To create the DynamoDB table
-
Open the Tables page
of the DynamoDB console. -
Choose Create table.
-
Under Table details, do the following:
-
For Table name, enter
lambda-apigateway. -
For Partition key, enter
id, and keep the data type set as String.
-
-
Under Table settings, keep the Default settings.
-
Choose Create table.
Test the integration of API Gateway, Lambda, and DynamoDB
You're now ready to test the integration of your API Gateway API method with your Lambda function and your DynamoDB table. Using the
API Gateway console, you send requests directly to your POST method using the console's test function.
In this step, you first use a create operation to add a new item to your DynamoDB table, then you
use an update operation to modify the item.
Test 1: To create a new item in your DynamoDB table
-
In the API Gateway console
, choose your API ( DynamoDBOperations). -
Choose the POST method under the
DynamoDBManagerresource. -
Choose the Test tab. You might need to choose the right arrow button to show the tab.
-
Under Test method, leave Query strings and Headers empty. For Request body, paste the following JSON:
{ "operation": "create", "payload": { "Item": { "id": "1234ABCD", "number": 5 } } } -
Choose Test.
The results that are displayed when the test completes should show status
200. This status code indicates that thecreateoperation was successful.To confirm, check that your DynamoDB table now contains the new item.
-
Open the Tables page
of the DynamoDB console and choose the lambda-apigatewaytable. -
Chose Explore table items. In the Items returned pane, you should see one item with the id
1234ABCDand the number5. Example:
Test 2: To update the item in your DynamoDB table
-
In the API Gateway console
, return to your POST method's Test tab. -
Under Test method, leave Query strings and Headers empty. For Request body, paste the following JSON:
{ "operation": "update", "payload": { "Key": { "id": "1234ABCD" }, "UpdateExpression": "SET #num = :newNum", "ExpressionAttributeNames": { "#num": "number" }, "ExpressionAttributeValues": { ":newNum": 10 } } } -
Choose Test.
The results which are displayed when the test completes should show status
200. This status code indicates that theupdateoperation was successful.To confirm, check that the item in your DynamoDB table has been modified.
-
Open the Tables page
of the DynamoDB console and choose the lambda-apigatewaytable. -
Chose Explore table items. In the Items returned pane, you should see one item with the id
1234ABCDand the number10.
Deploy the API
For a client to call the API, you must create a deployment and an associated stage. A stage represents a snapshot of your API including its methods and integrations.
To deploy the API
-
Open the APIs page of the API Gateway console
and choose the DynamoDBOperationsAPI. -
On the Resources page for your API choose Deploy API.
-
For Stage, choose *New stage*, then for Stage name, enter
test. -
Choose Deploy.
-
In the Stage details pane, copy the Invoke URL. You will use this in the next step to invoke your function using an HTTP request.
Use curl to invoke your function using HTTP requests
You can now invoke your Lambda function by issuing an HTTP request to your API. In this step, you will create a new item in your DynamoDB table and then perform read, update, and delete operations on that item.
To create an item in your DynamoDB table using curl
-
Open a terminal or command prompt on your local machine and run the following
curlcommand using the invoke URL you copied in the previous step. This command uses the following options:-
-H: Adds a custom header to the request. Here, it specifies the content type as JSON. -
-d: Sends data in the request body. This option uses an HTTP POST method by default.
If the operation was successful, you should see a response returned with an HTTP status code of 200.
-
-
You can also use the DynamoDB console to verify that the new item is in your table by doing the following:
-
Open the Tables page
of the DynamoDB console and choose the lambda-apigatewaytable. -
Choose Explore table items. In the Items returned pane, you should see an item with the id
5678EFGHand the number15.
-
To read the item in your DynamoDB table using curl
-
In your terminal or command prompt, run the following
curlcommand to read the value of the item you just created. Use your own invoke URL.You should see output like one of the following depending on whether you chose the Node.js or Python function code:
To update the item in your DynamoDB table using curl
-
In your terminal or command prompt, run the following
curlcommand to update the item you just created by changing thenumbervalue. Use your own invoke URL. -
To confirm that the value of
numberfor the item has been updated, run another read command:
To delete the item in your DynamoDB table using curl
-
In your terminal or command prompt, run the following
curlcommand to delete the item you just created. Use your own invoke URL. Confirm that the delete operation was successful. In the Items returned pane of the DynamoDB console Explore items page, verify that the item with id
5678EFGHis no longer in the table.
Clean up your resources (optional)
You can now delete the resources that you created for this tutorial, unless you want to retain them. By deleting AWS resources that you're no longer using, you prevent unnecessary charges to your AWS account.
To delete the Lambda function
-
Open the Functions page
of the Lambda console. -
Select the function that you created.
-
Choose Actions, Delete.
-
Type
confirmin the text input field and choose Delete.
To delete the execution role
-
Open the Roles page
of the IAM console. -
Select the execution role that you created.
-
Choose Delete.
-
Enter the name of the role in the text input field and choose Delete.
To delete the API
-
Open the APIs page
of the API Gateway console. -
Select the API you created.
-
Choose Actions, Delete.
-
Choose Delete.
To delete the DynamoDB table
-
Open the Tables page
of the DynamoDB console. -
Select the table you created.
-
Choose Delete.
-
Enter
deletein the text box. -
Choose Delete table.
