Creating a network of bots for your Lex V2 bots
Network of Bots enables enterprises to deliver a unified user experience across multiple bots. With Network of Bots, enterprises can add multiple bots to a single network to enable flexible and independent bot lifecycle management. The network exposes a single unified interface to the end-user and routes the request to the appropriate bot based on user input.
Teams can collaborate to create a network of bots to meet various business needs by maintaining and adding bots to the network as improved bots are deployed to production. Developers can simplify and speed up deployment and improvements by integrating multiple bots into a single network.
Network of bots is currently only available in the en-US language.
Note
Currently, a network of bots is limited to one account. You cannot add bots from other accounts.
Create a network of bots for your Lex V2 bots
Sign in to the AWS Management Console and open the Amazon Lex V2 console at https://console.aws.amazon.com/lexv2/home
Step 1: Configure network of bot settings
-
In the Details section, enter the name of your network and give it an optional description.
-
In the IAM permissions section, choose an AWS Identity and Access Management (IAM) role that provides Amazon Lex V2 permission to access other AWS services, such as Amazon CloudWatch. You can have Amazon Lex V2 create the role, or you can choose an existing role with CloudWatch permissions. See Identity and access management for Amazon Lex V2 for more information.
-
In the Children's Online Privacy Protection Act (COPPA) section, choose the appropriate response. See DataPrivacy for more information.
-
In the Idle session timeout section, choose the duration that Amazon Lex V2 keeps a session with a user open. Amazon Lex V2 maintains session variables for the duration of the session so that your bot can resume a conversation with the same variables. See Setting the session timeout for more information.
-
In the Add language settings section, choose a voice for your bot to interact with users. You can type a phrase in Voice sample and select Play to listen to the voice.
-
In the Advanced settings section, optionally add tags that help identify the bot. Tags can be used to control access and monitor resources. See Tagging resources for more information.
-
Choose Next to create the bot network and move to adding bots.
Step 2: Add bots
-
In the Bots section, select + Add bots.
-
An Add bots modal will pop up. Choose a bot to add from the Bot dropdown menu and the alias of the bot that you want to use from the Alias dropdown menu.
The alias must point to a numbered version of the bot and not to the draft version. You may add up to 5 bots. A bot may be added to up to 25 different networks.
-
Select + Add bot to add more bots to your network. To remove a bot, select Remove next to the bot that you want to remove. When you are done adding bots, choose Save to close the modal.
-
Select Save to finish creating your network.
Manage your network of bots for your Lex V2 bots
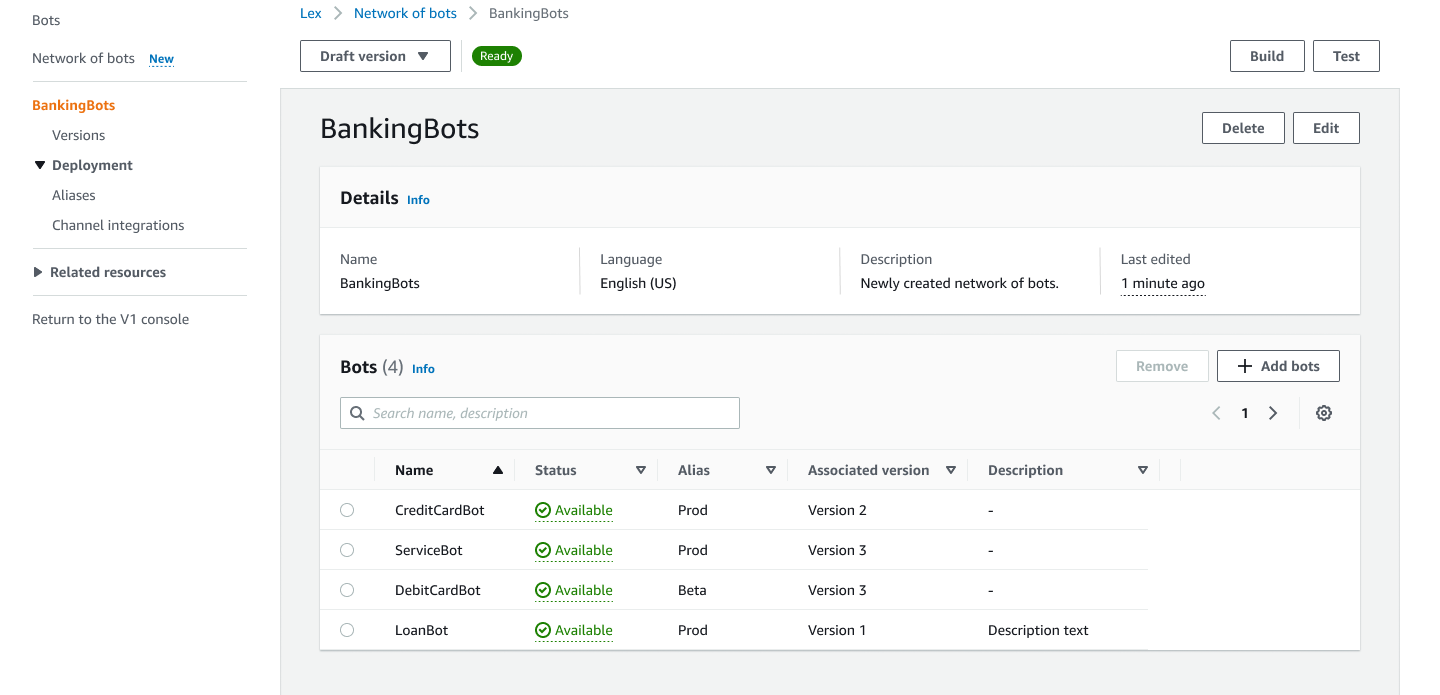
After creating your network of bots, you will be taken to a page where you can manage and build your network. Or you can reach this page by selecting Network of bots in the side menu, and choosing the name of the network to manage.
-
To edit information for your network, select Edit above the Details section. To delete the network, select Delete above the Details section.
-
In the Bots section, you can add more bots by selecting + Add bots. You can also add bots if you navigate to the Bots page in the side menu in the Amazon Lex V2 console. Toggle the radio button next to the bot you want to add, and select Add to a network of bots from the Actions dropdown menu.
From the Network of bots dropdown menu in the modal that pops up, choose the network to which you want to add the bot. Then choose the alias of the bot that you want to use from the Bot alias dropdown menu. Select Add to add the bot to the network that you chose.
-
You can remove bots from your network by toggling the radio button next to a bot and choosing Remove.
-
When you are done configuring your network, select Build in the upper-right to build your network. It may take a few minutes to build. If the build is successful, a green success banner appears at the top of the page.
-
Once the network is built, you can select Test in the upper-right for a chat window to appear in the bottom right corner. You can use this chat window to converse with your network's bots and make sure the conversation flows and transitions are configured correctly.
Note
If you add, remove, or update bots within your network, you must rebuild the network.
Versions of your network of bots for Lex V2
You can create different versions of your network of bots. To manage versions, choose your network from the side menu in the Amazon Lex V2 console and select Versions.
-
Select Create Version to make a new version of your network of bots. You can add an optional description. Choose Create to create the version.
-
When you toggle the radio button next to a version of your network of bots, you can select Associate alias with version to point an alias to this version.
-
To manage a version of your network, select the name of the version in the Versions section. In the following page, you can edit details of the version and manage the bots within the version and its associated alias.
Aliases for your network of bots for Lex V2
You can use aliases to deploy your networks. To manage aliases, choose your network from the side menu in the Amazon Lex V2 console and select Aliases.
-
Select Create alias to make a new alias.
-
Give the alias a name and an optional Description in the Alias details section. You can choose a version to associate the alias with the Associate with a version section and add tags in the Tags section. Choose Create to create the alias.
-
To manage an alias for your network, select the name of the alias in the Aliases section. In the following page, you can edit details of the alias and manage its tags, channel integrations, and resource-based policy. You can also view the history of its association with versions of the network.
Channel integrations for your Lex V2 network of bots
To integrate your network of bots with a messaging platform, choose your network of bots from the side menu in the Amazon Lex V2 console. Then select Channel integrations.
-
Select Add channel to integrate your network with a new channel.
-
In the Platform section, choose the platform that you want to deploy your bot to in Select platform. An IAM role will be created. Choose a key from the dropdown menu under KMS key to protect your information.
-
In the Integration configuration channel, enter the Name and an optional Description. Choose an Alias from the dropdown menu.
-
Get your account SID and authentication token from the platform and fill out the Account SID and Authentication token fields. See Integrating your bots for more information.
-
Select Create to complete the channel integration.
Note
Network of bots is currently not available in Amazon Connect voice or chat.
